Instruction Manual
Page 1
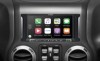
... Wrangler i207-WRA Restyle Installation Manual ˜ Model: Wrangler ˜ Model Year: 2007-2017 WRANGLER Jeep Wrangler ˜ 1/16 Jeep Model Wrangler Year 2007-2017 * The specified vehicles have been tested and have met compatibility specs at the time of this indication and using the product incorrectly is not guaranteed if the manufacturer has made production changes to follow the instructions...
... Wrangler i207-WRA Restyle Installation Manual ˜ Model: Wrangler ˜ Model Year: 2007-2017 WRANGLER Jeep Wrangler ˜ 1/16 Jeep Model Wrangler Year 2007-2017 * The specified vehicles have been tested and have met compatibility specs at the time of this indication and using the product incorrectly is not guaranteed if the manufacturer has made production changes to follow the instructions...
Instruction Manual
Page 2
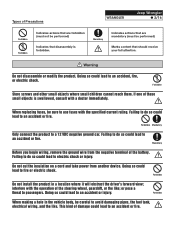
...battery. When replacing fuses, be performed) Marks content that are forbidden (must be sure to a 12 VDC negative ground car. Forbidden Mandatory Only connect the product to use fuses with a doctor immediately. Failing to do so could lead to avoid damaging pipes, the fuel tank, electrical wiring, and the like ; Do not cut the insulation on a cord and take power... shock. Mandatory Indicates actions that should receive your full attention. Forbidden When making a hole in a location where it will obstruct the driver's forward view; Failing to do so could lead to...
...battery. When replacing fuses, be performed) Marks content that are forbidden (must be sure to a 12 VDC negative ground car. Forbidden Mandatory Only connect the product to use fuses with a doctor immediately. Failing to do so could lead to avoid damaging pipes, the fuel tank, electrical wiring, and the like ; Do not cut the insulation on a cord and take power... shock. Mandatory Indicates actions that should receive your full attention. Forbidden When making a hole in a location where it will obstruct the driver's forward view; Failing to do so could lead to...
Instruction Manual
Page 3
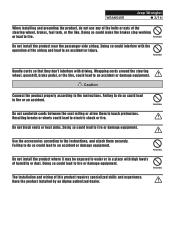
...Jeep Wrangler ˜ 3/16 When installing and grounding the product, do not use any of the bolts or nuts of the steering wheel, brakes, fuel tank, or the like , could make the brakes stop working or lead to fire. Wrapping cords around the steering wheel, gearshift, ...operation of the airbag and lead to touch protrusions. Forbidden Use the accessories according to the instructions, and attach them to an accident or injury. Have the product installed by an Alpine authorized dealer. Resulting breaks or shorts could lead to water or in a place with driving. Forbidden Do not install...
...Jeep Wrangler ˜ 3/16 When installing and grounding the product, do not use any of the bolts or nuts of the steering wheel, brakes, fuel tank, or the like , could make the brakes stop working or lead to fire. Wrapping cords around the steering wheel, gearshift, ...operation of the airbag and lead to touch protrusions. Forbidden Use the accessories according to the instructions, and attach them to an accident or injury. Have the product installed by an Alpine authorized dealer. Resulting breaks or shorts could lead to water or in a place with driving. Forbidden Do not install...

Instruction Manual
Page 4
Tools Required Panel Removing Tool Wire Cutters T20 Torx WRANGLER Jeep Wrangler ˜ 4/16 7mm Sockets #2 Phillips Screwdriver Extension Ratchet Accessory List Installation Kit Parts Rear Support Bracket (only for 2011-2017) Side Mounting Brackets Add-on Microphone
Tools Required Panel Removing Tool Wire Cutters T20 Torx WRANGLER Jeep Wrangler ˜ 4/16 7mm Sockets #2 Phillips Screwdriver Extension Ratchet Accessory List Installation Kit Parts Rear Support Bracket (only for 2011-2017) Side Mounting Brackets Add-on Microphone
Instruction Manual
Page 5
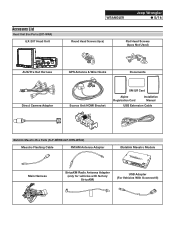
... List Head Unit Box Parts (i207-WRA) iLX-207 Head Unit WRANGLER Jeep Wrangler ˜ 5/16 Round Head Screws (4pcs) Flat Head Screws (4pcs Not Used) AUX/Pre Out Harness GPS Antenna & Wire Hooks Documents Direct Camera Adapter Source Unit HDMI Bracket OM QR Card Alpine Registration Card Installation Manual USB Extension Cable iDatalink Maestro Box Parts (ALP-MRR2/ALP-HRN-WRA2) Maestro Flashing Cable FM/AM Antenna Adapter iDatalink Maestro Module Main Harness SiriusXM Radio Antenna Adapter (only for vehicles with factory SiriusXM) USB Adapter...
... List Head Unit Box Parts (i207-WRA) iLX-207 Head Unit WRANGLER Jeep Wrangler ˜ 5/16 Round Head Screws (4pcs) Flat Head Screws (4pcs Not Used) AUX/Pre Out Harness GPS Antenna & Wire Hooks Documents Direct Camera Adapter Source Unit HDMI Bracket OM QR Card Alpine Registration Card Installation Manual USB Extension Cable iDatalink Maestro Box Parts (ALP-MRR2/ALP-HRN-WRA2) Maestro Flashing Cable FM/AM Antenna Adapter iDatalink Maestro Module Main Harness SiriusXM Radio Antenna Adapter (only for vehicles with factory SiriusXM) USB Adapter...
Instruction Manual
Page 6
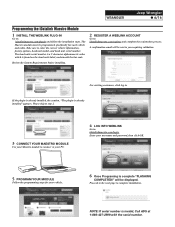
... will be programmed specifically for your PC. 4 LOG INTO WEBLINK Go to enter the correct vehicle information, factory options, head unit model, and head unit serial number. NOTE: If serial number is found on the head units label, underneath the bar code. WRANGLER Jeep Wrangler ˜ 6/16 Programming the iDatalink Maestro Module 1 INSTALL THE WEBLINK PLUG-IN Go to complete installation. The Maestro module must be displayed. If...
... will be programmed specifically for your PC. 4 LOG INTO WEBLINK Go to enter the correct vehicle information, factory options, head unit model, and head unit serial number. NOTE: If serial number is found on the head units label, underneath the bar code. WRANGLER Jeep Wrangler ˜ 6/16 Programming the iDatalink Maestro Module 1 INSTALL THE WEBLINK PLUG-IN Go to complete installation. The Maestro module must be displayed. If...

Instruction Manual
Page 7
... in poor GPS performance. Failure to remove the visor. GPS Antenna Wire Hook Peel the plastic layer off from the double side tape of the driver side roof frame. T20 Torx to do so will result in poor GPS performance for CarPlay and Android Auto. WRANGLER Jeep Wrangler ˜ 7/16 Component Locations IMPORTANT: Follow the recommended component...
... in poor GPS performance. Failure to remove the visor. GPS Antenna Wire Hook Peel the plastic layer off from the double side tape of the driver side roof frame. T20 Torx to do so will result in poor GPS performance for CarPlay and Android Auto. WRANGLER Jeep Wrangler ˜ 7/16 Component Locations IMPORTANT: Follow the recommended component...

Instruction Manual
Page 8
...) 5 Extract (4) 7 mm screws and remove the factory radio. Remove those. 3 Release 2 clips on the top of the bottom panel. This will expose two 7mm screws. This will expose two 7mm screws. Remove using a 7mm socket with ratchet & extension. 4 Use panel removal tool to remove dash panel by releasing 2 rear clips on the back of the top panel and then pull panel forward. 2 Release 2 clips on the...
...) 5 Extract (4) 7 mm screws and remove the factory radio. Remove those. 3 Release 2 clips on the top of the bottom panel. This will expose two 7mm screws. This will expose two 7mm screws. Remove using a 7mm socket with ratchet & extension. 4 Use panel removal tool to remove dash panel by releasing 2 rear clips on the back of the top panel and then pull panel forward. 2 Release 2 clips on the...

Instruction Manual
Page 9
... switch pod using a panel removing tool and extract (1) 7mm screw. FAILURE TO DO SO WILL DISABLE MANY FEATURES. 1 Remove the rubber cover from the top center storage area and extract (1) 7mm screw. 2 Remove the knee cover panel and extract (2) 7mm screws located to the right and left sides of steering wheel column. 4 Remove the dash panel. 5 Extract (4) 7 mm screws and remove the factory radio...
... switch pod using a panel removing tool and extract (1) 7mm screw. FAILURE TO DO SO WILL DISABLE MANY FEATURES. 1 Remove the rubber cover from the top center storage area and extract (1) 7mm screw. 2 Remove the knee cover panel and extract (2) 7mm screws located to the right and left sides of steering wheel column. 4 Remove the dash panel. 5 Extract (4) 7 mm screws and remove the factory radio...

Instruction Manual
Page 10
... the head unit to desired location, connect antenna, other adapters to remove the visor. For vehicles without uConnect run the USB extension cable to the glove box, connect the main harness, antenna, and other adapters, and secure them . Insert the push clips from the factory bracket, to attach head unit bracket in the same place. 2 Plug the OBDII connector on to the OBDII port below the driver side dash and...
... the head unit to desired location, connect antenna, other adapters to remove the visor. For vehicles without uConnect run the USB extension cable to the glove box, connect the main harness, antenna, and other adapters, and secure them . Insert the push clips from the factory bracket, to attach head unit bracket in the same place. 2 Plug the OBDII connector on to the OBDII port below the driver side dash and...

Instruction Manual
Page 11
... connector. 3 Connect the 4pin OEM connector to the OEM USB adaptor (included). 4 Use the USB extension to connect USB adaptor to both Bluetooth devices simultaneously resulting in the radio cavity. The user's phone may connect to the radio USB input. Connecting A SiriusXM Module (Sold Separately) CAN I /F GPS SXM/DAB USB HDMI IN HDMI OUT PRE OUT W. NOTE: if the factory Uconnect® system is included with factory Uconnect®) 1 Remove the factory climate control panel...
... connector. 3 Connect the 4pin OEM connector to the OEM USB adaptor (included). 4 Use the USB extension to connect USB adaptor to both Bluetooth devices simultaneously resulting in the radio cavity. The user's phone may connect to the radio USB input. Connecting A SiriusXM Module (Sold Separately) CAN I /F GPS SXM/DAB USB HDMI IN HDMI OUT PRE OUT W. NOTE: if the factory Uconnect® system is included with factory Uconnect®) 1 Remove the factory climate control panel...
Instruction Manual
Page 12
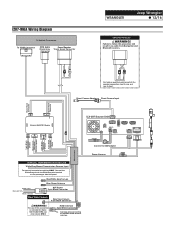
... for Alpine HCE-TCAM1-WRA rear view camera ONLY. Blue/White Amp Turn-on the passenger side kick panel. Failure to the White/Gray wire located on Blue Power Antenna Yellow -12V+ Red - The use of this procedure will result in no audio from Navigation and Bluetooth sources. Acc 12V+ Black - i207-WRA Wiring Diagram To Vehicle Connectors To OBDII Connector OEM Audio 20-pin Gray Connector Power/Speaker 16-pin Green Connector WRANGLER Jeep Wrangler ˜ 12/16 AMPLIFIED VEHICLES...
... for Alpine HCE-TCAM1-WRA rear view camera ONLY. Blue/White Amp Turn-on the passenger side kick panel. Failure to the White/Gray wire located on Blue Power Antenna Yellow -12V+ Red - The use of this procedure will result in no audio from Navigation and Bluetooth sources. Acc 12V+ Black - i207-WRA Wiring Diagram To Vehicle Connectors To OBDII Connector OEM Audio 20-pin Gray Connector Power/Speaker 16-pin Green Connector WRANGLER Jeep Wrangler ˜ 12/16 AMPLIFIED VEHICLES...

Instruction Manual
Page 13
... OUT W.REMOTE POWER ANTENNA SUBW (Blue/White) REMOTE (Red) (White) RCA Extension Cable (sold separately) Remote Turn-On Lead (Blue/White) Subwoofer RCA Connectors Front Output RCA Connectors Rear Output RCA Connectors REMOTE ON (Blue/White) REMOTE ON (Blue/White) Ampli er for subwoofer (sold separately) To subwoofer input terminal Subwoofer FRONT OUT REAR OUT (Red) (White) (Red) (White) To front input terminal Ampli er 4 ch (sold separately) To rear input terminal Front speaker Rear speaker i207-WRA With Optional HDMI Interface Wiring Diagram WRANGLER...
... OUT W.REMOTE POWER ANTENNA SUBW (Blue/White) REMOTE (Red) (White) RCA Extension Cable (sold separately) Remote Turn-On Lead (Blue/White) Subwoofer RCA Connectors Front Output RCA Connectors Rear Output RCA Connectors REMOTE ON (Blue/White) REMOTE ON (Blue/White) Ampli er for subwoofer (sold separately) To subwoofer input terminal Subwoofer FRONT OUT REAR OUT (Red) (White) (Red) (White) To front input terminal Ampli er 4 ch (sold separately) To rear input terminal Front speaker Rear speaker i207-WRA With Optional HDMI Interface Wiring Diagram WRANGLER...
Instruction Manual
Page 14
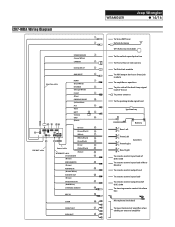
... power antenna To the parking brake signal lead Ignition key Rear Left Battery Front Left Front Right Speakers Rear Right To remote control input lead of DVE-5300 To remote control input lead of Rear Monitor To remote control output lead To remote control input lead To remote control output lead of DVE-5300 To steering remote control interface box Microphone (Included) To input terminal of ampli er when adding an external ampli er i207-WRA Wiring Diagram Interface cable...
... power antenna To the parking brake signal lead Ignition key Rear Left Battery Front Left Front Right Speakers Rear Right To remote control input lead of DVE-5300 To remote control input lead of Rear Monitor To remote control output lead To remote control input lead To remote control output lead of DVE-5300 To steering remote control interface box Microphone (Included) To input terminal of ampli er when adding an external ampli er i207-WRA Wiring Diagram Interface cable...
Instruction Manual
Page 16
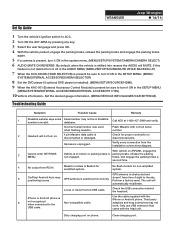
.... (MENU/VEHICLE INFO/GAUGES/CAR SETTINGS) Troubleshooting Guide Symptom Possible Cause Remedy 1 iDatalink website says serial Serial number may not work. brake, and engage the parking brake a second time. 4 No output from the installation connections diagram. doesn't have line of sight to turn it ON in the system menu. (MENU/SETUP/SYSTEM/CAMERA/CAMERA SELECT) 6 AUDIO MUTE ON REVERSE- iPhone or Android phone is unplugged. Verify every connection from RCA's Maestro module is flashed...
.... (MENU/VEHICLE INFO/GAUGES/CAR SETTINGS) Troubleshooting Guide Symptom Possible Cause Remedy 1 iDatalink website says serial Serial number may not work. brake, and engage the parking brake a second time. 4 No output from the installation connections diagram. doesn't have line of sight to turn it ON in the system menu. (MENU/SETUP/SYSTEM/CAMERA/CAMERA SELECT) 6 AUDIO MUTE ON REVERSE- iPhone or Android phone is unplugged. Verify every connection from RCA's Maestro module is flashed...

