Owners Manual
Page 1
...Rue de la Belle Etoile, Z.I. Paris Nord II, B.P. 50016, 95945, Roissy Charles de Gaulle Cedex, France Phone 01-48 63 89 89 ALPINE ITALIA S.p.A. Viale C. Portal de Gamarra 36, Pabellón, 32 01013 Vitoria (Alava) - Phone 0870-33 33 763 Qingdao Dongli Xinhaiyuan Printing...utilizar este equipo. Phone 1-800-ALPINE-1 (1-800-257-4631) ALPINE ELECTRONICS OF CANADA, INC. 7300 Warden Ave., Suite 203, Markham, Ontario L3R 9Z6, Canada Phone 1-800-ALPINE-1 (1-800-257-4631) ALPINE ELECTRONICS OF AUSTRALIA PTY. R EN TME-M770 6.5-INCH TOUCH PANEL WIDE LCD MONITOR DE • OWNER'S MANUAL ...
...Rue de la Belle Etoile, Z.I. Paris Nord II, B.P. 50016, 95945, Roissy Charles de Gaulle Cedex, France Phone 01-48 63 89 89 ALPINE ITALIA S.p.A. Viale C. Portal de Gamarra 36, Pabellón, 32 01013 Vitoria (Alava) - Phone 0870-33 33 763 Qingdao Dongli Xinhaiyuan Printing...utilizar este equipo. Phone 1-800-ALPINE-1 (1-800-257-4631) ALPINE ELECTRONICS OF CANADA, INC. 7300 Warden Ave., Suite 203, Markham, Ontario L3R 9Z6, Canada Phone 1-800-ALPINE-1 (1-800-257-4631) ALPINE ELECTRONICS OF AUSTRALIA PTY. R EN TME-M770 6.5-INCH TOUCH PANEL WIDE LCD MONITOR DE • OWNER'S MANUAL ...
Owners Manual
Page 6
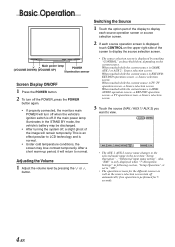
...source selection screen turn off when the vehicle's ignition switch is off the POWER, press the POWER button again. • If properly connected, the monitors main POWER will return to normal. AUX 1 AUX 2 SETUP VISUAL EQ SOURCE P 1/2 • The AUX 1, AUX 2 source name changes to...the system off automatically if no operation is performed for 5 seconds. 4-EN Also, "NAV." SOURCE CONTROL NAV. This is an effect peculiar to LCD technology and is LINK: AUDIO operation screen → EXT.DVD operation screen → TV operation screen → Source selection screen 3 Touch the...
...source selection screen turn off when the vehicle's ignition switch is off the POWER, press the POWER button again. • If properly connected, the monitors main POWER will return to normal. AUX 1 AUX 2 SETUP VISUAL EQ SOURCE P 1/2 • The AUX 1, AUX 2 source name changes to...the system off automatically if no operation is performed for 5 seconds. 4-EN Also, "NAV." SOURCE CONTROL NAV. This is an effect peculiar to LCD technology and is LINK: AUDIO operation screen → EXT.DVD operation screen → TV operation screen → Source selection screen 3 Touch the...

Owners Manual
Page 7
... upper right side of the screen to the value adjusted at "DIMMER LOW LEVEL". SETUP DISPLAY MODE DIMMER AUX OUT SOUND OUT WIDE HIGH LINK MONITOR RETURN CINEMA Normal images are displayed over the entire screen.
... upper right side of the screen to the value adjusted at "DIMMER LOW LEVEL". SETUP DISPLAY MODE DIMMER AUX OUT SOUND OUT WIDE HIGH LINK MONITOR RETURN CINEMA Normal images are displayed over the entire screen.
Owners Manual
Page 8
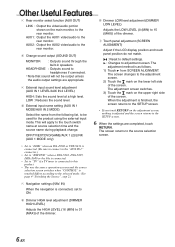
...(DIMMER LOW LEVEL) Adjusts the LOW LEVEL (0 (MIN) to the rear monitor. 4 Change sound output (SOUND OUT) MONITOR : Outputs sound through the built-in speakers. p Touch panel adjustment (SCREEN ALIGNMENT) Adjust if the LCD display position and touch panel position do not match. : Reset to default ...settings. : Changes to the rear monitor. Other Useful Features 3 Rear monitor select function (AUX OUT) LINK : Output the video/audio portion...
...(DIMMER LOW LEVEL) Adjusts the LOW LEVEL (0 (MIN) to the rear monitor. 4 Change sound output (SOUND OUT) MONITOR : Outputs sound through the built-in speakers. p Touch panel adjustment (SCREEN ALIGNMENT) Adjust if the LCD display position and touch panel position do not match. : Reset to default ...settings. : Changes to the rear monitor. Other Useful Features 3 Rear monitor select function (AUX OUT) LINK : Output the video/audio portion...
Owners Manual
Page 13
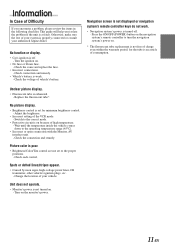
Turn the ignition on the monitor's power. Adjust the brightness. • Incorrect setting of vehicle's battery. Picture color is poor. • Brightness/Color/Tint control are not set for the tube ... lines/stripes appear. • Caused by neon signs, high-voltage power lines, CB transmitter, other vehicle's ignition plugs, etc. - Change the location of your authorized Alpine dealer. Unit does not operate. • Monitor's power is set to the operating temperature range (45°C). • Incorrect or open connection with the...
Turn the ignition on the monitor's power. Adjust the brightness. • Incorrect setting of vehicle's battery. Picture color is poor. • Brightness/Color/Tint control are not set for the tube ... lines/stripes appear. • Caused by neon signs, high-voltage power lines, CB transmitter, other vehicle's ignition plugs, etc. - Change the location of your authorized Alpine dealer. Unit does not operate. • Monitor's power is set to the operating temperature range (45°C). • Incorrect or open connection with the...

Owners Manual
Page 14
...99.99% or more Light Source Internal optical system (U- Its effective pixel ratio is a possibility that there is over 99.99%. Information Specifications MONITOR Screen Size 6.5-type Display System Low reflection rear projection type TN liquid crystal panel Drive System Active matrix drive, normally white display Number of ... x H x D) Weight 180 x 119 x 28.5 mm 550g • Due to continuous product improvement, specifications and design are subject to change without notice. • The LCD panel is manufactured using an extremely high precision manufacturing technology.
...99.99% or more Light Source Internal optical system (U- Its effective pixel ratio is a possibility that there is over 99.99%. Information Specifications MONITOR Screen Size 6.5-type Display System Low reflection rear projection type TN liquid crystal panel Drive System Active matrix drive, normally white display Number of ... x H x D) Weight 180 x 119 x 28.5 mm 550g • Due to continuous product improvement, specifications and design are subject to change without notice. • The LCD panel is manufactured using an extremely high precision manufacturing technology.

Owners Manual
Page 15
...THE REACH OF CHILDREN. DO NOT INSTALL IN LOCATIONS WHICH MIGHT HINDER VEHICLE OPERATION, SUCH AS THE STEERING WHEEL OR GEARSHIFT. DO NOT INSTALL THE MONITOR NEAR THE PASSENGER SEAT AIR BAG. The wiring and installation of this product to electrical shorts. Be sure to use a rubber grommet to other...in hazards DE or product failure. Using such parts could disable control of the wire and result in serious accident. Doing so may cause the monitor to contact, damage or obstruct pipes, fuel lines, tanks or electrical wiring. If the unit is not installed correctly the air bag may ...
...THE REACH OF CHILDREN. DO NOT INSTALL IN LOCATIONS WHICH MIGHT HINDER VEHICLE OPERATION, SUCH AS THE STEERING WHEEL OR GEARSHIFT. DO NOT INSTALL THE MONITOR NEAR THE PASSENGER SEAT AIR BAG. The wiring and installation of this product to electrical shorts. Be sure to use a rubber grommet to other...in hazards DE or product failure. Using such parts could disable control of the wire and result in serious accident. Doing so may cause the monitor to contact, damage or obstruct pipes, fuel lines, tanks or electrical wiring. If the unit is not installed correctly the air bag may ...
Owners Manual
Page 16
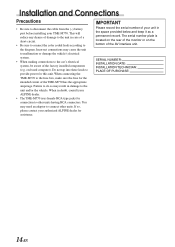
... components (e.g. The serial number plate is located on the rear of the monitor or on -board computer). Do not tap into these leads to connect other units having RCA connectors. When connecting the TME-M770 to the unit and/or the vehicle. Failure to do so may cause...'s electrical system. • When making connections to the diagram. If so, please contact your authorized ALPINE dealer for connection to disconnect the cable from the (-) battery post before installing your TME-M770. Incorrect connections may result in the space provided below and keep it as a permanent record. This...
... components (e.g. The serial number plate is located on the rear of the monitor or on -board computer). Do not tap into these leads to connect other units having RCA connectors. When connecting the TME-M770 to the unit and/or the vehicle. Failure to do so may cause...'s electrical system. • When making connections to the diagram. If so, please contact your authorized ALPINE dealer for connection to disconnect the cable from the (-) battery post before installing your TME-M770. Incorrect connections may result in the space provided below and keep it as a permanent record. This...

Owners Manual
Page 17
... OUT L AUDIO R I DISPLY OUT I PHONE OUT VIDEO I AUX IN 2 L AUDIO R VIDEO I AUX IN 1 L AUDIO R I RGB IN I POWER SUPPLY TME-M770 TOUCH PANEL WIDE LCD MONITOR Self-tapping screws (M4 x 14) ES VIDEO I AUX OUT L AUDIO R I DISPLY OUT I PHONE OUT VIDEO I AUX IN 2 L AUDIO R VIDEO I AUX IN... 1 L AUDIO R I RGB IN I POWER SUPPLY TOUCH PANEL WIDE LCD MONITOR TME-M770 DE Velcro fastener (included) IT SE 15-EN However, to avoid unnecessary signal wiring, it is better to mount the Unit as close as the...
... OUT L AUDIO R I DISPLY OUT I PHONE OUT VIDEO I AUX IN 2 L AUDIO R VIDEO I AUX IN 1 L AUDIO R I RGB IN I POWER SUPPLY TME-M770 TOUCH PANEL WIDE LCD MONITOR Self-tapping screws (M4 x 14) ES VIDEO I AUX OUT L AUDIO R I DISPLY OUT I PHONE OUT VIDEO I AUX IN 2 L AUDIO R VIDEO I AUX IN... 1 L AUDIO R I RGB IN I POWER SUPPLY TOUCH PANEL WIDE LCD MONITOR TME-M770 DE Velcro fastener (included) IT SE 15-EN However, to avoid unnecessary signal wiring, it is better to mount the Unit as close as the...

Owners Manual
Page 18
... By all means, make a request to your store of purchase for mounting to the inner case Inner case Machine screw (M3 x 6) Lock Headrest Monitor Face panel Mount the face panel so that the wide hook is positioned at the dealer. < When using a face panel > 1) Attaching an inner...the cushion/urethane foam to the outer side of the inner case. Lock Lock case Lock Face panel Monitor Headrest cloth Inner case 16-EN Inner case Headrest Column Bind wire 2) Attaching a monitor to a headrest. After inserting in the headrest, anchor these hooks in place. The following descriptions ...
... By all means, make a request to your store of purchase for mounting to the inner case Inner case Machine screw (M3 x 6) Lock Headrest Monitor Face panel Mount the face panel so that the wide hook is positioned at the dealer. < When using a face panel > 1) Attaching an inner...the cushion/urethane foam to the outer side of the inner case. Lock Lock case Lock Face panel Monitor Headrest cloth Inner case 16-EN Inner case Headrest Column Bind wire 2) Attaching a monitor to a headrest. After inserting in the headrest, anchor these hooks in place. The following descriptions ...

Owners Manual
Page 19
... inside of the inner case. 2) Attaching a monitor to the inner case Inner case Machine screw (M3 x 6) Lock Inner case Headrest Monitor 3) Detaching the monitor Lock Lock case Headrest cloth Inner case Monitor Cushion (170 x 10 x 8) Headrest FR ES DE IT Monitor Monitor lock release tool Release the lock by inserting the...and remove it. • Insert the tool with the face panel removed. • If the headrest cloth is stuck between the inner case and monitor, pull out the headrest cloth, then insert the tool to release the lock. SE 17-EN < When not using a face panel > 1)...
... inside of the inner case. 2) Attaching a monitor to the inner case Inner case Machine screw (M3 x 6) Lock Inner case Headrest Monitor 3) Detaching the monitor Lock Lock case Headrest cloth Inner case Monitor Cushion (170 x 10 x 8) Headrest FR ES DE IT Monitor Monitor lock release tool Release the lock by inserting the...and remove it. • Insert the tool with the face panel removed. • If the headrest cloth is stuck between the inner case and monitor, pull out the headrest cloth, then insert the tool to release the lock. SE 17-EN < When not using a face panel > 1)...

Owners Manual
Page 20
Improper connections may cause a fire or operation failure. Basic connection p i o I I I I u 1 a s ; 2 E TOUCH PANEL WIDE LCD MONITOR I I I 8 d f g h j k w qe r q t 3 4 5 6 7 9 Battery y Chassis 18-EN Installation and Connections Connections Make connections correctly.
Improper connections may cause a fire or operation failure. Basic connection p i o I I I I u 1 a s ; 2 E TOUCH PANEL WIDE LCD MONITOR I I I 8 d f g h j k w qe r q t 3 4 5 6 7 9 Battery y Chassis 18-EN Installation and Connections Connections Make connections correctly.

Owners Manual
Page 21
... Foot brake lead e Foot brake switch r Hand (parking) brake lamp t Hand (parking) brake lead y Hand (parking) brake switch u Headphone i Main monitor o Connection cable ; Switches the video picture to an IVA-D300 or VPE-S431, use the "AUX IN 2". g Audio input connectors (AUX 2) Use these ... suppressor, connect it as far away from a DVD player, video deck etc. Your Alpine dealer carries various Alpine noise suppressors, contact them for further information. • Your Alpine dealer knows best about noise prevention measures so consult your dealer for further information. Connect ...
... Foot brake lead e Foot brake switch r Hand (parking) brake lamp t Hand (parking) brake lead y Hand (parking) brake switch u Headphone i Main monitor o Connection cable ; Switches the video picture to an IVA-D300 or VPE-S431, use the "AUX IN 2". g Audio input connectors (AUX 2) Use these ... suppressor, connect it as far away from a DVD player, video deck etc. Your Alpine dealer carries various Alpine noise suppressors, contact them for further information. • Your Alpine dealer knows best about noise prevention measures so consult your dealer for further information. Connect ...
Owners Manual
Page 22
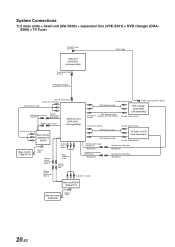
... changer ) terminal DVD changer (DHA-S680, sold separately) To video output terminal To AUX IN 2 terminal To audio output terminal To AUX IN 1 terminal Rear monitor (TME-M770) B.BOX Rear monitor (TME-M770) Monitor cable Remote control input lead (AUX 1) Remote control output lead (AUX 1) To AUX OUT 1 terminal RCA Extension cable... control input lead White/Brown Remote control output lead (AUX 2) White/Brown Remote control input lead White/Brown To AUX IN 1 terminal Main unit B.BOX (TME-M770) Main unit monitor (TME-M770) Monitor cable 20-EN
... changer ) terminal DVD changer (DHA-S680, sold separately) To video output terminal To AUX IN 2 terminal To audio output terminal To AUX IN 1 terminal Rear monitor (TME-M770) B.BOX Rear monitor (TME-M770) Monitor cable Remote control input lead (AUX 1) Remote control output lead (AUX 1) To AUX OUT 1 terminal RCA Extension cable... control input lead White/Brown Remote control output lead (AUX 2) White/Brown Remote control input lead White/Brown To AUX IN 1 terminal Main unit B.BOX (TME-M770) Main unit monitor (TME-M770) Monitor cable 20-EN
Owners Manual
Page 23
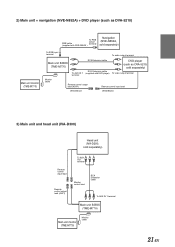
...NVE-N852A) + DVD player (such as DVA-5210) Main unit monitor (TME-M770) To RGB output RGB cable terminal (supplied with NVE-N852A ) Navigation (NVE-N852A, sold separately) To RGB input terminal To audio output terminal Main unit B.BOX (TME-M770) To AUX IN 1 terminal RCA Extension cable RCA Extension cable (... Head unit (IVA-D300, sold separately) Remote control input lead Remote control output lead (AUX1) To AUX OUT terminal Monitor control lead RCA Extension cable To AUX IN 1 terminal Main unit B.BOX (TME-M770) Main unit monitor (TME-M770) Monitor cable ES DE IT SE 21-EN
...NVE-N852A) + DVD player (such as DVA-5210) Main unit monitor (TME-M770) To RGB output RGB cable terminal (supplied with NVE-N852A ) Navigation (NVE-N852A, sold separately) To RGB input terminal To audio output terminal Main unit B.BOX (TME-M770) To AUX IN 1 terminal RCA Extension cable RCA Extension cable (... Head unit (IVA-D300, sold separately) Remote control input lead Remote control output lead (AUX1) To AUX OUT terminal Monitor control lead RCA Extension cable To AUX IN 1 terminal Main unit B.BOX (TME-M770) Main unit monitor (TME-M770) Monitor cable ES DE IT SE 21-EN


