Owners Manual
Page 1
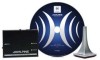
I IMPRINT SOUND MANAGER I KTX-100EQ • /I\UDYSSEY] MULTEQ XT • OWNER'S MANUAL Please read before using this equipment. • ISTRUZIONI PER ~USO Si prega di leggere prima di utilizzare il attrezzatura. • BEDIENUNGSANLEITUNG Lesen Sie diese Bedienungsanleitung bitte vor Gebrauch des Gerates. • MODE D'EMPLOI Veuillez lire avant d'utiliser cet appareil. • MANUAL DE OPERACION Lealo antes de utilizar este equipo. • ANVANDARHANDLEDNING Innan du anvander utrustningen bar du lasa igenom denna anvandarhandledning. • I&t&~SF.l~ < c~mO)MI;:J:
I IMPRINT SOUND MANAGER I KTX-100EQ • /I\UDYSSEY] MULTEQ XT • OWNER'S MANUAL Please read before using this equipment. • ISTRUZIONI PER ~USO Si prega di leggere prima di utilizzare il attrezzatura. • BEDIENUNGSANLEITUNG Lesen Sie diese Bedienungsanleitung bitte vor Gebrauch des Gerates. • MODE D'EMPLOI Veuillez lire avant d'utiliser cet appareil. • MANUAL DE OPERACION Lealo antes de utilizar este equipo. • ANVANDARHANDLEDNING Innan du anvander utrustningen bar du lasa igenom denna anvandarhandledning. • I&t&~SF.l~ < c~mO)MI;:J:
Owners Manual
Page 2
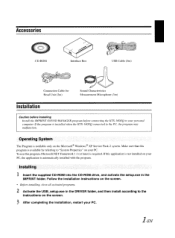
...according to the instructions on the screen. • Before installing, close all activated programs. 2 Activate the USB_setup.exe in the IMPRINT folder. Follow the installation instructions on the screen. 3 After completing the installation, restart your personal computer. To use this application is... Pack-2 system. Accessories CD-ROM Interface Box I USB Cable (5m) Connection Cable for Head Unit (2m) Sound Characteristics Measurement Microphone (3m) Installation Caution before Installing Install the IMPRINT SOUND MANAGER program before connecting the KTX-IOOEQ to your PC.
...according to the instructions on the screen. • Before installing, close all activated programs. 2 Activate the USB_setup.exe in the IMPRINT folder. Follow the installation instructions on the screen. 3 After completing the installation, restart your personal computer. To use this application is... Pack-2 system. Accessories CD-ROM Interface Box I USB Cable (5m) Connection Cable for Head Unit (2m) Sound Characteristics Measurement Microphone (3m) Installation Caution before Installing Install the IMPRINT SOUND MANAGER program before connecting the KTX-IOOEQ to your PC.

Owners Manual
Page 5
... vehicle, and start the MultEQ selling operation. 5 Choose by double-clicking one of the Area Selection items to be measured from the IMPRINT SOUND MANAGER screen. 6 Place the measurement microphone in a vertical position, at ear level (a camera tripod is useful for data lost due to ...the incorrect operatioll of the IMPRINT SOUND MANAGER screen. Afier disconnecting tlte Itead unit cable and bringing the front panel back to the indication of the IMPRINT SOUND MANAGER. We recommend you to the indications on the PC. • Strictly ...
... vehicle, and start the MultEQ selling operation. 5 Choose by double-clicking one of the Area Selection items to be measured from the IMPRINT SOUND MANAGER screen. 6 Place the measurement microphone in a vertical position, at ear level (a camera tripod is useful for data lost due to ...the incorrect operatioll of the IMPRINT SOUND MANAGER screen. Afier disconnecting tlte Itead unit cable and bringing the front panel back to the indication of the IMPRINT SOUND MANAGER. We recommend you to the indications on the PC. • Strictly ...

Owners Manual
Page 6
... 7 according to the Target Curve settillg. however, it up. 7 When microphone placement is complete, move to the indications on the IMPRINT SOUND MANAGER screen. Do not open the doors until all doors, windows and sunroof. never remove the microphone during measurement, "Error" will take ... to the next measurement location according to the indications on the screen and set it will be displayed on the screen for sound characteristics adjustment. Then, start measurement by double-clicking the Measure button. • Perform PC operation outside during measurement. 8 When...
... 7 according to the Target Curve settillg. however, it up. 7 When microphone placement is complete, move to the indications on the IMPRINT SOUND MANAGER screen. Do not open the doors until all doors, windows and sunroof. never remove the microphone during measurement, "Error" will take ... to the next measurement location according to the indications on the screen and set it will be displayed on the screen for sound characteristics adjustment. Then, start measurement by double-clicking the Measure button. • Perform PC operation outside during measurement. 8 When...
Owners Manual
Page 7
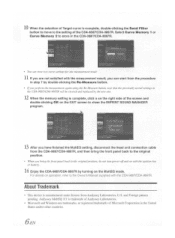
For details on the EXIT screen to close the IMPRINT SOUND MANAGER program. 13 After you bring the front panel back to the original position. U.S. Audyssey MultEQ XT is trademark of Audyssey Laboratories. • Microsoft and Windows ...
For details on the EXIT screen to close the IMPRINT SOUND MANAGER program. 13 After you bring the front panel back to the original position. U.S. Audyssey MultEQ XT is trademark of Audyssey Laboratories. • Microsoft and Windows ...
Owners Manual
Page 11
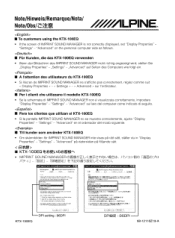
... ein. • A I'attention des utilisateurs du KTX-100EQ • Si I 'ordinateur. • Per i clienti che utilizzano iI modello KTX-100EQ e • Se la schermata di IMPRINT SOUND MANAGER non visualizzata correttamente, impostare "Display Properties" - Note/Hinweis/Remarque/Nota/ Nota/Obs/~5.ti\ • To customers using the KTX-100EQ • If the screen of IMPRINT SOUND MANAGER is not correctly displayed, set "Display...
... ein. • A I'attention des utilisateurs du KTX-100EQ • Si I 'ordinateur. • Per i clienti che utilizzano iI modello KTX-100EQ e • Se la schermata di IMPRINT SOUND MANAGER non visualizzata correttamente, impostare "Display Properties" - Note/Hinweis/Remarque/Nota/ Nota/Obs/~5.ti\ • To customers using the KTX-100EQ • If the screen of IMPRINT SOUND MANAGER is not correctly displayed, set "Display...


