Owner's Manual (english/french)
Page 1
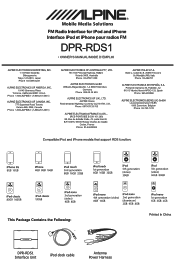
This Package Contains the Following: REM GND +12V DPR-RDS1 Interface Unit iPod dock cable Antenna Power Harness
This Package Contains the Following: REM GND +12V DPR-RDS1 Interface Unit iPod dock cable Antenna Power Harness
Owner's Manual (english/french)
Page 2
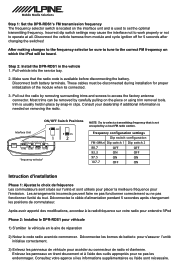
... transmitting frequency that the radio code is available before disconnecting the battery. Pull out the radio by a local FM radio station. Interface Unit ON/OFF Switch Positions OFF 1 ON 2 "frequency selector" NOTE: Try to set the optimal transmitting frequency. Frequency configuration ...d'alimentation pendant 5 secondes après changement les positions de commutateur. Step 1: Set the DPR-RDS1's FM transmission frequency The frequency selector switch is located on which the iPod will be heard. Make sure that is not occupied by removing surrounding trims and screws to ...
... transmitting frequency that the radio code is available before disconnecting the battery. Pull out the radio by a local FM radio station. Interface Unit ON/OFF Switch Positions OFF 1 ON 2 "frequency selector" NOTE: Try to set the optimal transmitting frequency. Frequency configuration ...d'alimentation pendant 5 secondes après changement les positions de commutateur. Step 1: Set the DPR-RDS1's FM transmission frequency The frequency selector switch is located on which the iPod will be heard. Make sure that is not occupied by removing surrounding trims and screws to ...
Owner's Manual (english/french)
Page 3
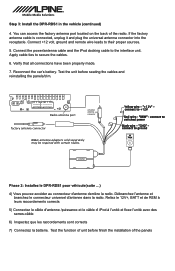
... Reliez le 12V+, BATT et de REM à leurs raccordements corrects 5) Connectez le câble d'antenne /puissance et le câble d' iPod à l'unité et fixez l'unité avec des serres-câble 6) Inspectez que les raccordements sont corrects 7) Connectez la batterie. If... and the iPod docking cable to ground Phase 2: Installez le DPR-RDS1 pour véhicule(suite ...) 4) Vous pouvez accéder au connecteur d'antenne derrière la radio. Reconnect the car's battery. Step 3: Install the DPR-RDS1 in the vehicle (continued) 4. "GND" connect to the interface unit.
... Reliez le 12V+, BATT et de REM à leurs raccordements corrects 5) Connectez le câble d'antenne /puissance et le câble d' iPod à l'unité et fixez l'unité avec des serres-câble 6) Inspectez que les raccordements sont corrects 7) Connectez la batterie. If... and the iPod docking cable to ground Phase 2: Installez le DPR-RDS1 pour véhicule(suite ...) 4) Vous pouvez accéder au connecteur d'antenne derrière la radio. Reconnect the car's battery. Step 3: Install the DPR-RDS1 in the vehicle (continued) 4. "GND" connect to the interface unit.
Owner's Manual (english/french)
Page 4
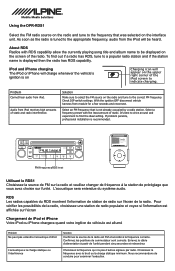
... audio. About RDS Radios with the least amount of the radio. iPod and iPhone charging The iPod or iPhone will charge whenever the vehicle's ignition is recommended. Solution Make sure to select the FM source on the interface unit. If problem persists, professional installation is on Charging icon will...224; partir de l'unité pendant cinq secondes et rebranchez Choisissez la fréquence qui n'a pas d'autres signaux par radio. Using the DPR-RDS1 Select the FM radio source on the radio and tune to the frequency that is not already occupied by a radio station. To find the ...
... audio. About RDS Radios with the least amount of the radio. iPod and iPhone charging The iPod or iPhone will charge whenever the vehicle's ignition is recommended. Solution Make sure to select the FM source on the interface unit. If problem persists, professional installation is on Charging icon will...224; partir de l'unité pendant cinq secondes et rebranchez Choisissez la fréquence qui n'a pas d'autres signaux par radio. Using the DPR-RDS1 Select the FM radio source on the radio and tune to the frequency that is not already occupied by a radio station. To find the ...


