
Owners Manual
Page 3
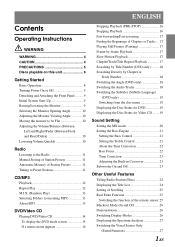
... 9 Detaching and Attaching the Front Panel ......... 9 Initial System Start-Up 9 Raising/Lowering the Monitor 9 Selecting the Monitor Opening Angle 10 Adjusting the Monitor Viewing Angle 10 Moving the monitor to be Flat 10 Adjusting the Volume/Balance (Between Left and Right)/Fader (Between Front and... Memory of Station Presets 11 Tuning to Preset Stations 11 CD/MP3 Playback 12 Repeat Play 12 M.I.X. (Random Play 13 Selecting Folders (concerning MP3 13 About MP3 13 DVD/Video CD Playing DVD/Video CD 14 To display the DVD mode screen 15 If a menu screen appears 16 Stopping Playback...
... 9 Detaching and Attaching the Front Panel ......... 9 Initial System Start-Up 9 Raising/Lowering the Monitor 9 Selecting the Monitor Opening Angle 10 Adjusting the Monitor Viewing Angle 10 Moving the monitor to be Flat 10 Adjusting the Volume/Balance (Between Left and Right)/Fader (Between Front and... Memory of Station Presets 11 Tuning to Preset Stations 11 CD/MP3 Playback 12 Repeat Play 12 M.I.X. (Random Play 13 Selecting Folders (concerning MP3 13 About MP3 13 DVD/Video CD Playing DVD/Video CD 14 To display the DVD mode screen 15 If a menu screen appears 16 Stopping Playback...

Owners Manual
Page 4
Setup DVD Setup DVD Setup Operation 28 Changing the language setting 28 Setting... Setting 31 GENERAL Setup General Setup Operation 31 Setting Automatic Opening/Closing of the Monitor 32 Setting Visual Mode 32 Playing MP3 Data 32 Sound (Beep) Guide Function 32 Displaying the Time 32 Setting the ... CD Changer (Optional 37 Multi-Changer Selection (Optional 38 XM Radio (Optional) Receiving XM Channels with the XM Receiver (Optional 38 Tuning in to Categorized Programs 39 Changing the Display 39 Checking the XM Radio ID Number 39 Storing XM Channel Presets 39 Receiving Stored XM ...
Setup DVD Setup DVD Setup Operation 28 Changing the language setting 28 Setting... Setting 31 GENERAL Setup General Setup Operation 31 Setting Automatic Opening/Closing of the Monitor 32 Setting Visual Mode 32 Playing MP3 Data 32 Sound (Beep) Guide Function 32 Displaying the Time 32 Setting the ... CD Changer (Optional 37 Multi-Changer Selection (Optional 38 XM Radio (Optional) Receiving XM Channels with the XM Receiver (Optional 38 Tuning in to Categorized Programs 39 Changing the Display 39 Checking the XM Radio ID Number 39 Storing XM Channel Presets 39 Receiving Stored XM ...
Owners Manual
Page 5
...Optional) Adjustment Procedure for the IVA-D900 52 Operating the DVD player/DVD changer (sold separately 54 Operating the Navigation (sold separately) .... 55 Operating a separately sold TV monitor ...... 55 Battery Replacement 56 Notes on Using the Remote Control 56 Information About DVDs 57 Terminology 58 List of Language Codes...bass sound to the rear channel ......... 49 Achieving powerful high volume sound ...... 49 Adjusting the speaker levels 50 Adjusting the DVD Level 50 Storing Settings in the Memory 50 Getting out the Preset Memory 50 Using the ProLogic II Mode 51 Linear PCM...
...Optional) Adjustment Procedure for the IVA-D900 52 Operating the DVD player/DVD changer (sold separately 54 Operating the Navigation (sold separately) .... 55 Operating a separately sold TV monitor ...... 55 Battery Replacement 56 Notes on Using the Remote Control 56 Information About DVDs 57 Terminology 58 List of Language Codes...bass sound to the rear channel ......... 49 Achieving powerful high volume sound ...... 49 Adjusting the speaker levels 50 Adjusting the DVD Level 50 Storing Settings in the Memory 50 Getting out the Preset Memory 50 Using the ProLogic II Mode 51 Linear PCM...
Owners Manual
Page 6
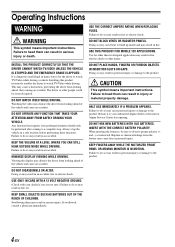
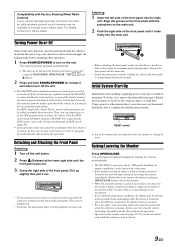
Failure to heed them can result in serious injury. Any function that requires your authorized Alpine dealer or the nearest Alpine Service Center for other than its designed application may cause personal injury or damage to heed them may result in serious injury or death. Doing ... vehicle in fire, etc. DO NOT WATCH VIDEO WHILE DRIVING. The driver or other injury. KEEP FINGERS AWAY WHILE THE MOTORIZED FRONT PANEL OR MOVING MONITOR IS IN MOTION.
Failure to heed them can result in serious injury. Any function that requires your authorized Alpine dealer or the nearest Alpine Service Center for other than its designed application may cause personal injury or damage to heed them may result in serious injury or death. Doing ... vehicle in fire, etc. DO NOT WATCH VIDEO WHILE DRIVING. The driver or other injury. KEEP FINGERS AWAY WHILE THE MOTORIZED FRONT PANEL OR MOVING MONITOR IS IN MOTION.
Owners Manual
Page 10
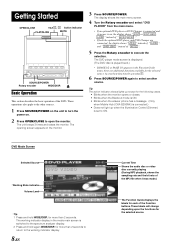
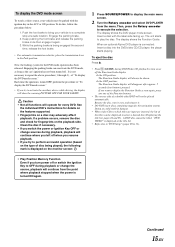
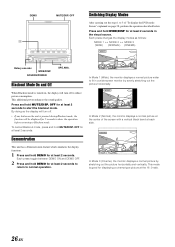
... unit beeps 3 times and raises the monitor. Basic Operation This section describes the basic operation of the MP3 file when it was made.) The Function Guide displays the labels for the selected source. The opening screen appears on , the display shows " DVD or DVD CHG , AUX2 " instead of " AUX1... Time Shows the audio disc or video disc currently playing (During MP3 playback, shows the sampling rate and the bit rate of the DVD. Access these functions by pressing 7. 6 Press SOURCE/POWER again to open the monitor. These operations also apply to the other sources. 1 Press SOURCE...
... unit beeps 3 times and raises the monitor. Basic Operation This section describes the basic operation of the MP3 file when it was made.) The Function Guide displays the labels for the selected source. The opening screen appears on , the display shows " DVD or DVD CHG , AUX2 " instead of " AUX1... Time Shows the audio disc or video disc currently playing (During MP3 playback, shows the sampling rate and the bit rate of the DVD. Access these functions by pressing 7. 6 Press SOURCE/POWER again to open the monitor. These operations also apply to the other sources. 1 Press SOURCE...
Owners Manual
Page 11
... the vehicle. Behind the front panel, to complete the initialization procedure. The unit beeps 3 times and raises (or lowers) the monitor automatically. • The IVA-D900 is in motion. Using a pencil or other pointed object, press the reset switch mounted behind this procedure. Align the groove on .... 1 Press SOURCE/POWER to your vehicle and apply the parking brake, then perform the operation. In this case, first stop your Alpine dealer. Initial System Start-Up Immediately after the power is unswitched, it must be disconnected from the battery post should be left side ...
... the vehicle. Behind the front panel, to complete the initialization procedure. The unit beeps 3 times and raises (or lowers) the monitor automatically. • The IVA-D900 is in motion. Using a pencil or other pointed object, press the reset switch mounted behind this procedure. Align the groove on .... 1 Press SOURCE/POWER to your vehicle and apply the parking brake, then perform the operation. In this case, first stop your Alpine dealer. Initial System Start-Up Immediately after the power is unswitched, it must be disconnected from the battery post should be left side ...

Owners Manual
Page 12
...the mode. This is being raised. R15 0 - 15 0 - 15 ON/OFF The volume level can be in 2 positions. Adjusting the Monitor Viewing Angle Adjust the monitor's angle for at certain angles. Pressing the buttons produces a beep and changes the screen angle between 40 and 105 degrees. • By ...pressing TILT or and holding, the angle changes continuously. • If the monitor touches an obstacle while the angle is normal and not a malfunction. Each press changes the modes as follows: VOL. → NAV.* → SUB...
...the mode. This is being raised. R15 0 - 15 0 - 15 ON/OFF The volume level can be in 2 positions. Adjusting the Monitor Viewing Angle Adjust the monitor's angle for at certain angles. Pressing the buttons produces a beep and changes the screen angle between 40 and 105 degrees. • By ...pressing TILT or and holding, the angle changes continuously. • If the monitor touches an obstacle while the angle is normal and not a malfunction. Each press changes the modes as follows: VOL. → NAV.* → SUB...
Owners Manual
Page 17
...While the parking brake is being played), the following mark is displayed on the monitor screen: 1 Press SOURCE/POWER to perform an invalid operation (based on the type of the titles can reactivate the DVD mode, as long as the car's ignition has not been turned off or switch...of the Function buttons. • The reverse side of "To display the DVD mode screen." Caution • Not all functions will continue from the menu. When an optional Alpine DVD player is connected: Insert a disc into the DVD/video CD/CD player, the player starts playing. If you want to repeat the above ...
...While the parking brake is being played), the following mark is displayed on the monitor screen: 1 Press SOURCE/POWER to perform an invalid operation (based on the type of the titles can reactivate the DVD mode, as long as the car's ignition has not been turned off or switch...of the Function buttons. • The reverse side of "To display the DVD mode screen." Caution • Not all functions will continue from the menu. When an optional Alpine DVD player is connected: Insert a disc into the DVD/video CD/CD player, the player starts playing. If you want to repeat the above ...
Owners Manual
Page 21
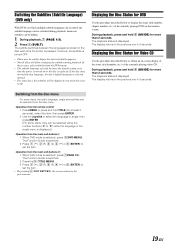
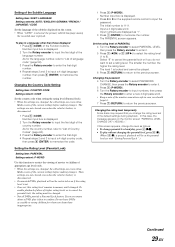
...switched during playback. The display returns to the previous one in 5 seconds. Operation from the DVDs menu. • The subtitle language selected becomes the default setting every time the power is turned on the monitor screen. During playback, press and hold 6 (GUIDE) for more than 2 seconds. Operation ... the subtitles during playback; Displaying the Disc Status for more than 2 seconds. During playback, press and hold 6 (GUIDE) for Video CD Use the procedure described below to obtain an on-screen display of the status (track number, etc.) of the currently playing...
...switched during playback. The display returns to the previous one in 5 seconds. Operation from the DVDs menu. • The subtitle language selected becomes the default setting every time the power is turned on the monitor screen. During playback, press and hold 6 (GUIDE) for more than 2 seconds. Operation ... the subtitles during playback; Displaying the Disc Status for more than 2 seconds. During playback, press and hold 6 (GUIDE) for Video CD Use the procedure described below to obtain an on-screen display of the status (track number, etc.) of the currently playing...
Owners Manual
Page 27
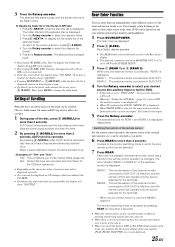
...Press REAR. To return to the front and the rear inside a car. Text: Some CDs have pre-recorded text information for REAR 1 and REAR 2 is displayed. Rear Enter ...built-in DVD in IVA-D900 (front monitor) and in the rear with an XM receiver connected). • If the disc is changed. Each time it is pressed, the external monitor which the...MP3 play , and the screen returns to select the desired file (track). 5 Press the Rotary encoder. The selected title starts to play ) appears. • By pressing 3 (XM), XM's Category list appears (only with the optional rear monitor...
...Press REAR. To return to the front and the rear inside a car. Text: Some CDs have pre-recorded text information for REAR 1 and REAR 2 is displayed. Rear Enter ...built-in DVD in IVA-D900 (front monitor) and in the rear with an XM receiver connected). • If the disc is changed. Each time it is pressed, the external monitor which the...MP3 play , and the screen returns to select the desired file (track). 5 Press the Rotary encoder. The selected title starts to play ) appears. • By pressing 3 (XM), XM's Category list appears (only with the optional rear monitor...
Owners Manual
Page 28
... additional power enhances the sound quality. Each press toggle between DEMO ON and DEMO OFF. 2 Press and hold MUTE/DISP. In Mode 3 (Cinema), the monitor displays a normal picture by evenly stretching out the picture horizontally. Each press changes the display modes as follows: MODE 1 ↔ MODE 2 ↔ MODE...) (NORMAL) (CINEMA) MODE1 Rotary encoder WIDE/DISP. To cancel Blackout mode, press and hold DEMO for at the center of "To display the DVD mode Screen" explained on , the display will turn off . • If any button on the unit is good for at least 2 seconds to...
... additional power enhances the sound quality. Each press toggle between DEMO ON and DEMO OFF. 2 Press and hold MUTE/DISP. In Mode 3 (Cinema), the monitor displays a normal picture by evenly stretching out the picture horizontally. Each press changes the display modes as follows: MODE 1 ↔ MODE 2 ↔ MODE...) (NORMAL) (CINEMA) MODE1 Rotary encoder WIDE/DISP. To cancel Blackout mode, press and hold DEMO for at the center of "To display the DVD mode Screen" explained on , the display will turn off . • If any button on the unit is good for at least 2 seconds to...
Owners Manual
Page 31
... Some discs may request that you are overwritten. The settings are not cleared even when the vehicle's battery is disconnected. • On unrated DVDs, playback will be played. 6 Press 7 (RETURN) to return to confirm. Make a note of the Function buttons. Set the rating level...level set a rating level. In this function to restrict the viewing of movies to 8). To enable playback of discs of the subtitles displayed on the monitor screen "PARENTAL LEVEL CHANGE OK? ." The smaller the number, the higher the rating level. LANGUAGE Setting contents: AUTO / ENGLISH / GERMAN / ...
... Some discs may request that you are overwritten. The settings are not cleared even when the vehicle's battery is disconnected. • On unrated DVDs, playback will be played. 6 Press 7 (RETURN) to return to confirm. Make a note of the Function buttons. Set the rating level...level set a rating level. In this function to restrict the viewing of movies to 8). To enable playback of discs of the subtitles displayed on the monitor screen "PARENTAL LEVEL CHANGE OK? ." The smaller the number, the higher the rating level. LANGUAGE Setting contents: AUTO / ENGLISH / GERMAN / ...

Owners Manual
Page 33
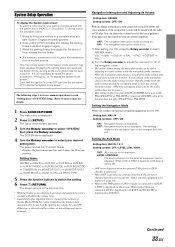
... the parking brake. 2. Refer to "ON" by the following steps 1 to 6 are common operations to a conventional 4:3 size (normal TV aspect ratio) monitor. The main menu is the factory setting. Continued 31-EN Setting the Digital Output To connect an audio processor using the optical digital output, set... not be parked with the ignition key in the ACC or ON position. However, due to repeat the above procedure (1 through 3), of TV monitor (rear monitor) being used. Bring your vehicle must be visible (when playing a 16 : 9 size movie). When the parking brake is not necessary to...
... the parking brake. 2. Refer to "ON" by the following steps 1 to 6 are common operations to a conventional 4:3 size (normal TV aspect ratio) monitor. The main menu is the factory setting. Continued 31-EN Setting the Digital Output To connect an audio processor using the optical digital output, set... not be parked with the ignition key in the ACC or ON position. However, due to repeat the above procedure (1 through 3), of TV monitor (rear monitor) being used. Bring your vehicle must be visible (when playing a 16 : 9 size movie). When the parking brake is not necessary to...
Owners Manual
Page 34
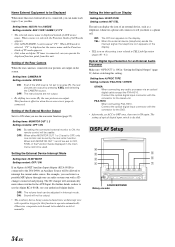
...to off or on the IVA-D900. Setting Visual Mode Setting item: V.SEL KEY Setting content: NAV. / V.SEL You can display the screen of the Monitor Setting item: MONITOR OPEN / CLOSE Setting content: MANUAL / FULL / CLOSE MANUAL: FULL: CLOSE: The monitor is turned off . OFF: Deactivate...changing the settings of the Telephone Setting item: PHONE RECEIVE Setting content: AUTO / MANUAL This operation can be changed. Playing MP3 Data Setting item: MULTI SESSION PLAY Setting content: CD / MP3 When using discs containing both audio data and MP3 data. Sound (Beep) Guide Function Setting item:...
...to off or on the IVA-D900. Setting Visual Mode Setting item: V.SEL KEY Setting content: NAV. / V.SEL You can display the screen of the Monitor Setting item: MONITOR OPEN / CLOSE Setting content: MANUAL / FULL / CLOSE MANUAL: FULL: CLOSE: The monitor is turned off . OFF: Deactivate...changing the settings of the Telephone Setting item: PHONE RECEIVE Setting content: AUTO / MANUAL This operation can be changed. Playing MP3 Data Setting item: MULTI SESSION PLAY Setting content: CD / MP3 When using discs containing both audio data and MP3 data. Sound (Beep) Guide Function Setting item:...
Owners Manual
Page 35
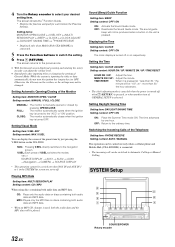
...following steps 1 to 6 are common operations to the IVA-D900, the voice guidance of the navigation system will be mixed with the radio or CD play. Otherwise, a title may not be written, or...an Alpine navigation system connected to each "Setting item" of "To display the System mode screen." When the navigation guide finishes, the previous audio volume and the previous screen are connected, DVD is... AUX IN1 MODE ↔ AUX IN2 MODE ↔ AUX IN3 MODE ↔ CAMERA IN ↔ MONITOR OUT1 ↔ MONITOR OUT2 ↔ IN-INT MUTE ↔ IN-INT ICON ↔ A.PROC TYPE 5 Press the function...
...following steps 1 to 6 are common operations to the IVA-D900, the voice guidance of the navigation system will be mixed with the radio or CD play. Otherwise, a title may not be written, or...an Alpine navigation system connected to each "Setting item" of "To display the System mode screen." When the navigation guide finishes, the previous audio volume and the previous screen are connected, DVD is... AUX IN1 MODE ↔ AUX IN2 MODE ↔ AUX IN3 MODE ↔ CAMERA IN ↔ MONITOR OUT1 ↔ MONITOR OUT2 ↔ IN-INT MUTE ↔ IN-INT ICON ↔ A.PROC TYPE 5 Press the function...
Owners Manual
Page 36
... the connected external monitor to ON, the remote control will automatically mute when switched to the AUX Input. Optical Digital Input Selection for the DVD. • Afterwards...mode. When both MONITOR OUT 1 and 2 are output on how to use the rear enter function (page 25). The CD changer will be ...you can listen to a portable MP3 player through your authorized Alpine dealer. Setting the External Device Interrupt Mode Setting item:...monitor can be set by pressing V.SEL and selecting the CAMERA source. Setting of TV mode appears. • Only when an Alpine TV tuner is connected to the IVA-D900...
... the connected external monitor to ON, the remote control will automatically mute when switched to the AUX Input. Optical Digital Input Selection for the DVD. • Afterwards...mode. When both MONITOR OUT 1 and 2 are output on how to use the rear enter function (page 25). The CD changer will be ...you can listen to a portable MP3 player through your authorized Alpine dealer. Setting the External Device Interrupt Mode Setting item:...monitor can be set by pressing V.SEL and selecting the CAMERA source. Setting of TV mode appears. • Only when an Alpine TV tuner is connected to the IVA-D900...
Owners Manual
Page 37
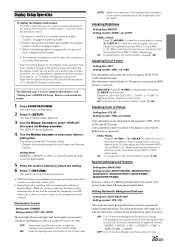
...MAX" respectively. ±0: To quickly set to select your desired setting item. Now, the locking system for each "Setting item" of the monitor bright. The main menu is turned off and turned back on the Auto Background Texture Scroll mode. AUTO: Adjust the brightness of the background ... "DISPLAY," then press the Rotary encoder. Otherwise, a title may not be written, or the settings may not be made only in the navigation, DVD, AUX1, AUX2 and AUX3 modes. Adjusting Color of Picture Setting item: COLOR Setting content: THIN / ±0 / THICK Color adjustment can adjust the...
...MAX" respectively. ±0: To quickly set to select your desired setting item. Now, the locking system for each "Setting item" of the monitor bright. The main menu is turned off and turned back on the Auto Background Texture Scroll mode. AUTO: Adjust the brightness of the background ... "DISPLAY," then press the Rotary encoder. Otherwise, a title may not be written, or the settings may not be made only in the navigation, DVD, AUX1, AUX2 and AUX3 modes. Adjusting Color of Picture Setting item: COLOR Setting content: THIN / ±0 / THICK Color adjustment can adjust the...
Owners Manual
Page 54
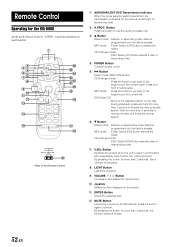
...to "AUDIO" to perform operations on the IVA-D900. 1 34 2 5 76 8 9 "! # $ % & < ; : / -. , + ~ ) ( = (Rear of the current file. MP3 mode: Folder Select (UP) Button to cancel. CD Changer mode: DISC Select (UP) Button selects a disc in combination with a separately sold monitor, etc. (Simul function) By pressing the button...for several seconds. 2 A.PROC Button Press the button to the beginning of the Remote Control) 1 AUDIO/NAV./EXT DVD Transmission Indicator When the mode selector switch is canceled. 8 LIGHT Button Lights the indicator. 9 VOLUME / Button Increase or decreases the volume...
...to "AUDIO" to perform operations on the IVA-D900. 1 34 2 5 76 8 9 "! # $ % & < ; : / -. , + ~ ) ( = (Rear of the current file. MP3 mode: Folder Select (UP) Button to cancel. CD Changer mode: DISC Select (UP) Button selects a disc in combination with a separately sold monitor, etc. (Simul function) By pressing the button...for several seconds. 2 A.PROC Button Press the button to the beginning of the Remote Control) 1 AUDIO/NAV./EXT DVD Transmission Indicator When the mode selector switch is canceled. 8 LIGHT Button Lights the indicator. 9 VOLUME / Button Increase or decreases the volume...

Owners Manual
Page 56
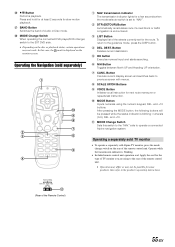
... Button Calls the external audio processor mode. 3 , Button Disc no . REAR Button Outputs the DVD video on the screen. Button Deletes one digit of IVA-D900 instantly. Button Switches the subtitle. Joystick Selects the item displayed on the monitor during other source. . Press and hold for at least 2 seconds to turn ON/OFF...
... Button Calls the external audio processor mode. 3 , Button Disc no . REAR Button Outputs the DVD video on the screen. Button Deletes one digit of IVA-D900 instantly. Button Switches the subtitle. Joystick Selects the item displayed on the monitor during other source. . Press and hold for at least 2 seconds to turn ON/OFF...
Owners Manual
Page 57
< Button Performs playback. Operating the Navigation (sold Alpine TV monitor, press the mode change switch on the rear of the streets currently set to "NAV.". 2 DTR (DETOUR) Button Automatically recalculates route if a road block or ... Inputs numerals using to the rear of the remote control unit. • Operation may differ or may not work. In this switch to the EXT DVD side. • Depending on the monitor screen. and +10. Operate while the transmission indicator is encountered. 3 LIST Button Displays list of the remote control unit.
< Button Performs playback. Operating the Navigation (sold Alpine TV monitor, press the mode change switch on the rear of the streets currently set to "NAV.". 2 DTR (DETOUR) Button Automatically recalculates route if a road block or ... Inputs numerals using to the rear of the remote control unit. • Operation may differ or may not work. In this switch to the EXT DVD side. • Depending on the monitor screen. and +10. Operate while the transmission indicator is encountered. 3 LIST Button Displays list of the remote control unit.
