
Cda-105 Owners Manual
Page 1
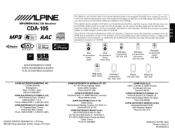
...-B6, 1930 Zaventem, Belgium Phone 02-725-13 15 Designed by ALPINE Japan 68-09359Z78-A Phone 0870-33 33 763 ALPINE ELECTRONICS FRANCE S.A.R.L. (RCS PONTOISE B 338 101 280) 98, Rue de la Belle Etoile, Z.I. Viale C. R EN MP3/WMA/AAC CD Receiver CDA-105 FR ES • OWNER'S MANUAL Please read before using this equipment...
...-B6, 1930 Zaventem, Belgium Phone 02-725-13 15 Designed by ALPINE Japan 68-09359Z78-A Phone 0870-33 33 763 ALPINE ELECTRONICS FRANCE S.A.R.L. (RCS PONTOISE B 338 101 280) 98, Rue de la Belle Etoile, Z.I. Viale C. R EN MP3/WMA/AAC CD Receiver CDA-105 FR ES • OWNER'S MANUAL Please read before using this equipment...
Cda-105 Owners Manual
Page 42
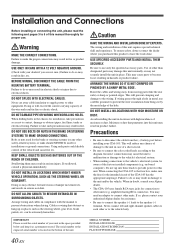
... the factory installed components (e.g. Failure to do so may need an adaptor to connect other units (e.g. You may result in doubt, consult your Alpine dealer. • The CDA-105 uses female RCA-type jacks for proper use only the specified accessory parts. Installation and Connections Before installing or connecting the unit, please read...
... the factory installed components (e.g. Failure to do so may need an adaptor to connect other units (e.g. You may result in doubt, consult your Alpine dealer. • The CDA-105 uses female RCA-type jacks for proper use only the specified accessory parts. Installation and Connections Before installing or connecting the unit, please read...
Cda-105 Owners Manual
Page 43
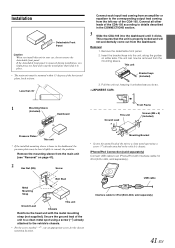
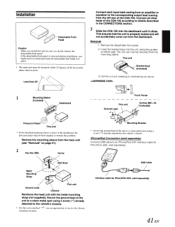
This ensures that holds it in place. • The main unit must be mounted within 35 degrees of the CDA-105 according to details described in the CONNECTlONS section. 3 Slide the CDA-105 into the unit, along the guides on page 41). 2 Hex Nut (M5) Screw *2 Bolt Stud Mounting Bracket • Secure ... too hard and warp the metal plate that the unit is properly locked and will not accidentally come out from the left rear of the CDA-105. Secure the ground lead of the unit to a clean metal spot using a screw (*1) already attached to the corresponding output lead coming from an...
This ensures that holds it in place. • The main unit must be mounted within 35 degrees of the CDA-105 according to details described in the CONNECTlONS section. 3 Slide the CDA-105 into the unit, along the guides on page 41). 2 Hex Nut (M5) Screw *2 Bolt Stud Mounting Bracket • Secure ... too hard and warp the metal plate that the unit is properly locked and will not accidentally come out from the left rear of the CDA-105. Secure the ground lead of the unit to a clean metal spot using a screw (*1) already attached to the corresponding output lead coming from an...
Cda-105 Owners Manual
Page 46
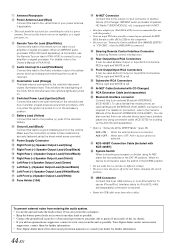
...MODEL SETUP)" to "CD CHG", when the DHA-S690 is left . Your Alpine dealer carries various noise suppressors, contact them for further information. • Your Alpine dealer knows best about noise prevention measures so consult your dealer for controlling the ...vehicle's power antenna. When an IMPRINT audio processor PXA-H100 (sold separately). * Refer to "Setting the AUX+ SETUP Mode" (page 18). When no device is turned on . For details, refer to the Owner's Manual of the CDA-105...
...MODEL SETUP)" to "CD CHG", when the DHA-S690 is left . Your Alpine dealer carries various noise suppressors, contact them for further information. • Your Alpine dealer knows best about noise prevention measures so consult your dealer for controlling the ...vehicle's power antenna. When an IMPRINT audio processor PXA-H100 (sold separately). * Refer to "Setting the AUX+ SETUP Mode" (page 18). When no device is turned on . For details, refer to the Owner's Manual of the CDA-105...
Quick Reference Guide
Page 1
...MIl. LTD. 161-165 Princes Highway, Hallam Victoria 3803, Australia Phone 03-8787-1200 ALPINE ELECTRONICS GmbH Frankfurter Ring 117, 80807 Munchen, Germany Phone 089-32 42 640 ALPINE ELECTRONICS OF U.K. MP3IWMAlAAC CD Receiver CDA-105 MP3 AAC illJD~@ DIGITAL AUDIO I TEXT I 'ensemble des fonctions, reportez-vous au ... CD ne peut pas etre utilise pour lire des fichiers a audio ou image sur Ie lecteur) Si vous Ie souhaitez, demandez votre revendeur ALPINE de vous fournir la version papier du mode d'emploi contenu dans Ie CD-ROM. Pour obtenir de plus amples informations sur I H)\Radio8 '!...
...MIl. LTD. 161-165 Princes Highway, Hallam Victoria 3803, Australia Phone 03-8787-1200 ALPINE ELECTRONICS GmbH Frankfurter Ring 117, 80807 Munchen, Germany Phone 089-32 42 640 ALPINE ELECTRONICS OF U.K. MP3IWMAlAAC CD Receiver CDA-105 MP3 AAC illJD~@ DIGITAL AUDIO I TEXT I 'ensemble des fonctions, reportez-vous au ... CD ne peut pas etre utilise pour lire des fichiers a audio ou image sur Ie lecteur) Si vous Ie souhaitez, demandez votre revendeur ALPINE de vous fournir la version papier du mode d'emploi contenu dans Ie CD-ROM. Pour obtenir de plus amples informations sur I H)\Radio8 '!...
Quick Reference Guide
Page 33
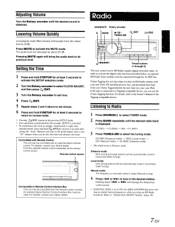
...the Rotary encoder to set hour. 4 Press o../ENT. 5 Repeat steps 3 and 4 above to a Tagging compatible device, you sync your Alpine dealer. the time will bring the audio back to another clock/watch or radio time 0.. Point the optional remote control transmitter at least 2 ...Remote Control This unit can use the iTunes Tagging function. Controllable with an optional Alpine remote control. I 0.. Refer to activate the digital radio functions described below. For details, consult your new CDA·105 and then preview, buy. lENT ~/ESC .- Remote control sensor c '.il.)...
...the Rotary encoder to set hour. 4 Press o../ENT. 5 Repeat steps 3 and 4 above to a Tagging compatible device, you sync your Alpine dealer. the time will bring the audio back to another clock/watch or radio time 0.. Point the optional remote control transmitter at least 2 ...Remote Control This unit can use the iTunes Tagging function. Controllable with an optional Alpine remote control. I 0.. Refer to activate the digital radio functions described below. For details, consult your new CDA·105 and then preview, buy. lENT ~/ESC .- Remote control sensor c '.il.)...
Quick Reference Guide
Page 67
... (Included) Dashboard Connect each input lead coming from an amplifier or equalizer to the corresponding output lead coming from the left rear of the CDA-105. Remove the mounting sleeve from the main unit (see "Removal" on either side. Connect all other leads of the... CDA-105 according to details described in the CONNECTIONS section. 3 Slide the CDA-105 into the unit, along the guides on page 41). 2 Hex Nut (M5) Screw Metal Mounting Strap • Secure the ground lead ...
... (Included) Dashboard Connect each input lead coming from an amplifier or equalizer to the corresponding output lead coming from the left rear of the CDA-105. Remove the mounting sleeve from the main unit (see "Removal" on either side. Connect all other leads of the... CDA-105 according to details described in the CONNECTIONS section. 3 Slide the CDA-105 into the unit, along the guides on page 41). 2 Hex Nut (M5) Screw Metal Mounting Strap • Secure the ground lead ...
