Operating Instructions
Page 8
... clockwise or counterclockwise installation may void the warranty. - Never place the unit with soft pads. - If an extended line is a precise electronic product. While the TV can be installed on the front of the product: 1.1 Open the Package - The product should be sure to securely fasten the product to avoid tipping...
... clockwise or counterclockwise installation may void the warranty. - Never place the unit with soft pads. - If an extended line is a precise electronic product. While the TV can be installed on the front of the product: 1.1 Open the Package - The product should be sure to securely fasten the product to avoid tipping...
Operating Instructions
Page 12
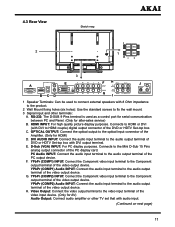
... the video output terminal to HDMI couple) digital output connector of the PC display card. Connects to fix the wall mount. 3 Signal input and other TV set that with audio input. (Continued on next page) 11 D-Sub (VGA) INPUT: For PC display purposes. RS-232: The D-SUB 9 Pins terminal is used...
... the video output terminal to HDMI couple) digital output connector of the PC display card. Connects to fix the wall mount. 3 Signal input and other TV set that with audio input. (Continued on next page) 11 D-Sub (VGA) INPUT: For PC display purposes. RS-232: The D-SUB 9 Pins terminal is used...

Operating Instructions
Page 17
... input device. The PDP and Computer are working at the same time. The second step is operated. 4. Connect audio amplifier apparatus or other TV set that with the HDMI cable. 2. Note: 1. Connect the DVI AUDIO input terminal to select HDMI on the PDP. 5. Press SOURCE button to the audio... the remote control or on the remote control. HDMI DVI AUDIO red white DVD or Set-top box Connect audio amplifier or other TV set (Only for AV) 1.
... input device. The PDP and Computer are working at the same time. The second step is operated. 4. Connect audio amplifier apparatus or other TV set that with the HDMI cable. 2. Note: 1. Connect the DVI AUDIO input terminal to select HDMI on the PDP. 5. Press SOURCE button to the audio... the remote control or on the remote control. HDMI DVI AUDIO red white DVD or Set-top box Connect audio amplifier or other TV set (Only for AV) 1.
Operating Instructions
Page 28
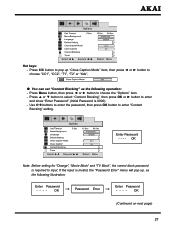
Press C/C button to pop up , as the following illustration; OK Note: Before setting for "Change", "Movie Block" and "TV Block", the correct block password is 0000). - Enter Password - - - - Hot keys: - Press ▲ or ▼ button to select "Content Blocking", then press OK or ► ...
Press C/C button to pop up , as the following illustration; OK Note: Before setting for "Change", "Movie Block" and "TV Block", the correct block password is 0000). - Enter Password - - - - Hot keys: - Press ▲ or ▼ button to select "Content Blocking", then press OK or ► ...

Operating Instructions
Page 29
... or Main Menu. ☼ Movie Block - Press Menu button to lock (display " ") or unlock (doesn't display " "). - "Movie Block" and "TV Block", these functions are activate, while "V-Chip" select "On". - "Movie Block" and "TV Block", these functions are inactivate, while "V-Chip" select "Off". - Press Menu button to confirm. - Use 0~9 buttons to...
... or Main Menu. ☼ Movie Block - Press Menu button to lock (display " ") or unlock (doesn't display " "). - "Movie Block" and "TV Block", these functions are activate, while "V-Chip" select "On". - "Movie Block" and "TV Block", these functions are inactivate, while "V-Chip" select "Off". - Press Menu button to confirm. - Use 0~9 buttons to...

Operating Instructions
Page 30
... to exit Sub Menu or Main Menu. (Continued on next page) 29 Not intended for all viewing). ☼ TV Block - When doesn't display " ", you can watch the programs. - Press OK button to pop up "TV Content Blocking" Menu. - When display " ", you can not watch the programs. - Press ▲ or ▼ button to...
... to exit Sub Menu or Main Menu. (Continued on next page) 29 Not intended for all viewing). ☼ TV Block - When doesn't display " ", you can watch the programs. - Press OK button to pop up "TV Content Blocking" Menu. - When display " ", you can not watch the programs. - Press ▲ or ▼ button to...
Operating Instructions
Page 31
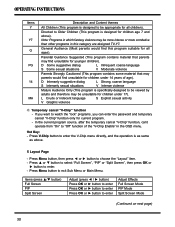
... Mode Split Screen Mode (Continued on next page) 30 Parental Guidance Suggested (This program contains material that may parents would find this category are designed TV-Y7. Press V-Chip button to enter the V-Chip menu directly, and the operation is designed for children age 7 and above . 5 Layout Page - Note: Programs in...
... Mode Split Screen Mode (Continued on next page) 30 Parental Guidance Suggested (This program contains material that may parents would find this category are designed TV-Y7. Press V-Chip button to enter the V-Chip menu directly, and the operation is designed for children age 7 and above . 5 Layout Page - Note: Programs in...

