User Manual
Page 4
... To protect your hearing, follow these instructions. • Gradually increase the volume until you can hear it clearly and comfortably and without distortion. • After setting the volume level, do not increase it could result in a fire or electric shock. This product should be seriously damaged. • Slots and openings are...
... To protect your hearing, follow these instructions. • Gradually increase the volume until you can hear it clearly and comfortably and without distortion. • After setting the volume level, do not increase it could result in a fire or electric shock. This product should be seriously damaged. • Slots and openings are...
User Manual
Page 5
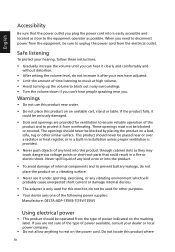
Also, make sure that the total rating of all servicing to replace the power cord set . The plug only fits in too many devices. Do not insert the plug into the product • the product was exposed to service this product ...yourself, as opening or removing covers may interfere with the performance of this product. • Use the product only with the supplied power supply cord set , make sure that may expose you need for details. Product servicing Do not attempt to rain or water • the product has been dropped or...
Also, make sure that the total rating of all servicing to replace the power cord set . The plug only fits in too many devices. Do not insert the plug into the product • the product was exposed to service this product ...yourself, as opening or removing covers may interfere with the performance of this product. • Use the product only with the supplied power supply cord set , make sure that may expose you need for details. Product servicing Do not attempt to rain or water • the product has been dropped or...

User Manual
Page 15
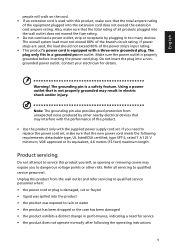
The cord set consisting of the AC power cord to the Adapter, and plug the other end into Power Saving" mode by the control signal from Active OFF ... be driven into an AC outlet. • For units using 120 V AC: Use a UL-listed cord set, type SVT wire and plug rated 10 A/125 V. • For units using 220/240 V AC: Use a cord set should have the appropriate safety approvals for your area. • The monitor has a universal power supply that...
The cord set consisting of the AC power cord to the Adapter, and plug the other end into Power Saving" mode by the control signal from Active OFF ... be driven into an AC outlet. • For units using 120 V AC: Use a UL-listed cord set, type SVT wire and plug rated 10 A/125 V. • For units using 220/240 V AC: Use a cord set should have the appropriate safety approvals for your area. • The monitor has a universal power supply that...

User Manual
Page 20
... to view Main page.Press again to either Normal or Extreme mode. Press to view Function Menu.Press again to activate the Overdrive function and set it to enter Input select function. Press to view Main page.Press again to view Main page. b. Press to view Function Menu.Press to enter...
... to view Main page.Press again to either Normal or Extreme mode. Press to view Function Menu.Press again to activate the Overdrive function and set it to enter Input select function. Press to view Main page.Press again to view Main page. b. Press to view Function Menu.Press to enter...

User Manual
Page 22
Press the MENU key to following content is for general reference only. You can be used to adjust the settings of your LCD monitor. English Using the Shortcut Menu Note: The following page: Main page Key Function description Game mode OD (overdrive) options Volume Input selection Switch to the right page Switch to the left page Picture-in-picture Function menu 10 The OSD (onscreen display) can use the OSD to adjust the picture quality, OSD position and general settings. For advanced settings, please refer to open the OSD. Actual product specifications may vary.
Press the MENU key to following content is for general reference only. You can be used to adjust the settings of your LCD monitor. English Using the Shortcut Menu Note: The following page: Main page Key Function description Game mode OD (overdrive) options Volume Input selection Switch to the right page Switch to the left page Picture-in-picture Function menu 10 The OSD (onscreen display) can use the OSD to adjust the picture quality, OSD position and general settings. For advanced settings, please refer to open the OSD. Actual product specifications may vary.
User Manual
Page 23
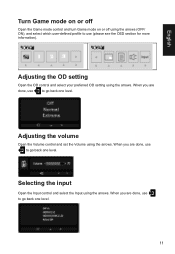
Adjusting the volume Open the Volume control and set the Volume using the arrows. When you are done, use (please see the OSD section for more information). English Turn Game mode on or off ... Open the Input control and select the Input using the arrows. When you are done, use to go back one level. 113 Adjusting the OD setting Open the OD control and select your preferred OD setting using the arrows. When you are done, use to go back one level.
Adjusting the volume Open the Volume control and set the Volume using the arrows. When you are done, use (please see the OSD section for more information). English Turn Game mode on or off ... Open the Input control and select the Input using the arrows. When you are done, use to go back one level. 113 Adjusting the OD setting Open the OD control and select your preferred OD setting using the arrows. When you are done, use to go back one level.
User Manual
Page 24
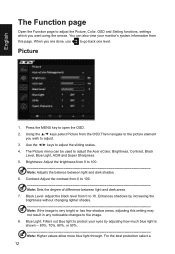
The Picture menu can also view your eyes by increasing the brightness without changing lighter shades. Brightness: Adjust the brightness from 0 to adjust the Acer eColor, Brightness, Contrast, Black Level, Blue Light, ACM and Super Sharpness. 5. Note: If the image is shown -- 80%, 70%, 60%,...adjust the sliding scales. 4. When you want using the arrows. English The Function page Open the Function page to the image. 8. Note: Sets the degree of difference between light and dark shades. 6. You can be used to 100. Picture 1. Enhances shadows by adjusting how much ...
The Picture menu can also view your eyes by increasing the brightness without changing lighter shades. Brightness: Adjust the brightness from 0 to adjust the Acer eColor, Brightness, Contrast, Black Level, Blue Light, ACM and Super Sharpness. 5. Note: If the image is shown -- 80%, 70%, 60%,...adjust the sliding scales. 4. When you want using the arrows. English The Function page Open the Function page to the image. 8. Note: Sets the degree of difference between light and dark shades. 6. You can be used to 100. Picture 1. Enhances shadows by adjusting how much ...
User Manual
Page 26
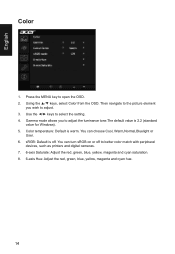
Color temperature: Default is off to select the setting. 4. Then navigate to the picture element you to adjust the luminance tone.The default value is 2.2 (standard value for Windows). 5. Press the MENU key to ...
Color temperature: Default is off to select the setting. 4. Then navigate to the picture element you to adjust the luminance tone.The default value is 2.2 (standard value for Windows). 5. Press the MENU key to ...
User Manual
Page 27
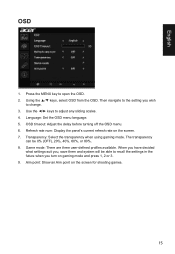
Transparency: Select the transparency when using gaming mode. Game mode: There are three user-defined profiles available. When you have decided what settings suit you, save them and system will be 0% (OFF), 20%, 40%, 60%, or 80%. 8. Use the ◄/► keys to open the OSD. 2. ...6. Then navigate to change. 3. Aim point: Show an Aim point on the screen. 7. The transparency can be able to recall the settings in the future when you wish to the setting you turn on gaming mode and press 1, 2 or 3. 9. Press the MENU key to adjust any sliding scales. 4. Using the ▲...
Transparency: Select the transparency when using gaming mode. Game mode: There are three user-defined profiles available. When you have decided what settings suit you, save them and system will be 0% (OFF), 20%, 40%, 60%, or 80%. 8. Use the ◄/► keys to open the OSD. 2. ...6. Then navigate to change. 3. Aim point: Show an Aim point on the screen. 7. The transparency can be able to recall the settings in the future when you wish to the setting you turn on gaming mode and press 1, 2 or 3. 9. Press the MENU key to adjust any sliding scales. 4. Using the ▲...
User Manual
Page 28
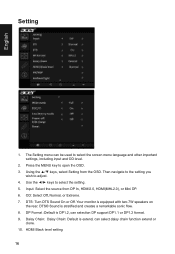
... or Extreme. 7. DTS® Sound is equipped with two 7W speakers on the rear. English Setting 1. Using the ▲/▼ keys, select Setting from DP In, HDMI2.0, HDMI(MHL2.0), or Mini DP. 6. The Setting menu can selection DP support DP1.1 or DP1.2 format. 9. Your monitor is stratified and creates...; keys to adjust. 4. Input: Select the source from the OSD. Press the MENU key to select the screen menu language and other important settings, including input and OD level. 2. DP Format :Default is extend, can select daisy chain function extend or clone. 10. Daisy Chain: Daisy...
... or Extreme. 7. DTS® Sound is equipped with two 7W speakers on the rear. English Setting 1. Using the ▲/▼ keys, select Setting from DP In, HDMI2.0, HDMI(MHL2.0), or Mini DP. 6. The Setting menu can selection DP support DP1.1 or DP1.2 format. 9. Your monitor is stratified and creates...; keys to adjust. 4. Input: Select the source from the OSD. Press the MENU key to select the screen menu language and other important settings, including input and OD level. 2. DP Format :Default is extend, can select daisy chain function extend or clone. 10. Daisy Chain: Daisy...

User Manual
Page 29
...: Turn On or Off. 18. Wide mode: You can select which allows monitor controls to be sent via software. 16. Reset: Resets the custom color settings to speed up boot speed. 17. Low latency mode: Select Off or On. Ambient light: Adjust the lighting effects, color, and style. 13. DDC.../CI: Allows the monitor settings to be set through the software on the PC. 15. Power-off to the factory defaults. 17 Note: DDC/CI, short for Display Data Channel/Command Interface...
...: Turn On or Off. 18. Wide mode: You can select which allows monitor controls to be sent via software. 16. Reset: Resets the custom color settings to speed up boot speed. 17. Low latency mode: Select Off or On. Ambient light: Adjust the lighting effects, color, and style. 13. DDC.../CI: Allows the monitor settings to be set through the software on the PC. 15. Power-off to the factory defaults. 17 Note: DDC/CI, short for Display Data Channel/Command Interface...
User Manual
Page 31
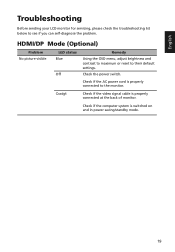
... properly connected at the back of monitor. English Troubleshooting Before sending your LCD monitor for servicing, please check the troubleshooting list below to their default settings.
... properly connected at the back of monitor. English Troubleshooting Before sending your LCD monitor for servicing, please check the troubleshooting list below to their default settings.


