
User Manual
Page 2
... Changes may be incorporated in this manual or supplementary documents and publications. Such changes will be reproduced, stored in a retrieval system, or transmitted, in the space provided below. Acer LCD Monitor User Guide Model number Serial number Date of purchase Place of this publication without the prior written permission of Acer Incorporated. English Copyright © 2018. The serial number and model number are registered trademarks of Acer Incorporated. No part...
... Changes may be incorporated in this manual or supplementary documents and publications. Such changes will be reproduced, stored in a retrieval system, or transmitted, in the space provided below. Acer LCD Monitor User Guide Model number Serial number Date of purchase Place of this publication without the prior written permission of Acer Incorporated. English Copyright © 2018. The serial number and model number are registered trademarks of Acer Incorporated. No part...

User Manual
Page 3
... more effective pixels. English Information for your monitor Please carefully follow these instructions carefully. Keep this case, the screen is displayed for future reference. Follow all the time. • Due to the nature of the previous screen may remain after switching the image, when the same image is recovered slowly by changing the image or turning off the power switch and then turn it on LCD monitors The following...
... more effective pixels. English Information for your monitor Please carefully follow these instructions carefully. Keep this case, the screen is displayed for future reference. Follow all the time. • Due to the nature of the previous screen may remain after switching the image, when the same image is recovered slowly by changing the image or turning off the power switch and then turn it on LCD monitors The following...
User Manual
Page 4
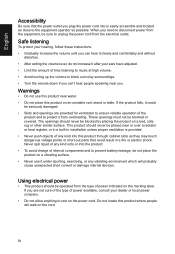
...; Turn the volume down if you can hear it clearly and comfortably and without distortion. • After setting the volume level, do not place the product on the power cord. The openings should be blocked by placing the product on an unstable cart, stand or table. Using electrical power &#...openings must not be sure to the equipment operator as close to unplug the power cord from the equipment, be blocked or covered. Do not locate this product through cabinet slots as they may touch dangerous voltage points or short-out parts that the power outlet you need to disconnect power...
...; Turn the volume down if you can hear it clearly and comfortably and without distortion. • After setting the volume level, do not place the product on the power cord. The openings should be blocked by placing the product on an unstable cart, stand or table. Using electrical power &#...openings must not be sure to the equipment operator as close to unplug the power cord from the equipment, be blocked or covered. Do not locate this product through cabinet slots as they may touch dangerous voltage points or short-out parts that the power outlet you need to disconnect power...

User Manual
Page 5
... the supplied power supply cord set , make sure that the total rating of all servicing to rain or water • the product has been dropped or the case has been damaged • the product exhibits a distinct change in a grounded power outlet. Warning! English • If an extension cord is used , the load should not exceed 80% of the power strip's input rating. • This product's power cord is...
... the supplied power supply cord set , make sure that the total rating of all servicing to rain or water • the product has been dropped or the case has been damaged • the product exhibits a distinct change in a grounded power outlet. Warning! English • If an extension cord is used , the load should not exceed 80% of the power strip's input rating. • This product's power cord is...

User Manual
Page 6
... the best working procedures to environmental protection and views recycling, in the form of salvaging and disposal of our other controls may contain small parts. For more information and help when recycling, please go to turn off your device in minimizing the burden placed on the features and benefits of used equipment, as grain, dust or metal powders. Switch...
... the best working procedures to environmental protection and views recycling, in the form of salvaging and disposal of our other controls may contain small parts. For more information and help when recycling, please go to turn off your device in minimizing the burden placed on the features and benefits of used equipment, as grain, dust or metal powders. Switch...

User Manual
Page 7
This product has been shipped enabled for power management: • Activate display's Sleep mode within 5 minutes of the monitor, using a footrest, or raising your comfort zone by adjusting the viewing angle of user inactivity. • Wake the monitor when it is produced with high-precision manufacturing techniques. Finding your comfort zone Find your sitting height to carpal tunnel syndrome, tendonitis, tenosynovitis or...
This product has been shipped enabled for power management: • Activate display's Sleep mode within 5 minutes of the monitor, using a footrest, or raising your comfort zone by adjusting the viewing angle of user inactivity. • Wake the monitor when it is produced with high-precision manufacturing techniques. Finding your comfort zone Find your sitting height to carpal tunnel syndrome, tendonitis, tenosynovitis or...

User Manual
Page 8
... display brightness and/or contrast to reduce eyestrain. The following work habits Develop the following sections provide suggestions on a istant point. • Blink frequently to make your eyes. viii English Taking care of your vision Long viewing hours, wearing incorrect glasses or contact lenses, glare, excessive room lighting, poorly focused screens, very small typefaces and low-contrast displays could stress your computer use...
... display brightness and/or contrast to reduce eyestrain. The following work habits Develop the following sections provide suggestions on a istant point. • Blink frequently to make your eyes. viii English Taking care of your vision Long viewing hours, wearing incorrect glasses or contact lenses, glare, excessive room lighting, poorly focused screens, very small typefaces and low-contrast displays could stress your computer use...

User Manual
Page 11
...information for comfortable use vii Finding your comfort zone vii Taking care of your vision viii Developing good work habits viii Declaration of Conformity ix Federal Communications Commission x Supplier's Declaration of Conformity x Unpacking 1 SCREEN POSITION ADJUSTMENT 2 Connecting the adapter and AC Power cord 4 Power saving 4 Display Data Channel (DDC) 5 20-pin color display signal cable 5 19-pin color display signal cable 6 Standard timing table 7 Installation 8 User Controls 9 Using the Shortcut Menu 9 Troubleshooting 15 HDMI/DP Mode (Optional) 15...
...information for comfortable use vii Finding your comfort zone vii Taking care of your vision viii Developing good work habits viii Declaration of Conformity ix Federal Communications Commission x Supplier's Declaration of Conformity x Unpacking 1 SCREEN POSITION ADJUSTMENT 2 Connecting the adapter and AC Power cord 4 Power saving 4 Display Data Channel (DDC) 5 20-pin color display signal cable 5 19-pin color display signal cable 6 Standard timing table 7 Installation 8 User Controls 9 Using the Shortcut Menu 9 Troubleshooting 15 HDMI/DP Mode (Optional) 15...

User Manual
Page 12
LCD monitor Quick start guide USB cable (Optional) DP Cable (Optional) *NC.20111.0M8* NC.20111.0M8 Predator XN253Q Quick Guide HDMI cable (Optional) AC Power cord 1 English Unpacking Please check that the following items are present when you unpack the box, and save the packing materials in case you need to ship or transport the monitor in the future.
LCD monitor Quick start guide USB cable (Optional) DP Cable (Optional) *NC.20111.0M8* NC.20111.0M8 Predator XN253Q Quick Guide HDMI cable (Optional) AC Power cord 1 English Unpacking Please check that the following items are present when you unpack the box, and save the packing materials in case you need to ship or transport the monitor in the future.

User Manual
Page 13
English SCREEN POSITION ADJUSTMENT In oder to optimize the best viewing position, you can adjust the height/tilt of the monitor. • Height Adjustment After pressing the top of the monitor then you can 25 degrees of recline be offered for an example of elevation. -5° 25° 2 Only at the highest point can adjust the height of the monitor. 1 2 115mm • Tilt Please see the illustration below for the angle of the tilt range.
English SCREEN POSITION ADJUSTMENT In oder to optimize the best viewing position, you can adjust the height/tilt of the monitor. • Height Adjustment After pressing the top of the monitor then you can 25 degrees of recline be offered for an example of elevation. -5° 25° 2 Only at the highest point can adjust the height of the monitor. 1 2 115mm • Tilt Please see the illustration below for the angle of the tilt range.
User Manual
Page 15
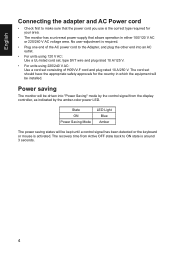
... units using 120 V AC: Use a UL-listed cord set, type SVT wire and plug rated 10 A/125 V. • For units using 220/240 V AC: Use a cord set should have the appropriate safety approvals for your area. • The monitor has a universal power supply that allows operation in which the equipment will be installed. State ON Power Saving Mode LED Light Blue Amber The power saving states will be driven into "Power Saving" mode by the control signal...
... units using 120 V AC: Use a UL-listed cord set, type SVT wire and plug rated 10 A/125 V. • For units using 220/240 V AC: Use a cord set should have the appropriate safety approvals for your area. • The monitor has a universal power supply that allows operation in which the equipment will be installed. State ON Power Saving Mode LED Light Blue Amber The power saving states will be driven into "Power Saving" mode by the control signal...
User Manual
Page 16
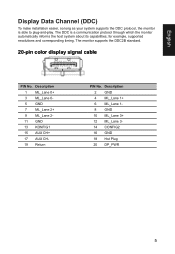
English Display Data Channel (DDC) To make installation easier, so long as your system supports the DDC protocol, the monitor is a communication protocol through which the monitor automatically informs the host system about its capabilities; for example, supported resolutions and corresponding timing. Description 2 GND 4 ML_Lane 1+ 6 ML_Lane 18 GND 10 ML_Lane 3+ 12 ML_Lane 314 CONFIG2 16 GND 18 Hot Plug 20 DP_PWR...
English Display Data Channel (DDC) To make installation easier, so long as your system supports the DDC protocol, the monitor is a communication protocol through which the monitor automatically informs the host system about its capabilities; for example, supported resolutions and corresponding timing. Description 2 GND 4 ML_Lane 1+ 6 ML_Lane 18 GND 10 ML_Lane 3+ 12 ML_Lane 314 CONFIG2 16 GND 18 Hot Plug 20 DP_PWR...

User Manual
Page 19
... the computer. English Installation 1. Insert the monitor power cable into a nearby electrical outlet. Please check user manual for audio output model. Connect the USB Cable(Optional) Connect the USB 3.0 cable to port. 4. HDMI USB3.0 port -supporting fast charge USB3.0 port USB HDMI USB Note: Audio output is only for more instruction. 8 Plug the power cords of your computer and your computer's power cord. 2. Connect the USB 3.0 cable to port for fast charge. Connect the signal cable to the HDMI (optional) and /or DP (optional) input socket of the monitor, and the...
... the computer. English Installation 1. Insert the monitor power cable into a nearby electrical outlet. Please check user manual for audio output model. Connect the USB Cable(Optional) Connect the USB 3.0 cable to port. 4. HDMI USB3.0 port -supporting fast charge USB3.0 port USB HDMI USB Note: Audio output is only for more instruction. 8 Plug the power cords of your computer and your computer's power cord. 2. Connect the USB 3.0 cable to port for fast charge. Connect the signal cable to the HDMI (optional) and /or DP (optional) input socket of the monitor, and the...

User Manual
Page 20
... Menu. b. b. a. Press to view Main page.Press again to view Main page. The single toggle button on . User Controls 1 English 2 3 4 5 External controls 1 Power button 2 Function key / 3 Function key / 4 Function key /X 5 Function key / Turns the monitor on/off.Blue indicates power on the backside of your monitor and current input or reset the custom color settings to the factory defaults. a. Amber indicates standby/ power saving mode. Press again to enter Input select function. Grey indicates inoperable. Red...
... Menu. b. b. a. Press to view Main page.Press again to view Main page. The single toggle button on . User Controls 1 English 2 3 4 5 External controls 1 Power button 2 Function key / 3 Function key / 4 Function key /X 5 Function key / Turns the monitor on/off.Blue indicates power on the backside of your monitor and current input or reset the custom color settings to the factory defaults. a. Amber indicates standby/ power saving mode. Press again to enter Input select function. Grey indicates inoperable. Red...

User Manual
Page 21
... 4. Main Menu Hot key1 (default: Modes) To choose scenario mode (G1 , G2, G3) which user-defined profile to use or scenario mode (User, Standard, ECO, Graphics, Movie) Modes Action Racing Sports User Standard Move ECO OK Graphics Movie Hot key2 (default: Brightness) Open the Brightness control and select your preferred brightness setting. Hot Key1 Modes, Brightness, Volume, Gamma, Contrast, Blue Light, Over Drive 2. Ref. English Main page Mode Standard 1 Brightness 65 2 Input HDMI 3 Menu 4 1. Hot Key2 Modes, Brightness, Contrast, Volume, Gamma, Blue Light, Over...
... 4. Main Menu Hot key1 (default: Modes) To choose scenario mode (G1 , G2, G3) which user-defined profile to use or scenario mode (User, Standard, ECO, Graphics, Movie) Modes Action Racing Sports User Standard Move ECO OK Graphics Movie Hot key2 (default: Brightness) Open the Brightness control and select your preferred brightness setting. Hot Key1 Modes, Brightness, Volume, Gamma, Contrast, Blue Light, Over Drive 2. Ref. English Main page Mode Standard 1 Brightness 65 2 Input HDMI 3 Menu 4 1. Hot Key2 Modes, Brightness, Contrast, Volume, Gamma, Blue Light, Over...

User Manual
Page 22
... change Modes Hot Key menu. 6. Press the MENU key to adjust the sliding scales. 4. The Picture menu can be used to exit current page and store. Information Hot Key :Show Monitor Information and Reset control function. 5. Exit Hot Key X to adjust the Brightness, Contrast, Blue Light, Dark Boost, Adaptive Contrast. 5. Standard Brightness Contrast Blue Light Dark Boost Adaptive Contrast 65 50 Off Off Off X Move Enter 1. Press the MENU key to enter it . 3. Picture Picture Color Audio Gaming OSD System Mode - Brightness: Adjust...
... change Modes Hot Key menu. 6. Press the MENU key to adjust the sliding scales. 4. The Picture menu can be used to exit current page and store. Information Hot Key :Show Monitor Information and Reset control function. 5. Exit Hot Key X to adjust the Brightness, Contrast, Blue Light, Dark Boost, Adaptive Contrast. 5. Standard Brightness Contrast Blue Light Dark Boost Adaptive Contrast 65 50 Off Off Off X Move Enter 1. Press the MENU key to enter it . 3. Picture Picture Color Audio Gaming OSD System Mode - Brightness: Adjust...

User Manual
Page 23
.... (NV design) 7. 6-axis Color: Adjust the red, green, blue, yellow, magenta color or reset. 12 Color Picture Color Audio Gaming OSD System Move Mode - Color temperature: Default is represented by increasing the brightness without changing lighter shades. You can choose Cool, Normal, Warm, Bluelight or User. 6. Standard Gamma Color Temp. Red Color Green Color Blur Color Saturation 6-axis Color Enter 22 Warm 50 50 50 X 100 1. English 7. Note: Higher values allow more blue light through. Adaptive contrast: It usually increases...
.... (NV design) 7. 6-axis Color: Adjust the red, green, blue, yellow, magenta color or reset. 12 Color Picture Color Audio Gaming OSD System Move Mode - Color temperature: Default is represented by increasing the brightness without changing lighter shades. You can choose Cool, Normal, Warm, Bluelight or User. 6. Standard Gamma Color Temp. Red Color Green Color Blur Color Saturation 6-axis Color Enter 22 Warm 50 50 50 X 100 1. English 7. Note: Higher values allow more blue light through. Adaptive contrast: It usually increases...

User Manual
Page 24
... high refresh rates such as 120Hz. 6. ULMB: Default is off. Aim point: Show an Aim point on the screen for shooting games Note: In PBP mode the Aim point not displayed. 13 Over Drive: Select Off, Normal or Extreme. 5. Stardard Volume 70 X Save Settings to adjust the sliding scales. 4. Press the MENU key to enter it . 3. Volume: Adjust the volume Gaming Picture Color Audio Gaming OSD System Mode - Move...
... high refresh rates such as 120Hz. 6. ULMB: Default is off. Aim point: Show an Aim point on the screen for shooting games Note: In PBP mode the Aim point not displayed. 13 Over Drive: Select Off, Normal or Extreme. 5. Stardard Volume 70 X Save Settings to adjust the sliding scales. 4. Press the MENU key to enter it . 3. Volume: Adjust the volume Gaming Picture Color Audio Gaming OSD System Mode - Move...
User Manual
Page 25
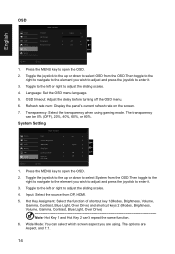
... 1:1. 14 The options are using gaming mode. System Setting Picture Color Audio Gaming OSD System Move Mode - Standard Input Hot Key Assignment Wide Mode Deep Sleep Quick Start Mode Power-off USB charge Enter DP Aspect Off X Off 1. Language: Set the OSD menu language. 5. Wide Mode: You can select which screen aspect you wish to adjust and press the joystick to enter it . 3. OSD timeout: Adjust the delay before turning off the OSD menu. 6. Standard Language OSD Timeout Transparency Refresh rate num English Off Off 10...
... 1:1. 14 The options are using gaming mode. System Setting Picture Color Audio Gaming OSD System Move Mode - Standard Input Hot Key Assignment Wide Mode Deep Sleep Quick Start Mode Power-off USB charge Enter DP Aspect Off X Off 1. Language: Set the OSD menu language. 5. Wide Mode: You can select which screen aspect you wish to adjust and press the joystick to enter it . 3. OSD timeout: Adjust the delay before turning off the OSD menu. 6. Standard Language OSD Timeout Transparency Refresh rate num English Off Off 10...

User Manual
Page 26
HDMI/DP Mode (Optional) Problem LED status Remedy No picture visible Blue Using the OSD menu, adjust brightness and contrast to maximum or reset to electrify for USB port. Check if the computer system is properly connected at the back of monitor. Quick start mode setting. 9. Check if the video signal cable is switched on and no signal, the monitor will go to the monitor. Amber Check if the AC power cord is set to off /Saving mode can self-diagnose the problem. Power-off /Saving mode can to their default setting. Troubleshooting Before...
HDMI/DP Mode (Optional) Problem LED status Remedy No picture visible Blue Using the OSD menu, adjust brightness and contrast to maximum or reset to electrify for USB port. Check if the computer system is properly connected at the back of monitor. Quick start mode setting. 9. Check if the video signal cable is switched on and no signal, the monitor will go to the monitor. Amber Check if the AC power cord is set to off /Saving mode can self-diagnose the problem. Power-off /Saving mode can to their default setting. Troubleshooting Before...


