User Manual RGB Light Sense
Page 2
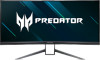
... Create the perfect atmosphere for unified lighting effects. Gear icon means customize the LED numbers (optional) as next picture After any lighting setting changed, you need to configure lighting setting Customize the LED numbers (optional) 2 Englis h Requirement Model No. With RGB Light Sense app, your monitor is synced for gaming, movies, and...
... Create the perfect atmosphere for unified lighting effects. Gear icon means customize the LED numbers (optional) as next picture After any lighting setting changed, you need to configure lighting setting Customize the LED numbers (optional) 2 Englis h Requirement Model No. With RGB Light Sense app, your monitor is synced for gaming, movies, and...
User Manual RGB Light Sense
Page 3
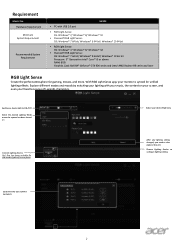
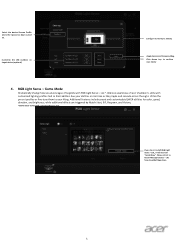
Select the desired Lighting Effect when the system has been turned on . 3 Apply or Discard the desired Lighting setting when the system has been turned on . Plesae check lighting device conncetion. 1. Vary the effect speed to suit your preference, then sit back and enjoy. ... nine effects (optional), including breathing, shifting, and more with Basic Sync mode. Select the desired Color when the system has been turned on Basic mode. Acer X35 only support Static, Breathing and Spectrum on . All enabled devices are automatically set up in Basic Sync mode. RGB Light Sense -
Select the desired Lighting Effect when the system has been turned on . 3 Apply or Discard the desired Lighting setting when the system has been turned on . Plesae check lighting device conncetion. 1. Vary the effect speed to suit your preference, then sit back and enjoy. ... nine effects (optional), including breathing, shifting, and more with Basic Sync mode. Select the desired Color when the system has been turned on Basic mode. Acer X35 only support Static, Breathing and Spectrum on . All enabled devices are automatically set up in Basic Sync mode. RGB Light Sense -
User Manual RGB Light Sense
Page 4
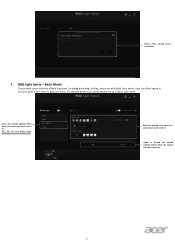
RGB Light Sense - Configure Screen Sync Setting 4 With multiple music genres to your favorite tunes as you a natural, organic flow of your eyes and ears with supported devices only and Windows® ... with Music Sync mode. Screen Mode With Screen Sync mode*, the lighting will mimic the colors that appear on . 3. Apply or Discard the desired Lighting setting when the system has been turned on your display and slowly spread to choose from, you can enjoy your peripherals, giving you work or play...
RGB Light Sense - Configure Screen Sync Setting 4 With multiple music genres to your favorite tunes as you a natural, organic flow of your eyes and ears with supported devices only and Windows® ... with Music Sync mode. Screen Mode With Screen Sync mode*, the lighting will mimic the colors that appear on . 3. Apply or Discard the desired Lighting setting when the system has been turned on your display and slowly spread to choose from, you can enjoy your peripherals, giving you work or play...
User Manual RGB Light Sense
Page 5
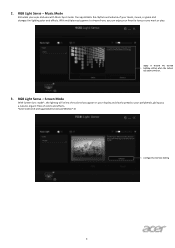
... League of your liking. LOL, it to your champion's skills with RGB Light Sense - LOL from OverWolf App Store. 5 Utilize the pre-set profiles or fine-tune them to Install RGB Light Sense - Please click it will be show "Install Now". Game Mode Dramatically change how you do...works with supported devices only. Select the desired Screen Profile when the system has been turned on target device (optional) Configure Screen Sync Setting Apply the desired Screen setting Click Demo key to their abilities. RGB Light Sense - See your device 4. Customize the LED numbers on .
... League of your liking. LOL, it to your champion's skills with RGB Light Sense - LOL from OverWolf App Store. 5 Utilize the pre-set profiles or fine-tune them to Install RGB Light Sense - Please click it will be show "Install Now". Game Mode Dramatically change how you do...works with supported devices only. Select the desired Screen Profile when the system has been turned on target device (optional) Configure Screen Sync Setting Apply the desired Screen setting Click Demo key to their abilities. RGB Light Sense - See your device 4. Customize the LED numbers on .

User Manual RGB Light Sense
Page 6
Please click it will be show "Lunch Now". LOL, it to confirm your lighting setting 6 LOL. LoL Control Champion Ability (Q/W/E/R) Light Effects/ Color/ Speed/ Duration/ Brightness Click Result key to lunch RGB Light Sense - LoL Choose Champion Color Under RGB Light Sense- Under RGB Light Sense- LoL Choose Champion which you use Under RGB Light Sense- After install RGB Light Sense -
Please click it will be show "Lunch Now". LOL, it to confirm your lighting setting 6 LOL. LoL Control Champion Ability (Q/W/E/R) Light Effects/ Color/ Speed/ Duration/ Brightness Click Result key to lunch RGB Light Sense - LoL Choose Champion Color Under RGB Light Sense- Under RGB Light Sense- LoL Choose Champion which you use Under RGB Light Sense- After install RGB Light Sense -
User Manual
Page 4
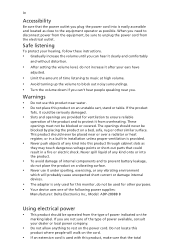
... the volume to block out noisy surroundings. • Turn the volume down if you can hear it clearly and comfortably and without distortion. • After setting the volume level, do not place the product on a vibrating surface. • Never use this product near you. Never spill liquid of any kind onto...
... the volume to block out noisy surroundings. • Turn the volume down if you can hear it clearly and comfortably and without distortion. • After setting the volume level, do not place the product on a vibrating surface. • Never use this product near you. Never spill liquid of any kind onto...
User Manual
Page 5
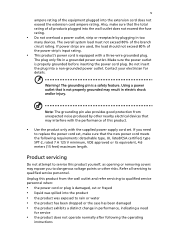
...service personnel when: • the power cord or plug is damaged, cut or frayed • liquid was exposed to replace the power cord set . Contact your electrician for service • the product does not operate normally after following requirements: detachable type, UL listed/CSA certified, type... of the equipment plugged into a non-grounded power outlet. Using a power outlet that is equipped with the supplied power supply cord set , make sure that the new power cord meets the following the operating instructions Refer all products plugged into the product • the...
...service personnel when: • the power cord or plug is damaged, cut or frayed • liquid was exposed to replace the power cord set . Contact your electrician for service • the product does not operate normally after following requirements: detachable type, UL listed/CSA certified, type... of the equipment plugged into a non-grounded power outlet. Using a power outlet that is equipped with the supplied power supply cord set , make sure that the new power cord meets the following the operating instructions Refer all products plugged into the product • the...
User Manual
Page 15
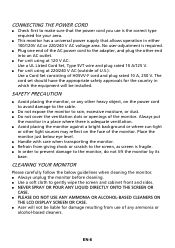
... ON THE LCD DISPLAY SCREEN OR CASE. Acer will be liable for the country in either 100/120V AC or 220/240 V AC voltage area. The cord set should have the appropriate safety approvals for damage resulting from... into an AC outlet. For unit using at 120 V AC: Use a UL Listed Cord Set, Type SVT wire and plug rated 10 A/125 V. For unit using at 220/240 V AC (outside of U.S.): ...Use a Cord Set consisting of H05VV-F cord and plug rated 10 A, 250 V. CONNECTING THE POWER CORD Check first to...
... ON THE LCD DISPLAY SCREEN OR CASE. Acer will be liable for the country in either 100/120V AC or 220/240 V AC voltage area. The cord set should have the appropriate safety approvals for damage resulting from... into an AC outlet. For unit using at 120 V AC: Use a UL Listed Cord Set, Type SVT wire and plug rated 10 A/125 V. For unit using at 220/240 V AC (outside of U.S.): ...Use a Cord Set consisting of H05VV-F cord and plug rated 10 A, 250 V. CONNECTING THE POWER CORD Check first to...

User Manual
Page 21
... (on or off From any function page, press to adjust the picture quality, OSD position and general settings. For advanced settings, please refer to use (please see the OSD section for adjusting the settings of your preferred functions. 1. Mode 2. Input 4. Actual product specifications may vary. Press the MENU key...following content is for buttons 1 and 2 are Mode and Brightness. Brightness 3. EN-12 You can use the Hot Key Assignment function to set these buttons to your LCD Monitor. Menu Turn Modes on -screen display) can use the OSD to open the OSD. Adjusting the OSD...
... (on or off From any function page, press to adjust the picture quality, OSD position and general settings. For advanced settings, please refer to use (please see the OSD section for adjusting the settings of your preferred functions. 1. Mode 2. Input 4. Actual product specifications may vary. Press the MENU key...following content is for buttons 1 and 2 are Mode and Brightness. Brightness 3. EN-12 You can use the Hot Key Assignment function to set these buttons to your LCD Monitor. Menu Turn Modes on -screen display) can use the OSD to open the OSD. Adjusting the OSD...
User Manual
Page 22
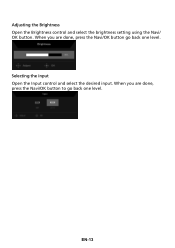
EN-13 When you are done, press the Navi/OK button to go back one level. Selecting the input Open the Input control and select the desired input. Adjusting the Brightness Open the Brightness control and select the brightness setting using the Navi/ OK button. When you are done, press the Navi/OK button go back one level.
EN-13 When you are done, press the Navi/OK button to go back one level. Selecting the input Open the Input control and select the desired input. Adjusting the Brightness Open the Brightness control and select the brightness setting using the Navi/ OK button. When you are done, press the Navi/OK button go back one level.
User Manual
Page 23
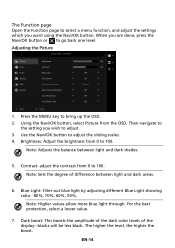
Using the Navi/OK button, select Picture from 0 to 100. Use the Navi/OK button to bring up the OSD. 2. Note: Sets the degree of the display- blacks will be less black. Press the MENU key to adjust the sliding scales. 4. Brightness: Adjust the brightness from 0 to .... 5. When you are done, press the Navi/OK button or to adjust. 3. For the best protection, select a lower value. 7. EN-14 Then navigate to the setting you want using the Navi/OK button. The higher the level, the higher the boost. The Function page Open the Function page to select a menu...
Using the Navi/OK button, select Picture from 0 to 100. Use the Navi/OK button to bring up the OSD. 2. Note: Sets the degree of the display- blacks will be less black. Press the MENU key to adjust the sliding scales. 4. Brightness: Adjust the brightness from 0 to .... 5. When you are done, press the Navi/OK button or to adjust. 3. For the best protection, select a lower value. 7. EN-14 Then navigate to the setting you want using the Navi/OK button. The higher the level, the higher the boost. The Function page Open the Function page to select a menu...
User Manual
Page 24
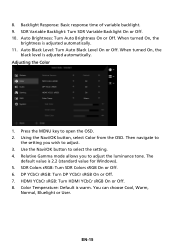
.... 3. When turned On, the brightness is adjusted automatically. Auto Brightness: Turn Auto Brightness On or Off. Adjusting the Color 1. Then navigate to the setting you to select the setting. 4. Relative Gamma mode allows you wish to open the OSD. 2. DP YCbCr sRGB: Turn DP YCbCr sRGB On or Off. 7. When turned On...
.... 3. When turned On, the brightness is adjusted automatically. Auto Brightness: Turn Auto Brightness On or Off. Adjusting the Color 1. Then navigate to the setting you to select the setting. 4. Relative Gamma mode allows you wish to open the OSD. 2. DP YCbCr sRGB: Turn DP YCbCr sRGB On or Off. 7. When turned On...

User Manual
Page 25
Volume: Adjusts the volume. Press the MENU key to adjust. 3. EN-16 Then navigate to the setting you wish to open the OSD. 2. Adjusting the Audio 1. Use the Navi/OK button to adjust any sliding scales. 4. Using the Navi/OK button, select Audio from the OSD.
Volume: Adjusts the volume. Press the MENU key to adjust. 3. EN-16 Then navigate to the setting you wish to open the OSD. 2. Adjusting the Audio 1. Use the Navi/OK button to adjust any sliding scales. 4. Using the Navi/OK button, select Audio from the OSD.

User Manual
Page 26
... the OSD. If nothing is displayed, disconnect the DisplayPort™ cable and use the monitor's on the screen for shooting games. Then navigate to the setting you to adjust. 3. EN-17 Use the Navi/OK button to select a default refresh rate. Aim point: Show an Aim point on -screen display to... Gaming from the total configuration of the system connected to open the OSD. 2. IMPORTANT: Overclocking may be overclocked to a higher refresh rate than advertised by setting a lower refresh rate. 6.
... the OSD. If nothing is displayed, disconnect the DisplayPort™ cable and use the monitor's on the screen for shooting games. Then navigate to the setting you to adjust. 3. EN-17 Use the Navi/OK button to select a default refresh rate. Aim point: Show an Aim point on -screen display to... Gaming from the total configuration of the system connected to open the OSD. 2. IMPORTANT: Overclocking may be overclocked to a higher refresh rate than advertised by setting a lower refresh rate. 6.

User Manual
Page 27
Then navigate to the setting you wish to adjust any sliding scales. 4. Transparency: Select the transparency when using gaming mode. If the OSD Lock message remains, please check whether the ...%, or 80%. 7. Refresh rate num: Display the panel's current refresh rate on the screen. 8. Use the Navi/OK button to adjust. 3. Adjusting the OSD 1. Language: Set the OSD menu language. 5. Press the MENU key to prevent OSD button from the OSD.
Then navigate to the setting you wish to adjust any sliding scales. 4. Transparency: Select the transparency when using gaming mode. If the OSD Lock message remains, please check whether the ...%, or 80%. 7. Refresh rate num: Display the panel's current refresh rate on the screen. 8. Use the Navi/OK button to adjust. 3. Adjusting the OSD 1. Language: Set the OSD menu language. 5. Press the MENU key to prevent OSD button from the OSD.

User Manual
Page 28
... source. 5. Input: Select the source from the OSD. Power-off the monitor DC power. Use the Navi/OK button to adjust. 3. Then navigate to the setting you are Aspect and 1:1. 8. Hot Key Assignment: Select the function of time, or if the user turns off USB charge: Turn On or Off. Note... key to open the OSD. 2. Quick Start Mode: Enable monitor rapidly. 10. Wide Mode: You can select which screen aspect you wish to select the setting. 4. Adjusting the System 1.
... source. 5. Input: Select the source from the OSD. Power-off the monitor DC power. Use the Navi/OK button to adjust. 3. Then navigate to the setting you are Aspect and 1:1. 8. Hot Key Assignment: Select the function of time, or if the user turns off USB charge: Turn On or Off. Note... key to open the OSD. 2. Quick Start Mode: Enable monitor rapidly. 10. Wide Mode: You can select which screen aspect you wish to select the setting. 4. Adjusting the System 1.

User Manual
Page 29
Product information 1. Reset All Settings: Reset all settings to open the OSD. 2. From any function page, press the key to the factory defaults. EN-20
Product information 1. Reset All Settings: Reset all settings to open the OSD. 2. From any function page, press the key to the factory defaults. EN-20

User Manual
Page 31
... model) (Optional) No sound, or sound level is too low Remedy Using OSD, adjust brightness and contrast to maximum or reset to their default settings. Check the power switch. Check if AC power cord is properly connected to the monitor. Check if video signal cable is properly...
... model) (Optional) No sound, or sound level is too low Remedy Using OSD, adjust brightness and contrast to maximum or reset to their default settings. Check the power switch. Check if AC power cord is properly connected to the monitor. Check if video signal cable is properly...


