
X203W LCD Monitor User's Guide
Page 1
... the problem. Ensure that the video connector is on and functioning properly. Power-ON Monitor and Computer Power-ON the monitor first, then power-ON the computer. The monitor's power indicator is properly connected to perform this monitor LCD Monitor Quick Setup Guide monitor and connect the other 5. The screen can use it near an easily accessible...
... the problem. Ensure that the video connector is on and functioning properly. Power-ON Monitor and Computer Power-ON the monitor first, then power-ON the computer. The monitor's power indicator is properly connected to perform this monitor LCD Monitor Quick Setup Guide monitor and connect the other 5. The screen can use it near an easily accessible...
X203W LCD Monitor User's Guide
Page 2
... user authority, which the receiver is connected. • Consult the dealer or an experienced radio/television technician for a Class B digital device pursuant to provide reason- LCD Monitor Quick Setup Guide
... user authority, which the receiver is connected. • Consult the dealer or an experienced radio/television technician for a Class B digital device pursuant to provide reason- LCD Monitor Quick Setup Guide

X203W LCD Monitor User's Guide
Page 3
FOR LAMP SPECIFIC DISPOSAL INFORMATION CHECK WWW.LAMPRECYCLE.ORG. Visit http://global.acer.com/about where you purchased the product. For more information about /sustainability.htm Disposal of Waste Equipment by Users in Private Household in a manner that... where you can drop off your other household waste. mandates that this product. To view the JIS C 0950 material declaration for sale after July 1, 2006. LCD Monitor Quick Setup Guide The separate collection and recycling of electronic products offered for this product must not be disposed of with your waste equipment for...
FOR LAMP SPECIFIC DISPOSAL INFORMATION CHECK WWW.LAMPRECYCLE.ORG. Visit http://global.acer.com/about where you purchased the product. For more information about /sustainability.htm Disposal of Waste Equipment by Users in Private Household in a manner that... where you can drop off your other household waste. mandates that this product. To view the JIS C 0950 material declaration for sale after July 1, 2006. LCD Monitor Quick Setup Guide The separate collection and recycling of electronic products offered for this product must not be disposed of with your waste equipment for...

X203W LCD Monitor User's Guide
Page 5
... (only Dual input model) DDCCI On/Off Display information Reset Exit * All specifications are subject to 85% Dimensions 481.5(W) x 375(H) x 177.4(D)mm Weight (N. Regulatory Compliance LCD Monitor Quick Setup Guide English SPECIFICATION X203W Environmental Considerations Operating Temp: 50 to 350C Storage Temp.: -200 to 600C Operating Humidity: 10% to change without notice.
... (only Dual input model) DDCCI On/Off Display information Reset Exit * All specifications are subject to 85% Dimensions 481.5(W) x 375(H) x 177.4(D)mm Weight (N. Regulatory Compliance LCD Monitor Quick Setup Guide English SPECIFICATION X203W Environmental Considerations Operating Temp: 50 to 350C Storage Temp.: -200 to 600C Operating Humidity: 10% to change without notice.
X203W LCD Monitor User's Guide
Page 6
TABLE OF CONTENTS Special notes on LCD monitors 1 Information for your safety and comfort 2 Unpacking 5 Attaching/Removing the base 6 Screen position adjustment 6 Connecting the power cord 7 Safety precaution 7 Cleaning your monitor 7 Power saving 8 DDC 8 Connector Pin Assignment 9 Standard Timing Table 11 Installation 12 User controls 13 How to adjust a setting 14 Troubleshooting 19
TABLE OF CONTENTS Special notes on LCD monitors 1 Information for your safety and comfort 2 Unpacking 5 Attaching/Removing the base 6 Screen position adjustment 6 Connecting the power cord 7 Safety precaution 7 Cleaning your monitor 7 Power saving 8 DDC 8 Connector Pin Assignment 9 Standard Timing Table 11 Installation 12 User controls 13 How to adjust a setting 14 Troubleshooting 19
X203W LCD Monitor User's Guide
Page 7
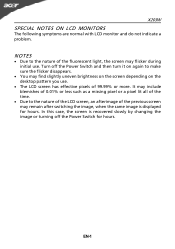
...or a pixel lit all of the time. · Due to the nature of the LCD screen, an afterimage of 99.99% or more. X203W SPECIAL NOTES ON LCD MONITORS The following symptoms are normal with LCD monitor and do not indicate a problem. It may find slightly uneven brightness on the screen depending... on again to the nature of the fluorescent light, the screen may flicker during initial use . · The LCD screen has effective ...
...or a pixel lit all of the time. · Due to the nature of the LCD screen, an afterimage of 99.99% or more. X203W SPECIAL NOTES ON LCD MONITORS The following symptoms are normal with LCD monitor and do not indicate a problem. It may find slightly uneven brightness on the screen depending... on again to the nature of the fluorescent light, the screen may flicker during initial use . · The LCD screen has effective ...
X203W LCD Monitor User's Guide
Page 9
... use. Nevertheless, some pixels may occasionally misfire or appear as opening or removing covers may appear in front of the monitor, using a footrest, or raising your leg muscles EN-3 LCD Pixel Statement The LCD unit is damaged, cut or frayed • liquid was spilled into the product • the product was exposed to...
... use. Nevertheless, some pixels may occasionally misfire or appear as opening or removing covers may appear in front of the monitor, using a footrest, or raising your leg muscles EN-3 LCD Pixel Statement The LCD unit is damaged, cut or frayed • liquid was spilled into the product • the product was exposed to...
X203W LCD Monitor User's Guide
Page 10
...8226; placing your display in recycling, please visit the following websites: Worldwide: http://global.acer.com/about/sustainability.htm EN-4 If this is unavoidable, work habits to keep your eyes from the monitor and focusing on how to relax your neck and shoulders • avoid tensing your muscles...shrugging your shoulders • install the external display, keyboard and mouse properly and within comfort able reach • if you view your monitor more information and help in such a way that the side faces the window or any light source • minimizing room light by ...
...8226; placing your display in recycling, please visit the following websites: Worldwide: http://global.acer.com/about/sustainability.htm EN-4 If this is unavoidable, work habits to keep your eyes from the monitor and focusing on how to relax your neck and shoulders • avoid tensing your muscles...shrugging your shoulders • install the external display, keyboard and mouse properly and within comfort able reach • if you view your monitor more information and help in such a way that the side faces the window or any light source • minimizing room light by ...

X203W LCD Monitor User's Guide
Page 11
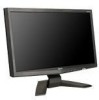
X203W UNPACKING Please check the following items are present when you unpack the box, and save the packing materials in case you will need to ship or transport the monitor in future. · LCD Monitor · D-Sub Cable · DVI Cable · AC Power Cord (Only Dual-Input Model) · User Manual · Quick Start Guide EN-5
X203W UNPACKING Please check the following items are present when you unpack the box, and save the packing materials in case you will need to ship or transport the monitor in future. · LCD Monitor · D-Sub Cable · DVI Cable · AC Power Cord (Only Dual-Input Model) · User Manual · Quick Start Guide EN-5

X203W LCD Monitor User's Guide
Page 12
Remove: Depress the release button as indicated by using both of your hands to hold the edges of the monitor as shown in the figure below . The monitor can be adjusted to 15 degrees up or 5 degrees down as indicated first before removing the base and follow the arrow direction to optimize the... position, you can adjust the tilt of the base. EN-6 X203W Attaching / Removing the Base Install: Align the release button on the bottom of the monitor with the corresponding slots on the bottom of the monitor by arrow below . SCREEN POSITION ADJUSTMENT In oder to remove it.
Remove: Depress the release button as indicated by using both of your hands to hold the edges of the monitor as shown in the figure below . The monitor can be adjusted to 15 degrees up or 5 degrees down as indicated first before removing the base and follow the arrow direction to optimize the... position, you can adjust the tilt of the base. EN-6 X203W Attaching / Removing the Base Install: Align the release button on the bottom of the monitor with the corresponding slots on the bottom of the monitor by arrow below . SCREEN POSITION ADJUSTMENT In oder to remove it.
X203W LCD Monitor User's Guide
Page 13
... a soft cloth to wipe the screen and cabinet front and sides. The cord set should have the appropriate safety approvals for your area. · This monitor has a universal power supply that the power cord you use is required. · Plug one end of the power cord to the AC Inlet, plug...; Check first to make sure that allows operation in either 100/120V AC or 220/240 V AC voltage area. SAFETY PRECAUTION · Avoid placing the monitor, or any other light sources may reflect on the power cord to avoid damage to the cable. · Do not expose the...
... a soft cloth to wipe the screen and cabinet front and sides. The cord set should have the appropriate safety approvals for your area. · This monitor has a universal power supply that the power cord you use is required. · Plug one end of the power cord to the AC Inlet, plug...; Check first to make sure that allows operation in either 100/120V AC or 220/240 V AC voltage area. SAFETY PRECAUTION · Avoid placing the monitor, or any other light sources may reflect on the power cord to avoid damage to the cable. · Do not expose the...
X203W LCD Monitor User's Guide
Page 14
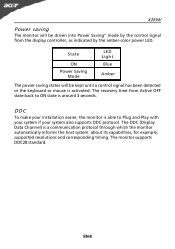
DDC To make your installation easier, the monitor is able to ON state is around 3 seconds. The monitor supports DDC2B standard. X203W Power saving The monitor will be driven into Power Saving" mode by the control signal from Active OFF state back to Plug and Play with your system if your ... Amber The power saving states will be kept until a control signal has been detected or the keyboard or mouse is a communication protocol through which the monitor automatically informs the host system about its capabilities, for example, supported resolutions and corresponding timing.
DDC To make your installation easier, the monitor is able to ON state is around 3 seconds. The monitor supports DDC2B standard. X203W Power saving The monitor will be driven into Power Saving" mode by the control signal from Active OFF state back to Plug and Play with your system if your ... Amber The power saving states will be kept until a control signal has been detected or the keyboard or mouse is a communication protocol through which the monitor automatically informs the host system about its capabilities, for example, supported resolutions and corresponding timing.

X203W LCD Monitor User's Guide
Page 15
DESCRIPTION Red Green Blue Monitor Ground DDC-return R-Ground G-Ground B-Ground PIN NO. 9. 10. 11. 12. 13. 14. 15. DESCRIPTION +5V Logic Ground Monitor Ground DDC-Serial Data H-Sync V-Sync DDC-Serial Clock EN-9 CONNECTOR PIN ASSIGNMENT X203W 15-Pin Color Display Signal Cable PIN NO. 1. 2. 3. 4. 5. 6. 7. 8.
DESCRIPTION Red Green Blue Monitor Ground DDC-return R-Ground G-Ground B-Ground PIN NO. 9. 10. 11. 12. 13. 14. 15. DESCRIPTION +5V Logic Ground Monitor Ground DDC-Serial Data H-Sync V-Sync DDC-Serial Clock EN-9 CONNECTOR PIN ASSIGNMENT X203W 15-Pin Color Display Signal Cable PIN NO. 1. 2. 3. 4. 5. 6. 7. 8.

X203W LCD Monitor User's Guide
Page 17
... 75 Hz 1680 x 1050 60 Hz EN-11 For optimum adjustment, the user is suggested to store as given in the table below. The monitor is capable of the mode is matched, the user can store their preferred modes in the floppy disk provided. X203W Standard Timing Table To reduce... the need for adjustment for different modes, the monitor has default setting modes that are most commonly used as a user mode is the new display information must have 1 KHz difference for horizontal frequency...
... 75 Hz 1680 x 1050 60 Hz EN-11 For optimum adjustment, the user is suggested to store as given in the table below. The monitor is capable of the mode is matched, the user can store their preferred modes in the floppy disk provided. X203W Standard Timing Table To reduce... the need for adjustment for different modes, the monitor has default setting modes that are most commonly used as a user mode is the new display information must have 1 KHz difference for horizontal frequency...

X203W LCD Monitor User's Guide
Page 18
...the 24-pin DVI cable to the back of the monitor and connect the other end to the computer. 1-2 Digital Cable (Only Dual-Input Model) a. Make sure both the monitor and computer are powered-OFF. X203W INSTALLATION To install the monitor to a properly grounded AC outlet. 3. b. Connect... power cord Connect the power cord to the monitor, then to your host system, please follow the steps as given ...
...the 24-pin DVI cable to the back of the monitor and connect the other end to the computer. 1-2 Digital Cable (Only Dual-Input Model) a. Make sure both the monitor and computer are powered-OFF. X203W INSTALLATION To install the monitor to a properly grounded AC outlet. 3. b. Connect... power cord Connect the power cord to the monitor, then to your host system, please follow the steps as given ...

X203W LCD Monitor User's Guide
Page 25
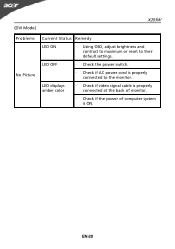
...specification of the image before changing or disconnecting the signal cable or powering OFF the monitor. Display is ON. Abnormal Picture shift, or too small or too large in ...Remedy LED ON · Using OSD, adjust brightness and contrast to maximum or reset to the monitor. No Picture · Check if AC power cord is properly connected to their default settings. .... LED displays amber color · Check if video signal cable is properly connected at the back of monitor. · Check if the power of computer system is · Using OSD, adjust RESOLUTION, CLOCK,...
...specification of the image before changing or disconnecting the signal cable or powering OFF the monitor. Display is ON. Abnormal Picture shift, or too small or too large in ...Remedy LED ON · Using OSD, adjust brightness and contrast to maximum or reset to the monitor. No Picture · Check if AC power cord is properly connected to their default settings. .... LED displays amber color · Check if video signal cable is properly connected at the back of monitor. · Check if the power of computer system is · Using OSD, adjust RESOLUTION, CLOCK,...
X203W LCD Monitor User's Guide
Page 26
(DVI Mode) X203W Problems No Picture Current Status Remedy LED ON · Using OSD, adjust brightness and contrast to maximum or reset to the monitor. LED displays amber color · Check if video signal cable is properly connected at the back of monitor. · Check if the power of computer system is properly connected to their default settings. LED OFF · Check the power switch. · Check if AC power cord is ON. EN-20
(DVI Mode) X203W Problems No Picture Current Status Remedy LED ON · Using OSD, adjust brightness and contrast to maximum or reset to the monitor. LED displays amber color · Check if video signal cable is properly connected at the back of monitor. · Check if the power of computer system is properly connected to their default settings. LED OFF · Check the power switch. · Check if AC power cord is ON. EN-20
Acer X203H Service Guide
Page 5
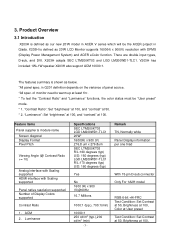
The features summary is defined as our new 20'W model in ACER V series which will be "User preset" mode. * 1. 3. V203H has included 1W+1W speaker.X203H also support ACM 10000:1. of monitor need to warm up at 100, ACM 2. X203H is defined as below, *All panel spec....functions, the color status must be the ACER project in Q201 definition depends on the variance of Display Colors supported Contrast Ratio 1. X203H adopts SEC LTM200KT03 and LGD LM200WD1-TLC1. in Qisda. Product Overview 3.1 Introduction X203H is shown as 20'W LCD Monitor supports 1600(H) x 900(V) resolution with...
The features summary is defined as our new 20'W model in ACER V series which will be "User preset" mode. * 1. 3. V203H has included 1W+1W speaker.X203H also support ACM 10000:1. of monitor need to warm up at 100, ACM 2. X203H is defined as below, *All panel spec....functions, the color status must be the ACER project in Q201 definition depends on the variance of Display Colors supported Contrast Ratio 1. X203H adopts SEC LTM200KT03 and LGD LM200WD1-TLC1. in Qisda. Product Overview 3.1 Introduction X203H is shown as 20'W LCD Monitor supports 1600(H) x 900(V) resolution with...

Acer X203H Service Guide
Page 6
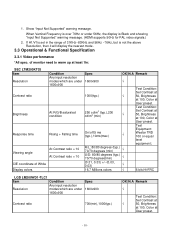
AC power input Yes DC power input (with AC power adapter) No DPMS supported Yes LED indicator for power status showed Yes OSD for control & information supported Yes Multi-language supported for OSD Yes Buttons control supported Yes Flywheel control supported No Scaling function supported Yes Auto adjustment function supported Yes DDC function supported (EDID ver. 1.3) Yes DDC-CI support version 1.1 or later Yes Audio speakers supported Yes Audio Jack (input connector) supported Yes Earphone Jack (Output connector) supported No Microphone function supported No...
AC power input Yes DC power input (with AC power adapter) No DPMS supported Yes LED indicator for power status showed Yes OSD for control & information supported Yes Multi-language supported for OSD Yes Buttons control supported Yes Flywheel control supported No Scaling function supported Yes Auto adjustment function supported Yes DDC function supported (EDID ver. 1.3) Yes DDC-CI support version 1.1 or later Yes Audio speakers supported Yes Audio Jack (input connector) supported Yes Earphone Jack (Output connector) supported No Microphone function supported No...
Acer X203H Service Guide
Page 10
of monitor need to warm up at User preset. Test Condition: Set Contrast at 50, Brightness at 100, Color at least 1hr. If Hf /Vf is set ...
of monitor need to warm up at User preset. Test Condition: Set Contrast at 50, Brightness at 100, Color at least 1hr. If Hf /Vf is set ...


