

Acer X203H Service Guide
Page 2
...34 5.2 Software / Firmware Upgrade Process 38 5.3 EDID Upgrade Procedure 42 5.4 OSD Operation Guide 46 6. About This Manual 3 1.1 Trademark ...3 2. Disassembly /Assembly 21 4.1 Exploded View 21 4.2 Disassembly /Assembly 23 5. Product Overview 5 3.1 Introduction ...5 3.2 Operational Specification 6 3.3 Operational & Functional Specification 10 3.4 LCD Characteristics 14 3.5 User Controls 16 3.6 Mechanical Characteristics 17 3.7 Pallet & Shipment 18 3.8 Certification ...19 3.9 Packing...20 4. Level 2 Circuit Board and Standard Parts Replacement 51 6.1 Trouble Shooting Guide 51...
...34 5.2 Software / Firmware Upgrade Process 38 5.3 EDID Upgrade Procedure 42 5.4 OSD Operation Guide 46 6. About This Manual 3 1.1 Trademark ...3 2. Disassembly /Assembly 21 4.1 Exploded View 21 4.2 Disassembly /Assembly 23 5. Product Overview 5 3.1 Introduction ...5 3.2 Operational Specification 6 3.3 Operational & Functional Specification 10 3.4 LCD Characteristics 14 3.5 User Controls 16 3.6 Mechanical Characteristics 17 3.7 Pallet & Shipment 18 3.8 Certification ...19 3.9 Packing...20 4. Level 2 Circuit Board and Standard Parts Replacement 51 6.1 Trouble Shooting Guide 51...

Acer X203H Service Guide
Page 4
... safety requirements. 2. The RoHS (Restriction of service: Level 1: Cosmetic / Appearance / Alignment Service Level 2: Circuit Board or Standard Parts Replacement Level 3: Component Repair to government requirements for servicing. 5. Refer to Circuit Boards - 4 - There are sensitive to the customer or make the product unsafe. 3. Ensure that it may cause a hazard to electrostatic discharge (ESD). Check that other persons are safe while you...
... safety requirements. 2. The RoHS (Restriction of service: Level 1: Cosmetic / Appearance / Alignment Service Level 2: Circuit Board or Standard Parts Replacement Level 3: Component Repair to government requirements for servicing. 5. Refer to Circuit Boards - 4 - There are sensitive to the customer or make the product unsafe. 3. Ensure that it may cause a hazard to electrostatic discharge (ESD). Check that other persons are safe while you...
Acer X203H Service Guide
Page 5
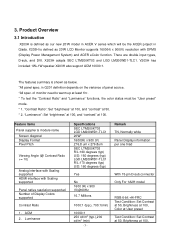
...items Panel supplier & module name Screen diagonal Display Format Pixel Pitch Viewing Angle (@ Contrast Ratio >= 10) Analog interface with Scaling supported HDMI interface with DPMS (Display Power Management System) and ACER eColor function. "Luminance": Set "brightness" at 100, and "contrast" at least 1hr. * To test the "Contrast Ratio" and "Luminance" functions, the color status must be "User preset" mode. * 1. X203H is shown as 20'W LCD Monitor supports 1600(H) x 900(V) resolution with Scaling supported Panel native resolution supported Number of Display Colors supported Contrast Ratio...
...items Panel supplier & module name Screen diagonal Display Format Pixel Pitch Viewing Angle (@ Contrast Ratio >= 10) Analog interface with Scaling supported HDMI interface with DPMS (Display Power Management System) and ACER eColor function. "Luminance": Set "brightness" at 100, and "contrast" at least 1hr. * To test the "Contrast Ratio" and "Luminance" functions, the color status must be "User preset" mode. * 1. X203H is shown as 20'W LCD Monitor supports 1600(H) x 900(V) resolution with Scaling supported Panel native resolution supported Number of Display Colors supported Contrast Ratio...

Acer X203H Service Guide
Page 6
...-language supported for OSD Yes Buttons control supported Yes Flywheel control supported No Scaling function supported Yes Auto adjustment function supported Yes DDC function supported (EDID ver. 1.3) Yes DDC-CI support version 1.1 or later Yes Audio speakers supported Yes Audio Jack (input connector) supported Yes Earphone Jack (Output connector) supported No Microphone function supported No Mechanical Tilt base design Yes VESA wall mounting design Yes Mechanical Rotate design No Mechanical Lift base design No Kensington compatible lock design Yes Color at User...
...-language supported for OSD Yes Buttons control supported Yes Flywheel control supported No Scaling function supported Yes Auto adjustment function supported Yes DDC function supported (EDID ver. 1.3) Yes DDC-CI support version 1.1 or later Yes Audio speakers supported Yes Audio Jack (input connector) supported Yes Earphone Jack (Output connector) supported No Microphone function supported No Mechanical Tilt base design Yes VESA wall mounting design Yes Mechanical Rotate design No Mechanical Lift base design No Kensington compatible lock design Yes Color at User...
Acer X203H Service Guide
Page 10
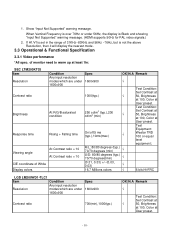
When Vertical Frequency is over 76Hz or under 56Hz, the display is not the above Resolution, then it will display the nearest mode. 3.3 Operational & Functional Specification 3.3.1 Video performance *All spec. If Hf /Vf is set in the range of monitor need to warm up at User preset. SEC LTM200KT03 Item Resolution Contrast ratio Brightness Response time Viewing angle CIE coordinate of White Display colors Condition Any input resolution modes which are under 1600x900 Spec 1600x900 Contrast ratio...
When Vertical Frequency is over 76Hz or under 56Hz, the display is not the above Resolution, then it will display the nearest mode. 3.3 Operational & Functional Specification 3.3.1 Video performance *All spec. If Hf /Vf is set in the range of monitor need to warm up at User preset. SEC LTM200KT03 Item Resolution Contrast ratio Brightness Response time Viewing angle CIE coordinate of White Display colors Condition Any input resolution modes which are under 1600x900 Spec 1600x900 Contrast ratio...
Acer X203H Service Guide
Page 13
... lifetime of CCFL is on the condition at 7.0mA lamp current. 3.3.9 Audio performance Item Condition Preamp + Power amp (1)Output power (2)THD (@ 1W) (3)S/N ratio Speaker Driver (1)Nominal impedance (2)Rated input power (3)Frequency response (4)Output sound pressure level (5)Dimension of lamp is determined as the time at which brightness of box Audio Control (1)Volume range (2)Mute Spec OK N.A Remark 1 Wrms/CH @ 1KHz √ 40dB √ 8 ohm √ 1 W/CH...
... lifetime of CCFL is on the condition at 7.0mA lamp current. 3.3.9 Audio performance Item Condition Preamp + Power amp (1)Output power (2)THD (@ 1W) (3)S/N ratio Speaker Driver (1)Nominal impedance (2)Rated input power (3)Frequency response (4)Output sound pressure level (5)Dimension of lamp is determined as the time at which brightness of box Audio Control (1)Volume range (2)Mute Spec OK N.A Remark 1 Wrms/CH @ 1KHz √ 40dB √ 8 ohm √ 1 W/CH...

Acer X203H Service Guide
Page 16
... User's hardware control definition Item Condition Power button Auto button(Exit button) Right/Inc. button Menu button Mode button Input Select button E-Key button Mute button Spec OK N.A Remark 3.5.2 OSD control function definition Item Condition Auto Adjust Brightness Contrast Horizontal Position Vertical Position Clock Foucs Color OSD Position OSD Time out OSD Lock Language Recall Input Select Sharpness Display Information Volume Mute Hot key for Auto Hot key for Contrast Hot key for Volume Hot key for Input Select Hot key for Mode Wide mode ACM DDC-CI Spec...
... User's hardware control definition Item Condition Power button Auto button(Exit button) Right/Inc. button Menu button Mode button Input Select button E-Key button Mute button Spec OK N.A Remark 3.5.2 OSD control function definition Item Condition Auto Adjust Brightness Contrast Horizontal Position Vertical Position Clock Foucs Color OSD Position OSD Time out OSD Lock Language Recall Input Select Sharpness Display Information Volume Mute Hot key for Auto Hot key for Contrast Hot key for Volume Hot key for Input Select Hot key for Mode Wide mode ACM DDC-CI Spec...

Acer X203H Service Guide
Page 34
... factory setting area (press "Empowering" and then press "SOFTPOWER"). 2. Turn on again. 5.Setup unit and keep it warm up at the same time to enable burn-in mode. 4.Power off the monitor power. 3. Timing adjustment: 1. 5. Check the settings to following values: Contrast = 50 Brightness = 85 Color = Warm Language = English Then, turn on monitor). 3.Move cursor into "Burn-in Mode" tag and select "On" to turn off the monitor, remove the input source and then power on power...
... factory setting area (press "Empowering" and then press "SOFTPOWER"). 2. Turn on again. 5.Setup unit and keep it warm up at the same time to enable burn-in mode. 4.Power off the monitor power. 3. Timing adjustment: 1. 5. Check the settings to following values: Contrast = 50 Brightness = 85 Color = Warm Language = English Then, turn on monitor). 3.Move cursor into "Burn-in Mode" tag and select "On" to turn off the monitor, remove the input source and then power on power...
Acer X203H Service Guide
Page 36
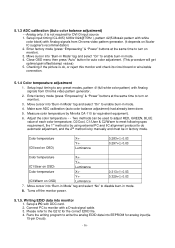
... OSD menu then press "Auto" button for DVI-D input source 1. Move cursor into monitor 1. Make sure ADC calibration (auto color balance adjustment) had already been done. 5. Connect PC to enable burn-in factory mode. 5.1.3 ADC calibration (Auto color balance adjustment) ~~Analog only, it depends on Scaler IC supplier's recommendation) 2. Measure color temperature by manually and must be in mode. 4. Setup a PC with Analog signals from Chroma video pattern generator. (it is not required for auto color adjustment. (This procedure will get optimal...
... OSD menu then press "Auto" button for DVI-D input source 1. Move cursor into monitor 1. Make sure ADC calibration (auto color balance adjustment) had already been done. 5. Connect PC to enable burn-in factory mode. 5.1.3 ADC calibration (Auto color balance adjustment) ~~Analog only, it depends on Scaler IC supplier's recommendation) 2. Measure color temperature by manually and must be in mode. 4. Setup a PC with Analog signals from Chroma video pattern generator. (it is not required for auto color adjustment. (This procedure will get optimal...
Acer X203H Service Guide
Page 57
... offers OSD menu for users to offer a smart power management and power saving function. It's have dual (D-SUB and DVI) interface LCD monitor with a 15 pins D-sub signal cable and 24 pin DVI signal cable which can manual controlled items. X203H also offer DDC/CI function to change input source, DDC/CI Enable and Auto Adjustment items well done just by pressing hot key, we called it "Input Select", "DDC/CI" and "Auto" which support...
... offers OSD menu for users to offer a smart power management and power saving function. It's have dual (D-SUB and DVI) interface LCD monitor with a 15 pins D-sub signal cable and 24 pin DVI signal cable which can manual controlled items. X203H also offer DDC/CI function to change input source, DDC/CI Enable and Auto Adjustment items well done just by pressing hot key, we called it "Input Select", "DDC/CI" and "Auto" which support...
Acer X203H Service Guide
Page 58
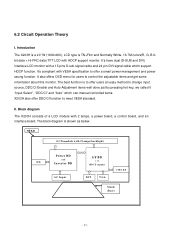
... output to LCD module. Detect timing is offering adjustable functions to LCD monitor specification. Those data related to end-user. Scaling IC is to convert analog signals of Red, Green and Blue to compress the digital RGB data, the Hsync, Vsync and pixel clock generated by "SDA" and "SCL" serial communication for I²C communication for detect change mode. The scaling IC has internal A/D converter, internal OSD, built in...
... output to LCD module. Detect timing is offering adjustable functions to LCD monitor specification. Those data related to end-user. Scaling IC is to convert analog signals of Red, Green and Blue to compress the digital RGB data, the Hsync, Vsync and pixel clock generated by "SDA" and "SCL" serial communication for I²C communication for detect change mode. The scaling IC has internal A/D converter, internal OSD, built in...

Acer X203H Service Guide
Page 59
... user's control which includes "Menu", "Right", "Left", "Auto", "Empowering", and "Power". Rectifier and filter Audio circuit LDO regulator Amber light means DPMS off power of monitor (7) LED: It indicates the DPMS status of expanding any source resolution to a highly uniform and sharp image or down scaling from 1980x1020, combined with the critically proven integrated 8 bit triple-ADC and patented Rapid-lock digital clock recovery system. green light...
... user's control which includes "Menu", "Right", "Left", "Auto", "Empowering", and "Power". Rectifier and filter Audio circuit LDO regulator Amber light means DPMS off power of monitor (7) LED: It indicates the DPMS status of expanding any source resolution to a highly uniform and sharp image or down scaling from 1980x1020, combined with the critically proven integrated 8 bit triple-ADC and patented Rapid-lock digital clock recovery system. green light...

User Manual
Page 8
.... ENERGY STAR and the ENERGY STAR mark are also at "sleep" mode. Long work periods, bad posture, poor work habits, stress, inadequate working in front of the monitor, using a footrest, or raising your leg muscles The following tips: • refrain from Sleep mode by adjusting the viewing angle of a computer. Finding your comfort zone Find your comfort zone by pushing the power button.
.... ENERGY STAR and the ENERGY STAR mark are also at "sleep" mode. Long work periods, bad posture, poor work habits, stress, inadequate working in front of the monitor, using a footrest, or raising your leg muscles The following tips: • refrain from Sleep mode by adjusting the viewing angle of a computer. Finding your comfort zone Find your comfort zone by pushing the power button.
User Manual
Page 13
... safety information vi IT equipment recycling information vi Disposal instructions vii LCD pixel statement vii Tips and information for comfortable use viii Federal Communications Commission Declaration of Conformity xi Unpacking 1 Attaching/removing the base 2 Screen position adjustment 2 Connecting the power cord 3 Power saving 3 Display Data Channel (DDC) 3 Connector pin assignment 4 Standard timing table 6 Installation 7 User controls 8 How to adjust a setting 9 Acer eColor Management 10 User 11 Troubleshooting 13 VGA mode 13 DVI mode 14
... safety information vi IT equipment recycling information vi Disposal instructions vii LCD pixel statement vii Tips and information for comfortable use viii Federal Communications Commission Declaration of Conformity xi Unpacking 1 Attaching/removing the base 2 Screen position adjustment 2 Connecting the power cord 3 Power saving 3 Display Data Channel (DDC) 3 Connector pin assignment 4 Standard timing table 6 Installation 7 User controls 8 How to adjust a setting 9 Acer eColor Management 10 User 11 Troubleshooting 13 VGA mode 13 DVI mode 14
User Manual
Page 17
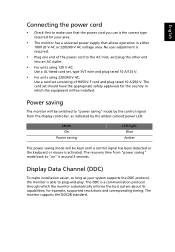
...) To make sure that allows operation in which the monitor automatically informs the host system about its capabilities; The cord set consisting of H05VV-F cord and plug rated 10 A/250 V. The recovery time from the display controller, as your area. • The monitor has a universal power supply that the power cord you use is activated. Power saving The monitor will be switched to "power saving" mode by the amber-colored power LED. No user-adjustment is around...
...) To make sure that allows operation in which the monitor automatically informs the host system about its capabilities; The cord set consisting of H05VV-F cord and plug rated 10 A/250 V. The recovery time from the display controller, as your area. • The monitor has a universal power supply that the power cord you use is activated. Power saving The monitor will be switched to "power saving" mode by the amber-colored power LED. No user-adjustment is around...
User Manual
Page 22
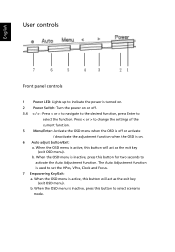
... the OSD menu is inactive, press this button for two seconds to activate the Auto Adjustment function. When the OSD menu is active, this button will act as the exit key (exit OSD menu). When the OSD menu is turned on. 2 Power Switch: Turn the power on . 6 Auto adjust button/Exit: a. English User controls 7 6 5 4 3 21 Front panel controls 1 Power LED: Lights up to indicate the power is inactive, press this button to select scenario mode. b. When the OSD menu is active, this button will...
... the OSD menu is inactive, press this button for two seconds to activate the Auto Adjustment function. When the OSD menu is active, this button will act as the exit key (exit OSD menu). When the OSD menu is turned on. 2 Power Switch: Turn the power on . 6 Auto adjust button/Exit: a. English User controls 7 6 5 4 3 21 Front panel controls 1 Power LED: Lights up to indicate the power is inactive, press this button to select scenario mode. b. When the OSD menu is active, this button will...
User Manual
Page 24
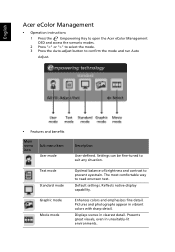
English Acer eColor Management • Operation instructions 1 Press the Empowering Key to open the Acer eColor Management OSD and access the scenario modes. 2 Press "" to select the mode. 3 Press the Auto-adjust button to read onscreen text. The most comfortable way to confirm the mode and run Auto Adjust. • Features and benefits Main menu icon Sub menu item User mode Text mode Standard mode Graphic mode Movie mode Description User-defined. Reflects native display capability...
English Acer eColor Management • Operation instructions 1 Press the Empowering Key to open the Acer eColor Management OSD and access the scenario modes. 2 Press "" to select the mode. 3 Press the Auto-adjust button to read onscreen text. The most comfortable way to confirm the mode and run Auto Adjust. • Features and benefits Main menu icon Sub menu item User mode Text mode Standard mode Graphic mode Movie mode Description User-defined. Reflects native display capability...
User Manual
Page 25
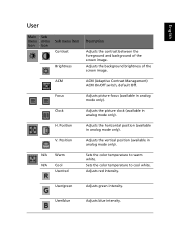
... (Adaptive Contrast Management) ACM On/Off switch, default Off. H. Position Adjusts the vertical position (available in analog mode only). English User Main Sub menu menu icon icon Sub menu item Contrast Brightness Description Adjusts the contrast between the foreground and background of the screen image. User/blue Adjusts blue intensity. V. N/A Warm N/A Cool User/red Sets the color temperature to cool white. Adjusts red intensity. Position Adjusts the horizontal position (available in analog mode only). Sets the color temperature to warm white. Focus Adjusts...
... (Adaptive Contrast Management) ACM On/Off switch, default Off. H. Position Adjusts the vertical position (available in analog mode only). English User Main Sub menu menu icon icon Sub menu item Contrast Brightness Description Adjusts the contrast between the foreground and background of the screen image. User/blue Adjusts blue intensity. V. N/A Warm N/A Cool User/red Sets the color temperature to cool white. Adjusts red intensity. Position Adjusts the horizontal position (available in analog mode only). Sets the color temperature to warm white. Focus Adjusts...
User Manual
Page 27
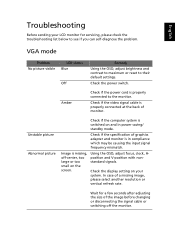
... if the video signal cable is in power saving/ standby mode. Using the OSD, adjust focus, clock, Hposition and V-position with nonstandard signals. Image is properly connected to their default settings. Amber Check if the power cord is missing, off the monitor. Check the display setting on your LCD monitor for a few seconds after adjusting the size of a missing image, please select another resolution or vertical refresh rate. VGA mode Problem No picture visible LED status Blue Off Remedy Using the OSD, adjust brightness and contrast to maximum or reset to the...
... if the video signal cable is in power saving/ standby mode. Using the OSD, adjust focus, clock, Hposition and V-position with nonstandard signals. Image is properly connected to their default settings. Amber Check if the power cord is missing, off the monitor. Check the display setting on your LCD monitor for a few seconds after adjusting the size of a missing image, please select another resolution or vertical refresh rate. VGA mode Problem No picture visible LED status Blue Off Remedy Using the OSD, adjust brightness and contrast to maximum or reset to the...
User Manual
Page 28
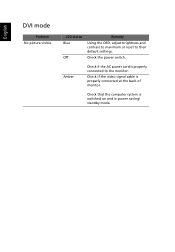
Amber Check if the AC power cord is properly connected to their default settings. Check that the computer system is properly connected at the back of monitor. Check if the video signal cable is switched on and in power saving/ standby mode. Check the power switch. English DVI mode Problem No picture visible LED status Blue Off Remedy Using the OSD, adjust brightness and contrast to maximum or reset to the monitor.
Amber Check if the AC power cord is properly connected to their default settings. Check that the computer system is properly connected at the back of monitor. Check if the video signal cable is switched on and in power saving/ standby mode. Check the power switch. English DVI mode Problem No picture visible LED status Blue Off Remedy Using the OSD, adjust brightness and contrast to maximum or reset to the monitor.


