

User Manual (3D)
Page 3
... cases, there is a power switch on one of the arms that you can view 3D content, you have connected your glasses for 24P contents. (1080P, 24Hz) Note: Suggest to use Acer DLP 3D glasses to enhance battery life, they turn them on . Note: Require DLP Link 3D glasses and support 96Hz, 100Hz, 120Hz sync signal. English 3 The Acer projector you have connected your projector to a computer, please...
... cases, there is a power switch on one of the arms that you can view 3D content, you have connected your glasses for 24P contents. (1080P, 24Hz) Note: Suggest to use Acer DLP 3D glasses to enhance battery life, they turn them on . Note: Require DLP Link 3D glasses and support 96Hz, 100Hz, 120Hz sync signal. English 3 The Acer projector you have connected your projector to a computer, please...

User Manual (3D)
Page 4
...: You may need to open the OSD. Select the 3D section (the sixth menu option) on the projector remote control to purchase additional software. 4 Ensure you are viewing Blu-ray 3D content over an HDMI 1.4a or later connection is not supported on your graphics card's documentation. 2 Download and install the latest drivers for the latest driver version. 3 You should also download a suitable 3D player...
...: You may need to open the OSD. Select the 3D section (the sixth menu option) on the projector remote control to purchase additional software. 4 Ensure you are viewing Blu-ray 3D content over an HDMI 1.4a or later connection is not supported on your graphics card's documentation. 2 Download and install the latest drivers for the latest driver version. 3 You should also download a suitable 3D player...
User Manual
Page 5
... your eyes. • Turn on . At least 50cm clearance from walls and free flow of air around the projector is necessary. • Locations where temperatures may become excessively high, such as inside of other controls may result in damage and will often require extensive work by the operating instructions, since improper adjustment of a car with all windows rolled up. • Locations where excessive humidity...
... your eyes. • Turn on . At least 50cm clearance from walls and free flow of air around the projector is necessary. • Locations where temperatures may become excessively high, such as inside of other controls may result in damage and will often require extensive work by the operating instructions, since improper adjustment of a car with all windows rolled up. • Locations where excessive humidity...
User Manual
Page 6
... operation as this could cause it to suitable qualified professional service personnel. • Do not stand the projector on rare occasions. • Never replace the lamp assembly or any object when the projector is showing warning message. • When changing the lamp, please allow unit to cool down, and follow all changing instructions. • Reset the "Lamp Hour Reset" function from the Onscreen display "Management" menu after replacing the lamp...
... operation as this could cause it to suitable qualified professional service personnel. • Do not stand the projector on rare occasions. • Never replace the lamp assembly or any object when the projector is showing warning message. • When changing the lamp, please allow unit to cool down, and follow all changing instructions. • Reset the "Lamp Hour Reset" function from the Onscreen display "Management" menu after replacing the lamp...
User Manual
Page 8
... warning messages. • Reset the "Lamp Hour Reset" function from AC outlet if the product is on. If this user's guide to maximize the life of your eyes. • To reduce the risk of fire or electric shock, do not expose this product to clean the display housing. • Disconnect the power plug from the Onscreen display "Management" menu after replacing the lamp module. • When switching...
... warning messages. • Reset the "Lamp Hour Reset" function from AC outlet if the product is on. If this user's guide to maximize the life of your eyes. • To reduce the risk of fire or electric shock, do not expose this product to clean the display housing. • Disconnect the power plug from the Onscreen display "Management" menu after replacing the lamp module. • When switching...

User Manual
Page 11
..., 1080i/p) supported • Lower power consumption and economy (ECO) mode extend lamp life • Acer EcoProjeciton Technology delivers Intelligent power management approach and physical efficiency improvement • Equipped with HDMI™ & MHL connection supporting HDCP • Smart detection delivers quick, intelligent source detection • Multi-language onscreen display (OSD) menus • Manual focus projection lens zooms up to 1.0x / 1.1x / 1.3x • 2x digital zoom • Microsoft® Windows®...
..., 1080i/p) supported • Lower power consumption and economy (ECO) mode extend lamp life • Acer EcoProjeciton Technology delivers Intelligent power management approach and physical efficiency improvement • Equipped with HDMI™ & MHL connection supporting HDCP • Smart detection delivers quick, intelligent source detection • Multi-language onscreen display (OSD) menus • Manual focus projection lens zooms up to 1.0x / 1.1x / 1.3x • 2x digital zoom • Microsoft® Windows®...
User Manual
Page 17
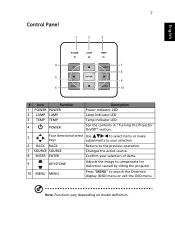
...: Functions vary depending on model definition. 7 Control Panel 1 2 3 English 4 7 8 5 9 6 10 # Icon Function 1 POWER POWER 2 LAMP LAMP 3 TEMP TEMP 4 POWER Description Power Indicator LED Lamp Indicator LED Temp Indicator LED See the contents in "Turning the Projector On/Off" section. 5 Four directional select Use to select items or make keys adjustments to your selection. 6 BACK BACK Returns to the previous operation. 7 SOURCE SOURCE Changes the active source. 8 ENTER ENTER Confirm your selection of items. 9 KEYSTONE Adjusts the image to compensate for distortion...
...: Functions vary depending on model definition. 7 Control Panel 1 2 3 English 4 7 8 5 9 6 10 # Icon Function 1 POWER POWER 2 LAMP LAMP 3 TEMP TEMP 4 POWER Description Power Indicator LED Lamp Indicator LED Temp Indicator LED See the contents in "Turning the Projector On/Off" section. 5 Four directional select Use to select items or make keys adjustments to your selection. 6 BACK BACK Returns to the previous operation. 7 SOURCE SOURCE Changes the active source. 8 ENTER ENTER Confirm your selection of items. 9 KEYSTONE Adjusts the image to compensate for distortion...
User Manual
Page 19
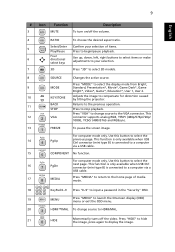
... Description 3 MUTE To turn on/off the video. Use this button to select 3D models. 8 SOURCE Changes the active source. Press "MODE" to select the display mode from Bright, 9 MODE Standard, Presentation*, Movie*, Game Dark*, Game Bright*, Video*, Game*, Education*, User 1, User 2. 10 KEYSTONE Adjusts the image to compensate for distortion caused by tilting the projector. 11 BACK STOP Returns to display the image. This 12 VGA connector supports analog RGB, YPbPr (480p...
... Description 3 MUTE To turn on/off the video. Use this button to select 3D models. 8 SOURCE Changes the active source. Press "MODE" to select the display mode from Bright, 9 MODE Standard, Presentation*, Movie*, Game Dark*, Game Bright*, Video*, Game*, Education*, User 1, User 2. 10 KEYSTONE Adjusts the image to compensate for distortion caused by tilting the projector. 11 BACK STOP Returns to display the image. This 12 VGA connector supports analog RGB, YPbPr (480p...

User Manual
Page 20
English 10 # Icon Function Description 22 ZOOM IN Zooms the projector display in. 23 VIDEO To change source to COMPOSITE VIDEO. 24 ZOOM OUT Zooms the projector display out. 25 LAN/WiFi No function. 26 Backlight Remote backlight. 27 Laser pointer Aim the remote at the viewing screen. 28 Laser button Aim the remote at the viewing screen, press and hold this button to activate the laser pointer. Note: Functions vary depending on model definition.
English 10 # Icon Function Description 22 ZOOM IN Zooms the projector display in. 23 VIDEO To change source to COMPOSITE VIDEO. 24 ZOOM OUT Zooms the projector display out. 25 LAN/WiFi No function. 26 Backlight Remote backlight. 27 Laser pointer Aim the remote at the viewing screen. 28 Laser button Aim the remote at the viewing screen, press and hold this button to activate the laser pointer. Note: Functions vary depending on model definition.
User Manual
Page 26
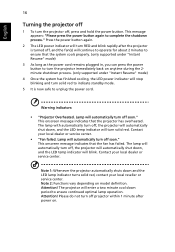
..., the LED power indicator will automatically turn solid red to indicate standby mode. 5 It is now safe to ensure that the projector has overheated. Note 2: Functions vary depending on . This onscreen message indicates that the fan has failed. Lamp will stop blinking and turn off , the projector will automatically shut down , and the LED temp indicator will continue to operate for about 2 minutes to unplug the power cord. This message appears: "Please press the power button again...
..., the LED power indicator will automatically turn solid red to indicate standby mode. 5 It is now safe to ensure that the projector has overheated. Note 2: Functions vary depending on . This onscreen message indicates that the fan has failed. Lamp will stop blinking and turn off , the projector will automatically shut down , and the LED temp indicator will continue to operate for about 2 minutes to unplug the power cord. This message appears: "Please press the power button again...
User Manual
Page 40
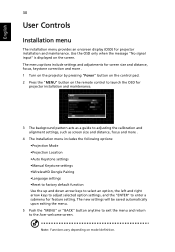
... the projector by pressing "Power" button on the control pad. 2 Press the "MENU" button on the remote control to launch the OSD for projector installation and maintenance. 3 The background pattern acts as a guide to adjusting the calibration and alignment settings, such as screen size and distance, focus and more . 4 The Installation menu includes the following options: •Projection Mode •Projection Location •Auto Keystone settings •Manual Keystone settings •WirelessHD Dongle Pairing •Language settings •Reset to factory default function Use...
... the projector by pressing "Power" button on the control pad. 2 Press the "MENU" button on the remote control to launch the OSD for projector installation and maintenance. 3 The background pattern acts as a guide to adjusting the calibration and alignment settings, such as screen size and distance, focus and more . 4 The Installation menu includes the following options: •Projection Mode •Projection Location •Auto Keystone settings •Manual Keystone settings •WirelessHD Dongle Pairing •Language settings •Reset to factory default function Use...
User Manual
Page 43
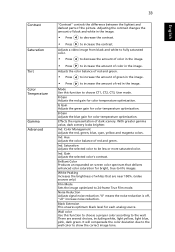
..." controls the difference between the lightest and darkest parts of color in the image. Adjusting the contrast changes the amount of whites that delivers enhanced color saturation for bright, true-to increase the contrast. Ind. Ind. G Gain Adjusts the green gain for each analog source. Brilliant Color Produces an expanded on-screen color spectrum that are several choices, including white, light yellow, light blue, pink, dark green. Color Management Adjusts the red, green, blue, cyan, yellow...
..." controls the difference between the lightest and darkest parts of color in the image. Adjusting the contrast changes the amount of whites that delivers enhanced color saturation for bright, true-to increase the contrast. Ind. Ind. G Gain Adjusts the green gain for each analog source. Brilliant Color Produces an expanded on-screen color spectrum that are several choices, including white, light yellow, light blue, pink, dark green. Color Management Adjusts the red, green, blue, cyan, yellow...
User Manual
Page 45
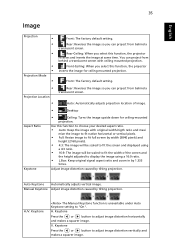
...Ratio Keystone • Ceiling: Turns the image upside down for ceiling-mounted projection. Adjust image distortion caused by tilting projection. Auto Keystone Automatically adjusts vertical image. Front-Ceiling: When you select this function, the projector inverts the image for ceiling-mounted projection. Manual Keystone Adjust image distortion caused by tilting projection. Front: The factory default setting. • Projection Location • Rear: Reverses the image so you can project from behind a translucent screen. Keystone Press the or button to adjust image...
...Ratio Keystone • Ceiling: Turns the image upside down for ceiling-mounted projection. Adjust image distortion caused by tilting projection. Auto Keystone Automatically adjusts vertical image. Front-Ceiling: When you select this function, the projector inverts the image for ceiling-mounted projection. Manual Keystone Adjust image distortion caused by tilting projection. Front: The factory default setting. • Projection Location • Rear: Reverses the image so you can project from behind a translucent screen. Keystone Press the or button to adjust image...

User Manual
Page 46
... image shape. HDMI Color Range Adjust the color range of the projector with the graphics card. Note 1: "H. Position", "Frequency" and "Tracking" functions are only supported under HDMI or Video mode. Press "MODE" repeatedly to select the corner that is unevenly rectangular on model definition. Tracking Synchronizes the signal timing of the HDMI image data to correct color display error. • Auto: Automatically adjust by information from player. • Limited Range: Prosess the input image...
... image shape. HDMI Color Range Adjust the color range of the projector with the graphics card. Note 1: "H. Position", "Frequency" and "Tracking" functions are only supported under HDMI or Video mode. Press "MODE" repeatedly to select the corner that is unevenly rectangular on model definition. Tracking Synchronizes the signal timing of the HDMI image data to correct color display error. • Auto: Automatically adjust by information from player. • Limited Range: Prosess the input image...
User Manual
Page 47
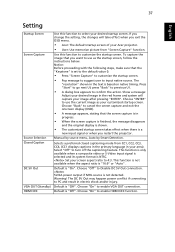
... on native timing. Show a message: Adjust your desired image in your screen aspect ratio to input native source. Default is "Off". Warning! Choose "On" to customize the startup screen. Use this function to PC and result in the text is a new input signal or when you exit the OSD menu. • Acer: The default startup screen of your Acer projector. • User: Use memorize picture from CC1, CC2, CC3, CC4, (CC1 displays captions in...
... on native timing. Show a message: Adjust your desired image in your screen aspect ratio to input native source. Default is "Off". Warning! Choose "On" to customize the startup screen. Use this function to PC and result in the text is a new input signal or when you exit the OSD menu. • Acer: The default startup screen of your Acer projector. • User: Use memorize picture from CC1, CC2, CC3, CC4, (CC1 displays captions in...
User Manual
Page 48
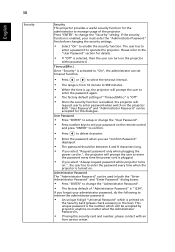
... projector will prompt the user to enter the password every time the power cord is enabled, your administrator password, do the following to retrieve the administrator password: • An unique 6-digit "Universal Password" which will request user to change the "Administrator Password". • The factory default of the projector . English 38 Security Security This projector provides a useful security function for this security card and number, please contact with an Acer service...
... projector will prompt the user to enter the password every time the power cord is enabled, your administrator password, do the following to retrieve the administrator password: • An unique 6-digit "Universal Password" which will request user to change the "Administrator Password". • The factory default of the projector . English 38 Security Security This projector provides a useful security function for this security card and number, please contact with an Acer service...
User Manual
Page 49
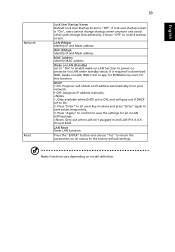
... your network. • Off: Assign an IP address manually. 1. Press "Enter" to the factory default settings. Grey out when LAN isn't plugged in and LAN IP X.X.X.X show 0.0.0.0 LAN Reset Reset LAN function. English Network Reset 39 Lock User Startup Screen Default Lock User Startup Screen is "On", users cannot change startup screen anymore and avoid other users change that arbitrarily. MAC Address Identify MAC address. Press the "ENTER" button and choose "Yes" to download WOL (wake-on model definition. DHCP • On: Projector will...
... your network. • Off: Assign an IP address manually. 1. Press "Enter" to the factory default settings. Grey out when LAN isn't plugged in and LAN IP X.X.X.X show 0.0.0.0 LAN Reset Reset LAN function. English Network Reset 39 Lock User Startup Screen Default Lock User Startup Screen is "On", users cannot change startup screen anymore and avoid other users change that arbitrarily. MAC Address Identify MAC address. Press the "ENTER" button and choose "Yes" to download WOL (wake-on model definition. DHCP • On: Projector will...
User Manual
Page 50
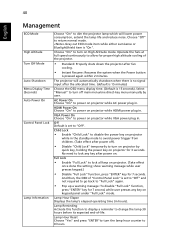
... Management ECO Mode High Altitude Turn Off Mode Auto Shutdown Menu Display Time (Seconds) Auto Power On Control Panel Lock Lamp Information Choose "On" to dim the projector lamp which will automatically shutdown when there is no signal input after the allocated time. (default is 15 minutes) Choose the OSD menu display time. (Default is set to "Off". Choose "On" to turn the lamp hour counter to 0 hours. Choose "Off" to "Full Lock" again. • Pop up a warning message: To disable "Full Lock" function...
... Management ECO Mode High Altitude Turn Off Mode Auto Shutdown Menu Display Time (Seconds) Auto Power On Control Panel Lock Lamp Information Choose "On" to dim the projector lamp which will automatically shutdown when there is no signal input after the allocated time. (default is 15 minutes) Choose the OSD menu display time. (Default is set to "Off". Choose "On" to turn the lamp hour counter to 0 hours. Choose "Off" to "Full Lock" again. • Pop up a warning message: To disable "Full Lock" function...
User Manual
Page 54
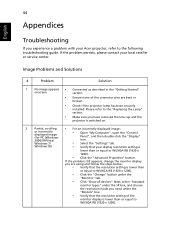
... "Models" box. • Verify that your local reseller or service center. 44 Appendices English Troubleshooting If you experience a problem with your Acer projector, refer to the "Replacing the Lamp" section. • Make sure you have removed the lens cap and the projector is switched on. 2 Partial, scrolling • For an incorrectly displayed image: or incorrectly displayed image (for PC (Windows 2000/XP/Vista/ • Open "My Computer", open the "Control Panel...
... "Models" box. • Verify that your local reseller or service center. 44 Appendices English Troubleshooting If you experience a problem with your Acer projector, refer to the "Replacing the Lamp" section. • Make sure you have removed the lens cap and the projector is switched on. 2 Partial, scrolling • For an incorrectly displayed image: or incorrectly displayed image (for PC (Windows 2000/XP/Vista/ • Open "My Computer", open the "Control Panel...
User Manual
Page 58
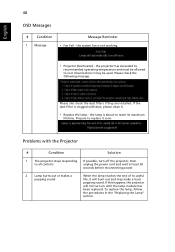
... recommended operating temperature and must be used. Prepare to all controls unplug the power cord and wait at least 30 seconds before it may make a loud popping sound. Problems with dust, please clean it soon. Please check the following message. Please also check the dust filters if they are installed. If the dust filter is not working. • Projector Overheated - English 48 OSD Messages # Condition 1 Message Message Reminder • Fan Fail - the projector...
... recommended operating temperature and must be used. Prepare to all controls unplug the power cord and wait at least 30 seconds before it may make a loud popping sound. Problems with dust, please clean it soon. Please check the following message. Please also check the dust filters if they are installed. If the dust filter is not working. • Projector Overheated - English 48 OSD Messages # Condition 1 Message Message Reminder • Fan Fail - the projector...


