

Veriton 9100 Service Guide
Page 41
... by Any KEY. Change the setting to Disabled if you want to use a USB mouse during POST or after boot if you don't have a USB driver in the operating system. Disabled Enabling the on-die AC97 MODEM if no add-on PCI Audio Auto device. Enabled Disabled Resumes the system from... This item allows you to assign an address and interrupt for each sector. Enabled Disabled This item lets you enable or disable the USB mouse driver within the onboard BIOS. PCI AGP Enabling the on-die AC97 Audio if no add-on CNR LAN. Parameter IDE Primary Master UDMA IDE Primary...
... by Any KEY. Change the setting to Disabled if you want to use a USB mouse during POST or after boot if you don't have a USB driver in the operating system. Disabled Enabling the on-die AC97 MODEM if no add-on PCI Audio Auto device. Enabled Disabled Resumes the system from... This item allows you to assign an address and interrupt for each sector. Enabled Disabled This item lets you enable or disable the USB mouse driver within the onboard BIOS. PCI AGP Enabling the on-die AC97 Audio if no add-on CNR LAN. Parameter IDE Primary Master UDMA IDE Primary...

Veriton 9100 Service Guide
Page 56
Then gently lift the DIMM out to remove the processor: 1. Remove the clip from the retention mechanism. 4. Removing the Processor Follow these steps to remove it. Removing the Housing Cover 45 2. Use a flat bladed screw driver to release the DIMM. 3. Removing a DIMM 1. Removing the Housing Cover 45 2. Detach the fan/ heatsink cable connector . 3. Press the latches on both sides of the DIMM socket outward, to release the clip from the retention mechanism. 47 Chapter 3
Then gently lift the DIMM out to remove the processor: 1. Remove the clip from the retention mechanism. 4. Removing the Processor Follow these steps to remove it. Removing the Housing Cover 45 2. Use a flat bladed screw driver to release the DIMM. 3. Removing a DIMM 1. Removing the Housing Cover 45 2. Detach the fan/ heatsink cable connector . 3. Press the latches on both sides of the DIMM socket outward, to release the clip from the retention mechanism. 47 Chapter 3
Veriton 9100 Service Guide
Page 68
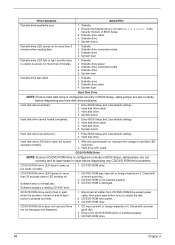
... failed. 1. Diskette drive 3. Enter BIOS Setup and Load default settings. 2. CD/DVD-ROM is damaged. System board. Diskette drive cable. 4. Ensure the CD/DVD-ROM driver is configured correctly in BIOS Setup, cable/jumper are set to light, but works normally. 1. Diskette. 2. CD/DVD-ROM Drive NOTE: Ensure CD/DVD-ROM...
... failed. 1. Diskette drive 3. Enter BIOS Setup and Load default settings. 2. CD/DVD-ROM is damaged. System board. Diskette drive cable. 4. Ensure the CD/DVD-ROM driver is configured correctly in BIOS Setup, cable/jumper are set to light, but works normally. 1. Diskette. 2. CD/DVD-ROM Drive NOTE: Ensure CD/DVD-ROM...

Veriton 9100 Service Guide
Page 70
... the system. (Only pressing power switch can turn on keyboard do not work. 1. Undetermined Problems 61 Chapter 4 Printer. 3. Power switch cable assembly. Ensure the printer driver is the same as the setting in BIOS Setup. 2. Power Supply 2. System Board Other Problems Any other problems. 1. Executing software shutdown from Windows98 Start menu...
... the system. (Only pressing power switch can turn on keyboard do not work. 1. Undetermined Problems 61 Chapter 4 Printer. 3. Power switch cable assembly. Ensure the printer driver is the same as the setting in BIOS Setup. 2. Power Supply 2. System Board Other Problems Any other problems. 1. Executing software shutdown from Windows98 Start menu...


