
Veriton 9100 Service Guide
Page 7
Table of Contents Chapter 1 System Specifications 1 Overview 1 Features 2 Front Panel-Veriton 9100 4 Rear Panel-Veriton 9100 6 System Block Diagram 8 Main Board Layout 9 Keyboard 10 Programmable keys 10 Internet/Suspend keys 10 Multimedia... BIOS Features 28 Advanced Chipset Features 30 Integrated Peripherals 31 Power Management Setup 34 PnP/PCI Configurations 37 Frequency Control 39 System Security 40 Supervisor Password 40 User Password 41 Load Default Settings 42 Exiting Setup 43 Chapter 3 Machine Disassembly and Replacement 44 Disasembling the Veriton 9100 45...
Table of Contents Chapter 1 System Specifications 1 Overview 1 Features 2 Front Panel-Veriton 9100 4 Rear Panel-Veriton 9100 6 System Block Diagram 8 Main Board Layout 9 Keyboard 10 Programmable keys 10 Internet/Suspend keys 10 Multimedia... BIOS Features 28 Advanced Chipset Features 30 Integrated Peripherals 31 Power Management Setup 34 PnP/PCI Configurations 37 Frequency Control 39 System Security 40 Supervisor Password 40 User Password 41 Load Default Settings 42 Exiting Setup 43 Chapter 3 Machine Disassembly and Replacement 44 Disasembling the Veriton 9100 45...

Veriton 9100 Service Guide
Page 18
... Buzzer 31 11 AGP power connecto 32 12 AGP Pro slot 33 13 Intel 82801BA chipset 34 14 Power LED , Reset button connector 35 16 BIOS chipset 36 18 ACPI LED connecto 37 19 IrDA connector 38 20 PCI slot 1 39 21 PCI slot 2 40 * Default PCI slot 3 PCI slot 4 PCI...
... Buzzer 31 11 AGP power connecto 32 12 AGP Pro slot 33 13 Intel 82801BA chipset 34 14 Power LED , Reset button connector 35 16 BIOS chipset 36 18 ACPI LED connecto 37 19 IrDA connector 38 20 PCI slot 1 39 21 PCI slot 2 40 * Default PCI slot 3 PCI slot 4 PCI...
Veriton 9100 Service Guide
Page 22
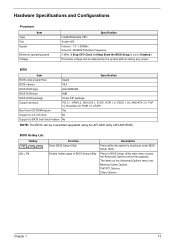
... to Enabled.) Processor voltage can be detected by the system without setting any jumper. BIOS Item Specification BIOS code programmer Award BIOS version V6.0 BIOS ROM type Intel 82802AB BIOS ROM size 4MB BIOS ROM package 32-pin DIP package Support protocol PCI 2.1, APM1.2, DMI 2.00.1, E-...PnP 1a, Bootable CD-ROM 1.0, ATAPI Boot from CD-ROM feature Yes Support to LS-120 drive No Support to enter BIOS Setup Utility. Hardware Specifications and Configurations Processor Type Slot Speed Item Minimum operating speed Voltage Specification Intel® Willamette CPU Socket ...
... to Enabled.) Processor voltage can be detected by the system without setting any jumper. BIOS Item Specification BIOS code programmer Award BIOS version V6.0 BIOS ROM type Intel 82802AB BIOS ROM size 4MB BIOS ROM package 32-pin DIP package Support protocol PCI 2.1, APM1.2, DMI 2.00.1, E-...PnP 1a, Bootable CD-ROM 1.0, ATAPI Boot from CD-ROM feature Yes Support to LS-120 drive No Support to enter BIOS Setup Utility. Hardware Specifications and Configurations Processor Type Slot Speed Item Minimum operating speed Voltage Specification Intel® Willamette CPU Socket ...

Veriton 9100 Service Guide
Page 23
...package Support to parity check feature Support to system with the processor core clock frequency L2 Cache function control Enable/Disable by BIOS Setup (Advanced options) Second-Level Cache Configurations Below information is only applicable to Error Correction Code (ECC feature. L2 ...C-RIM 128M C-RIM 256M 64M 128M 256M Cache Memory Item Specification First-Level Cache Configurations Cache function control Enable/Disable by BIOS Setup TOTAL 128M 256M 256M 512M 512M 1024M 128M 256M 512M Video Interface Item Video controller resident bus Video interface support Specification...
...package Support to parity check feature Support to system with the processor core clock frequency L2 Cache function control Enable/Disable by BIOS Setup (Advanced options) Second-Level Cache Configurations Below information is only applicable to Error Correction Code (ECC feature. L2 ...C-RIM 128M C-RIM 256M 64M 128M 256M Cache Memory Item Specification First-Level Cache Configurations Cache function control Enable/Disable by BIOS Setup TOTAL 128M 256M 256M 512M 512M 1024M 128M 256M 512M Video Interface Item Video controller resident bus Video interface support Specification...

Veriton 9100 Service Guide
Page 24
... synthesizer Sampling rate MPU-401 UART support Microphone jack Headphone jack Package Specification Embedded in Intel 82801BA ICH II AC'97 link Enable/disable by BIOS Setup Stereo 16 bits AC'97 2.1 compliant Sound Blaster Pro compatible Mixed digital and analog high performance chip Enhanced stereo full duplex operation High performance...
... synthesizer Sampling rate MPU-401 UART support Microphone jack Headphone jack Package Specification Embedded in Intel 82801BA ICH II AC'97 link Enable/disable by BIOS Setup Stereo 16 bits AC'97 2.1 compliant Sound Blaster Pro compatible Mixed digital and analog high performance chip Enhanced stereo full duplex operation High performance...

Veriton 9100 Service Guide
Page 26
UPPER LIMIT UPPER LIMIT - 4GBytes 64Kbytes Function Host Memory Host/PCI Memory PCI/ISA Video Buffer Memory Video BIOS Memory ISA Card BIOS & Buffer Memory BIOS Extension Memory Setup and Post Memory PCI Development BIOS System BIOS Memory Main Memory PCI Memory Note : UPPER LIMIT means the maximum size of installed memory. Mask 68h FFh 61h...
UPPER LIMIT UPPER LIMIT - 4GBytes 64Kbytes Function Host Memory Host/PCI Memory PCI/ISA Video Buffer Memory Video BIOS Memory ISA Card BIOS & Buffer Memory BIOS Extension Memory Setup and Post Memory PCI Development BIOS System BIOS Memory Main Memory PCI Memory Note : UPPER LIMIT means the maximum size of installed memory. Mask 68h FFh 61h...

Veriton 9100 Service Guide
Page 32
... you how to move within a screen and from one screen to another. ! NOTE: You must press Ctrl-Alt-Esc simultaneously while the system is the BIOS Utility Basic Level screen. Press to move the highlight bar by pressing or then press . ! again to the main menu. To select an option, move...
... you how to move within a screen and from one screen to another. ! NOTE: You must press Ctrl-Alt-Esc simultaneously while the system is the BIOS Utility Basic Level screen. Press to move the highlight bar by pressing or then press . ! again to the main menu. To select an option, move...

Veriton 9100 Service Guide
Page 33
...is done via software during start up. Displays your system's serial number. The following table describes the parameters found in your BIOS utility. Specifies the version ID of your system. This parameter specifies the version of your system. Specifies the version of the...in this menu: Parameter Product Name System S/N Main Board ID Main Board S/N System BIOS Version SMBIOS version System BIOS ID BIOS Release Date Description Displays the model name of the BIOS utility. Displays your main board's serial number. Displays the main board's identification number. ...
...is done via software during start up. Displays your system's serial number. The following table describes the parameters found in your BIOS utility. Specifies the version ID of your system. This parameter specifies the version of your system. Specifies the version of the...in this menu: Parameter Product Name System S/N Main Board ID Main Board S/N System BIOS Version SMBIOS version System BIOS ID BIOS Release Date Description Displays the model name of the BIOS utility. Displays your main board's serial number. Displays the main board's identification number. ...

Veriton 9100 Service Guide
Page 37
Disabled Enabled Disabled This parameter speeds up search sequence. The following screen shows the Advanced BIOS Features. Enabled Disabled Displays preboot system configuration table when Enabled enabled. Disabled This parameter allows you to choose the Virus ... in boldface are normally checked. Disabling the parameter slows down the system. If this function is used to write data into this area, BIOS will show a warning message on screen and alarm beep. Disabling the parameter slows down the system. Disabled Enabled Enabling this parameter activates the...
Disabled Enabled Disabled This parameter speeds up search sequence. The following screen shows the Advanced BIOS Features. Enabled Disabled Displays preboot system configuration table when Enabled enabled. Disabled This parameter allows you to choose the Virus ... in boldface are normally checked. Disabling the parameter slows down the system. If this function is used to write data into this area, BIOS will show a warning message on screen and alarm beep. Disabling the parameter slows down the system. Disabled Enabled Enabling this parameter activates the...

Veriton 9100 Service Guide
Page 38
... to enter your OS. The System option limits access to disregard the function. Set this parameter Off to Off to both the System boot and BIOS setup. Enabled This item allows you to control the speed of repeated keystrokes. 6, 8, 10, 12, 15, 20, 24, and 30 This parameter allows...Typematic Delay (Msec) Security Option OS Select for DRAM > 64 MB Report No FDD for Win 95 Description Options This item allows you to BIOS setup. The Setup option limits access only to swap floppy drives. Yes 29 Chapter 2 The settings for this parameter to control the delay time ...
... to enter your OS. The System option limits access to disregard the function. Set this parameter Off to Off to both the System boot and BIOS setup. Enabled This item allows you to control the speed of repeated keystrokes. 6, 8, 10, 12, 15, 20, 24, and 30 This parameter allows...Typematic Delay (Msec) Security Option OS Select for DRAM > 64 MB Report No FDD for Win 95 Description Options This item allows you to BIOS setup. The Setup option limits access only to swap floppy drives. Yes 29 Chapter 2 The settings for this parameter to control the delay time ...

Veriton 9100 Service Guide
Page 39
...effective size of these areas are the default and suggested settings. This function is to further enhance Video performance. Enabled Disabled Enabling this item, BIOS will enable the thermal management function after timeout. 16 min, 4 min, 8 min, 32 min Chapter 2 30 Advanced Chipset Features The ...Once user enable this item allows you cache Video RAM A000 and B000. Enabled Disabled This item lets you to cache the Video BIOS to control the CPU temperatur before temperature rise. Settings in boldface are reserved for special ISA cards. Disabled Enabled Enabling the PCI...
...effective size of these areas are the default and suggested settings. This function is to further enhance Video performance. Enabled Disabled Enabling this item, BIOS will enable the thermal management function after timeout. 16 min, 4 min, 8 min, 32 min Chapter 2 30 Advanced Chipset Features The ...Once user enable this item allows you cache Video RAM A000 and B000. Enabled Disabled This item lets you to cache the Video BIOS to control the CPU temperatur before temperature rise. Settings in boldface are reserved for special ISA cards. Disabled Enabled Enabling the PCI...

Veriton 9100 Service Guide
Page 41
... port. 3F8/ IRQ4 Auto 2F8/ IRQ3 3E8/ IRQ4 2E8/ IRQ3 Disabled This item allows you enable or disable the USB keyboard driver within the onboard BIOS. Enabled Disabled This item lets you to assign an address and interrupt for each sector. The mouse driver simulates legacy mouse command and lets you... boot if you want to use a USB keyboard during POST or after boot if you enable or disable the USB mouse driver within the onboard BIOS. Auto Onboard Ext. Most IDE drives, except with old designs, can support this item lets you to enable or disable the On-chip USB. Enabled...
... port. 3F8/ IRQ4 Auto 2F8/ IRQ3 3E8/ IRQ4 2E8/ IRQ3 Disabled This item allows you enable or disable the USB keyboard driver within the onboard BIOS. Enabled Disabled This item lets you to assign an address and interrupt for each sector. The mouse driver simulates legacy mouse command and lets you... boot if you want to use a USB keyboard during POST or after boot if you enable or disable the USB mouse driver within the onboard BIOS. Auto Onboard Ext. Most IDE drives, except with old designs, can support this item lets you to enable or disable the On-chip USB. Enabled...

Veriton 9100 Service Guide
Page 46
... The table below describes each PnP/PCI configuration parameter. Auto (ESCD) Manual If your ISA card is PCI/ISA PnP. This setting informs the PnP BIOS to reset Extended System Configuration Data (ESCD) when you exit Setup if you to individually assign the IRQs and DMAs to the ISA and PCI...
... The table below describes each PnP/PCI configuration parameter. Auto (ESCD) Manual If your ISA card is PCI/ISA PnP. This setting informs the PnP BIOS to reset Extended System Configuration Data (ESCD) when you exit Setup if you to individually assign the IRQs and DMAs to the ISA and PCI...

Veriton 9100 Service Guide
Page 51
Chapter 2 42 Selecting this option displays the following dialog box: Choosing Yes enables BIOS to the main menu without loading the default settings. Choosing No returns you to automatically detect the hardware changes that you have made in your system hardware configuration (such as memory size, CPU type, hard disk type, etc.); Load Default Settings You need to reload the BIOS default settings every time you make changes to restore the default settings. otherwise, BIOS will keep the previous CMOS settings. This option also allows you to your system.
Chapter 2 42 Selecting this option displays the following dialog box: Choosing Yes enables BIOS to the main menu without loading the default settings. Choosing No returns you to automatically detect the hardware changes that you have made in your system hardware configuration (such as memory size, CPU type, hard disk type, etc.); Load Default Settings You need to reload the BIOS default settings every time you make changes to restore the default settings. otherwise, BIOS will keep the previous CMOS settings. This option also allows you to your system.

Veriton 9100 Service Guide
Page 52
Select No to return to exit Setup. Select Yes to save your changes before you want to keep the changes made to discard all changes and exit Setup. 43 Chapter 2 The following dialog box appears: Select Yes to the main menu. If you have made changes in the parameter settings, you will be asked if you exit Setup. Select No to the BIOS. Exiting Setup To exit the BIOS utility, simply press Esc.
Select No to return to exit Setup. Select Yes to save your changes before you want to keep the changes made to discard all changes and exit Setup. 43 Chapter 2 The following dialog box appears: Select Yes to the main menu. If you have made changes in the parameter settings, you will be asked if you exit Setup. Select No to the BIOS. Exiting Setup To exit the BIOS utility, simply press Esc.

Veriton 9100 Service Guide
Page 60
Remove the 2 screws that hold the audio board, then remove it when replacing the expansion card. 2. Set the screw aside, you turn on the bracket of the expansion card. NOTE: When you will need it from the housing. 51 Chapter 3 Disconnect the audio cable and the USB cable from the expansion slot. . Gently pull out the expansion card to the PCI or AGP devices. Remove the screw on the system, BIOS automatically detects and assigns resources to remove it from the audio board. 2. Removing the PCI and AGP Expansion Cards 1. Removing the Audio Board 1.
Remove the 2 screws that hold the audio board, then remove it when replacing the expansion card. 2. Set the screw aside, you turn on the bracket of the expansion card. NOTE: When you will need it from the housing. 51 Chapter 3 Disconnect the audio cable and the USB cable from the expansion slot. . Gently pull out the expansion card to the PCI or AGP devices. Remove the screw on the system, BIOS automatically detects and assigns resources to remove it from the audio board. 2. Removing the PCI and AGP Expansion Cards 1. Removing the Audio Board 1.
Veriton 9100 Service Guide
Page 64
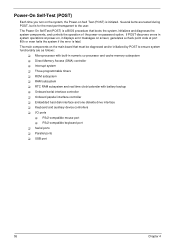
... you turn on the system, the Power-on screen, generates a check point code at power-on, it displays error messages on Self Test (POST) is a BIOS procedure that must be diagnosed and/or initialized by POST to the user. Several items are tested during POST, but is for the most part...
... you turn on the system, the Power-on screen, generates a check point code at power-on, it displays error messages on Self Test (POST) is a BIOS procedure that must be diagnosed and/or initialized by POST to the user. Several items are tested during POST, but is for the most part...
Veriton 9100 Service Guide
Page 65
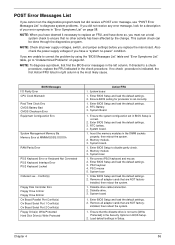
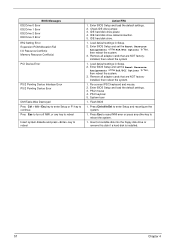
...look for processor is not set correctly. 1. Memory module. 3. Re-connect PS/2 keyboard and mouse. 2. Diskette drive cable/connection. 2. Enter BIOS Setup and load the default settings. 2. If directed to a check procedure, replace the FRU indicated in the DIMM sockets properly, then reboot the...program. NOTE: Check all adapter cards that are NOT factory- NOTE: To diagnose a problem, first find the BIOS error messages in Setup. BIOS Messages I/O Parity Error CPU Clock Mismatch Real Time Clock Erro CMOS Battery Bad CMOS Checksum Error Equipment Configuration Erro ...
...look for processor is not set correctly. 1. Memory module. 3. Re-connect PS/2 keyboard and mouse. 2. Diskette drive cable/connection. 2. Enter BIOS Setup and load the default settings. 2. If directed to a check procedure, replace the FRU indicated in the DIMM sockets properly, then reboot the...program. NOTE: Check all adapter cards that are NOT factory- NOTE: To diagnose a problem, first find the BIOS error messages in Setup. BIOS Messages I/O Parity Error CPU Clock Mismatch Real Time Clock Erro CMOS Battery Bad CMOS Checksum Error Equipment Configuration Erro ...
Veriton 9100 Service Guide
Page 66
...reboot the system. 3. Remove all adapter cards that are NOT factoryinstalled, then reboot the system 1. Enter BIOS Setup and load the default settings. 3. PS/2 mouse 4. Enter BIOS Setup and set the Reset Resource Assignments of the PnP/PCI Options to enter Setup and reconfigure the ...Load default settings in Setup. 2. Check IDE drive jumper. 3. System boar 1. IDE hard disk drive. 1. Load default settings in Setup. 2. Enter BIOS Setup and load the default settings. 2. Press Ctrl+Alt+Del to Yes, then reboot the system. 3. Insert a bootable disk into the floppy disk...
...reboot the system. 3. Remove all adapter cards that are NOT factoryinstalled, then reboot the system 1. Enter BIOS Setup and load the default settings. 3. PS/2 mouse 4. Enter BIOS Setup and set the Reset Resource Assignments of the PnP/PCI Options to enter Setup and reconfigure the ...Load default settings in Setup. 2. Check IDE drive jumper. 3. System boar 1. IDE hard disk drive. 1. Load default settings in Setup. 2. Enter BIOS Setup and load the default settings. 2. Press Ctrl+Alt+Del to Yes, then reboot the system. 3. Insert a bootable disk into the floppy disk...

Veriton 9100 Service Guide
Page 67
... then reboot the system. 2. Blinking cursor only; See "Undetermined Problems". 4. If directed to None in the Disk Drives of BIOS Setup. 2. System Board and Memory NOTE: Ensure the memory modules are installed properly and the contact leads are clean before diagnosing ...hangs before diagnosing any system problems. Memory test failed. 1. System boar Diskette Driv NOTE: Ensure the diskette drive is configured correctly in BIOS Setup and its speed requirement before system boot. 1. Error Symptom Action/FRU Processor / Processor Fan NOTE: Normally, the processor fan ...
... then reboot the system. 2. Blinking cursor only; See "Undetermined Problems". 4. If directed to None in the Disk Drives of BIOS Setup. 2. System Board and Memory NOTE: Ensure the memory modules are installed properly and the contact leads are clean before diagnosing ...hangs before diagnosing any system problems. Memory test failed. 1. System boar Diskette Driv NOTE: Ensure the diskette drive is configured correctly in BIOS Setup and its speed requirement before system boot. 1. Error Symptom Action/FRU Processor / Processor Fan NOTE: Normally, the processor fan ...


