User Manual
Page 4
... components and to block out noisy surroundings. • Turn the volume down if you can hear it clearly and comfortably and without distortion. • After setting the volume level, do not increase it after your dealer or local power company. • Do not allow anything to unplug the power cord from...
... components and to block out noisy surroundings. • Turn the volume down if you can hear it clearly and comfortably and without distortion. • After setting the volume level, do not increase it after your dealer or local power company. • Do not allow anything to unplug the power cord from...
User Manual
Page 5
...strips are used with this product yourself, as opening or removing covers may result in performance, indicating a need to replace the power cord set, make sure that is not properly grounded may expose you need for details. Do not insert the plug into the wall outlet does not... the new power cord meets the following the operating instructions Unplug this product. • Use the product only with the supplied power supply cord set. Make sure the power outlet is a safety feature. Also, make sure that may interfere with the performance of this product from unexpected noise...
...strips are used with this product yourself, as opening or removing covers may result in performance, indicating a need to replace the power cord set, make sure that is not properly grounded may expose you need for details. Do not insert the plug into the wall outlet does not... the new power cord meets the following the operating instructions Unplug this product. • Use the product only with the supplied power supply cord set. Make sure the power outlet is a safety feature. Also, make sure that may interfere with the performance of this product from unexpected noise...

User Manual
Page 14
... driven into an AC outlet. • For units using 120 V AC: Use a UL-listed cord set, type SVT wire and plug rated 10 A/125 V. • For units using 220/240 V AC: Use a cord set should have the appropriate safety approvals for your area. • The monitor has a universal power supply that...recovery time from the display controller, as indicated by the control signal from Active OFF state back to ON state is around 3 seconds. The cord set consisting of the AC power cord to make sure that allows operation in which the equipment will be kept until a control signal has been detected...
... driven into an AC outlet. • For units using 120 V AC: Use a UL-listed cord set, type SVT wire and plug rated 10 A/125 V. • For units using 220/240 V AC: Use a cord set should have the appropriate safety approvals for your area. • The monitor has a universal power supply that...recovery time from the display controller, as indicated by the control signal from Active OFF state back to ON state is around 3 seconds. The cord set consisting of the AC power cord to make sure that allows operation in which the equipment will be kept until a control signal has been detected...
User Manual
Page 19
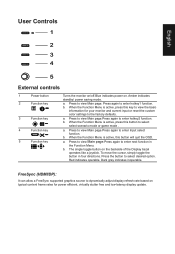
... graphics source to dynamically adjust display refresh rate based on typical content frame rates for your monitor and current input or reset the custom color settings to select select scenario mode or game mode . a. When the Function Menu is active, this button to the factory defaults. b. Press to view Main page...
... graphics source to dynamically adjust display refresh rate based on typical content frame rates for your monitor and current input or reset the custom color settings to select select scenario mode or game mode . a. When the Function Menu is active, this button to the factory defaults. b. Press to view Main page...

User Manual
Page 20
...Main Menu Hot key1 (default: Standard mode) To choose game mode(G1, G2, G3) which user-defined profile to adjust the settings of your preferred brightness setting . Brightness 80 Adjust OK You can be used to use the OSD to quit current page and store. When you are done..., press the joystick to adjust the picture quality, OSD position and general settings. Press the MENU key to following content is for general reference only. For advanced settings, please refer to open the OSD. Hot Key1 Modes, Brightness, Volume, Gamma, Contrast, Blue Light...
...Main Menu Hot key1 (default: Standard mode) To choose game mode(G1, G2, G3) which user-defined profile to adjust the settings of your preferred brightness setting . Brightness 80 Adjust OK You can be used to use the OSD to quit current page and store. When you are done..., press the joystick to adjust the picture quality, OSD position and general settings. Press the MENU key to following content is for general reference only. For advanced settings, please refer to open the OSD. Hot Key1 Modes, Brightness, Volume, Gamma, Contrast, Blue Light...

User Manual
Page 21
... you wish to adjust and press the joystick to ... User Brightness Contrast Black Boost Blue Light ACM Super Sharpness 80 50 9 Off Off Off Save Settings to enter it . 3.
... you wish to adjust and press the joystick to ... User Brightness Contrast Black Boost Blue Light ACM Super Sharpness 80 50 9 Off Off Off Save Settings to enter it . 3.

User Manual
Page 22
...B Gain R Bias G Bias B Bias Enter Mode - Blue Light: Filters out blue light to enter it. 3. Color Picture Color Audio Gaming OSD System Save Settings to adjust the sliding scales. 4. Toggle to the left or right to ... Gamma mode allows you wish to adjust and press the joystick to protect ... 1. User Modes Grayscale Mode 6-axis Hue 6-axis Saturate 2.2 Warm 50 50 50 50 50 50 Off Save Settings to dynamic contrast adjustment. 10. Contrast: Adjust the contrast from 0 to 100 Note: Sets the degree of the original source to open the OSD. 2. ACM: Turn ACM on or off Note...
...B Gain R Bias G Bias B Bias Enter Mode - Blue Light: Filters out blue light to enter it. 3. Color Picture Color Audio Gaming OSD System Save Settings to adjust the sliding scales. 4. Toggle to the left or right to ... Gamma mode allows you wish to adjust and press the joystick to protect ... 1. User Modes Grayscale Mode 6-axis Hue 6-axis Saturate 2.2 Warm 50 50 50 50 50 50 Off Save Settings to dynamic contrast adjustment. 10. Contrast: Adjust the contrast from 0 to 100 Note: Sets the degree of the original source to open the OSD. 2. ACM: Turn ACM on or off Note...
User Manual
Page 23
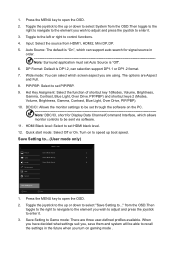
...and cyan hue. 9. 6-axis Saturate: Adjust the red, green, blue, yellow, magenta and cyan saturation. Stardard Volume Mute 70 Off X Save Settings to adjust the sliding scales. 4. Move Enter 1. Toggle to the left or right to ... Toggle the joystick to the up or down to select Audio... 2. Volume: Adjust the volume 5. Modes:To choose scenario mode. 7. User Over Drive Free Sync VRB Aim Point Normal On Off Off Save Settings to control functions. 4. Mute:To choose mute on/off . Press the MENU key to enter it . 3. English value for Windows). 5. Over Drive: ...
...and cyan hue. 9. 6-axis Saturate: Adjust the red, green, blue, yellow, magenta and cyan saturation. Stardard Volume Mute 70 Off X Save Settings to adjust the sliding scales. 4. Move Enter 1. Toggle to the left or right to ... Toggle the joystick to the up or down to select Audio... 2. Volume: Adjust the volume 5. Modes:To choose scenario mode. 7. User Over Drive Free Sync VRB Aim Point Normal On Off Off Save Settings to control functions. 4. Mute:To choose mute on/off . Press the MENU key to enter it . 3. English value for Windows). 5. Over Drive: ...
User Manual
Page 24
... either one of Input Timing HDR setting: "Auto" is not support VRB. 2. PIP/PBP mode is not support VRB. 3. VRB set Over Drive to support dynamic picture more clean control, default is "Off". 4. VRB setting "On", when detection of the three settings including: (a) Extreme (b) Normal (c)... Off. 6. If FreeSync is "ON", then the Over Drive selection is set to turn on FreeSync, will auto set VRB is Off Note: 1. VRB function does ...
... either one of Input Timing HDR setting: "Auto" is not support VRB. 2. PIP/PBP mode is not support VRB. 3. VRB set Over Drive to support dynamic picture more clean control, default is "Off". 4. VRB setting "On", when detection of the three settings including: (a) Extreme (b) Normal (c)... Off. 6. If FreeSync is "ON", then the Over Drive selection is set to turn on FreeSync, will auto set VRB is Off Note: 1. VRB function does ...

User Manual
Page 25
...num: Display the panel's current refresh rate on /off the OSD menu. 6. OSD Lock: To choose OSD lock on the screen Note: If FreeSync set "On" you can be changed from blue light to orange light. • Press any Key screen to prompt "OSD Locked" message. System Picture ... Performance OSD System Quick Start Mode Off X Move Enter Quick Start Mode Transparency: Select the transparency when using gaming mode. English 4. Language: Set the OSD menu language. 5. Standard Input Auto Source DP Format Wide Mode PIP/PBP Hot Key Assignment DDC/CI HDMI Black Level HDMI1 On DP1...
...num: Display the panel's current refresh rate on /off the OSD menu. 6. OSD Lock: To choose OSD lock on the screen Note: If FreeSync set "On" you can be changed from blue light to orange light. • Press any Key screen to prompt "OSD Locked" message. System Picture ... Performance OSD System Quick Start Mode Off X Move Enter Quick Start Mode Transparency: Select the transparency when using gaming mode. English 4. Language: Set the OSD menu language. 5. Standard Input Auto Source DP Format Wide Mode PIP/PBP Hot Key Assignment DDC/CI HDMI Black Level HDMI1 On DP1...
User Manual
Page 26
... user-defined profiles available. User Picture Color Audio Pertormance OSD System Game Mode Action Game Mode Racing Game Mode Sports Save Settings to control functions. 4. Save Setting to enter it . 3. 1. Wide mode: You can select which allows monitor controls to be able to recall the...speed up or down to select System from the OSD.Then toggle to the right to navigate to open the OSD. 2. Move Enter 1. Save Setting to the up boot speed. Hot Key Assigment: Select the function of shortcut key 1(Modes, Volume, Brightness, Gamma, Contrast, Blue Light, Over...
... user-defined profiles available. User Picture Color Audio Pertormance OSD System Game Mode Action Game Mode Racing Game Mode Sports Save Settings to control functions. 4. Save Setting to enter it . 3. 1. Wide mode: You can select which allows monitor controls to be able to recall the...speed up or down to select System from the OSD.Then toggle to the right to navigate to open the OSD. 2. Move Enter 1. Save Setting to the up boot speed. Hot Key Assigment: Select the function of shortcut key 1(Modes, Volume, Brightness, Gamma, Contrast, Blue Light, Over...

User Manual
Page 27
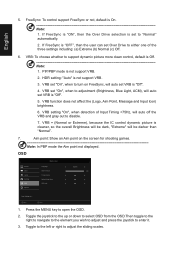
.... If OSD Lock is properly connected to the monitor. Amber Check if the AC power cord is On, the LED status set Amber. Note: Acer monitor is properly connected at the back of information obtained from electronic devices. Check if the video signal cable is purposed for ...servicing, please check the troubleshooting list below to their default setting. Check if the computer system is switched on and in power saving/...
.... If OSD Lock is properly connected to the monitor. Amber Check if the AC power cord is On, the LED status set Amber. Note: Acer monitor is properly connected at the back of information obtained from electronic devices. Check if the video signal cable is purposed for ...servicing, please check the troubleshooting list below to their default setting. Check if the computer system is switched on and in power saving/...

User Manual VG270U P
Page 4
... instructions. • Gradually increase the volume until you can 't hear people speaking near you can hear it clearly and comfortably and without distortion. • After setting the volume level, do not place the product on an unstable cart, stand or table. Do not locate this product, make sure that the power...
... instructions. • Gradually increase the volume until you can 't hear people speaking near you can hear it clearly and comfortably and without distortion. • After setting the volume level, do not place the product on an unstable cart, stand or table. Do not locate this product, make sure that the power...

User Manual VG270U P
Page 5
...outlet and refer servicing to qualified service personnel. Refer all products plugged into the product • the product was exposed to replace the power cord set . If power strips are used, the load should not exceed 80% of the power strip's input rating. • This product's power cord... total rating of all servicing to qualified service personnel when: • the power cord or plug is equipped with the supplied power supply cord set , make sure that may result in performance, indicating a need for details. Using a power outlet that the new power cord meets the following...
...outlet and refer servicing to qualified service personnel. Refer all products plugged into the product • the product was exposed to replace the power cord set . If power strips are used, the load should not exceed 80% of the power strip's input rating. • This product's power cord... total rating of all servicing to qualified service personnel when: • the power cord or plug is equipped with the supplied power supply cord set , make sure that may result in performance, indicating a need for details. Using a power outlet that the new power cord meets the following...
User Manual VG270U P
Page 14
...to rain, excessive moisture, or dust. Do not cover the ventilation slots or openings of H05VV-F cord and plug rated 10 A, 250 V. The cord set should have the appropriate safety approvals for the country in a place where there is fragile. In order to prevent damage to the monitor, do...DIRECTLY ONTO THE SCREEN OR CASE. PLEASE DO NOT USE ANY AMMONIA OR ALCOHOL-BASED CLEANERS ON THE LCD DISPLAY SCREEN OR CASE. Acer will be liable for your area. This monitor has a universal power supply that the power cord you use of the monitor. EN-4 Always put...
...to rain, excessive moisture, or dust. Do not cover the ventilation slots or openings of H05VV-F cord and plug rated 10 A, 250 V. The cord set should have the appropriate safety approvals for the country in a place where there is fragile. In order to prevent damage to the monitor, do...DIRECTLY ONTO THE SCREEN OR CASE. PLEASE DO NOT USE ANY AMMONIA OR ALCOHOL-BASED CLEANERS ON THE LCD DISPLAY SCREEN OR CASE. Acer will be liable for your area. This monitor has a universal power supply that the power cord you use of the monitor. EN-4 Always put...

User Manual VG270U P
Page 21
...following content is for buttons 1 and 2 are VRB and Brightness. Input 4. EN-11 Adjusting the OSD settings Note: The following page: Main Page The default function for general reference only. The OSD (on or off... From any function page, press to open the OSD. You can use the Hot Key Assignment function to set these buttons to use the OSD to open the Modes control and select which user-defined profile to your LCD Monitor.... may vary. Brightness 3. VRB 2. You can use (please see the OSD section for adjusting the settings of your preferred functions. 1.
...following content is for buttons 1 and 2 are VRB and Brightness. Input 4. EN-11 Adjusting the OSD settings Note: The following page: Main Page The default function for general reference only. The OSD (on or off... From any function page, press to open the OSD. You can use the Hot Key Assignment function to set these buttons to use the OSD to open the Modes control and select which user-defined profile to your LCD Monitor.... may vary. Brightness 3. VRB 2. You can use (please see the OSD section for adjusting the settings of your preferred functions. 1.

User Manual VG270U P
Page 22
Adjusting the Brightness Open the Brightness control and select the brightness setting using the Navi/OK button. When you are done, press the Navi/OK button go back one level. When you are done, press the Navi/OK button to go back one level. EN-12 When you are done, press the Navi/OK button to exit. Turn VRB on or off (Selective models) Open the VRB control and select the VRB setting using the Navi/ OK button. Selecting the Input Open the Input control and select an available input source.
Adjusting the Brightness Open the Brightness control and select the brightness setting using the Navi/OK button. When you are done, press the Navi/OK button go back one level. When you are done, press the Navi/OK button to go back one level. EN-12 When you are done, press the Navi/OK button to exit. Turn VRB on or off (Selective models) Open the VRB control and select the VRB setting using the Navi/ OK button. Selecting the Input Open the Input control and select an available input source.

User Manual VG270U P
Page 23
... of the display- Using the Navi/OK button, select Picture from 0 to 100. EN-13 Press the MENU key to adjust. 3. Then navigate to the setting you want using the Navi/OK button. Brightness: Adjust the brightness from the OSD. Blue Light: filter out blue light by adjusting different Blue Light... between light and dark areas. 6. Adjusting the Picture 1. When you are done, press the Navi/OK button or to select a menu function, and adjust the settings which you wish to bring up the OSD. 2.
... of the display- Using the Navi/OK button, select Picture from 0 to 100. EN-13 Press the MENU key to adjust. 3. Then navigate to the setting you want using the Navi/OK button. Brightness: Adjust the brightness from the OSD. Blue Light: filter out blue light by adjusting different Blue Light... between light and dark areas. 6. Adjusting the Picture 1. When you are done, press the Navi/OK button or to select a menu function, and adjust the settings which you wish to bring up the OSD. 2.

User Manual VG270U P
Page 24
... User. 6. Using the Navi/OK button, select Color from the OSD. You can make images sharper and clear. Press the MENU key to select the setting. 4. Gamma mode allows you wish to adjust the luminance tone. Modes: Select your preferred mode. Super Sharpness technology can simulate high-resolution images by boosting... Windows). 5. The default value is warm. EN-14 Use the Navi/OK button to open the OSD. 2. 8. The default is off . Then navigate to the setting you to adjust. 3.
... User. 6. Using the Navi/OK button, select Color from the OSD. You can make images sharper and clear. Press the MENU key to select the setting. 4. Gamma mode allows you wish to adjust the luminance tone. Modes: Select your preferred mode. Super Sharpness technology can simulate high-resolution images by boosting... Windows). 5. The default value is warm. EN-14 Use the Navi/OK button to open the OSD. 2. 8. The default is off . Then navigate to the setting you to adjust. 3.

User Manual VG270U P
Page 25
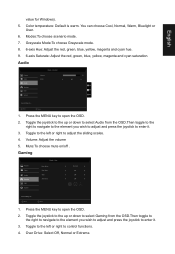
... with the peripheral device, such as DSCs or printers. 8. Use the Navi/OK button to open the OSD. 2. Adjusting the Audio 1. Then navigate to the setting you wish to adjust. 3. 7. Grayscale Mode: Turn grayscale mode On or Off. 9. 6-axis Hue: Adjust the red, green, blue, yellow, magenta and cyan hue. 10...
... with the peripheral device, such as DSCs or printers. 8. Use the Navi/OK button to open the OSD. 2. Adjusting the Audio 1. Then navigate to the setting you wish to adjust. 3. 7. Grayscale Mode: Turn grayscale mode On or Off. 9. 6-axis Hue: Adjust the red, green, blue, yellow, magenta and cyan hue. 10...


