User Manual
Page 2
Acer LCD Monitor User's Guide Original Issue: 02/2013 Changes may be reproduced, stored in a retrieval system, or transmitted, in any form or by any person of Acer Incorporated. All correspondence concerning your computer. This company makes no representations or warranties, either expressed or implied, with respect to your unit should include the serial number, model number and purchase information. The serial number and model number are...
Acer LCD Monitor User's Guide Original Issue: 02/2013 Changes may be reproduced, stored in a retrieval system, or transmitted, in any form or by any person of Acer Incorporated. All correspondence concerning your computer. This company makes no representations or warranties, either expressed or implied, with respect to your unit should include the serial number, model number and purchase information. The serial number and model number are...
User Manual
Page 3
... of power, disconnect power from the power supplies. Turn off the power switch for future reference. Keep this case, the screen is recovered slowly by unplugging all the time. • Due to make sure the flicker disappears. • You may remain after switching the image, when the same image is attached to its base before connecting the power cord to the AC power outlet. • Make sure both the LCD monitor and...
... of power, disconnect power from the power supplies. Turn off the power switch for future reference. Keep this case, the screen is recovered slowly by unplugging all the time. • Due to make sure the flicker disappears. • You may remain after switching the image, when the same image is attached to its base before connecting the power cord to the AC power outlet. • Make sure both the LCD monitor and...
User Manual
Page 4
...slots as possible. The openings should be sure to block out noisy surroundings. • Turn the volume down if you can't hear people speaking near water. • Do not place this product, make sure that the power outlet you plug the power cord into the product. &#...power company. • Do not allow anything to the equipment operator as they may touch dangerous voltage points or short-out parts that could be blocked or covered. Safe listening To protect your hearing, follow these instructions. • Gradually increase the volume until you . Warnings • Do not use...
...slots as possible. The openings should be sure to block out noisy surroundings. • Turn the volume down if you can't hear people speaking near water. • Do not place this product, make sure that the power outlet you plug the power cord into the product. &#...power company. • Do not allow anything to the equipment operator as they may touch dangerous voltage points or short-out parts that could be blocked or covered. Safe listening To protect your hearing, follow these instructions. • Gradually increase the volume until you . Warnings • Do not use...

User Manual
Page 5
... from the wall outlet and refer servicing to replace the power cord set . v ampere rating of the equipment plugged into the wall outlet does not exceed the fuse rating. • Do not overload a power outlet, strip or receptacle by other risks. Using a power outlet that the new power cord meets the following the operating instructions Make sure the power outlet is a safety feature. If power strips are used, the load...
... from the wall outlet and refer servicing to replace the power cord set . v ampere rating of the equipment plugged into the wall outlet does not exceed the fuse rating. • Do not overload a power outlet, strip or receptacle by other risks. Using a power outlet that the new power cord meets the following the operating instructions Make sure the power outlet is a safety feature. If power strips are used, the load...

User Manual
Page 6
Switch off the device near gas pumps at Acer are often, but not always, marked. Keep them out of the reach of our other controls may contain small parts. We at service stations. acer-group .com for further information on the environment. vi Note: Adjust only those controls that are in progress. or where blasting operations are covered by a qualified technician...
Switch off the device near gas pumps at Acer are often, but not always, marked. Keep them out of the reach of our other controls may contain small parts. We at service stations. acer-group .com for further information on the environment. vi Note: Adjust only those controls that are in progress. or where blasting operations are covered by a qualified technician...

User Manual
Page 7
.../public/Sustainability/ LCD pixel statement The LCD unit is produced with high-precision manufacturing techniques. To minimize pollution and ensure utmost protection of the global environment, please recycle. Nevertheless, some pixels may occasionally misfire or appear as black or red dots. For more information on the recorded image and does not constitute a malfunction. vii Disposal instructions Do not...
.../public/Sustainability/ LCD pixel statement The LCD unit is produced with high-precision manufacturing techniques. To minimize pollution and ensure utmost protection of the global environment, please recycle. Nevertheless, some pixels may occasionally misfire or appear as black or red dots. For more information on the recorded image and does not constitute a malfunction. vii Disposal instructions Do not...

User Manual
Page 8
... injury after long hours of working conditions, personal health and other musculoskeletal disorders. The following section provides tips for comfortable use , consult a physician immediately and inform your leg muscles Finding your comfort zone Find your comfort zone by adjusting the viewing angle of the monitor, using a footrest, or raising your sitting height to remove the strain on your...
... injury after long hours of working conditions, personal health and other musculoskeletal disorders. The following section provides tips for comfortable use , consult a physician immediately and inform your leg muscles Finding your comfort zone Find your comfort zone by adjusting the viewing angle of the monitor, using a footrest, or raising your sitting height to remove the strain on your...

User Manual
Page 9
... monitor and focusing on how to an awkward viewing angle. • Avoid looking at bright light sources, such as possible. • Exercise regularly and maintain a healthy body. Developing good work habits Develop the following sections provide suggestions on a distant point. • Blink frequently to keep your eyes point downward when looking away from drying out. Display • Keep your display clean. • Keep...
... monitor and focusing on how to an awkward viewing angle. • Avoid looking at bright light sources, such as possible. • Exercise regularly and maintain a healthy body. Developing good work habits Develop the following sections provide suggestions on a distant point. • Blink frequently to keep your eyes point downward when looking away from drying out. Display • Keep your display clean. • Keep...
User Manual
Page 12
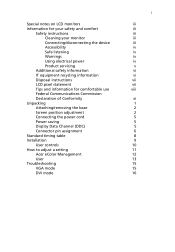
... Accessibility Safe listening Warnings Using electrical power Product servicing Additional safety information IT equipment recycling information Disposal instructions LCD pixel statement Tips and information for comfortable use Federal Communications Commission Declaration of Conformity Unpacking Attaching/removing the base Screen position adjustment Connecting the power cord Power saving Display Data Channel (DDC) Connector pin assignment Standard timing table Installation User controls How to adjust a setting Acer eColor Management User Troubleshooting VGA mode DVI mode 1 iii iii iii iii...
... Accessibility Safe listening Warnings Using electrical power Product servicing Additional safety information IT equipment recycling information Disposal instructions LCD pixel statement Tips and information for comfortable use Federal Communications Commission Declaration of Conformity Unpacking Attaching/removing the base Screen position adjustment Connecting the power cord Power saving Display Data Channel (DDC) Connector pin assignment Standard timing table Installation User controls How to adjust a setting Acer eColor Management User Troubleshooting VGA mode DVI mode 1 iii iii iii iii...

User Manual
Page 13
English 1 Unpacking Please check that the following items are present when you unpack the box, and save the packing materials in case you need to ship or transport the monitor in the future. LCD monitor Quick start guide Audio Cable (Option) LCD monitor D-sub cable (Option) DVI cable (Option) AC power cord Audio Cable (Option)
English 1 Unpacking Please check that the following items are present when you unpack the box, and save the packing materials in case you need to ship or transport the monitor in the future. LCD monitor Quick start guide Audio Cable (Option) LCD monitor D-sub cable (Option) DVI cable (Option) AC power cord Audio Cable (Option)

User Manual
Page 14
English 2 Attaching the Base Note: Remove the monitor and monitor base from its packaging. The monitor can adjust the monitor tilt by using both of your hands to 25 degrees up or 5 degrees down on a stable surface -- Screen position adjustment To optimize the viewing position, you can be adjusted to hold the edges of the monitor as shown below. use a cloth to remove the base. Carefully place the monitor face-down . 25 Remove: Reverse the steps to avoid scratching the screen.
English 2 Attaching the Base Note: Remove the monitor and monitor base from its packaging. The monitor can adjust the monitor tilt by using both of your hands to 25 degrees up or 5 degrees down on a stable surface -- Screen position adjustment To optimize the viewing position, you can be adjusted to hold the edges of the monitor as shown below. use a cloth to remove the base. Carefully place the monitor face-down . 25 Remove: Reverse the steps to avoid scratching the screen.
User Manual
Page 15
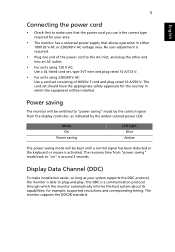
... the equipment will be kept until a control signal has been detected or the keyboard or mouse is required. • Plug one end of the power cord to plug-and-play. The monitor supports the DDC2B standard. Mode On Power saving LED light Blue Amber The power saving mode will be switched to "power saving" mode by the control signal from "power saving" mode back to make installation easier, so long as indicated by the amber-colored power LED. No user-adjustment is activated.
... the equipment will be kept until a control signal has been detected or the keyboard or mouse is required. • Plug one end of the power cord to plug-and-play. The monitor supports the DDC2B standard. Mode On Power saving LED light Blue Amber The power saving mode will be switched to "power saving" mode by the control signal from "power saving" mode back to make installation easier, so long as indicated by the amber-colored power LED. No user-adjustment is activated.

User Manual
Page 17
7 English 24-pin color display signal cable* PIN No. Description 13 NC 14 +5 V power 15 GND (return for +5 V hsync.vsync) 16 Hot-plug detection 17 TMDS data 0- 18 TMDS data 0+ 19 TMDS data 0/5 shield 20 NC 21 NC 22 TMDS clock shield 23 TMDS clock+ 24 DDC TMDS clock- Description 1 TMDS data 2- 2 TMDS data 2+ 3 TMDS data 2/4 shield 4 NC 5 NC 6 DDC clock 7 DDC data 8 NC 9 TMDS data 1- 10 TMDS data 1+ 11 TMDS data 1/3 shield 12 NC PIN No.
7 English 24-pin color display signal cable* PIN No. Description 13 NC 14 +5 V power 15 GND (return for +5 V hsync.vsync) 16 Hot-plug detection 17 TMDS data 0- 18 TMDS data 0+ 19 TMDS data 0/5 shield 20 NC 21 NC 22 TMDS clock shield 23 TMDS clock+ 24 DDC TMDS clock- Description 1 TMDS data 2- 2 TMDS data 2+ 3 TMDS data 2/4 shield 4 NC 5 NC 6 DDC clock 7 DDC data 8 NC 9 TMDS data 1- 10 TMDS data 1+ 11 TMDS data 1/3 shield 12 NC PIN No.
User Manual
Page 19
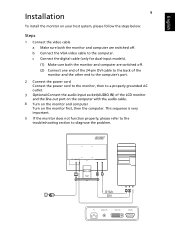
c Connect the digital cable (only for dual-input models). (1) Make sure both the monitor and computer are switched off . POWER AUDIO IN DVI-D IN VGA IN D-Sub DVI AUDIO IN DVI-D IN VGA IN b Connect the VGA video cable to a properly grounded AC outlet. 3 e Turn on the monitor and computer Turn on your host system, please follow the steps below: Steps 1 Connect the video cable a Make sure both the monitor and computer are switched off . (2) Connect one end of the 24...
c Connect the digital cable (only for dual-input models). (1) Make sure both the monitor and computer are switched off . POWER AUDIO IN DVI-D IN VGA IN D-Sub DVI AUDIO IN DVI-D IN VGA IN b Connect the VGA video cable to a properly grounded AC outlet. 3 e Turn on the monitor and computer Turn on your host system, please follow the steps below: Steps 1 Connect the video cable a Make sure both the monitor and computer are switched off . (2) Connect one end of the 24...
User Manual
Page 21
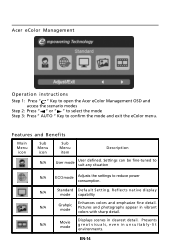
... Operation instructions Step 1: Press " " Key to open the Acer eColor Management OSD and access the scenario modes Step 2: Press " " or " " to select the mode Step 3: Press " AUTO " Key to reduce power consumption. Pictures and photographs appear in clearest detail. EN-14 N/A Standard D efau lt Settin g . Settings can be fine-tuned to suit any situation N/A ECO mode Adjusts the settings to confirm the mode and...
... Operation instructions Step 1: Press " " Key to open the Acer eColor Management OSD and access the scenario modes Step 2: Press " " or " " to select the mode Step 3: Press " AUTO " Key to reduce power consumption. Pictures and photographs appear in clearest detail. EN-14 N/A Standard D efau lt Settin g . Settings can be fine-tuned to suit any situation N/A ECO mode Adjusts the settings to confirm the mode and...
User Manual
Page 22
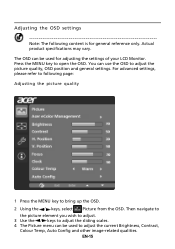
Actual product specifications may vary. You can be used to adjust the current Brightness, Contrast, Colour Temp, Auto Config and other image-related qualities. For advanced settings, please refer to following content is for adjusting the settings of your LCD Monitor. Adjusting the OSD settings Note: The following page: Adjusting the picture quality 1 Press the MENU key to bring up the OSD. 2 Using the / keys, select Picture from the OSD. EN-15 The...
Actual product specifications may vary. You can be used to adjust the current Brightness, Contrast, Colour Temp, Auto Config and other image-related qualities. For advanced settings, please refer to following content is for adjusting the settings of your LCD Monitor. Adjusting the OSD settings Note: The following page: Adjusting the picture quality 1 Press the MENU key to bring up the OSD. 2 Using the / keys, select Picture from the OSD. EN-15 The...
User Manual
Page 24
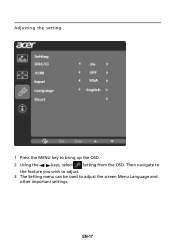
Then navigate to the feature you wish to adjust. 3 The Setting menu can be used to bring up the OSD. 2 Using the / keys, select Setting from the OSD. EN-17 Adjusting the setting 1 Press the MENU key to adjust the screen Menu Language and other important settings.
Then navigate to the feature you wish to adjust. 3 The Setting menu can be used to bring up the OSD. 2 Using the / keys, select Setting from the OSD. EN-17 Adjusting the setting 1 Press the MENU key to adjust the screen Menu Language and other important settings.
User Manual
Page 26
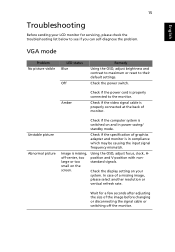
... after adjusting the size of graphics adapter and monitor is missing, off the monitor. Unstable picture Abnormal picture Check if the computer system is properly connected to their default settings. Using the OSD, adjust focus, clock, Hposition and V-position with nonstandard signals. Check the power switch. Check if the video signal cable is properly connected at the back of a missing image, please select another resolution or vertical refresh rate. VGA mode Problem No picture visible LED status Blue Off Remedy Using the OSD, adjust brightness and contrast to...
... after adjusting the size of graphics adapter and monitor is missing, off the monitor. Unstable picture Abnormal picture Check if the computer system is properly connected to their default settings. Using the OSD, adjust focus, clock, Hposition and V-position with nonstandard signals. Check the power switch. Check if the video signal cable is properly connected at the back of a missing image, please select another resolution or vertical refresh rate. VGA mode Problem No picture visible LED status Blue Off Remedy Using the OSD, adjust brightness and contrast to...
User Manual
Page 27
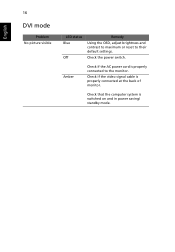
English 16 DVI mode Problem No picture visible LED status Blue Off Remedy Using the OSD, adjust brightness and contrast to maximum or reset to the monitor. Check that the computer system is properly connected at the back of monitor. Check if the video signal cable is switched on and in power saving/ standby mode. Check the power switch. Amber Check if the AC power cord is properly connected to their default settings.
English 16 DVI mode Problem No picture visible LED status Blue Off Remedy Using the OSD, adjust brightness and contrast to maximum or reset to the monitor. Check that the computer system is properly connected at the back of monitor. Check if the video signal cable is switched on and in power saving/ standby mode. Check the power switch. Amber Check if the AC power cord is properly connected to their default settings.

User Manual
Page 28
... "display sleep" within 5 minutes of inactivity. • Wake the monitor when it is proud to offer our customers products with the ENERGY STAR mark. ENERGY STAR and the ENERGY STAR mark are ENERGY STAR qualified use less energy and prevent greenhouse gas emissions by meeting strict energy efficiency guidelines set by reducing energy costs and helps...
... "display sleep" within 5 minutes of inactivity. • Wake the monitor when it is proud to offer our customers products with the ENERGY STAR mark. ENERGY STAR and the ENERGY STAR mark are ENERGY STAR qualified use less energy and prevent greenhouse gas emissions by meeting strict energy efficiency guidelines set by reducing energy costs and helps...


