
TravelMate 6000/8000 Service Guide
Page 7
... BIOS Utility 32 Information 33 Main 34 Advanced 36 Security 37 Boot 41 Exit 42 BIOS Flash Utility 43 Chapter 3 Machine Disassembly and Replacement 45 General Information 46 Before You Begin 46 Disassembly Procedure Flowchart 47 Removing the Battery Pack 50 Removing the Optical Module/HDD Module/Wireless Lan Card and LCD module . .51 Removing the Optical Module 51 Removing the HDD Module 51 Removing the Wireless LAN Card 51 Removing the LCD Module 52 Disassembling the Main Unit 53 Remove the function key board and the keyboard...
... BIOS Utility 32 Information 33 Main 34 Advanced 36 Security 37 Boot 41 Exit 42 BIOS Flash Utility 43 Chapter 3 Machine Disassembly and Replacement 45 General Information 46 Before You Begin 46 Disassembly Procedure Flowchart 47 Removing the Battery Pack 50 Removing the Optical Module/HDD Module/Wireless Lan Card and LCD module . .51 Removing the Optical Module 51 Removing the HDD Module 51 Removing the Wireless LAN Card 51 Removing the LCD Module 52 Disassembling the Main Unit 53 Remove the function key board and the keyboard...
TravelMate 6000/8000 Service Guide
Page 8
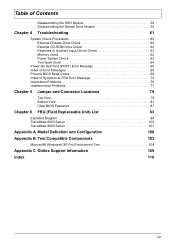
...-to-FRU Error Message 72 Intermittent Problems 76 Undetermined Problems 77 Chapter 5 Jumper and Connector Locations 79 Top View 79 Bottom View 81 Clear BIOS Password 81 Chapter 6 FRU (Field Replaceable Unit) List 83 Exploded Diagram 84 TravelMate 6000 Series 100 TravelMate 8000 Series 101 Appendix A Model Definition and Configuration 100 Appendix B Test Compatible Components 103 Microsoft® Windows® XP Pro Environment Test 104 Appendix C Online Support Information 109...
...-to-FRU Error Message 72 Intermittent Problems 76 Undetermined Problems 77 Chapter 5 Jumper and Connector Locations 79 Top View 79 Bottom View 81 Clear BIOS Password 81 Chapter 6 FRU (Field Replaceable Unit) List 83 Exploded Diagram 84 TravelMate 6000 Series 100 TravelMate 8000 Series 101 Appendix A Model Definition and Configuration 100 Appendix B Test Compatible Components 103 Microsoft® Windows® XP Pro Environment Test 104 Appendix C Online Support Information 109...
TravelMate 6000/8000 Service Guide
Page 9
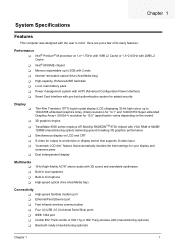
... or display device that supports S-video input "Automatic LCD dim" feature that automatically decides the best settings for your display and conserves pwer Dual indenpendent display Multimedia T T T T 16-bit high-fidelity AC'97 stereo audio with the user in microphone High-speed optical drive (AcerMedia bay) Connectivity T High-speed fax/data modem port T Ethernet/Fast Ethernet port T Fast infrared wireless communication T Four (4) USB 2.0 (Universal Serial Bus) ports T IEEE 1394 port...
... or display device that supports S-video input "Automatic LCD dim" feature that automatically decides the best settings for your display and conserves pwer Dual indenpendent display Multimedia T T T T 16-bit high-fidelity AC'97 stereo audio with the user in microphone High-speed optical drive (AcerMedia bay) Connectivity T High-speed fax/data modem port T Ethernet/Fast Ethernet port T Fast infrared wireless communication T Four (4) USB 2.0 (Universal Serial Bus) ports T IEEE 1394 port...

TravelMate 6000/8000 Service Guide
Page 24
... Display toggle Screen blank Touchpad toggle Switches display output between the display screen, external monitor (if connected) and both the display screen and external monitor. Puts the computer in the hot key combination. Fn-w Volume up Increases the speaker volume. 16 Chapter 1 Fn-F3 Fn-F4 Power Options Sleep Display the Power Options Properties used by the computer (function available if supported by operating system). Hot Key Fn-F1 Fn-F2 Icon Function Hot key help Description Displays help on and off . Turns the internal touchpad on hot keys...
... Display toggle Screen blank Touchpad toggle Switches display output between the display screen, external monitor (if connected) and both the display screen and external monitor. Puts the computer in the hot key combination. Fn-w Volume up Increases the speaker volume. 16 Chapter 1 Fn-F3 Fn-F4 Power Options Sleep Display the Power Options Properties used by the computer (function available if supported by operating system). Hot Key Fn-F1 Fn-F2 Icon Function Hot key help Description Displays help on and off . Turns the internal touchpad on hot keys...
TravelMate 6000/8000 Service Guide
Page 30
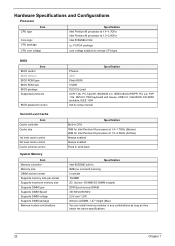
... control 2st level cache control Cache scheme control System Memory Item Memory controller Memory size DIMM socket number Supports memory size per socket Supports maximum memory size Supports DIMM type Supports DIMM Speed Supports DIMM voltage Supports DIMM package Memory module combinations Specification Phneoix 3A01 Flash ROM 512KB PLCC32-Lead ACPI 1.0b, PC Card 95, SM BIOS 2.3, IEEE1284-ECP/EPP, PCI 2.2, PnP 1.0a, DMI 2.0, PS/2 keyboard and mouse, USB 2.0, VGA BIOS, CD-ROM bootable, IEEE 1394 Set by setup manual Specification Built-in CPU...
... control 2st level cache control Cache scheme control System Memory Item Memory controller Memory size DIMM socket number Supports memory size per socket Supports maximum memory size Supports DIMM type Supports DIMM Speed Supports DIMM voltage Supports DIMM package Memory module combinations Specification Phneoix 3A01 Flash ROM 512KB PLCC32-Lead ACPI 1.0b, PC Card 95, SM BIOS 2.3, IEEE1284-ECP/EPP, PCI 2.2, PnP 1.0a, DMI 2.0, PS/2 keyboard and mouse, USB 2.0, VGA BIOS, CD-ROM bootable, IEEE 1394 Set by setup manual Specification Built-in CPU...

TravelMate 6000/8000 Service Guide
Page 36
... Vendor & model name Battery Type Pack capacity Number of keypads Windows logo key Internal & external keyboard work simultaneously by software specification. System Board Major Chips Item VGA LAN IEEE 1394 USB 2.0 Super I/O controller MODEM Blue tooth Wireless 802.11 b Wireless 802.11 a+b Wireless 802.11 b+g PCMCIA Smart card reader Audio Four-in-one card reader Keyboard Item Keyboard controller Keyboard vendor & model name Total number of battery cell Package configuration Normal voltage Charge voltage Specification Sanyo Panasonic Li-ion 4400 Ah 8 4 cells in series, 2 series in...
... Vendor & model name Battery Type Pack capacity Number of keypads Windows logo key Internal & external keyboard work simultaneously by software specification. System Board Major Chips Item VGA LAN IEEE 1394 USB 2.0 Super I/O controller MODEM Blue tooth Wireless 802.11 b Wireless 802.11 a+b Wireless 802.11 b+g PCMCIA Smart card reader Audio Four-in-one card reader Keyboard Item Keyboard controller Keyboard vendor & model name Total number of battery cell Package configuration Normal voltage Charge voltage Specification Sanyo Panasonic Li-ion 4400 Ah 8 4 cells in series, 2 series in...
TravelMate 6000/8000 Service Guide
Page 43
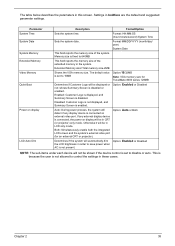
...) System Time Sets the system date. shows Summary Screen is enabled. NOTE: The sub-items under each device will automatically dim Option: Enabled or Disabled the LCD brightness in LCD only mode. Format MM/DD/YYYY (month/day/ year) System Date This field reports the memory size of the extended memory in this screen. Both: Simultaneously enable both the integrated LCD screen and the system's external video port (for TravelMate 8000 series 128MB Determines...
...) System Time Sets the system date. shows Summary Screen is enabled. NOTE: The sub-items under each device will automatically dim Option: Enabled or Disabled the LCD brightness in LCD only mode. Format MM/DD/YYYY (month/day/ year) System Date This field reports the memory size of the extended memory in this screen. Both: Simultaneously enable both the integrated LCD screen and the system's external video port (for TravelMate 8000 series 128MB Determines...
TravelMate 6000/8000 Service Guide
Page 46
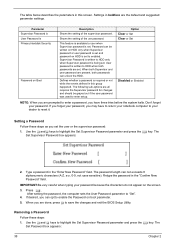
... enter a password, you are prompted to HDD only when Supervisor password is Primary Harddisk Security Password on boot parameter. 5. Option Clear or Set Clear or Set Disabled or Enabled NOTE: When you have to return your notebook computer to your password because the characters do not appear on HDD is available to enter setup. Don't forget your password, you set . Use the w andy keys to highlight the Set Supervisor Password parameter and press the e key. Removing a Password...
... enter a password, you are prompted to HDD only when Supervisor password is Primary Harddisk Security Password on boot parameter. 5. Option Clear or Set Clear or Set Disabled or Enabled NOTE: When you have to return your notebook computer to your password because the characters do not appear on HDD is available to enter setup. Don't forget your password, you set . Use the w andy keys to highlight the Set Supervisor Password parameter and press the e key. Removing a Password...

TravelMate 6000/8000 Service Guide
Page 47
... setting the password, the computer sets the User Password parameter to "Clear". 4. Press e twice without typing anything in the Confirm New Password field. 4. 2. Chapter 2 39 Type the current password in the Enter Current Password field and press e. 3. Press e. If desired, you the Setup Warning. The password setting is OK, the screen will show you can enable the Password on boot parameter. 6. Use the w and y keys to save the changes and exit the BIOS Setup Utility. When...
... setting the password, the computer sets the User Password parameter to "Clear". 4. Press e twice without typing anything in the Confirm New Password field. 4. 2. Chapter 2 39 Type the current password in the Enter Current Password field and press e. 3. Press e. If desired, you the Setup Warning. The password setting is OK, the screen will show you can enable the Password on boot parameter. 6. Use the w and y keys to save the changes and exit the BIOS Setup Utility. When...
TravelMate 6000/8000 Service Guide
Page 77
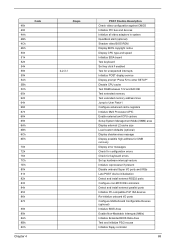
... devices Initialize all video adapters in system QuietBoot start (optional) Shadow video BIOS ROM Display BIOS copyright notice Display CPU type and speed Initialize EISA board Test keyboard Set key click if enabled Test for unexpected interrupts Initialize POST display service Display prompt "Press F2 to enter SETUP" Disable CPU cache Test RAM between 512 and 640 KB Test extended memory Test extended memory address lines Jump to User Patch1 Configure advanced cache registers Initialize Multi Processor APIC Enable external and CPU caches Setup...
... devices Initialize all video adapters in system QuietBoot start (optional) Shadow video BIOS ROM Display BIOS copyright notice Display CPU type and speed Initialize EISA board Test keyboard Set key click if enabled Test for unexpected interrupts Initialize POST display service Display prompt "Press F2 to enter SETUP" Disable CPU cache Test RAM between 512 and 640 KB Test extended memory Test extended memory address lines Jump to User Patch1 Configure advanced cache registers Initialize Multi Processor APIC Enable external and CPU caches Setup...

TravelMate 6000/8000 Service Guide
Page 78
... stroke Enter SETUP Clear Boot flag Check for option ROMs. One long, two short beeps on checksum failure. Check for SMART drive (optional) Shadow option ROMs Set up Power Management Initialize security engine (optional) Enable hardware interrupts Determine number of ATA and SCSI drives Set time of ATA drives (optional) Initialize hard-disk controllers Initialize local-bus hard-disk controllers Jump to boot with INT 19 Initialize POST Error Manager (PEM) Initialize error logging Initialize error display function Initialize system error handler PnPnd dual CMOS (optional) Initialize notebook...
... stroke Enter SETUP Clear Boot flag Check for option ROMs. One long, two short beeps on checksum failure. Check for SMART drive (optional) Shadow option ROMs Set up Power Management Initialize security engine (optional) Enable hardware interrupts Determine number of ATA and SCSI drives Set time of ATA drives (optional) Initialize hard-disk controllers Initialize local-bus hard-disk controllers Jump to boot with INT 19 Initialize POST Error Manager (PEM) Initialize error logging Initialize error display function Initialize system error handler PnPnd dual CMOS (optional) Initialize notebook...

TravelMate 6000/8000 Service Guide
Page 79
... the CPU Initialize the system timer Initialize system I/O Check force recovery boot Checksum BIOS ROM Go to BIOS Set Huge Segment Initialize Multi Processor Initialize OEM special code Initialize PIC and DMA Initialize Memory type Initialize Memory size Shadow Boot Block System memory test Initialize interrupt vectors Initialize Run Time Clock Initialize video Initialize System Management Mode Output one beep before boot Boot to Mini DOS Clear Huge Segment Boot...
... the CPU Initialize the system timer Initialize system I/O Check force recovery boot Checksum BIOS ROM Go to BIOS Set Huge Segment Initialize Multi Processor Initialize OEM special code Initialize PIC and DMA Initialize Memory type Initialize Memory size Shadow Boot Block System memory test Initialize interrupt vectors Initialize Run Time Clock Initialize video Initialize System Management Mode Output one beep before boot Boot to Mini DOS Clear Huge Segment Boot...
TravelMate 6000/8000 Service Guide
Page 80
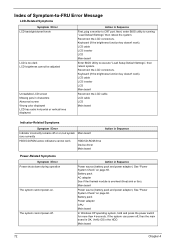
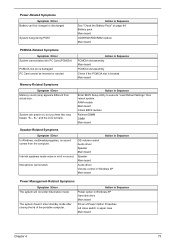
... if the thermal module is OK. See "Power System Check" on page 63. Index of Symptom-to-FRU Error Message LCD-Related Symptoms Symptom / Error LCD backlight doesn't work ). The system cannot power-off , then the main board is overheat (Heat sink or fan). Keyboard (if the brightness function key doesn't work HDD/CD-ROM drive Device driver Main board Action in Sequence First, plug a monitor to running "Load Default Settings" then reboot the system.
... if the thermal module is OK. See "Power System Check" on page 63. Index of Symptom-to-FRU Error Message LCD-Related Symptoms Symptom / Error LCD backlight doesn't work ). The system cannot power-off , then the main board is overheat (Heat sink or fan). Keyboard (if the brightness function key doesn't work HDD/CD-ROM drive Device driver Main board Action in Sequence First, plug a monitor to running "Load Default Settings" then reboot the system.
TravelMate 6000/8000 Service Guide
Page 81
... Enter BIOS Setup Utility to execute "Load Default Settings" then reboot system. Internal speakers make noise or emit no sound comes from actual size. Battery pack Main board ODD/HDD/FDD/RAM module Main board PCMCIA-Related Symptoms Symptom / Error System cannot detect the PC Card (PCMCIA) PCMCIA slot pin is damaged. System can 't be inserted or ejected Action in Windows XP Hard disk drive Main board Driver of the portable computer. Power-Related Symptoms Symptom / Error Battery...
... Enter BIOS Setup Utility to execute "Load Default Settings" then reboot system. Internal speakers make noise or emit no sound comes from actual size. Battery pack Main board ODD/HDD/FDD/RAM module Main board PCMCIA-Related Symptoms Symptom / Error System cannot detect the PC Card (PCMCIA) PCMCIA slot pin is damaged. System can 't be inserted or ejected Action in Windows XP Hard disk drive Main board Driver of the portable computer. Power-Related Symptoms Symptom / Error Battery...

TravelMate 6000/8000 Service Guide
Page 82
...Device driver Device cable Device Main board Keyboard/Touchpad-Related Symptoms Symptom / Error Keyboard (one or more keys) does not work correctly. Reconnect hard disk/CD-ROM drives. Touchpad board Main board 74 Chapter 4 Reconnect hard disk/CD-ROM drives/FDD or other peripherals. Connect AC adapter then check if the system resumes from standby mode LCD cover switch after opening the lid of the portable computer. Main board Press Fn+F5, LCD/CRT/Both display switching Keyboard Main board Main board Enter BIOS Setup Utility to execute "Load Default Settings" then reboot...
...Device driver Device cable Device Main board Keyboard/Touchpad-Related Symptoms Symptom / Error Keyboard (one or more keys) does not work correctly. Reconnect hard disk/CD-ROM drives. Touchpad board Main board 74 Chapter 4 Reconnect hard disk/CD-ROM drives/FDD or other peripherals. Connect AC adapter then check if the system resumes from standby mode LCD cover switch after opening the lid of the portable computer. Main board Press Fn+F5, LCD/CRT/Both display switching Keyboard Main board Main board Enter BIOS Setup Utility to execute "Load Default Settings" then reboot...
TravelMate 6000/8000 Service Guide
Page 84
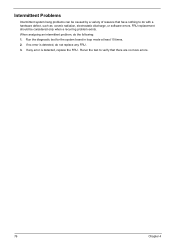
... a recurring problem exists. FRU replacement should be caused by a variety of reasons that have nothing to verify that there are no error is detected, replace the FRU. Run the diagnostic test for the system board in loop mode at least 10 times. 2. When analyzing an intermittent problem, do with a hardware defect, such as: cosmic radiation, electrostatic discharge, or software errors.
... a recurring problem exists. FRU replacement should be caused by a variety of reasons that have nothing to verify that there are no error is detected, replace the FRU. Run the diagnostic test for the system board in loop mode at least 10 times. 2. When analyzing an intermittent problem, do with a hardware defect, such as: cosmic radiation, electrostatic discharge, or software errors.

TravelMate 6000/8000 Service Guide
Page 119
... external 51 removing 51 Disassembly Battery Pack 48 CD-ROM/DVD-ROM Module 53 Floppy Disk Drive 57 Procedure Flowchart 47 Display 3 DVD-ROM Interface 25 E Error Symptom-to-Spare Part Index 65 Index Index External CD-ROM Drive Check 62 External Diskette Drive Check 62 F Features 1 Flash Utility 43 Floppy Disk removing the 57 FRU (Field Replaceable Unit) List 83 H Hard disk 24 HDD 24 Hot Keys 13 I Indicators 12 Intermittent Problems 76 K Keyboard 28 Keyboard or Auxiliary Input Device Check 62 L L2 cache 22 M Memory...
... external 51 removing 51 Disassembly Battery Pack 48 CD-ROM/DVD-ROM Module 53 Floppy Disk Drive 57 Procedure Flowchart 47 Display 3 DVD-ROM Interface 25 E Error Symptom-to-Spare Part Index 65 Index Index External CD-ROM Drive Check 62 External Diskette Drive Check 62 F Features 1 Flash Utility 43 Floppy Disk removing the 57 FRU (Field Replaceable Unit) List 83 H Hard disk 24 HDD 24 Hot Keys 13 I Indicators 12 Intermittent Problems 76 K Keyboard 28 Keyboard or Auxiliary Input Device Check 62 L L2 cache 22 M Memory...

User's Guide
Page 7
...Special keys Launch Keys Touchpad Touchpad basics Storage Hard disk AcerMedia bay Using software Audio Adjusting the volume DVI(Digital Visual Interface) Power management Moving around with your TravelMate Disconnecting from the desktop Moving around Taking the computer home Traveling with the computer Traveling internationally with the computer Securing your computer Using a computer security lock Using the Smart Card Using passwords 2 Customizing my computer Expanding through options Connectivity options Upgrade options Using system utilities Notebook Manager Launch Manager BIOS Utility vii...
...Special keys Launch Keys Touchpad Touchpad basics Storage Hard disk AcerMedia bay Using software Audio Adjusting the volume DVI(Digital Visual Interface) Power management Moving around with your TravelMate Disconnecting from the desktop Moving around Taking the computer home Traveling with the computer Traveling internationally with the computer Securing your computer Using a computer security lock Using the Smart Card Using passwords 2 Customizing my computer Expanding through options Connectivity options Upgrade options Using system utilities Notebook Manager Launch Manager BIOS Utility vii...

User's Guide
Page 69
.... I pressed the power button and opened the display, but the computer does not start or boot-up. Check the following: • If you created during the use of your system and make necessary fixes. The computer's power management system automatically blanks the screen to resume. Press the display toggle hot key Fn-F5 to toggle the display back to the computer. • If the Sleep indicator is lit, the...
.... I pressed the power button and opened the display, but the computer does not start or boot-up. Check the following: • If you created during the use of your system and make necessary fixes. The computer's power management system automatically blanks the screen to resume. Press the display toggle hot key Fn-F5 to toggle the display back to the computer. • If the Sleep indicator is lit, the...
User's Guide
Page 74
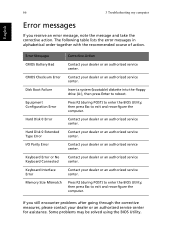
... into the floppy drive (A:), then press Enter to exit and reconfigure the computer. Hard Disk 0 Extended Type Error Contact your dealer or an authorized service center. Keyboard Error or No Keyboard Connected Contact your dealer or an authorized service center. then press Esc to reboot. CMOS Checksum Error Contact your dealer or an authorized service center. Equipment Configuration Error Press F2 (during POST) to enter the BIOS Utility; Hard Disk 0 Error Contact your dealer...
... into the floppy drive (A:), then press Enter to exit and reconfigure the computer. Hard Disk 0 Extended Type Error Contact your dealer or an authorized service center. Keyboard Error or No Keyboard Connected Contact your dealer or an authorized service center. then press Esc to reboot. CMOS Checksum Error Contact your dealer or an authorized service center. Equipment Configuration Error Press F2 (during POST) to enter the BIOS Utility; Hard Disk 0 Error Contact your dealer...


