TravelMate 240/250 Service Guide
Page 13
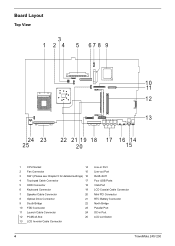
... 10 FDD Connector 23 11 Launch Cable Connector 24 12 PCMCIA Slot 25 13 LCD Inverter Cable Connector Line-in Port Line-out Port RJ45+RJ11 Four USB Ports VGA Port LCD Coaxial Cable Connector Mini PCI Connector RTC Battery Connector North Bridge Parallel Port DC-in Port LCD Lid Switch 4 TravelMate 240...
... 10 FDD Connector 23 11 Launch Cable Connector 24 12 PCMCIA Slot 25 13 LCD Inverter Cable Connector Line-in Port Line-out Port RJ45+RJ11 Four USB Ports VGA Port LCD Coaxial Cable Connector Mini PCI Connector RTC Battery Connector North Bridge Parallel Port DC-in Port LCD Lid Switch 4 TravelMate 240...

TravelMate 240/250 Service Guide
Page 59
... Battery HDD Module *2 HDD HDD Holder *2 Dimm Cover Memory *1 Modem Cover *2 Modem Board Hinge Caps *2 Middle Cover Keyboard *6 LCD Module *2 Launch Board Lower Case Assembly *2 FDD Module *3 *3 *11 *4 RTC Battery *3 Mini PCI Card Plate Upper Case Assembly Disconnect Wireless LAN Antenna *4 Thermal Module *4 Wireless LAN Antenna Touchpad Cover Wireless LAN Card...
... Battery HDD Module *2 HDD HDD Holder *2 Dimm Cover Memory *1 Modem Cover *2 Modem Board Hinge Caps *2 Middle Cover Keyboard *6 LCD Module *2 Launch Board Lower Case Assembly *2 FDD Module *3 *3 *11 *4 RTC Battery *3 Mini PCI Card Plate Upper Case Assembly Disconnect Wireless LAN Antenna *4 Thermal Module *4 Wireless LAN Antenna Touchpad Cover Wireless LAN Card...
TravelMate 240/250 Service Guide
Page 76
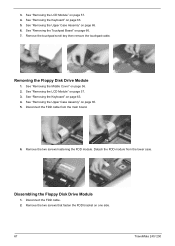
... on page 63. 5. Disconnect the FDD cable from the lower case. Detach the FDD module from the main board. 6. See "Removing the Keyboard" on page 66. 7. Removing the Floppy Disk Drive Module 1. See "Removing the LCD Module" on one side. 67 TravelMate 240/ 250 Remove the two screws that fasten... the FDD bracket on page 57. 3. Remove the touchpad scroll key then remove the touchpad cable. See "Removing the LCD Module" on...
... on page 63. 5. Disconnect the FDD cable from the lower case. Detach the FDD module from the main board. 6. See "Removing the Keyboard" on page 66. 7. Removing the Floppy Disk Drive Module 1. See "Removing the LCD Module" on one side. 67 TravelMate 240/ 250 Remove the two screws that fasten... the FDD bracket on page 57. 3. Remove the touchpad scroll key then remove the touchpad cable. See "Removing the LCD Module" on...
TravelMate 240/250 Service Guide
Page 77
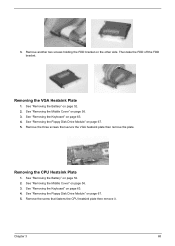
..." on page 67. 5. See "Removing the Floppy Disk Drive Module" on page 52. 2. Then take the FDD off the FDD bracket. See "Removing the Middle Cover" on the other side. Remove another two screws holding the FDD bracket on page 56. 3. Remove the screw that secure the VGA heatsink plate then remove the...
..." on page 67. 5. See "Removing the Floppy Disk Drive Module" on page 52. 2. Then take the FDD off the FDD bracket. See "Removing the Middle Cover" on the other side. Remove another two screws holding the FDD bracket on page 56. 3. Remove the screw that secure the VGA heatsink plate then remove the...
TravelMate 240/250 Service Guide
Page 86
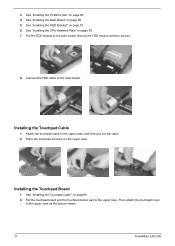
... Board" on page89. 2. Then attach the touchpad cover to the main board. 3. Connect the FDD cable to the upper case as the picture shows. 77 TravelMate 240/ 250 See "Installing the Touchpad Cable" on page 86. 5. Secure the FDD module with two screws. 8. Put the touchpad board and the touchpad button pad to the...
... Board" on page89. 2. Then attach the touchpad cover to the main board. 3. Connect the FDD cable to the upper case as the picture shows. 77 TravelMate 240/ 250 See "Installing the Touchpad Cable" on page 86. 5. Secure the FDD module with two screws. 8. Put the touchpad board and the touchpad button pad to the...
TravelMate 240/250 Service Guide
Page 104
... the following to select the test device. 1. Do the following to isolate the problem to a controller, driver, or diskette. See if FDD Test is correctly seated in the connector on the system board. If an error occurs with the internal diskette drive, reconnect the diskette connector ... diskette drive/DVD-ROM module. 2. If the tests detect a keyboard problem, do not work, reconnect the cable connector and repeat the failing operation. 95 TravelMate 240/ 250 Replace the main board. See if CD-ROM Test is to it . Do not replace a non-defective FRU: 1. A write-enabled, diagnostic...
... the following to select the test device. 1. Do the following to isolate the problem to a controller, driver, or diskette. See if FDD Test is correctly seated in the connector on the system board. If an error occurs with the internal diskette drive, reconnect the diskette connector ... diskette drive/DVD-ROM module. 2. If the tests detect a keyboard problem, do not work, reconnect the cable connector and repeat the failing operation. 95 TravelMate 240/ 250 Replace the main board. See if CD-ROM Test is to it . Do not replace a non-defective FRU: 1. A write-enabled, diagnostic...

TravelMate 240/250 Service Guide
Page 126
Picture No. Partname And Description TOUCHPAD COVER Part Number 42.T30V1.006 Communication Module CPU FDD/Floppy Disk Drive MIDDLE COVE W/LAUNCH BOARD 60.T30V1.005 WIRELESS ANTENNA RIGHT (BLACK) 50.T30V1.004 WIRELESS ANTENNA LEFT (GRAY) 50.T30V1.005 INTEL ... INTEL MOBILE PENTIUM 4 PORTABILITY 2.66GHZ 512K 1.53V for TM250 KC.NP001.266 INTEL MOBILE PENTIUM 4 KC.NP001.2G4 PORTABILITY 2.4GHZ 512K 1.53V for TM250 117 TravelMate 240/250
Picture No. Partname And Description TOUCHPAD COVER Part Number 42.T30V1.006 Communication Module CPU FDD/Floppy Disk Drive MIDDLE COVE W/LAUNCH BOARD 60.T30V1.005 WIRELESS ANTENNA RIGHT (BLACK) 50.T30V1.004 WIRELESS ANTENNA LEFT (GRAY) 50.T30V1.005 INTEL ... INTEL MOBILE PENTIUM 4 PORTABILITY 2.66GHZ 512K 1.53V for TM250 KC.NP001.266 INTEL MOBILE PENTIUM 4 KC.NP001.2G4 PORTABILITY 2.4GHZ 512K 1.53V for TM250 117 TravelMate 240/250