
Quick Start Guide
Page 1
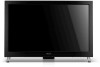
...; To avoid electric shock, never touch the inside of the monitor. Connect the Audio Cable(Only Audio-Input Model)(Optional) 3 4. Connect power cord Connect the power cord to the monitor, then to a Computer 1. 1-1 Connect Video Cable a. Connect the HDMI cable to user's guide in CD-ROM packaged with the AC power available in a working electrical device such as a lamp. Test the electrical oulet by plugging in your location. • Locate your monitor does not operate normally-in...
...; To avoid electric shock, never touch the inside of the monitor. Connect the Audio Cable(Only Audio-Input Model)(Optional) 3 4. Connect power cord Connect the power cord to the monitor, then to a Computer 1. 1-1 Connect Video Cable a. Connect the HDMI cable to user's guide in CD-ROM packaged with the AC power available in a working electrical device such as a lamp. Test the electrical oulet by plugging in your location. • Locate your monitor does not operate normally-in...
Quick Start Guide
Page 2
... void the user authority, which can radiate radio frequency energy and, if not installed and used in interference to other household waste. Instead, it over to result in accordance with EMC regulations. LCD Monitor Quick Setup Guide Notice: Canadian users This Class B digital apparatus complies with Part 15 of the following two conditions: (1) this device may cause undesired operation. Caution Changes or modifications...
... void the user authority, which can radiate radio frequency energy and, if not installed and used in interference to other household waste. Instead, it over to result in accordance with EMC regulations. LCD Monitor Quick Setup Guide Notice: Canadian users This Class B digital apparatus complies with Part 15 of the following two conditions: (1) this device may cause undesired operation. Caution Changes or modifications...
User Manual
Page 1
TABLE OF CONTENTS Special notes on LCD monitors 1 Information for your safety and comfort 2 Unpacking 5 Screen position adjustment 6 Connecting the power cord 7 Safety precaution 7 Cleaning your monitor 7 Power saving 8 DDC 8 Connector Pin Assignment 9 Standard Timing Table 11 Installation 12 User controls 13 Troubleshooting 19
TABLE OF CONTENTS Special notes on LCD monitors 1 Information for your safety and comfort 2 Unpacking 5 Screen position adjustment 6 Connecting the power cord 7 Safety precaution 7 Cleaning your monitor 7 Power saving 8 DDC 8 Connector Pin Assignment 9 Standard Timing Table 11 Installation 12 User controls 13 Troubleshooting 19

User Manual
Page 2
... LCD monitor and do not indicate a problem. EN-1 In this case, the screen is recovered slowly by changing the image or turning off the Power Switch and then turn it on the desktop pattern you use . It may include blemishes of 0.01% or less such as a missing pixel or a pixel lit all of the time. • Due to the nature of the fluorescent light...
... LCD monitor and do not indicate a problem. EN-1 In this case, the screen is recovered slowly by changing the image or turning off the Power Switch and then turn it on the desktop pattern you use . It may include blemishes of 0.01% or less such as a missing pixel or a pixel lit all of the time. • Due to the nature of the fluorescent light...

User Manual
Page 3
... noisy surroundings. • Turn the volume down if you can't hear people speaking near you. Warnings • Do not use it could result in installation unless proper ventilation is provided. • Never push objects of the product and to protect it from overheating. Safe listening Follow these instructions carefully. When you plug the power cord into this product...
... noisy surroundings. • Turn the volume down if you can't hear people speaking near you. Warnings • Do not use it could result in installation unless proper ventilation is provided. • Never push objects of the product and to protect it from overheating. Safe listening Follow these instructions carefully. When you plug the power cord into this product...
User Manual
Page 4
... power cord or plug is produced with high-precision manufacturing techniques. Tips and information for comfortable use Computer users may expose you have these symptoms, or any other risks. Long work periods, bad posture, poor work by adjusting the viewing angle of working conditions, personal health and other musculoskeletal disorders. Unplug this product yourself, as black or red dots. Nevertheless, some pixels may...
... power cord or plug is produced with high-precision manufacturing techniques. Tips and information for comfortable use Computer users may expose you have these symptoms, or any other risks. Long work periods, bad posture, poor work by adjusting the viewing angle of working conditions, personal health and other musculoskeletal disorders. Unplug this product yourself, as black or red dots. Nevertheless, some pixels may...
User Manual
Page 5
... display at bright light sources, such as open windows, for only short periods, take short rests to relax your neck and shoulders • avoid tensing your muscles or shrugging your shoulders • install the external display, keyboard and mouse properly and within comfort able reach • if you view your monitor more than the top edge of the display. • Adjust the display brightness...
... display at bright light sources, such as open windows, for only short periods, take short rests to relax your neck and shoulders • avoid tensing your muscles or shrugging your shoulders • install the external display, keyboard and mouse properly and within comfort able reach • if you view your monitor more than the top edge of the display. • Adjust the display brightness...
User Manual
Page 6
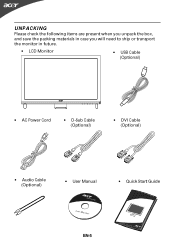
UNPACKING Please check the following items are present when you unpack the box, and save the packing materials in case you will need to ship or transport the monitor in future. • LCD Monitor • USB Cable (Optional) • AC Power Cord • D-Sub Cable (Optional) • DVI Cable (Optional) • Audio Cable (Optional) • User Manual • Quick Start Guide EN-5
UNPACKING Please check the following items are present when you unpack the box, and save the packing materials in case you will need to ship or transport the monitor in future. • LCD Monitor • USB Cable (Optional) • AC Power Cord • D-Sub Cable (Optional) • DVI Cable (Optional) • Audio Cable (Optional) • User Manual • Quick Start Guide EN-5

User Manual
Page 8
...: Use a UL Listed Cord Set, Type SVT wire and plug rated 10 A/125 V. • For unit using at 220/240 V AC (outside of U.S.): Use a Cord Set consisting of the monitor. Place the monitor just below guidelines when cleaning the monitor. • Always unplug the monitor before cleaning. • Use a soft cloth to wipe the screen and cabinet front and sides. CONNECTING THE POWER CORD • Check first to make sure that the power cord...
...: Use a UL Listed Cord Set, Type SVT wire and plug rated 10 A/125 V. • For unit using at 220/240 V AC (outside of U.S.): Use a Cord Set consisting of the monitor. Place the monitor just below guidelines when cleaning the monitor. • Always unplug the monitor before cleaning. • Use a soft cloth to wipe the screen and cabinet front and sides. CONNECTING THE POWER CORD • Check first to make sure that the power cord...
User Manual
Page 9
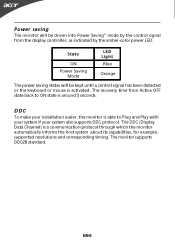
..., for example, supported resolutions and corresponding timing. The DDC (Display Data Channel) is around 3 seconds. The monitor supports DDC2B standard. EN-8 Power saving The monitor will be driven into Power Saving" mode by the control signal from Active OFF state back to Plug and Play with your system if your installation easier, the monitor is activated. The recovery time from the display controller, as indicated by the amber-color power LED.
..., for example, supported resolutions and corresponding timing. The DDC (Display Data Channel) is around 3 seconds. The monitor supports DDC2B standard. EN-8 Power saving The monitor will be driven into Power Saving" mode by the control signal from Active OFF state back to Plug and Play with your system if your installation easier, the monitor is activated. The recovery time from the display controller, as indicated by the amber-color power LED.

User Manual
Page 10
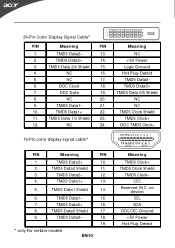
DESCRIPTION +5V Logic Ground Monitor Ground DDC-Serial Data H-Sync V-Sync DDC-Serial Clock EN-9 CONNECTOR PIN ASSIGNMENT 15-Pin Color Display Signal Cable PIN NO. 1. 2. 3. 4. 5. 6. 7. 8. DESCRIPTION Red Green Blue Monitor Ground DDC-return R-Ground G-Ground B-Ground PIN NO. 9. 10. 11. 12. 13. 14. 15.
DESCRIPTION +5V Logic Ground Monitor Ground DDC-Serial Data H-Sync V-Sync DDC-Serial Clock EN-9 CONNECTOR PIN ASSIGNMENT 15-Pin Color Display Signal Cable PIN NO. 1. 2. 3. 4. 5. 6. 7. 8. DESCRIPTION Red Green Blue Monitor Ground DDC-return R-Ground G-Ground B-Ground PIN NO. 9. 10. 11. 12. 13. 14. 15.
User Manual
Page 11
24-Pin Color Display Signal Cable* PIN Meaning PIN 1. TMDS Data 2/4 Shield 15. 4. DDC Data 19. 8. TMDS Data1- 21. 10. NC 24. TMDS Data2 Shield 11. 3. TMDS Data1+ 13. 5. TMDS Data 1/3 ... Data2+ 14. 3. TMDS Data2- 12. 4. Meaning NC +5V Power Logic Ground Hot Plug Detect TMDS Data0TMDS Data0+ TMDS Data 0/5 Shield NC NC TMDS Clock Shield TMDS Clock+ DDC TMDS Clock- 19-Pin color display signal cable* PIN Meaning PIN 1. NC 17. 6. TMDS Data0- 18. 19. * only for certain models EN-10 Meaning TMDS Clock+ TMDS Clock Shield...
24-Pin Color Display Signal Cable* PIN Meaning PIN 1. TMDS Data 2/4 Shield 15. 4. DDC Data 19. 8. TMDS Data1- 21. 10. NC 24. TMDS Data2 Shield 11. 3. TMDS Data1+ 13. 5. TMDS Data 1/3 ... Data2+ 14. 3. TMDS Data2- 12. 4. Meaning NC +5V Power Logic Ground Hot Plug Detect TMDS Data0TMDS Data0+ TMDS Data 0/5 Shield NC NC TMDS Clock Shield TMDS Clock+ DDC TMDS Clock- 19-Pin color display signal cable* PIN Meaning PIN 1. NC 17. 6. TMDS Data0- 18. 19. * only for certain models EN-10 Meaning TMDS Clock+ TMDS Clock Shield...

User Manual
Page 13
.... 1-2 Connect Digital Cable (Only Dual-Input Model) a. Connect the VGA video cable to diagnose the problem. INSTALLATION To install the monitor to the computer's port. 1-3 Connect HDMI Cable (Only HDMI-Input Model) a. AC IN AUDIO IN 3 HDMI DVI-D IN VGA IN USB H D MI D VI V GA 3 1-3 1-2 1-1 2 EN-12 2 1-1 1-2 1-3 3 VGA DVI HDMI b. Connect one end of the 24-pin DVI cable to the back of the monitor and connect the other end to your host system, please follow the steps as given below: Steps 1. 1-1 Connect Video Cable a. Connect the USB Cable...
.... 1-2 Connect Digital Cable (Only Dual-Input Model) a. Connect the VGA video cable to diagnose the problem. INSTALLATION To install the monitor to the computer's port. 1-3 Connect HDMI Cable (Only HDMI-Input Model) a. AC IN AUDIO IN 3 HDMI DVI-D IN VGA IN USB H D MI D VI V GA 3 1-3 1-2 1-1 2 EN-12 2 1-1 1-2 1-3 3 VGA DVI HDMI b. Connect one end of the 24-pin DVI cable to the back of the monitor and connect the other end to your host system, please follow the steps as given below: Steps 1. 1-1 Connect Video Cable a. Connect the USB Cable...
User Manual
Page 14
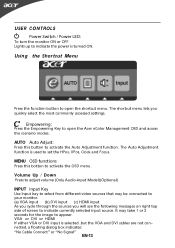
... power is turned ON. Volume Up / Down Press to adjust volume (Only Audio-Input Model)(Optional) INPUT Input Key Use Input key to select from different video sources that may take 1 or 2 seconds for the image to activate the Auto Adjustment function. The Auto Adjustment function is selected ,but the VGA and DVI cables are not connected, a floating dialog box indicates: "No Cable Connect" or "No Signal" EN-13 MENU OSD functions Press this button to appear. USER CONTROLS Power Switch / Power LED: To turn the monitor...
... power is turned ON. Volume Up / Down Press to adjust volume (Only Audio-Input Model)(Optional) INPUT Input Key Use Input key to select from different video sources that may take 1 or 2 seconds for the image to activate the Auto Adjustment function. The Auto Adjustment function is selected ,but the VGA and DVI cables are not connected, a floating dialog box indicates: "No Cable Connect" or "No Signal" EN-13 MENU OSD functions Press this button to appear. USER CONTROLS Power Switch / Power LED: To turn the monitor...
User Manual
Page 15
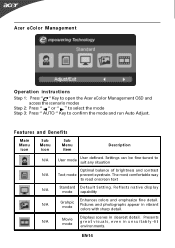
... to suit any situation Optimal balance of brightness and contrast N/A Text mode prevent eyestrain. N/A Movie mode Displays scenes in unsuitably-lit environments. Presents great visuals, even in clearest detail. Features and Benefits Main Menu icon Sub Menu ic o n Sub Menu item D e s cr ip tio n N/A User mode User defined. Acer eColor Management Operation instructions Step 1: Press " " Key to open the Acer eColor Management OSD and access the scenario...
... to suit any situation Optimal balance of brightness and contrast N/A Text mode prevent eyestrain. N/A Movie mode Displays scenes in unsuitably-lit environments. Presents great visuals, even in clearest detail. Features and Benefits Main Menu icon Sub Menu ic o n Sub Menu item D e s cr ip tio n N/A User mode User defined. Acer eColor Management Operation instructions Step 1: Press " " Key to open the Acer eColor Management OSD and access the scenario...
User Manual
Page 16
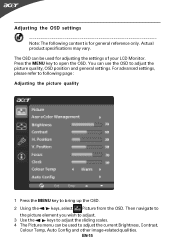
... open the OSD. Press the MENU key to adjust the picture quality, OSD position and general settings. You can be used for general reference only. Actual product specifications may vary. For advanced settings, please refer to following content is for adjusting the settings of your LCD Monitor. Adjusting the OSD settings Note: The following page: Adjusting the picture quality 1 Press the MENU key to adjust the current Brightness, Contrast, Colour Temp, Auto Config and other image...
... open the OSD. Press the MENU key to adjust the picture quality, OSD position and general settings. You can be used for general reference only. Actual product specifications may vary. For advanced settings, please refer to following content is for adjusting the settings of your LCD Monitor. Adjusting the OSD settings Note: The following page: Adjusting the picture quality 1 Press the MENU key to adjust the current Brightness, Contrast, Colour Temp, Auto Config and other image...
User Manual
Page 18
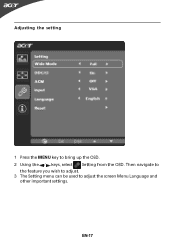
EN-17 Adjusting the setting 1 Press the MENU key to adjust the screen Menu Language and other important settings. Then navigate to the feature you wish to adjust. 3 The Setting menu can be used to bring up the OSD. 2 Using the / keys, select Setting from the OSD.
EN-17 Adjusting the setting 1 Press the MENU key to adjust the screen Menu Language and other important settings. Then navigate to the feature you wish to adjust. 3 The Setting menu can be used to bring up the OSD. 2 Using the / keys, select Setting from the OSD.
User Manual
Page 20
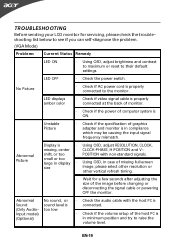
... problem. (VGA Mode) Problems Current Status Remedy LED ON · Using OSD, adjust brightness and contrast to maximum or reset to raise the volume level. LED OFF · Check the power switch. EN-19 No Picture · Check if AC power cord is ON. Using OSD, in display · size Using OSD, adjust RESOLUTION, CLOCK, CLOCK-PHASE, H-POSITION and VPOSITION with the host PC is connected. · Check if the volume setup of graphics adapter and monitor is in compliance which may be causing the input signal frequency...
... problem. (VGA Mode) Problems Current Status Remedy LED ON · Using OSD, adjust brightness and contrast to maximum or reset to raise the volume level. LED OFF · Check the power switch. EN-19 No Picture · Check if AC power cord is ON. Using OSD, in display · size Using OSD, adjust RESOLUTION, CLOCK, CLOCK-PHASE, H-POSITION and VPOSITION with the host PC is connected. · Check if the volume setup of graphics adapter and monitor is in compliance which may be causing the input signal frequency...
User Manual
Page 21
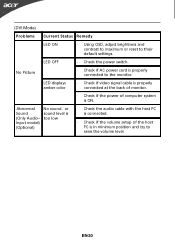
(DVI Mode) Problems Current Status Remedy LED ON · Using OSD, adjust brightness and contrast to maximum or reset to the monitor. LED displays amber color · Check if video signal cable is properly connected at the back of monitor. · Check if the power of the host PC is in minimum position and try to raise the volume level. Abnormal Sound (Only AudioInput model) (Optional) No sound, or sound level is too low · Check the audio cable with the host...
(DVI Mode) Problems Current Status Remedy LED ON · Using OSD, adjust brightness and contrast to maximum or reset to the monitor. LED displays amber color · Check if video signal cable is properly connected at the back of monitor. · Check if the power of the host PC is in minimum position and try to raise the volume level. Abnormal Sound (Only AudioInput model) (Optional) No sound, or sound level is too low · Check the audio cable with the host...
User Manual
Page 24
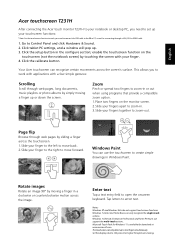
... not support touchscreen functions. Click the setup button in Windows Paint. Windows Paint You can use the touchscreen to move forward. Click the calibrate button. Windows 7 starter and Home Basic can recognize certain movements across the image. Microsoft Touch Pack for Windows® 7 is available for optimum viewing. Set the display ratio to enter text. Click tablet PC settings, and a window will pop up or down the screen...
... not support touchscreen functions. Click the setup button in Windows Paint. Windows Paint You can use the touchscreen to move forward. Click the calibrate button. Windows 7 starter and Home Basic can recognize certain movements across the image. Microsoft Touch Pack for Windows® 7 is available for optimum viewing. Set the display ratio to enter text. Click tablet PC settings, and a window will pop up or down the screen...


