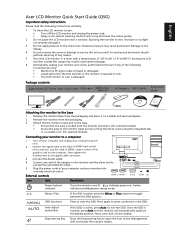
Quick Start Guide
Page 1
...to140° F). Amber indicates standby/power saving mode. / Minus / Plus If the OSD is damaged. Storing the LCD monitor outside this range may cause permanent damage to the display. 4 Do not remove the cover or attempt to service this unit yourself. HDMI 1 5 Plug the power cords of... your monitor into a nearby electrical outlet. OSD functions Press to open the Acer eColor Management OSD and access the scenario modes. English Acer LCD Monitor Quick Start...
...to140° F). Amber indicates standby/power saving mode. / Minus / Plus If the OSD is damaged. Storing the LCD monitor outside this range may cause permanent damage to the display. 4 Do not remove the cover or attempt to service this unit yourself. HDMI 1 5 Plug the power cords of... your monitor into a nearby electrical outlet. OSD functions Press to open the Acer eColor Management OSD and access the scenario modes. English Acer LCD Monitor Quick Start...

Quick Start Guide
Page 2
... manufacturer could void the user authority, which is in the European Union This symbol on the product or on a circuit different from that this LCD monitor is granted by user in private household in compliance with your waste equipment at the time of waste electrical and electronic equipment. CE declaration of...
... manufacturer could void the user authority, which is in the European Union This symbol on the product or on a circuit different from that this LCD monitor is granted by user in private household in compliance with your waste equipment at the time of waste electrical and electronic equipment. CE declaration of...
User Manual
Page 2
...any means, electronically, mechanically, by photocopy, recording or otherwise, without obligation to notify any person of Acer Incorporated. All correspondence concerning your computer. Acer LCD Monitor User Guide Original Issue: 06/2009 Changes may be reproduced, stored in a retrieval system, or transmitted...the information in new editions of this manual or supplementary documents and publications. Acer LCD Monitor User Guide Model number Serial number Date of purchase Place of purchase Acer and the Acer logo are used herein for a particular purpose. All Rights Reserved. Other...
...any means, electronically, mechanically, by photocopy, recording or otherwise, without obligation to notify any person of Acer Incorporated. All correspondence concerning your computer. Acer LCD Monitor User Guide Original Issue: 06/2009 Changes may be reproduced, stored in a retrieval system, or transmitted...the information in new editions of this manual or supplementary documents and publications. Acer LCD Monitor User Guide Model number Serial number Date of purchase Place of purchase Acer and the Acer logo are used herein for a particular purpose. All Rights Reserved. Other...
User Manual
Page 3
...turning off the power switch for a few hours. Cleaning your safety and comfort Safety instructions Read these guidelines when cleaning the monitor: • Always unplug the monitor before cleaning. • Use a soft cloth to wipe the screen and cabinet front and sides. It may flicker during initial... use . • The LCD screen has 99.99% or more effective pixels. Special notes on the desktop pattern you use . Keep this case, the screen is displayed...
...turning off the power switch for a few hours. Cleaning your safety and comfort Safety instructions Read these guidelines when cleaning the monitor: • Always unplug the monitor before cleaning. • Use a soft cloth to wipe the screen and cabinet front and sides. It may flicker during initial... use . • The LCD screen has 99.99% or more effective pixels. Special notes on the desktop pattern you use . Keep this case, the screen is displayed...
User Manual
Page 4
... available, consult your hearing, follow these instructions. • Gradually increase the volume until you can 't hear people speaking near water. • Do not place this monitor ,do not increase it from the type of internal components and to prevent battery leakage, do not place the product on the cord. • If...
... available, consult your hearing, follow these instructions. • Gradually increase the volume until you can 't hear people speaking near water. • Do not place this monitor ,do not increase it from the type of internal components and to prevent battery leakage, do not place the product on the cord. • If...
User Manual
Page 7
... the strain on the recorded image and does not constitute a malfunction. This product has been shipped enabled for power management: • Activate display's Sleep mode within 15 minutes of user inactivity. • Activate computer's Sleep mode within 30 minutes of physical injury. Incorrect computer usage ...or other factors greatly increase the risk of user inactivity. • Wake the computer from staying too long in front of the monitor, using a footrest, or raising your comfort zone by pushing the power button. This has no effect on your company's health and safety department...
... the strain on the recorded image and does not constitute a malfunction. This product has been shipped enabled for power management: • Activate display's Sleep mode within 15 minutes of user inactivity. • Activate computer's Sleep mode within 30 minutes of physical injury. Incorrect computer usage ...or other factors greatly increase the risk of user inactivity. • Wake the computer from staying too long in front of the monitor, using a footrest, or raising your comfort zone by pushing the power button. This has no effect on your company's health and safety department...
User Manual
Page 8
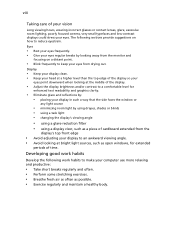
... Long viewing hours, wearing incorrect glasses or contact lenses, glare, excessive room lighting, poorly focused screens, very small typefaces and low-contrast displays could stress your computer use more relaxing and productive: • Take short breaks regularly and often. • Perform some stretching exercises. ... to reduce eyestrain. viii Taking care of time. Eyes • Rest your eyes frequently. • Give your eyes from the monitor and focusing on how to keep your eyes regular breaks by using drapes, shades or blinds • using a task light • changing ...
... Long viewing hours, wearing incorrect glasses or contact lenses, glare, excessive room lighting, poorly focused screens, very small typefaces and low-contrast displays could stress your computer use more relaxing and productive: • Take short breaks regularly and often. • Perform some stretching exercises. ... to reduce eyestrain. viii Taking care of time. Eyes • Rest your eyes frequently. • Give your eyes from the monitor and focusing on how to keep your eyes regular breaks by using drapes, shades or blinds • using a task light • changing ...
User Manual
Page 9
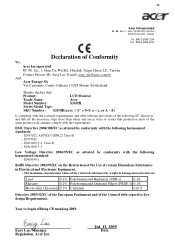
...-. The maximum concentration values of the restricted substances by conformity with the following harmonized standard: -. Easy Lai /Manager Regulation, Acer Inc. ix Acer Incorporated 8F, 88, Sec. 1, Hsin Tai Wu Rd., Hsichih Taipei Hsien 221, Taiwan Tel : 886-2-2696-1234 Fax ..., Taipei Hsien 221, Taiwan Contact Person: Mr. Easy Lai, E-mail: easy_lai@acer.com.tw And, Acer Europe SA Via Cantonale, Centro Galleria 2 6928 Manno Switzerland Hereby declare that: Product: LCD Monitor Trade Name: Acer Model Number: S243HL Series Model Type: SKU Number: S243HLxxxx ("x" = 0~9, a ~ z, or A...
...-. The maximum concentration values of the restricted substances by conformity with the following harmonized standard: -. Easy Lai /Manager Regulation, Acer Inc. ix Acer Incorporated 8F, 88, Sec. 1, Hsin Tai Wu Rd., Hsichih Taipei Hsien 221, Taiwan Tel : 886-2-2696-1234 Fax ..., Taipei Hsien 221, Taiwan Contact Person: Mr. Easy Lai, E-mail: easy_lai@acer.com.tw And, Acer Europe SA Via Cantonale, Centro Galleria 2 6928 Manno Switzerland Hereby declare that: Product: LCD Monitor Trade Name: Acer Model Number: S243HL Series Model Type: SKU Number: S243HLxxxx ("x" = 0~9, a ~ z, or A...
User Manual
Page 10
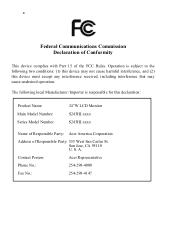
... may not cause harmful interference, and (2) this declaration: Product Name: Main Model Number: Series Model Number: 24"W LCD Monitor S243HLxxxx S243HLxxxx Name of Responsible Party: Acer America Corporation Address of the FCC Rules. x Federal Communications Commission Declaration of Conformity This device complies with Part 15 of Responsible... U. The following local Manufacturer /Importer is subject to the following two conditions: (1) this device may cause undesired operation. Contact Person: Acer Representative Phone No.: 254-298-4000 Fax No.: 254-298-4147 A. S.
... may not cause harmful interference, and (2) this declaration: Product Name: Main Model Number: Series Model Number: 24"W LCD Monitor S243HLxxxx S243HLxxxx Name of Responsible Party: Acer America Corporation Address of the FCC Rules. x Federal Communications Commission Declaration of Conformity This device complies with Part 15 of Responsible... U. The following local Manufacturer /Importer is subject to the following two conditions: (1) this device may cause undesired operation. Contact Person: Acer Representative Phone No.: 254-298-4000 Fax No.: 254-298-4147 A. S.

User Manual
Page 11
Contents Information for your safety and comfort iii Safety instructions iii Special notes on LCD monitors iii Cleaning your monitor iii Connecting/disconnecting the device iii Accessibility iv Safe listening iv Warnings iv Using ...Connecting the docking device (for selected models) 5 Display Data Channel (DDC) 5 Connector pin assignment 5 15-pin color display signal cable 5 19-pin color display signal cable* 6 6 Standard timing table 7 Installation 8 Users controls 9 Front panel controls 9 Acer eColor Management 10 Operation instructions 10 Features and ...
Contents Information for your safety and comfort iii Safety instructions iii Special notes on LCD monitors iii Cleaning your monitor iii Connecting/disconnecting the device iii Accessibility iv Safe listening iv Warnings iv Using ...Connecting the docking device (for selected models) 5 Display Data Channel (DDC) 5 Connector pin assignment 5 15-pin color display signal cable 5 19-pin color display signal cable* 6 6 Standard timing table 7 Installation 8 Users controls 9 Front panel controls 9 Acer eColor Management 10 Operation instructions 10 Features and ...
User Manual
Page 13
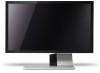
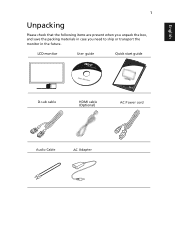
LCD monitor User guide Quick start guide D-sub cable HDMI cable (Optional) AC Power cord Audio Cable AC Adapter English 1 Unpacking Please check that the following items are present when you unpack the box, and save the packing materials in case you need to ship or transport the monitor in the future.
LCD monitor User guide Quick start guide D-sub cable HDMI cable (Optional) AC Power cord Audio Cable AC Adapter English 1 Unpacking Please check that the following items are present when you unpack the box, and save the packing materials in case you need to ship or transport the monitor in the future.
User Manual
Page 14
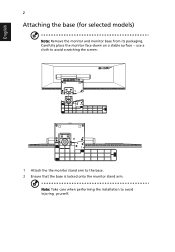
English 2 Attaching the base (for selected models) Note: Remove the monitor and monitor base from its packaging. Carefully place the monitor face-down on a stable surface -- use a cloth to avoid scratching the screen. 1 Attach the the monitor stand arm to avoid injuring yourself. Note: Take care when performing the installation to the base. 2 Ensure that the base is locked onto the monitor stand arm.
English 2 Attaching the base (for selected models) Note: Remove the monitor and monitor base from its packaging. Carefully place the monitor face-down on a stable surface -- use a cloth to avoid scratching the screen. 1 Attach the the monitor stand arm to avoid injuring yourself. Note: Take care when performing the installation to the base. 2 Ensure that the base is locked onto the monitor stand arm.

User Manual
Page 15
... adjust the monitor tilt, using 220/240 V AC: Use a cord set should have the appropriate safety approvals for your hands to "power saving" mode by the control signal from "power saving" mode back to 15 degrees up or 5 degrees down. The recovery time from the display controller, as ...indicated by the amber-colored power LED. No useradjustment is required. • Plug one end of your area. • The monitor has a universal power supply that the power cord you can be adjusted to ...
... adjust the monitor tilt, using 220/240 V AC: Use a cord set should have the appropriate safety approvals for your hands to "power saving" mode by the control signal from "power saving" mode back to 15 degrees up or 5 degrees down. The recovery time from the display controller, as ...indicated by the amber-colored power LED. No useradjustment is required. • Plug one end of your area. • The monitor has a universal power supply that the power cord you can be adjusted to ...

User Manual
Page 16
... PIN No. Description 9 +5 V 10 Logic ground 11 Monitor ground 12 DDC-serial data 13 H-sync 14 V-sync 15 DDC-serial clock Connector pin assignment 15-pin color display signal cable 1 5 6 10 11 15 PIN No. 4 English Display Data Channel (DDC) To make installation easier, so long ...as your system supports the DDC protocol, the monitor is a communication protocol through which the monitor automatically informs the host ...
... PIN No. Description 9 +5 V 10 Logic ground 11 Monitor ground 12 DDC-serial data 13 H-sync 14 V-sync 15 DDC-serial clock Connector pin assignment 15-pin color display signal cable 1 5 6 10 11 15 PIN No. 4 English Display Data Channel (DDC) To make installation easier, so long ...as your system supports the DDC protocol, the monitor is a communication protocol through which the monitor automatically informs the host ...
User Manual
Page 19
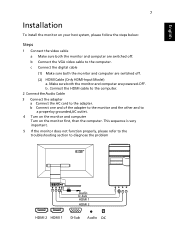
...the troubleshooting section to a properloy grounded,AC outlet. 4 Turn on the monitor and computer Turn on your host system, please follow the steps below: Steps 1 Connect the video cable a Make sure both the monitor and computer are switched off . (2) HDMI Cable (Only HDMI-Input Model... Audio DC b Connect the VGA video cable to the adapter. English 7 Installation To install the monitor on the monitor first, then the computer. c Connect the digital cable (1) Make sure both the monitor and computer are switched off . Connect the HDMI cable to the computer. 2 Connect the Audio Cable...
...the troubleshooting section to a properloy grounded,AC outlet. 4 Turn on the monitor and computer Turn on your host system, please follow the steps below: Steps 1 Connect the video cable a Make sure both the monitor and computer are switched off . (2) HDMI Cable (Only HDMI-Input Model... Audio DC b Connect the VGA video cable to the adapter. English 7 Installation To install the monitor on the monitor first, then the computer. c Connect the digital cable (1) Make sure both the monitor and computer are switched off . Connect the HDMI cable to the computer. 2 Connect the Audio Cable...
User Manual
Page 20
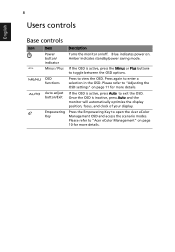
8 Users controls English Base controls Icon Item Description Power button/ indicator Turns the monitor on page 10 for more details. Once the OSD is active, press the Minus or Plus buttons to toggle between the OSD options. Please ... mode. / Minus / Plus If the OSD is inactive, press Auto and the monitor will automatically optimize the display position, focus, and clock of your display. Please refer to "Acer eColor Management" on /off. OSD functions Press to open the Acer eColor Management OSD and access the scenario modes. Empowering Key Press the Empowering Key...
8 Users controls English Base controls Icon Item Description Power button/ indicator Turns the monitor on page 10 for more details. Once the OSD is active, press the Minus or Plus buttons to toggle between the OSD options. Please ... mode. / Minus / Plus If the OSD is inactive, press Auto and the monitor will automatically optimize the display position, focus, and clock of your display. Please refer to "Acer eColor Management" on /off. OSD functions Press to open the Acer eColor Management OSD and access the scenario modes. Empowering Key Press the Empowering Key...
User Manual
Page 22
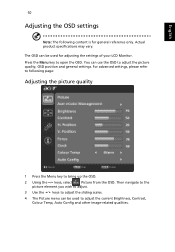
..., Colour Temp, Auto Config and other image-related qualities. For advanced settings, please refer to following content is for adjusting the settings of your LCD Monitor. Press the Menu key to bring up the OSD. 2 Using the / keys, select Picture from the OSD. Actual product specifications may vary.
..., Colour Temp, Auto Config and other image-related qualities. For advanced settings, please refer to following content is for adjusting the settings of your LCD Monitor. Press the Menu key to bring up the OSD. 2 Using the / keys, select Picture from the OSD. Actual product specifications may vary.
User Manual
Page 25
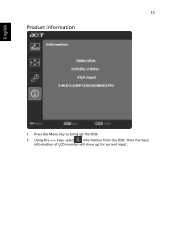
13 Product information English 1 Press the Menu key to bring up for current input. Then the basic information of LCD monitor will show up the OSD. 2 Using the / keys, select Information from the OSD.
13 Product information English 1 Press the Menu key to bring up for current input. Then the basic information of LCD monitor will show up the OSD. 2 Using the / keys, select Information from the OSD.
User Manual
Page 26
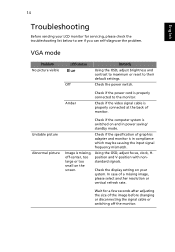
... to maximum or reset to see if you can self-diagnose the problem. Check if the video signal cable is properly connected to the monitor. Using the OSD, adjust focus, clock, Hposition and V-position with nonstandard signals. Unstable picture Abnormal picture Check if the computer system is... or disconnecting the signal cable or switching off -center, too large or too small on your LCD monitor for servicing, please check the troubleshooting list below to their default settings. Check the display setting on the screen. Wait for a few seconds after adjusting the size of a missing image, ...
... to maximum or reset to see if you can self-diagnose the problem. Check if the video signal cable is properly connected to the monitor. Using the OSD, adjust focus, clock, Hposition and V-position with nonstandard signals. Unstable picture Abnormal picture Check if the computer system is... or disconnecting the signal cable or switching off -center, too large or too small on your LCD monitor for servicing, please check the troubleshooting list below to their default settings. Check the display setting on the screen. Wait for a few seconds after adjusting the size of a missing image, ...
User Manual
Page 27
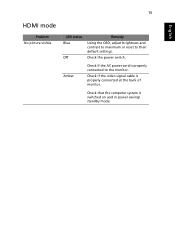
Amber Check if the AC power cord is switched on and in power saving/ standby mode. Check that the computer system is properly connected to their default settings. Check the power switch. Check if the video signal cable is properly connected at the back of monitor. 15 English HDMI mode Problem No picture visible LED status Blue Off Remedy Using the OSD, adjust brightness and contrast to maximum or reset to the monitor.
Amber Check if the AC power cord is switched on and in power saving/ standby mode. Check that the computer system is properly connected to their default settings. Check the power switch. Check if the video signal cable is properly connected at the back of monitor. 15 English HDMI mode Problem No picture visible LED status Blue Off Remedy Using the OSD, adjust brightness and contrast to maximum or reset to the monitor.


