Quick Start Guide
Page 1
... Ensure that the base is active, press Auto to exit the OSD. Storing the LCD monitor outside this unit yourself. Then tighten the thumbscrews on . OSD functions Press to open the Acer eColor Management OSD and access the scenario modes. Press the Empowering Key to view the OSD.... English Acer LCD Monitor Quick Start Guide (QSG) Important safety instructions Please read the following circumstances occur: • Monitor-to-PC signal cable is frayed or damaged. • Liquid spills onto the LCD monitor or the monitor is exposed to rain. • The LCD monitor or case is damaged...
... Ensure that the base is active, press Auto to exit the OSD. Storing the LCD monitor outside this unit yourself. Then tighten the thumbscrews on . OSD functions Press to open the Acer eColor Management OSD and access the scenario modes. Press the Empowering Key to view the OSD.... English Acer LCD Monitor Quick Start Guide (QSG) Important safety instructions Please read the following circumstances occur: • Monitor-to-PC signal cable is frayed or damaged. • Liquid spills onto the LCD monitor or the monitor is exposed to rain. • The LCD monitor or case is damaged...

Quick Start Guide
Page 2
... correct the interference by turning the device off your waste equipment at the time of conformity Hereby, Acer Inc., declares that this product must accept any interference received, including interference that this LCD monitor is subject to provide reasonable protection against harmful interference in compliance with the essential requirements and other household...
... correct the interference by turning the device off your waste equipment at the time of conformity Hereby, Acer Inc., declares that this product must accept any interference received, including interference that this LCD monitor is subject to provide reasonable protection against harmful interference in compliance with the essential requirements and other household...

User Manual
Page 2
... may be made periodically to notify any means, electronically, mechanically, by any person of such revisions or changes. Acer Incorporated. Acer LCD Monitor User Guide Original Issue: 03/2010 Changes may be incorporated in new editions of this publication without the prior written permission...belong to your unit should include the serial number, model number and purchase information. Acer LCD Monitor User Guide Model number Serial number Date of purchase Place of purchase Acer and the Acer logo are used herein for a particular purpose. Other companies' product names or trademarks...
... may be made periodically to notify any means, electronically, mechanically, by any person of such revisions or changes. Acer Incorporated. Acer LCD Monitor User Guide Original Issue: 03/2010 Changes may be incorporated in new editions of this publication without the prior written permission...belong to your unit should include the serial number, model number and purchase information. Acer LCD Monitor User Guide Model number Serial number Date of purchase Place of purchase Acer and the Acer logo are used herein for a particular purpose. Other companies' product names or trademarks...

User Manual
Page 3
... depending on again to wipe the screen and cabinet front and sides. iii Information for a few hours. Turn off the power switch for your monitor Please carefully follow these instructions carefully. Special notes on the product. It may include blemishes of 0.01% or less such as a missing pixel... or a pixel lit all warnings and instructions marked on LCD monitors The following are normal with the LCD monitor and do not indicate a problem. • Due to the nature of the LCD screen, an afterimage of the fluorescent light...
... depending on again to wipe the screen and cabinet front and sides. iii Information for a few hours. Turn off the power switch for your monitor Please carefully follow these instructions carefully. Special notes on the product. It may include blemishes of 0.01% or less such as a missing pixel... or a pixel lit all warnings and instructions marked on LCD monitors The following are normal with the LCD monitor and do not indicate a problem. • Due to the nature of the LCD screen, an afterimage of the fluorescent light...
User Manual
Page 4
.... Do not locate this product where people will probably cause unexpected short current or damage internal devices. • The adapter is only used for this monitor ,do not place the product on the marking label. Never spill liquid of any kind onto or into is used for other similar surface. If...
.... Do not locate this product where people will probably cause unexpected short current or damage internal devices. • The adapter is only used for this monitor ,do not place the product on the marking label. Never spill liquid of any kind onto or into is used for other similar surface. If...

User Manual
Page 7
... prolonged use . Users are also at risk of physical injury. Long work periods, bad posture, poor work habits, stress, inadequate working in front of the monitor, using a footrest, or raising your sitting height to computer use Computer users may lead to remove the strain on the recorded image and does not...
... prolonged use . Users are also at risk of physical injury. Long work periods, bad posture, poor work habits, stress, inadequate working in front of the monitor, using a footrest, or raising your sitting height to computer use Computer users may lead to remove the strain on the recorded image and does not...

User Manual
Page 8
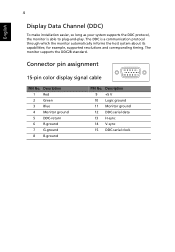
... stress your display in such a way that the side faces the window or any light source • minimizing room light by looking away from the monitor and focusing on how to reduce eyestrain.
... stress your display in such a way that the side faces the window or any light source • minimizing room light by looking away from the monitor and focusing on how to reduce eyestrain.

User Manual
Page 9
... by conformity with the following harmonized standards: -. EN61000-3-2, Class D -. Mar. 12, 2010 Date Easy Lai /Manager Regulation, Acer Inc. The maximum concentration values of the restricted substances by conformity with the following harmonized standard: -. Year to begin affixing CE ...Via Cantonale, Centro Galleria 2 6928 Manno Switzerland Hereby declare that: Product: Trade Name: Model Number: SKU Number: LCD Monitor Acer S221HQL/S211HL S221HQL/S211HL 0~9, a ~ z, or A ~ Z) Is compliant with the essential requirements and other relevant provisions of the following EC...
... by conformity with the following harmonized standards: -. EN61000-3-2, Class D -. Mar. 12, 2010 Date Easy Lai /Manager Regulation, Acer Inc. The maximum concentration values of the restricted substances by conformity with the following harmonized standard: -. Year to begin affixing CE ...Via Cantonale, Centro Galleria 2 6928 Manno Switzerland Hereby declare that: Product: Trade Name: Model Number: SKU Number: LCD Monitor Acer S221HQL/S211HL S221HQL/S211HL 0~9, a ~ z, or A ~ Z) Is compliant with the essential requirements and other relevant provisions of the following EC...

User Manual
Page 10
... interference that may not cause harmful interference, and (2) this declaration: Product Name: LCD Monitor Main Model Number: S221HQL/S211HL Series Model Number: S221HQL/S211HL 0~9, a ~ z, A ~ Z or Blank) Name of Responsible Party: Acer America Corporation Address of the FCC Rules. Contact Person: Acer Representative Phone No.: 254-298-4000 Fax No.: 254-298-4147 The following two...
... interference that may not cause harmful interference, and (2) this declaration: Product Name: LCD Monitor Main Model Number: S221HQL/S211HL Series Model Number: S221HQL/S211HL 0~9, a ~ z, A ~ Z or Blank) Name of Responsible Party: Acer America Corporation Address of the FCC Rules. Contact Person: Acer Representative Phone No.: 254-298-4000 Fax No.: 254-298-4147 The following two...

User Manual
Page 11
Contents Information for your safety and comfort iii Safety instructions iii Special notes on LCD monitors iii Cleaning your monitor iii Connecting/disconnecting the device iii Accessibility iv Safe listening iv Warnings iv Using electrical power ... color display signal cable 5 19-pin color display signal cable 5 Standard timing table 6 Installation 7 Users controls 8 Front panel controls 8 Acer eColor Management 9 Operation instructions 9 Features and benefits 9 Adjusting the OSD settings 10 Adjusting the picture quality 10 Adjusting the OSD position 11 ...
Contents Information for your safety and comfort iii Safety instructions iii Special notes on LCD monitors iii Cleaning your monitor iii Connecting/disconnecting the device iii Accessibility iv Safe listening iv Warnings iv Using electrical power ... color display signal cable 5 19-pin color display signal cable 5 Standard timing table 6 Installation 7 Users controls 8 Front panel controls 8 Acer eColor Management 9 Operation instructions 9 Features and benefits 9 Adjusting the OSD settings 10 Adjusting the picture quality 10 Adjusting the OSD position 11 ...

User Manual
Page 13
LCD monitor User guide Quick start guide D-sub cable HDMI cable (Optional) AC Power cord DVI cable (Optional) AC Adapter English 1 Unpacking Please check that the following items are present when you unpack the box, and save the packing materials in case you need to ship or transport the monitor in the future.
LCD monitor User guide Quick start guide D-sub cable HDMI cable (Optional) AC Power cord DVI cable (Optional) AC Adapter English 1 Unpacking Please check that the following items are present when you unpack the box, and save the packing materials in case you need to ship or transport the monitor in the future.

User Manual
Page 14
English 2 Attaching the base (for selected models) Note: Remove the monitor and monitor base from its packaging. Note: Take care when performing the installation to the base. 2 Ensure that the base is locked onto the monitor stand arm. use a cloth to avoid scratching the screen. 1 Attach the the monitor stand arm to avoid injuring yourself. Carefully place the monitor face-down on a stable surface --
English 2 Attaching the base (for selected models) Note: Remove the monitor and monitor base from its packaging. Note: Take care when performing the installation to the base. 2 Ensure that the base is locked onto the monitor stand arm. use a cloth to avoid scratching the screen. 1 Attach the the monitor stand arm to avoid injuring yourself. Carefully place the monitor face-down on a stable surface --

User Manual
Page 15
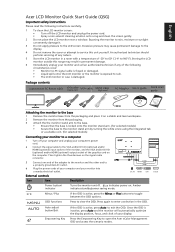
... position, you use is the correct type required for the country in either 100/120 V AC or 220/240 V AC voltage area. Power saving The monitor will be switched to "on" is around 3 seconds. The recovery time from "power saving" mode back to "power saving" mode by the control signal from...-listed cord set, type SVT wire and plug rated 10 A/125 V. • For units using both of your hands to hold the edges of the monitor. Mode On Power saving LED light Blue Orange The power saving mode will be kept until a control signal has been detected or the keyboard or...
... position, you use is the correct type required for the country in either 100/120 V AC or 220/240 V AC voltage area. Power saving The monitor will be switched to "on" is around 3 seconds. The recovery time from "power saving" mode back to "power saving" mode by the control signal from...-listed cord set, type SVT wire and plug rated 10 A/125 V. • For units using both of your hands to hold the edges of the monitor. Mode On Power saving LED light Blue Orange The power saving mode will be kept until a control signal has been detected or the keyboard or...
User Manual
Page 16
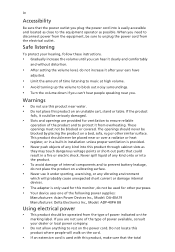
...the DDC2B standard. The DDC is able to plug-and-play. Description 9 +5 V 10 Logic ground 11 Monitor ground 12 DDC-serial data 13 H-sync 14 V-sync 15 DDC-serial clock Description 1 Red 2 Green 3 Blue 4 Monitor ground 5 DDC-return 6 R-ground 7 G-ground 8 B-ground PIN No. for example, supported resolutions and ...10 11 15 PIN No. 4 English Display Data Channel (DDC) To make installation easier, so long as your system supports the DDC protocol, the monitor is a communication protocol through which the monitor automatically informs the host system about its capabilities;
...the DDC2B standard. The DDC is able to plug-and-play. Description 9 +5 V 10 Logic ground 11 Monitor ground 12 DDC-serial data 13 H-sync 14 V-sync 15 DDC-serial clock Description 1 Red 2 Green 3 Blue 4 Monitor ground 5 DDC-return 6 R-ground 7 G-ground 8 B-ground PIN No. for example, supported resolutions and ...10 11 15 PIN No. 4 English Display Data Channel (DDC) To make installation easier, so long as your system supports the DDC protocol, the monitor is a communication protocol through which the monitor automatically informs the host system about its capabilities;
User Manual
Page 19
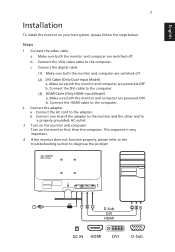
...please follow the steps below: Steps 1 Connect the video cable a Make sure both the monitor and computer are switched off . (2) DVI Cable (Only Dual-Input Model) a. Make sure both the monitor and computer are powered-OFF. Connect the DVI cable to the computer. English 7 Installation... To install the monitor on the monitor first, then the computer. b Connect the VGA video cable to the computer. (3)...
...please follow the steps below: Steps 1 Connect the video cable a Make sure both the monitor and computer are switched off . (2) DVI Cable (Only Dual-Input Model) a. Make sure both the monitor and computer are powered-OFF. Connect the DVI cable to the computer. English 7 Installation... To install the monitor on the monitor first, then the computer. b Connect the VGA video cable to the computer. (3)...

User Manual
Page 20
.../power saving mode. / Minus / Plus If the OSD is inactive, press Auto and the monitor will automatically optimize the display position, focus, and clock of your display. Press again to "Acer eColor Management" on /off. 8 Users controls English Base controls Icon Item Description Power button/ ...indicator Turns the monitor on page 10 for more details. Once the OSD is active, press the ...
.../power saving mode. / Minus / Plus If the OSD is inactive, press Auto and the monitor will automatically optimize the display position, focus, and clock of your display. Press again to "Acer eColor Management" on /off. 8 Users controls English Base controls Icon Item Description Power button/ ...indicator Turns the monitor on page 10 for more details. Once the OSD is active, press the ...

User Manual
Page 22
... adjust the picture quality, OSD position and general settings. For advanced settings, please refer to following content is for adjusting the settings of your LCD Monitor. Press the Menu key to bring up the OSD. 2 Using the / keys, select Picture from the OSD. Actual product specifications may vary. English 10 Adjusting...
... adjust the picture quality, OSD position and general settings. For advanced settings, please refer to following content is for adjusting the settings of your LCD Monitor. Press the Menu key to bring up the OSD. 2 Using the / keys, select Picture from the OSD. Actual product specifications may vary. English 10 Adjusting...
User Manual
Page 25
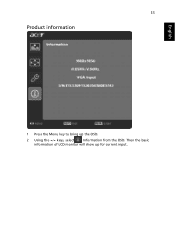
Then the basic information of LCD monitor will show up the OSD. 2 Using the / keys, select Information from the OSD. 13 Product information English 1 Press the Menu key to bring up for current input.
Then the basic information of LCD monitor will show up the OSD. 2 Using the / keys, select Information from the OSD. 13 Product information English 1 Press the Menu key to bring up for current input.

User Manual
Page 26
... compliance which may be causing the input signal frequency mismatch. In case of monitor. Image is switched on your LCD monitor for a few seconds after adjusting the size of graphics adapter and monitor is in power saving/ standby mode. Wait for servicing, please check the... troubleshooting list below to their default settings. Unstable picture Abnormal picture Check if the computer system is missing, off the monitor. Using the OSD, adjust focus, clock, Hposition and V-position with nonstandard signals. Amber Check if the power cord is properly ...
... compliance which may be causing the input signal frequency mismatch. In case of monitor. Image is switched on your LCD monitor for a few seconds after adjusting the size of graphics adapter and monitor is in power saving/ standby mode. Wait for servicing, please check the... troubleshooting list below to their default settings. Unstable picture Abnormal picture Check if the computer system is missing, off the monitor. Using the OSD, adjust focus, clock, Hposition and V-position with nonstandard signals. Amber Check if the power cord is properly ...

User Manual
Page 27
Check that the computer system is properly connected at the back of monitor. Amber Check if the AC power cord is properly connected to their default settings. Check if the video signal cable is switched on and in power saving/ standby mode. Check the power switch. 15 English DVI/HDMI mode Problem No picture visible LED status Blue Off Remedy Using the OSD, adjust brightness and contrast to maximum or reset to the monitor.
Check that the computer system is properly connected at the back of monitor. Amber Check if the AC power cord is properly connected to their default settings. Check if the video signal cable is switched on and in power saving/ standby mode. Check the power switch. 15 English DVI/HDMI mode Problem No picture visible LED status Blue Off Remedy Using the OSD, adjust brightness and contrast to maximum or reset to the monitor.


