
User Manual
Page 3
... sources of power, disconnect power from the system by changing the image or turning off the power switch and then turn it on again to the nature of information obtained from the power supplies. Keep this case, the screen is recovered slowly by unplugging all warnings and instructions marked on the desktop pattern you use . In this document for video and visual display of the fluorescent light, the screen...
... sources of power, disconnect power from the system by changing the image or turning off the power switch and then turn it on again to the nature of information obtained from the power supplies. Keep this case, the screen is recovered slowly by unplugging all warnings and instructions marked on the desktop pattern you use . In this document for video and visual display of the fluorescent light, the screen...

User Manual
Page 4
.... • Turn the volume down if you can hear it under sporting, exercising, or any kind into this product through cabinet slots as possible. Using electrical power • This product should be sure to disconnect power from the equipment, be operated from overheating. When you need to unplug the power cord from the electrical outlet. The openings should never...
.... • Turn the volume down if you can hear it under sporting, exercising, or any kind into this product through cabinet slots as possible. Using electrical power • This product should be sure to disconnect power from the equipment, be operated from overheating. When you need to unplug the power cord from the electrical outlet. The openings should never...

User Manual
Page 5
... provides good protection from the wall outlet and refer servicing to qualified service personnel when: • the power cord or plug is equipped with the supplied power supply cord set , make sure that is not properly grounded may expose you need for details. If power strips are used, the load should not exceed 80% of the power strip's input rating. • This product's power cord is damaged, cut or frayed...
... provides good protection from the wall outlet and refer servicing to qualified service personnel when: • the power cord or plug is equipped with the supplied power supply cord set , make sure that is not properly grounded may expose you need for details. If power strips are used, the load should not exceed 80% of the power strip's input rating. • This product's power cord is damaged, cut or frayed...

User Manual
Page 6
... the best working procedures to reduce the environmental impact of our products. They include below deck on the use of radio equipment in fuel depots, storage and distribution areas; For more information and help when recycling, please go to turn off your vehicle engine. Areas with a potentially explosive atmosphere and obey all signs and instructions. Additional...
... the best working procedures to reduce the environmental impact of our products. They include below deck on the use of radio equipment in fuel depots, storage and distribution areas; For more information and help when recycling, please go to turn off your vehicle engine. Areas with a potentially explosive atmosphere and obey all signs and instructions. Additional...

User Manual
Page 8
... to carpal tunnel syndrome, tendonitis, tenosynovitis or other factors greatly increase the risk of the monitor, using a footrest, or raising your sitting height to remove the strain on your comfort zone by pushing the power button. The following tips: • refrain from Sleep mode by adjusting the viewing angle of physical injury. Finding your comfort zone Find your leg muscles
... to carpal tunnel syndrome, tendonitis, tenosynovitis or other factors greatly increase the risk of the monitor, using a footrest, or raising your sitting height to remove the strain on your comfort zone by pushing the power button. The following tips: • refrain from Sleep mode by adjusting the viewing angle of physical injury. Finding your comfort zone Find your leg muscles

User Manual
Page 9
... looking at bright light sources, such as open windows, for enhanced text readability and graphics clarity. • Eliminate glare and reflections by: • placing your display in such a way that the side faces the window or any light source • minimizing room light by using drapes, shades or blinds • using a task light • changing the display's viewing angle • using a glare-reduction filter • using a display visor, such...
... looking at bright light sources, such as open windows, for enhanced text readability and graphics clarity. • Eliminate glare and reflections by: • placing your display in such a way that the side faces the window or any light source • minimizing room light by using drapes, shades or blinds • using a task light • changing the display's viewing angle • using a glare-reduction filter • using a display visor, such...

User Manual
Page 10
TABLE OF CONTENTS UNPACKING 1 ATTACHING / REMOVING THE BASE 2 SCREEN POSITION ADJUSTMENT 4 CONNECTING THE POWER CORD 5 SAFETY PRECAUTION 5 CLEANING YOUR MONITOR 5 POWER SAVING 6 DDC...6 CONNECTOR PIN ASSIGNMENT 7 INSTALLATION 9 USER CONTROLS 10 TROUBLESHOOTING 21
TABLE OF CONTENTS UNPACKING 1 ATTACHING / REMOVING THE BASE 2 SCREEN POSITION ADJUSTMENT 4 CONNECTING THE POWER CORD 5 SAFETY PRECAUTION 5 CLEANING YOUR MONITOR 5 POWER SAVING 6 DDC...6 CONNECTOR PIN ASSIGNMENT 7 INSTALLATION 9 USER CONTROLS 10 TROUBLESHOOTING 21

User Manual
Page 11
UNPACKING Please check the following items are present when you unpack the box, and save the packing materials in case you will need to ship or transport the monitor in future. LCD Monitor Quick Start Guide AC Power Cord HDMI Cable (Optional) D-Sub Cable (Optional) Audio Cable (Optional) EN-1
UNPACKING Please check the following items are present when you unpack the box, and save the packing materials in case you will need to ship or transport the monitor in future. LCD Monitor Quick Start Guide AC Power Cord HDMI Cable (Optional) D-Sub Cable (Optional) Audio Cable (Optional) EN-1
User Manual
Page 15
... alcohol-based cleaners. CONNECTING THE POWER CORD Check first to rain, excessive moisture, or dust. Do not cover the ventilation slots or openings of the monitor. No user-adjustment is fragile. In order to prevent damage to the adapter, and plug the other light sources may reflect on the power cord to avoid damage to the cable. Do not expose the monitor to make sure...
... alcohol-based cleaners. CONNECTING THE POWER CORD Check first to rain, excessive moisture, or dust. Do not cover the ventilation slots or openings of the monitor. No user-adjustment is fragile. In order to prevent damage to the adapter, and plug the other light sources may reflect on the power cord to avoid damage to the cable. Do not expose the monitor to make sure...

User Manual
Page 16
.... POWER SAVING The monitor will be driven into "Power Saving" mode by the amber-color power LED. EN-6 State LED Light ON Blue Power Saving Mode Amber The power saving states will be kept until a control signal has been detected or the keyboard or mouse is activated. The recovery time from the display controller, as indicated by the control signal from Active OFF state back to Plug and Play with your system if your installation...
.... POWER SAVING The monitor will be driven into "Power Saving" mode by the amber-color power LED. EN-6 State LED Light ON Blue Power Saving Mode Amber The power saving states will be kept until a control signal has been detected or the keyboard or mouse is activated. The recovery time from the display controller, as indicated by the control signal from Active OFF state back to Plug and Play with your system if your installation...

User Manual
Page 17
... Clock+ 11. on device) 15. DESCRIPTION Red Green Blue Monitor Ground DDC-return R-Ground G-Ground B-Ground PIN NO. 9. 10. 11. 12. 13. 14. 15. TMDS Data2- 4. DDC/CEC Ground 18. +5V Power 19. CONNECTOR PIN ASSIGNMENT 15-Pin Color Display Signal Cable PIN NO. 1. 2. 3. 4. 5. 6. 7. 8. DESCRIPTION +5V Logic Ground Monitor Ground DDC-Serial Data H-Sync V-Sync DDC-Serial Clock 19-Pin Color Display Signal Cable* PIN Meaning 1. TMDS Data2+ 2. TMDS...
... Clock+ 11. on device) 15. DESCRIPTION Red Green Blue Monitor Ground DDC-return R-Ground G-Ground B-Ground PIN NO. 9. 10. 11. 12. 13. 14. 15. TMDS Data2- 4. DDC/CEC Ground 18. +5V Power 19. CONNECTOR PIN ASSIGNMENT 15-Pin Color Display Signal Cable PIN NO. 1. 2. 3. 4. 5. 6. 7. 8. DESCRIPTION +5V Logic Ground Monitor Ground DDC-Serial Data H-Sync V-Sync DDC-Serial Clock 19-Pin Color Display Signal Cable* PIN Meaning 1. TMDS Data2+ 2. TMDS...

User Manual
Page 20
Press to activate user defined hotkey function. Amber indicates standby/power saving mode. Press to toggle input sources. Press to activate the OSD menu, then use it again to highlight the desired function. Item 1 Power button/indicator 2 Hotkey 1, 2 buttons 3 Input button 4 Navi/OK button Description Turns the monitor on . Press it as a directional key to enter a selection. USER CONTROLS Base Controls 1 2 3 4 1 No. EN-10 Blue indicates power on /off.
Press to activate user defined hotkey function. Amber indicates standby/power saving mode. Press to toggle input sources. Press to activate the OSD menu, then use it again to highlight the desired function. Item 1 Power button/indicator 2 Hotkey 1, 2 buttons 3 Input button 4 Navi/OK button Description Turns the monitor on . Press it as a directional key to enter a selection. USER CONTROLS Base Controls 1 2 3 4 1 No. EN-10 Blue indicates power on /off.
User Manual
Page 21
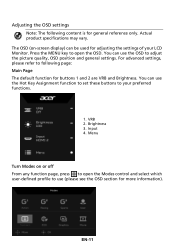
... Menu Turn Modes on -screen display) can use the Hot Key Assignment function to set these buttons to use the OSD to open the Modes control and select which user-defined profile to your LCD Monitor. Press the MENU key to adjust the picture quality, OSD position and general settings. For advanced settings, please refer to following content is for general reference only. You can be used for adjusting the settings of your preferred functions. 1. VRB 2. Brightness...
... Menu Turn Modes on -screen display) can use the Hot Key Assignment function to set these buttons to use the OSD to open the Modes control and select which user-defined profile to your LCD Monitor. Press the MENU key to adjust the picture quality, OSD position and general settings. For advanced settings, please refer to following content is for general reference only. You can be used for adjusting the settings of your preferred functions. 1. VRB 2. Brightness...
User Manual
Page 22
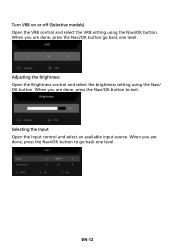
Adjusting the Brightness Open the Brightness control and select the brightness setting using the Navi/OK button. Selecting the Input Open the Input control and select an available input source. EN-12 Turn VRB on or off (Selective models) Open the VRB control and select the VRB setting using the Navi/ OK button. When you are done, press the Navi/OK button go back one level. When you are done, press the Navi/OK button to exit. When you are done, press the Navi/OK button to go back one level.
Adjusting the Brightness Open the Brightness control and select the brightness setting using the Navi/OK button. Selecting the Input Open the Input control and select an available input source. EN-12 Turn VRB on or off (Selective models) Open the VRB control and select the VRB setting using the Navi/ OK button. When you are done, press the Navi/OK button go back one level. When you are done, press the Navi/OK button to exit. When you are done, press the Navi/OK button to go back one level.
User Manual
Page 24
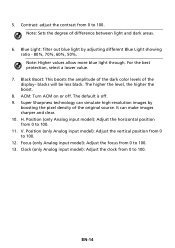
...-resolution images by adjusting different Blue Light showing ratio - 80%, 70%, 60%, 50%. Position (only Analog input model): Adjust the horizontal position from 0 to 100. 12. ACM: Turn ACM on or off . 9. The default is off . Position (only Analog input model): Adjust the vertical position from 0 to 100. Blue Light: filter out blue light by boosting the pixel density of difference between light and dark areas. 6. Black Boost: This boosts the amplitude of the dark color levels of the display...
...-resolution images by adjusting different Blue Light showing ratio - 80%, 70%, 60%, 50%. Position (only Analog input model): Adjust the horizontal position from 0 to 100. 12. ACM: Turn ACM on or off . 9. The default is off . Position (only Analog input model): Adjust the vertical position from 0 to 100. Blue Light: filter out blue light by boosting the pixel density of difference between light and dark areas. 6. Black Boost: This boosts the amplitude of the dark color levels of the display...

User Manual
Page 25
... adjust. 3. Grayscale Mode: Turn grayscale mode On or Off. 9. 6-axis Hue: Adjust the red, green, blue, yellow, magenta and cyan hue. Press the MENU key to select the setting. 4. The default value is 2.2 (standard value for getting better color matching representation with the peripheral device, such as DSCs or printers. 8. Use the Navi/OK button to open the OSD. 2. You can choose Cool, Warm, Bluelight or User...
... adjust. 3. Grayscale Mode: Turn grayscale mode On or Off. 9. 6-axis Hue: Adjust the red, green, blue, yellow, magenta and cyan hue. Press the MENU key to select the setting. 4. The default value is 2.2 (standard value for getting better color matching representation with the peripheral device, such as DSCs or printers. 8. Use the Navi/OK button to open the OSD. 2. You can choose Cool, Warm, Bluelight or User...

User Manual
Page 27
... dynamic picture; the default is Off. • VRB does not support PIP/PBP Mode and HDR Mode. (Selective models) • When VRB is Extreme or Normal, FreeSync is automatically turned off. • VRB will affect the brightness of the three settings including: (a) Extreme (b) Normal (c) Off 5. Aim Point: Show an Aim point on the monitor's maximum refresh rate. Then navigate to the setting you...
... dynamic picture; the default is Off. • VRB does not support PIP/PBP Mode and HDR Mode. (Selective models) • When VRB is Extreme or Normal, FreeSync is automatically turned off. • VRB will affect the brightness of the three settings including: (a) Extreme (b) Normal (c) Off 5. Aim Point: Show an Aim point on the monitor's maximum refresh rate. Then navigate to the setting you...

User Manual
Page 28
...%. 7. Refresh Rate Num: Display the panel's current refresh rate on the screen. 8. EN-18 Adjusting the OSD 1. OSD Lock: OSD Lock function is stuck. Using the Navi/OK button, select OSD from being pressed accidentally. Press the MENU key to adjust. 3. Transparency: Select the transparency when using gaming mode. To remove the OSD Lock message, press and hold the Navi/OK button continuously for 3 seconds until the message disappears. Use the Navi/OK button to prevent OSD button...
...%. 7. Refresh Rate Num: Display the panel's current refresh rate on the screen. 8. EN-18 Adjusting the OSD 1. OSD Lock: OSD Lock function is stuck. Using the Navi/OK button, select OSD from being pressed accidentally. Press the MENU key to adjust. 3. Transparency: Select the transparency when using gaming mode. To remove the OSD Lock message, press and hold the Navi/OK button continuously for 3 seconds until the message disappears. Use the Navi/OK button to prevent OSD button...
User Manual
Page 31
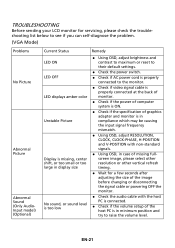
... problem. (VGA Mode) Problems No Picture Abnormal Picture Abnormal Sound (Only AudioInput model) (Optional) Current Status LED ON LED OFF LED displays amber color Unstable Picture Display is missing, center shift, or too small or too large in display size No sound, or sound level is too low Remedy Using OSD, adjust brightness and contrast to maximum or reset to their default settings. Check the power switch. Check if AC power cord is properly connected to the monitor. Check if video signal cable is properly connected...
... problem. (VGA Mode) Problems No Picture Abnormal Picture Abnormal Sound (Only AudioInput model) (Optional) Current Status LED ON LED OFF LED displays amber color Unstable Picture Display is missing, center shift, or too small or too large in display size No sound, or sound level is too low Remedy Using OSD, adjust brightness and contrast to maximum or reset to their default settings. Check the power switch. Check if AC power cord is properly connected to the monitor. Check if video signal cable is properly connected...
User Manual
Page 32
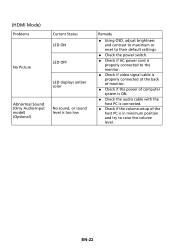
(HDMI Mode) Problems Current Status LED ON No Picture LED OFF LED displays amber color Abnormal Sound (Only Audio-Input model) (Optional) No sound, or sound level is too low Remedy Using OSD, adjust brightness and contrast to maximum or reset to their default settings. Check the power switch. Check if AC power cord is properly connected to the monitor. Check if video signal cable is properly connected at the back of monitor. Check if the power of computer system is ON. Check the audio cable with...
(HDMI Mode) Problems Current Status LED ON No Picture LED OFF LED displays amber color Abnormal Sound (Only Audio-Input model) (Optional) No sound, or sound level is too low Remedy Using OSD, adjust brightness and contrast to maximum or reset to their default settings. Check the power switch. Check if AC power cord is properly connected to the monitor. Check if video signal cable is properly connected at the back of monitor. Check if the power of computer system is ON. Check the audio cable with...


