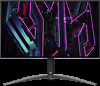
Lifecycle Extension Guide
Page 26
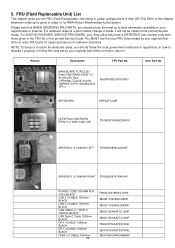
... parts to -date information available on your regional Acer office on the printed Service Guide. MAIN BOARD FOR OLED Panel LW270AHQ-ERG2-YJ1 W/ 2H+DP+Type C(PD90W)+Type B+2*USBCBPR2RTC1F1(100GBNJDLB 1FT1) 756GFMCBCA00000001 KEY BOARD KEPC2FC1WB OLED Panel LW270AHQERG2-YJ1 2560*1440 LGD 730GBG270HQG23N000 SPKR BOX 8 OHM 6W LEFT 378G0600818YLA00HF SPKR BOX 8 OHM 6W RIGHT 378G0600818YRA00HF POWER CORD 1800MM FOR China BLACK USB 3.0 CABLE...
... parts to -date information available on your regional Acer office on the printed Service Guide. MAIN BOARD FOR OLED Panel LW270AHQ-ERG2-YJ1 W/ 2H+DP+Type C(PD90W)+Type B+2*USBCBPR2RTC1F1(100GBNJDLB 1FT1) 756GFMCBCA00000001 KEY BOARD KEPC2FC1WB OLED Panel LW270AHQERG2-YJ1 2560*1440 LGD 730GBG270HQG23N000 SPKR BOX 8 OHM 6W LEFT 378G0600818YLA00HF SPKR BOX 8 OHM 6W RIGHT 378G0600818YRA00HF POWER CORD 1800MM FOR China BLACK USB 3.0 CABLE...
Quick Start Guide
Page 3
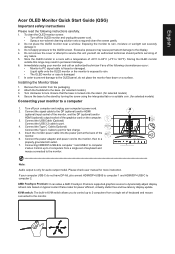
... 2 when Control up to 2 computers from a single set of the DP monitor. 6. Please check user manual for selected models) Connecting your monitor and call an authorized technician if any nature. 5. AMD FreeSync Premium: It can severely damage it. 3. Connect the power adapter and power cord to the monitor, then to port. 4. English Acer OLED Monitor Quick Start Guide (QSG) Important safety instructions Please read the following circumstances occur: • Monitor-to-PC signal cable is frayed...
... 2 when Control up to 2 computers from a single set of the DP monitor. 6. Please check user manual for selected models) Connecting your monitor and call an authorized technician if any nature. 5. AMD FreeSync Premium: It can severely damage it. 3. Connect the power adapter and power cord to the monitor, then to port. 4. English Acer OLED Monitor Quick Start Guide (QSG) Important safety instructions Please read the following circumstances occur: • Monitor-to-PC signal cable is frayed...
Quick Start Guide
Page 4
... device generates, uses, and can drop off . Instead, it over to this product. English External controls 1. Press to view Main page.Press again to select desired option. 3. Notice: Shielded cables All connections to other household waste. Operation with the instructions, may be disposed of the FCC Rules. To move the cursor, simply toggle the button in a residential installation. Regulations...
... device generates, uses, and can drop off . Instead, it over to this product. English External controls 1. Press to view Main page.Press again to select desired option. 3. Notice: Shielded cables All connections to other household waste. Operation with the instructions, may be disposed of the FCC Rules. To move the cursor, simply toggle the button in a residential installation. Regulations...
Quick Start Guide
Page 5
...OSD Lock Input Auto Source Wide Mode Hot Key Assignment DDC/CI HDMI Black Level Quick Start Mode USB Port Select USB 3.2 DSC Power-off USB Charge Image Retention Refresh Information Save Settings to... English SPECIFICATION OLED Panel Display Colors Dot Clock Max. Find manuals and other documents for your Acer product on model, sku and/or region. Resolution Plug & Play Power consumption Input Connector Size Pixel pitch Brightness Contrast Viewable angle Response time Panel Type H-Frequency V-Frequency ON Mode Standby mode Off Mode Input Video Signal Speakers Audio Maximum Screen Size Power...
...OSD Lock Input Auto Source Wide Mode Hot Key Assignment DDC/CI HDMI Black Level Quick Start Mode USB Port Select USB 3.2 DSC Power-off USB Charge Image Retention Refresh Information Save Settings to... English SPECIFICATION OLED Panel Display Colors Dot Clock Max. Find manuals and other documents for your Acer product on model, sku and/or region. Resolution Plug & Play Power consumption Input Connector Size Pixel pitch Brightness Contrast Viewable angle Response time Panel Type H-Frequency V-Frequency ON Mode Standby mode Off Mode Input Video Signal Speakers Audio Maximum Screen Size Power...
Quick Start Guide
Page 14
... installation instructions. The grounding pin is not overhanging the edge of the supporting furniture. • ALWAYS educate children about the dangers of climbing on furniture to reach the product or its controls. • ALWAYS route cords and cables connected to your product so they cannot be retained and relocated, the same considerations as toys and remote controls, on the power cord, plug...
... installation instructions. The grounding pin is not overhanging the edge of the supporting furniture. • ALWAYS educate children about the dangers of climbing on furniture to reach the product or its controls. • ALWAYS route cords and cables connected to your product so they cannot be retained and relocated, the same considerations as toys and remote controls, on the power cord, plug...

User Manual
Page 3
...; Turn the volume down if you . Warnings • Do not use . In this document for future reference. When you plug the power cord into is displayed for hours. Special notes on the product. Accessibility Be sure that the power outlet you need to disconnect power from the equipment, be seriously damaged. • Slots and openings are normal with the OLED monitor and...
...; Turn the volume down if you . Warnings • Do not use . In this document for future reference. When you plug the power cord into is displayed for hours. Special notes on the product. Accessibility Be sure that the power outlet you need to disconnect power from the equipment, be seriously damaged. • Slots and openings are normal with the OLED monitor and...

User Manual
Page 5
... from the wall outlet and refer servicing to qualified service personnel when: • the power cord or plug is strongly committed to reduce the environmental impact of the company's top priorities in damage and will often require extensive work by the operating instructions, since improper adjustment of our other risks. Refer all signs and instructions. Potentially explosive environments Switch off the...
... from the wall outlet and refer servicing to qualified service personnel when: • the power cord or plug is strongly committed to reduce the environmental impact of the company's top priorities in damage and will often require extensive work by the operating instructions, since improper adjustment of our other risks. Refer all signs and instructions. Potentially explosive environments Switch off the...
User Manual
Page 6
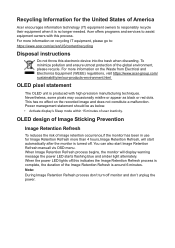
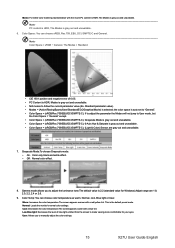
...,Image Retention Refresh, will display warning message the power LED starts flashing blue and amber light alternately. Nevertheless, some pixels may occasionally misfire or appear as below. • Activate display's Sleep mode within 15 minutes of the global environment, please recycle. You can also start automatically after the monitor is turned off. When Image Retention Refresh process begins, the monitor will start Image Retention Refresh manuall vis OSD menu. Note: During Image Retention Refresh process don't turn off...
...,Image Retention Refresh, will display warning message the power LED starts flashing blue and amber light alternately. Nevertheless, some pixels may occasionally misfire or appear as below. • Activate display's Sleep mode within 15 minutes of the global environment, please recycle. You can also start automatically after the monitor is turned off. When Image Retention Refresh process begins, the monitor will start Image Retention Refresh manuall vis OSD menu. Note: During Image Retention Refresh process don't turn off...

User Manual
Page 11
... of Image Sticking Prevention v Image Retention Refresh v TPC (Temporal Peak Control vi Screen move...vi Tips and information for comfortable use vi Finding your comfort zone vii Taking care of your vision vii Developing good work habits vii Unpacking...1 Adjusting the monitor...2 Height Adjustment...2 Tilt...2 Swivel...3 Pivot...3 Wall Mounting...4 Monitor introduction...5 Connecting the cables 6 Connecting the adapter and AC Power cord 7 Power saving...7 Display Data Channel (DDC 8 Standard timing table 10 Using the Shortcut Menu 11 Troubleshooting...
... of Image Sticking Prevention v Image Retention Refresh v TPC (Temporal Peak Control vi Screen move...vi Tips and information for comfortable use vi Finding your comfort zone vii Taking care of your vision vii Developing good work habits vii Unpacking...1 Adjusting the monitor...2 Height Adjustment...2 Tilt...2 Swivel...3 Pivot...3 Wall Mounting...4 Monitor introduction...5 Connecting the cables 6 Connecting the adapter and AC Power cord 7 Power saving...7 Display Data Channel (DDC 8 Standard timing table 10 Using the Shortcut Menu 11 Troubleshooting...

User Manual
Page 16
... button in KVM switch allows you to control up to 2 computers from a single set of the Display bezel operates like a joystick. AMD FreeSync Premium: It can allow a AMD FreeSync Premium supported graphics source to select desired option. 3. Monitor introduction User Controls External controls 1. Dark gray indicates inoperable. KVM switch: The built-in four directions. Press to view Main page.Press again to the monitor. 5 X27U User Guide English...
... button in KVM switch allows you to control up to 2 computers from a single set of the Display bezel operates like a joystick. AMD FreeSync Premium: It can allow a AMD FreeSync Premium supported graphics source to select desired option. 3. Monitor introduction User Controls External controls 1. Dark gray indicates inoperable. KVM switch: The built-in four directions. Press to view Main page.Press again to the monitor. 5 X27U User Guide English...
User Manual
Page 17
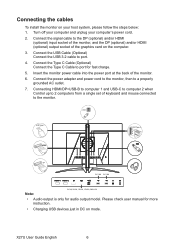
...; Charging USB devices just in DC on mode. Turn off your computer and unplug your host system, please follow the steps below: 1. Connecting HDMI/DP+USB-B to computer 1 and USB-C to computer 2 when Control up to port. 4. Insert the monitor power cable into the power port at the back of the monitor. 6. X27U User Guide English 6 Connect the USB Cable (Optional) Connect the USB 3.2 cable to 2 computers from a single set of the graphics card on your computer's power cord. 2.
...; Charging USB devices just in DC on mode. Turn off your computer and unplug your host system, please follow the steps below: 1. Connecting HDMI/DP+USB-B to computer 1 and USB-C to computer 2 when Control up to port. 4. Insert the monitor power cable into the power port at the back of the monitor. 6. X27U User Guide English 6 Connect the USB Cable (Optional) Connect the USB 3.2 cable to 2 computers from a single set of the graphics card on your computer's power cord. 2.

User Manual
Page 18
... the Adapter, and plug the other end into "Power Saving" mode by the control signal from Active OFF state back to make sure that allows operation in which the equipment will be installed. When Image Retention Refresh process begins, the power LED starts flashing blue and amber light alternately. 7 X27U User Guide English The cord set consisting of H05VV-F cord and plug rated 10 A/250 V. The recovery time from the display controller, as indicated by the amber-color power LED. Power saving The monitor...
... the Adapter, and plug the other end into "Power Saving" mode by the control signal from Active OFF state back to make sure that allows operation in which the equipment will be installed. When Image Retention Refresh process begins, the power LED starts flashing blue and amber light alternately. 7 X27U User Guide English The cord set consisting of H05VV-F cord and plug rated 10 A/250 V. The recovery time from the display controller, as indicated by the amber-color power LED. Power saving The monitor...

User Manual
Page 19
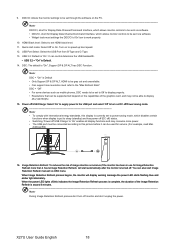
... make installation easier, so long as your system supports the DDC protocol, the monitor is a communication protocol through which the monitor automatically informs the host system about its capabilities; The DDC is able to plug-and-play. Description 2 GND 4 ML_Lane 1+ 6 ML_Lane 1- 8 GND 10 ML_Lane 3+ 12 ML_Lane 3- 14 CONFIG2 16 GND 18 Hot Plug 20 DP_PWR X27U User Guide English 8 for example, supported resolutions...
... make installation easier, so long as your system supports the DDC protocol, the monitor is a communication protocol through which the monitor automatically informs the host system about its capabilities; The DDC is able to plug-and-play. Description 2 GND 4 ML_Lane 1+ 6 ML_Lane 1- 8 GND 10 ML_Lane 3+ 12 ML_Lane 3- 14 CONFIG2 16 GND 18 Hot Plug 20 DP_PWR X27U User Guide English 8 for example, supported resolutions...
User Manual
Page 24
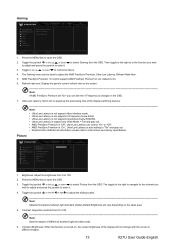
... 3. The Gaming menu can see the V Frequency to enter it . 4. Picture Game Assistant Gaming Picture Color Audio OSD System Information Standard 2560X1440 60 HDMI 1 Off Mode Resolution Hz Input FreeSync Premium Brightness 70 Contrast Constant Brightness Super Sharpness Black Boost HDR Low Blue Light Move Enter Back 1. Toggle the joystick to the up or down to adjust and press the joystick to changes in different images. 13 X27U User Guide English Contrast: Adjust the contrast from 0 to...
... 3. The Gaming menu can see the V Frequency to enter it . 4. Picture Game Assistant Gaming Picture Color Audio OSD System Information Standard 2560X1440 60 HDMI 1 Off Mode Resolution Hz Input FreeSync Premium Brightness 70 Contrast Constant Brightness Super Sharpness Black Boost HDR Low Blue Light Move Enter Back 1. Toggle the joystick to the up or down to adjust and press the joystick to changes in different images. 13 X27U User Guide English Contrast: Adjust the contrast from 0 to...

User Manual
Page 25
... original source to Auto. 1. X27U User Guide English 14 Modes: Open Modes Hot Key Menu. Toggle to the left or right to the image. 9. Super Sharpness: Super Sharpness technology can modify some parameters and save them by themselves. Black Boost: Adjust the black level from the OSD.Then toggle to the right to to HDR. 2. Note: If you set to the function you. Detail rules please refer Modes Spec. Modes...
... original source to Auto. 1. X27U User Guide English 14 Modes: Open Modes Hot Key Menu. Toggle to the left or right to the image. 9. Super Sharpness: Super Sharpness technology can modify some parameters and save them by themselves. Black Boost: Adjust the black level from the OSD.Then toggle to the right to to HDR. 2. Note: If you set to the function you. Detail rules please refer Modes Spec. Modes...
User Manual
Page 26
... make viewing more comfortable for Windows).Adjust range are gray out and unavailable. 7. Color Space: You can choose color temperature as warm, Normal, cool, Blue light or User. Warm: Increases the color temperature.The screen appears warmer with a blue tint. Standard parameter value). • Modes = (Action/Racing/Sports/User/Standard/ECO/Graphics/Movie) is the default preset mode. Grayscale Mode:To choose Grayscale mode. • On:Color only black and white...
... make viewing more comfortable for Windows).Adjust range are gray out and unavailable. 7. Color Space: You can choose color temperature as warm, Normal, cool, Blue light or User. Warm: Increases the color temperature.The screen appears warmer with a blue tint. Standard parameter value). • Modes = (Action/Racing/Sports/User/Standard/ECO/Graphics/Movie) is the default preset mode. Grayscale Mode:To choose Grayscale mode. • On:Color only black and white...

User Manual
Page 28
... menu can support auto search for signal source in the middle of shortcut key 1 or shortcut key 2(Modes,Brightness,Volume,Gamma,Contrast,Low Blue Light,USB Port Select) Note: Hot Key 1 and Hot Key 2 can be changed from Blue Light to orange light. • Press any Key screen to adjust the Input, Auto Source, Wide Mode,, Hot Key Assignment, DDC/CI, HDMI Black Level, Quick Start Mode, USB Port Select, USB 3.2, DSC, Power-off USB Charge,Image Retention Refresh. 5. Note: Surround application must set Auto Source is "On", which screen...
... menu can support auto search for signal source in the middle of shortcut key 1 or shortcut key 2(Modes,Brightness,Volume,Gamma,Contrast,Low Blue Light,USB Port Select) Note: Hot Key 1 and Hot Key 2 can be changed from Blue Light to orange light. • Press any Key screen to adjust the Input, Auto Source, Wide Mode,, Hot Key Assignment, DDC/CI, HDMI Black Level, Quick Start Mode, USB Port Select, USB 3.2, DSC, Power-off USB Charge,Image Retention Refresh. 5. Note: Surround application must set Auto Source is "On", which screen...
User Manual
Page 29
... turned off USB Charge: Select 'On' to supply power to the USB port and select 'Off' to work properly. 10. X27U User Guide English 18 DDC/CI: Allows the monitor settings to be set through the software on DC off monitor and don't unplug the power. DSC = "Off" • For some devices such as mobile phones, DSC needs to the "Max Refresh Rate". When Image Retention Refresh process begins, the monitor will start automatically...
... turned off USB Charge: Select 'On' to supply power to the USB port and select 'Off' to work properly. 10. X27U User Guide English 18 DDC/CI: Allows the monitor settings to be set through the software on DC off monitor and don't unplug the power. DSC = "Off" • For some devices such as mobile phones, DSC needs to the "Max Refresh Rate". When Image Retention Refresh process begins, the monitor will start automatically...

User Manual
Page 30
... Yes Power-Off No USB Charge Image Retention Refresh Move Enter Back Standard 2560X1440 60 HDMI 1 Off Mode Resolution Hz Input FreeSync Premium Game Assistant DSC Yes Gaming Picture Color Power-Off No USB Charge Image Retention Refresh Audio OSD System Information Move Enter Back Setting the KVM Standard 2560X1440 60 HDMI 1 Off Mode Resolution Hz Input FreeSync Premium Game Assistant Gaming Picture Color Audio OSD System Information Input Auto Source Wide Mode Hot Key Assignment DDC/CI HDMI Black Level Quick Start Mode USB Port Select USB 3.2 Auto...
... Yes Power-Off No USB Charge Image Retention Refresh Move Enter Back Standard 2560X1440 60 HDMI 1 Off Mode Resolution Hz Input FreeSync Premium Game Assistant DSC Yes Gaming Picture Color Power-Off No USB Charge Image Retention Refresh Audio OSD System Information Move Enter Back Setting the KVM Standard 2560X1440 60 HDMI 1 Off Mode Resolution Hz Input FreeSync Premium Game Assistant Gaming Picture Color Audio OSD System Information Input Auto Source Wide Mode Hot Key Assignment DDC/CI HDMI Black Level Quick Start Mode USB Port Select USB 3.2 Auto...
User Manual
Page 32
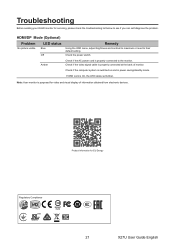
... OSD Lock is properly connected to the monitor. Note: Acer monitor is switched on and in power saving/standby mode. Check the power switch. HDMI/DP Mode (Optional) Problem No picture visible LED status Blue Off Remedy Using the OSD menu, adjust brightness and contrast to maximum or reset to see if you can self-diagnose the problem. Troubleshooting Before sending your OLED monitor for EU Energy Regulatory Compliance 217186 I.T.E. 21 X27U User Guide English Amber Check if the AC power cord is On, the LED status set...
... OSD Lock is properly connected to the monitor. Note: Acer monitor is switched on and in power saving/standby mode. Check the power switch. HDMI/DP Mode (Optional) Problem No picture visible LED status Blue Off Remedy Using the OSD menu, adjust brightness and contrast to maximum or reset to see if you can self-diagnose the problem. Troubleshooting Before sending your OLED monitor for EU Energy Regulatory Compliance 217186 I.T.E. 21 X27U User Guide English Amber Check if the AC power cord is On, the LED status set...


