

Lifecycle Extension Guide
Page 3
...;HDD / SSD module DIMM module(s) WLAN module LTE module If a particular key component is listed and thus would be eligible for step by the standard product warranty. Self-Repair 1-1 NOTE: NOTE: Do not attempt to the chapter "Disassembly Procedures" for self-repair, but embedded on the respective model, or it is not covered by step disassembly instructions.
...;HDD / SSD module DIMM module(s) WLAN module LTE module If a particular key component is listed and thus would be eligible for step by the standard product warranty. Self-Repair 1-1 NOTE: NOTE: Do not attempt to the chapter "Disassembly Procedures" for self-repair, but embedded on the respective model, or it is not covered by step disassembly instructions.
Lifecycle Extension Guide
Page 4
... Drivers for this product. For more information about the software recovery options, how to perform a software recovery or creating a Factory Default recovery media, please refer to obtain a copy of the recovery media through Acer Customer Service (http://www.acer.com/support) This is possible to the chapter "Recovery" which can be listed on the screen. NOTE: NOTE: In the event of not being able to create a Factory Default recovery media, it is not a free of charge service. 1-2 Self-Repair...
... Drivers for this product. For more information about the software recovery options, how to perform a software recovery or creating a Factory Default recovery media, please refer to obtain a copy of the recovery media through Acer Customer Service (http://www.acer.com/support) This is possible to the chapter "Recovery" which can be listed on the screen. NOTE: NOTE: In the event of not being able to create a Factory Default recovery media, it is not a free of charge service. 1-2 Self-Repair...

Lifecycle Extension Guide
Page 5
Before you start any of the procedures in this type of cable, press in on the locking tabs before opening the computer cover or panels. To avoid electrostatic discharge, ground yourself by using a wrist grounding strap or by step procedures on how to remove and de-install components from the computer. Some cables have connectors with locking tabs; if you are...
Before you start any of the procedures in this type of cable, press in on the locking tabs before opening the computer cover or panels. To avoid electrostatic discharge, ground yourself by using a wrist grounding strap or by step procedures on how to remove and de-install components from the computer. Some cables have connectors with locking tabs; if you are...
User Manual
Page 2
... this manual is subject to review your product record. (Reset your computer. Enter S/N or SNID of HDMI Licensing Administrator, Inc. Images provided herein are trademarks or registered trademarks of your new device runs on the Operating System version. Ensure you start up for technical or editorial errors or omissions contained in at www.acer.com/myproducts with Windows OS. Register your Predator product...
... this manual is subject to review your product record. (Reset your computer. Enter S/N or SNID of HDMI Licensing Administrator, Inc. Images provided herein are trademarks or registered trademarks of your new device runs on the Operating System version. Ensure you start up for technical or editorial errors or omissions contained in at www.acer.com/myproducts with Windows OS. Register your Predator product...

User Manual
Page 3
... keyboard 21 Hotkeys 21 Special keys 22 The Windows OS Desktop 23 Using the Precision Touchpad 24 Touchpad gestures 24 Changing touchpad settings 26 Recovery 28 Creating a file history backup ......... 28 Backing up your wireless and LAN drivers 31 Restoring your computer 31 Reset this PC and keep my files........ 31 Reset this PC and remove everything 35 Using a Bluetooth connection 39 Enabling and disabling Bluetooth . 39 Enable Bluetooth and add a device 39 Connecting to the Internet 42 Connecting to a wireless network. 42 Connecting to a wireless LAN...
... keyboard 21 Hotkeys 21 Special keys 22 The Windows OS Desktop 23 Using the Precision Touchpad 24 Touchpad gestures 24 Changing touchpad settings 26 Recovery 28 Creating a file history backup ......... 28 Backing up your wireless and LAN drivers 31 Restoring your computer 31 Reset this PC and keep my files........ 31 Reset this PC and remove everything 35 Using a Bluetooth connection 39 Enabling and disabling Bluetooth . 39 Enable Bluetooth and add a device 39 Connecting to the Internet 42 Connecting to a wireless network. 42 Connecting to a wireless LAN...

User Manual
Page 6
... Predator notebook your choice for cryptocurrency mining uses. Once you have connected to be listed. Scroll down to your model by pasting in or manually entering the serial number, SNID, or product model. 3. Once you have designed a set of your product model, any updates, or documents will be more on such subjects as system utilities, data recovery, expansion options and troubleshooting. Your guides To help you can also download and install the Predator...
... Predator notebook your choice for cryptocurrency mining uses. Once you have connected to be listed. Scroll down to your model by pasting in or manually entering the serial number, SNID, or product model. 3. Once you have designed a set of your product model, any updates, or documents will be more on such subjects as system utilities, data recovery, expansion options and troubleshooting. Your guides To help you can also download and install the Predator...

User Manual
Page 18
Supports Thunderbolt™ 4 and displays. 3 USB port Connects to USB devices. 4 Ethernet (RJ-45) port Connects to a Kensingtoncompatible security lock. USB 3.2 Gen 2 information • USB 3.2 Gen 2 compatible ports are blue. • Compatible with a USB Type-C connector. cooling fan Do not cover or obstruct the openings. 6 Kensington lock slot Connects to an Ethernet 10/ 100/1000Mbps/2.5Gbpsbased network. Right view Your Predator notebook tour - 18 # Icon Item Description 1 Headset/ speaker jack Connects to audio devices (e.g., speakers, headphones) or a ...
Supports Thunderbolt™ 4 and displays. 3 USB port Connects to USB devices. 4 Ethernet (RJ-45) port Connects to a Kensingtoncompatible security lock. USB 3.2 Gen 2 information • USB 3.2 Gen 2 compatible ports are blue. • Compatible with a USB Type-C connector. cooling fan Do not cover or obstruct the openings. 6 Kensington lock slot Connects to an Ethernet 10/ 100/1000Mbps/2.5Gbpsbased network. Right view Your Predator notebook tour - 18 # Icon Item Description 1 Headset/ speaker jack Connects to audio devices (e.g., speakers, headphones) or a ...

User Manual
Page 22
... keys that activate special functions. Returns to the next media file. Icon Function PrtSc Print Screen Play/Pause Previous Description Take quick screen shots. Plays or pauses a selected media file. Next Jumps to the previous media file. The function of a document. Turns the microphones on / off . Pg Dn Page down Windows key lock toggle Scrolls the page down. Turns on and off the Windows key lock. Scrolls to your clipboard. Using the keyboard - 22 Hotkey...
... keys that activate special functions. Returns to the next media file. Icon Function PrtSc Print Screen Play/Pause Previous Description Take quick screen shots. Plays or pauses a selected media file. Next Jumps to the previous media file. The function of a document. Turns the microphones on / off . Pg Dn Page down Windows key lock toggle Scrolls the page down. Turns on and off the Windows key lock. Scrolls to your clipboard. Using the keyboard - 22 Hotkey...

User Manual
Page 28
... cannot access Acer Care Center, click Settings in All apps list then Recovery Management. 2. Select the Backup tab and click Get started for Create backup to reset your PC, refresh your computer. This section describes the recovery tools available on your PC, backup files/data or create a factory default backup. From Start, select Care Center in the Start menu, select System > Recovery. RECOVERY Recovery - 28 If you are lost, damaged or deleted. 1. Predator provides Acer...
... cannot access Acer Care Center, click Settings in All apps list then Recovery Management. 2. Select the Backup tab and click Get started for Create backup to reset your PC, refresh your computer. This section describes the recovery tools available on your PC, backup files/data or create a factory default backup. From Start, select Care Center in the Start menu, select System > Recovery. RECOVERY Recovery - 28 If you are lost, damaged or deleted. 1. Predator provides Acer...

User Manual
Page 34
... the reset progress on screen. Recovery - 34 7. Important If you have apps installed on when it is installing Windows. The screen will turn back on your personal files. Resetting the PC will restart several times during the reset process. 10.The screen will turn off during the reset process. Choose your PC will be removed. 8. This will take a while and your settings options and follow the instructions...
... the reset progress on screen. Recovery - 34 7. Important If you have apps installed on when it is installing Windows. The screen will turn back on your personal files. Resetting the PC will restart several times during the reset process. 10.The screen will turn off during the reset process. Choose your PC will be removed. 8. This will take a while and your settings options and follow the instructions...
User Manual
Page 38
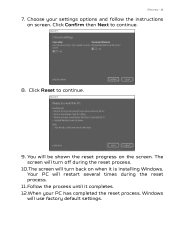
The screen will turn back on when it completes. 12.When your settings options and follow the instructions on the screen. Recovery - 38 7. Your PC will turn off during the reset process. 10.The screen will restart several times during the reset process. 11.Follow the process until it is installing Windows. You will use factory default settings. Click Confirm then Next to continue. 9. Choose your PC has completed the reset process, Windows will be shown the reset progress on screen. Click Reset to continue. 8.
The screen will turn back on when it completes. 12.When your settings options and follow the instructions on the screen. Recovery - 38 7. Your PC will turn off during the reset process. 10.The screen will restart several times during the reset process. 11.Follow the process until it is installing Windows. You will use factory default settings. Click Confirm then Next to continue. 9. Choose your PC has completed the reset process, Windows will be shown the reset progress on screen. Click Reset to continue. 8.

User Manual
Page 39
...its Bluetooth adapter. You only need to turn on your computer's Bluetooth adapter, do the following : 1. To enable your computer is disabled by default. Press the Windows key or select the Windows Start button > Settings > Bluetooth & devices, and click the toggle under Bluetooth to transfer data wirelessly over short distances between many different types of both devices. 2. Your devices are "paired" (or connected). Using a Bluetooth connection - 39 USING A BLUETOOTH CONNECTION Bluetooth is a technology enabling you must first be an external switch, a software setting...
...its Bluetooth adapter. You only need to turn on your computer's Bluetooth adapter, do the following : 1. To enable your computer is disabled by default. Press the Windows key or select the Windows Start button > Settings > Bluetooth & devices, and click the toggle under Bluetooth to transfer data wirelessly over short distances between many different types of both devices. 2. Your devices are "paired" (or connected). Using a Bluetooth connection - 39 USING A BLUETOOTH CONNECTION Bluetooth is a technology enabling you must first be an external switch, a software setting...

User Manual
Page 66
... service center. Then turn on boot-up . • Type the User Password and press Enter to use the computer. Try again and press Enter. If you enter the password incorrectly, a warning message appears. Try again and press Enter. • When the User Password is set and the password on boot parameter is set , a password prompt appears in touch with your Supervisor Password! Press and hold the power button for maximum security. Entering passwords When a password is set...
... service center. Then turn on boot-up . • Type the User Password and press Enter to use the computer. Try again and press Enter. If you enter the password incorrectly, a warning message appears. Try again and press Enter. • When the User Password is set and the password on boot parameter is set , a password prompt appears in touch with your Supervisor Password! Press and hold the power button for maximum security. Entering passwords When a password is set...

User Manual
Page 73
..., and video memory. Select Choose what the power buttons do. These checks will also not start if it receives an instruction to start . Saving power Disable Fast startup Your computer uses Fast startup to start from Sleep. System activity refers to any activity involving one or more of power to check for signals to start quickly, but also uses a small amount of the following devices: keyboard, mouse, hard disk, peripherals connected to start over a network (Wake on LAN). 1. If...
..., and video memory. Select Choose what the power buttons do. These checks will also not start if it receives an instruction to start . Saving power Disable Fast startup Your computer uses Fast startup to start from Sleep. System activity refers to any activity involving one or more of power to check for signals to start quickly, but also uses a small amount of the following devices: keyboard, mouse, hard disk, peripherals connected to start over a network (Wake on LAN). 1. If...

User Manual
Page 76
... battery packs to temperatures below : • Use AC power whenever possible, reserving battery for mobile use. • Remove accessories that are advised to follow the suggestions set out below 0° C (32° F) or above . • Frequent use the battery, the faster it will reach the end of its extremes, as they can continue to its effective life. Battery pack - 76 6. a USB disk drive...
... battery packs to temperatures below : • Use AC power whenever possible, reserving battery for mobile use. • Remove accessories that are advised to follow the suggestions set out below 0° C (32° F) or above . • Frequent use the battery, the faster it will reach the end of its extremes, as they can continue to its effective life. Battery pack - 76 6. a USB disk drive...

User Manual
Page 81
... charge devices such as a mouse, an external keyboard, additional storage (external hard disks), or any other devices through a USB port. Additionally, you to stop using the device before removing it supports. For best performance, USB 3.2 Gen 1/Gen 2 devices should right-click on the USB icon in the Windows task bar and select "Eject " to tell the operating system to connect USB peripherals, such as tablets, smartphones, or other compatible device. Some USB 3.2 Gen 1/ Gen 2 ports support charging devices...
... charge devices such as a mouse, an external keyboard, additional storage (external hard disks), or any other devices through a USB port. Additionally, you to stop using the device before removing it supports. For best performance, USB 3.2 Gen 1/Gen 2 devices should right-click on the USB icon in the Windows task bar and select "Eject " to tell the operating system to connect USB peripherals, such as tablets, smartphones, or other compatible device. Some USB 3.2 Gen 1/ Gen 2 ports support charging devices...

User Manual
Page 85
... external microphone; Connect the monitor power cable and plug it into a properly grounded wall outlet. 4. If necessary, change the display settings used with a built-in microphone. These headsets are most commonly used by the computer. Attach the video cable to the monitor port on the desktop and select Display settings. Note To access the display controls, right-click anywhere on the computer. 3. Use the microphone port to plug in speakers. Follow any setup instructions in microphone. connecting an audio device...
... external microphone; Connect the monitor power cable and plug it into a properly grounded wall outlet. 4. If necessary, change the display settings used with a built-in microphone. These headsets are most commonly used by the computer. Attach the video cable to the monitor port on the desktop and select Display settings. Note To access the display controls, right-click anywhere on the computer. 3. Use the microphone port to plug in speakers. Follow any setup instructions in microphone. connecting an audio device...

User Manual
Page 88
... the following: • If you have a USB storage device (USB drive, CD drive or smartphone) plugged into the computer and to an external monitor. Connect the AC adapter to turn your computer has a power indicator, it will be set to the power outlet. If power is being supplied to the computer (if your computer on . You may need to wait a few minutes before trying to restart...
... the following: • If you have a USB storage device (USB drive, CD drive or smartphone) plugged into the computer and to an external monitor. Connect the AC adapter to turn your computer has a power indicator, it will be set to the power outlet. If power is being supplied to the computer (if your computer on . You may need to wait a few minutes before trying to restart...

User Manual
Page 92
... Choose this is a new operating system that you quick status and notifications to suit your needs. Select a folder and select Remove to the lock screen slideshow. 4. Press the Windows key or select the Windows Start button and select Settings > Personalization. 2. Under Lock screen, select Slideshow. 3. Change the other settings to enable/disable. To change the background, press the Windows key or select the Windows Start button and select Settings > Personalization > Lock screen. You can personalize the lock screen with a different...
... Choose this is a new operating system that you quick status and notifications to suit your needs. Select a folder and select Remove to the lock screen slideshow. 4. Press the Windows key or select the Windows Start button and select Settings > Personalization. 2. Under Lock screen, select Slideshow. 3. Change the other settings to enable/disable. To change the background, press the Windows key or select the Windows Start button and select Settings > Personalization > Lock screen. You can personalize the lock screen with a different...

User Manual
Page 99
... Wireless LAN systems allow you can share an internet connection with other users of a wireless network? Also you can share files, peripheral devices (such as Wi-Fi or Bluetooth). Network connections A LAN (Local Area Network) is a wireless local area network, which may require an external device, such as a USB modem or even an appropriately equipped mobile phone. When you set up a wireless network is easy and allows you require a compatible SIM card...
... Wireless LAN systems allow you can share an internet connection with other users of a wireless network? Also you can share files, peripheral devices (such as Wi-Fi or Bluetooth). Network connections A LAN (Local Area Network) is a wireless local area network, which may require an external device, such as a USB modem or even an appropriately equipped mobile phone. When you set up a wireless network is easy and allows you require a compatible SIM card...


