
PD525 Service Guide
Page 23
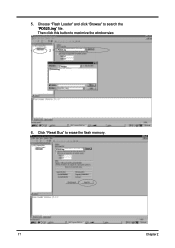
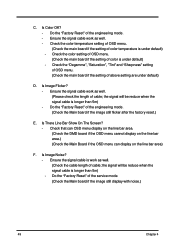
PD525.ing 17 Chapter 2 Then click this button to search the "PD525.ing" file. Choose "Flash Loader" and click "Browse" to maximize the window size. 1 2 PD525.ing PD525 PD525.ing 6. 5. Click "Reset Bus" to erase the flash memory.
PD525.ing 17 Chapter 2 Then click this button to search the "PD525.ing" file. Choose "Flash Loader" and click "Browse" to maximize the window size. 1 2 PD525.ing PD525 PD525.ing 6. 5. Click "Reset Bus" to erase the flash memory.
PD525 Service Guide
Page 54
...menu. (Check the main board if the setting of the engineering mode. (Check the Main board if the image still flicker after the factory reset.) E. Do the "Factory Reset" of color temperature is longer than 5m) - Ensure the signal cable work as well. - Is There Line Bar Show On The Screen... D. Check the "Degamma", "Saturation", "Tint" and "Sharpness" setting of OSD menu. (Check the main board if the setting of cable; Do the "Factory Reset" of color is work as well. (Check the cable length of above setting are under default) - Check the color setting of OSD menu. (Check the...
...menu. (Check the main board if the setting of the engineering mode. (Check the Main board if the image still flicker after the factory reset.) E. Do the "Factory Reset" of color temperature is longer than 5m) - Ensure the signal cable work as well. - Is There Line Bar Show On The Screen... D. Check the "Degamma", "Saturation", "Tint" and "Sharpness" setting of OSD menu. (Check the main board if the setting of cable; Do the "Factory Reset" of color is work as well. (Check the cable length of above setting are under default) - Check the color setting of OSD menu. (Check the...

PD525 Service Guide
Page 64
... check and ensure the control function of "Service Mode", then ensure the reset function is work as well. - Test Signal : 1024 x 768 @ 75Hz Test Pattern : Full white pattern - Please select "Factory Reset" function of keypad is work as well. Please check and ensure the unit...the original factory setting. This action will allow you to repair area. Item Keypad Function 1 (Including Remote Control) 2 Factory Reset 3 R, G, B and white color contrast 4 Screen Uniformity 5 Dead Pixel (Bright pixel) 6 Dead Pixel (Dark pixel) Description - Inspection Procedure No.
... check and ensure the control function of "Service Mode", then ensure the reset function is work as well. - Test Signal : 1024 x 768 @ 75Hz Test Pattern : Full white pattern - Please select "Factory Reset" function of keypad is work as well. Please check and ensure the unit...the original factory setting. This action will allow you to repair area. Item Keypad Function 1 (Including Remote Control) 2 Factory Reset 3 R, G, B and white color contrast 4 Screen Uniformity 5 Dead Pixel (Bright pixel) 6 Dead Pixel (Dark pixel) Description - Inspection Procedure No.

PD525 Service Guide
Page 65
...you erase all saved change again and restore the factory defaults.. Item 7 Blemish (Bright) 8 Blemish (Dark) 9 Boundary 10 Video 11 HDTV 12 Audio 13 Reset All Chapter 4 Description Test Signal : 1024 x 768 @ 75Hz Test Pattern : Full black and Gray 16 patterns - Please check and ensure the unit is ... pattern - Please check and ensure the unit can display the HDTV signal without color abnormal or image abnormal issue. - Please select and enter "Factory Reset" function of "Service Mode" to be able to see under Blue 60 pattern) - If not, please return the unit to repair area. Please...
...you erase all saved change again and restore the factory defaults.. Item 7 Blemish (Bright) 8 Blemish (Dark) 9 Boundary 10 Video 11 HDTV 12 Audio 13 Reset All Chapter 4 Description Test Signal : 1024 x 768 @ 75Hz Test Pattern : Full black and Gray 16 patterns - Please check and ensure the unit is ... pattern - Please check and ensure the unit can display the HDTV signal without color abnormal or image abnormal issue. - Please select and enter "Factory Reset" function of "Service Mode" to be able to see under Blue 60 pattern) - If not, please return the unit to repair area. Please...

PD525 User's Guide
Page 2
... the product as recommended in operation. Please be sure to page 26). Warning- Warning- Warning- The bright light may cause electric shock. Warning- Reset the "Lamp Hour Reset" function from the On Screen Display "Management" menu after replacing the lamp module (refer to change the lamp when it will burn out and...
... the product as recommended in operation. Please be sure to page 26). Warning- Warning- Warning- The bright light may cause electric shock. Warning- Reset the "Lamp Hour Reset" function from the On Screen Display "Management" menu after replacing the lamp module (refer to change the lamp when it will burn out and...

PD525 User's Guide
Page 26
... and My Start-up Screen utility (refer to another, when you press "Source" button on , it will "Lock" the current source channel before end of Acer projector. 4User : The user customized start -up screen of life. When source lock is turned on remote control for other signals if the current input... signal is lost. Lamp Hour Reset Press the button after choosing "Yes "to turn the lamp hour counter to show up 30 hours before you exit the OSD menu, the new...
... and My Start-up Screen utility (refer to another, when you press "Source" button on , it will "Lock" the current source channel before end of Acer projector. 4User : The user customized start -up screen of life. When source lock is turned on remote control for other signals if the current input... signal is lost. Lamp Hour Reset Press the button after choosing "Yes "to turn the lamp hour counter to show up 30 hours before you exit the OSD menu, the new...

PD525 User's Guide
Page 27
... has been plugged and connected to your PC to the factory default settings. 27 ... User Controls Management (Computer / Video Mode) My Start Screen Acer My Start-up Screen is blinking. 4. Before the download starts, the projector must enter "Download Mode" first. If the AC power cord of ... turn on , press power button twice to change the default start-up Screen from your projector. Reset Press the button after choosing "Yes" to return the display parameters on all the fan of Acer projector to enter "Download Mode". 1. You can install My Start-up screen of projector was unplugged...
... has been plugged and connected to your PC to the factory default settings. 27 ... User Controls Management (Computer / Video Mode) My Start Screen Acer My Start-up Screen is blinking. 4. Before the download starts, the projector must enter "Download Mode" first. If the AC power cord of ... turn on , press power button twice to change the default start-up Screen from your projector. Reset Press the button after choosing "Yes" to return the display parameters on all the fan of Acer projector to enter "Download Mode". 1. You can install My Start-up screen of projector was unplugged...
PD525 User's Guide
Page 28
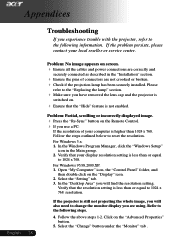
... are using. Please refer to 1024 x 768 resolution. In the "Desktop Area" you will also need to 1024 x 768. Follow the steps outlined below to reset the resolution. Appendices English ... 28 Troubleshooting If you experience trouble with the projector, refer to the following steps. 4.
... are using. Please refer to 1024 x 768 resolution. In the "Desktop Area" you will also need to 1024 x 768. Follow the steps outlined below to reset the resolution. Appendices English ... 28 Troubleshooting If you experience trouble with the projector, refer to the following steps. 4.


