

User Manual
Page 4
... the performance of this product. • Use the product only with this product where people will probably cause unexpected short current or damage rotor devices, lamp. Using a power outlet that is properly grounded before inserting the AC adapter plug. Do not locate this product, make sure that the new power cord...
... the performance of this product. • Use the product only with this product where people will probably cause unexpected short current or damage rotor devices, lamp. Using a power outlet that is properly grounded before inserting the AC adapter plug. Do not locate this product, make sure that the new power cord...
User Manual
Page 5
... qualified service personnel when: • the power cord or plug is damaged, cut or frayed • liquid was spilled into the projector's lens when the lamp is poorly ventilated or confined. Unplug this product yourself, as inside of a car with all servicing to qualified service personnel. Additional safety information • Do...
... qualified service personnel when: • the power cord or plug is damaged, cut or frayed • liquid was spilled into the projector's lens when the lamp is poorly ventilated or confined. Unplug this product yourself, as inside of a car with all servicing to qualified service personnel. Additional safety information • Do...

User Manual
Page 6
...hurt your dealer. • Do not keep using this product to disassemble this could cause it . Please be sure to change the lamp when is securely installed. Only use acer ceiling mount kit for inspection. • Do not face the projector lens to fire. • When switching the projector off . ... damage. • This product is operating. It may hurt you. Allow the projector to cool for approximately 45 minutes prior to removing the lamp assembly for the fan to turn off before disconnecting power. • Do not turn off the main power abruptly or unplug the projector during...
...hurt your dealer. • Do not keep using this product to disassemble this could cause it . Please be sure to change the lamp when is securely installed. Only use acer ceiling mount kit for inspection. • Do not face the projector lens to fire. • When switching the projector off . ... damage. • This product is operating. It may hurt you. Allow the projector to cool for approximately 45 minutes prior to removing the lamp assembly for the fan to turn off before disconnecting power. • Do not turn off the main power abruptly or unplug the projector during...

User Manual
Page 9
... Alliance at www.eiae.org. To minimize pollution and ensure utmost protection of according to local, state or federal laws. Lamp(s) inside this electronic device into the trash when discarding. For more information on the Waste from Electrical and Electronics Equipment (...WEEE) regulations, visit http://www.acer-group.com/public/ Sustainability/sustainability01.htm Mercury advisory For projectors or electronic products containing an LCD/CRT monitor or display: "Lamp(s) contain Mercury, Dispose Properly." ix Disposal instructions Do not throw...
... Alliance at www.eiae.org. To minimize pollution and ensure utmost protection of according to local, state or federal laws. Lamp(s) inside this electronic device into the trash when discarding. For more information on the Waste from Electrical and Electronics Equipment (...WEEE) regulations, visit http://www.acer-group.com/public/ Sustainability/sustainability01.htm Mercury advisory For projectors or electronic products containing an LCD/CRT monitor or display: "Lamp(s) contain Mercury, Dispose Properly." ix Disposal instructions Do not throw...
User Manual
Page 10
...not turn back on the unit provided for a long period of time. Don't: • Block the slots and openings on until the lamp module has been replaced. Precautions Follow all changing instructions. • This product will burn out and may cause electric shock. • When changing... the lamp, please allow unit to cool down, and follow the procedures listed under the following conditions: • In extremely hot, cold or humid environments...
...not turn back on the unit provided for a long period of time. Don't: • Block the slots and openings on until the lamp module has been replaced. Precautions Follow all changing instructions. • This product will burn out and may cause electric shock. • When changing... the lamp, please allow unit to cool down, and follow the procedures listed under the following conditions: • In extremely hot, cold or humid environments...
User Manual
Page 12
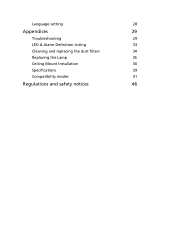
Language setting 28 Appendices 29 Troubleshooting 29 LED & Alarm Definition Listing 33 Cleaning and replacing the dust filters 34 Replacing the Lamp 35 Ceiling Mount Installation 36 Specifications 39 Compatibility modes 41 Regulations and safety notices 46
Language setting 28 Appendices 29 Troubleshooting 29 LED & Alarm Definition Listing 33 Cleaning and replacing the dust filters 34 Replacing the Lamp 35 Ceiling Mount Installation 36 Specifications 39 Compatibility modes 41 Regulations and safety notices 46
User Manual
Page 13
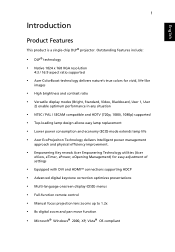
... 2) enable optimum performance in any situation • NTSC / PAL / SECAM compatible and HDTV (720p, 1080i, 1080p) supported • Top-loading lamp design allows easy lamp replacement • Lower power consumption and economy (ECO) mode extends lamp life • Acer EcoProjeciton Technology delivers Intelligent power management approach and physical efficiency improvement. • Empowering Key reveals...
... 2) enable optimum performance in any situation • NTSC / PAL / SECAM compatible and HDTV (720p, 1080i, 1080p) supported • Top-loading lamp design allows easy lamp replacement • Lower power consumption and economy (ECO) mode extends lamp life • Acer EcoProjeciton Technology delivers Intelligent power management approach and physical efficiency improvement. • Empowering Key reveals...

User Manual
Page 16
...the OSD menu operation or exit the OSD menu. • Confirm your selection of items. Temp Indicator LED Lamp Indicator LED Use to select items or make adjustments to your selection. See the contents in "Turning the Projector On/ ...Off" section. Unique Acer functions: eOpening, eView, eTimer, ePower Sends signals to choose RGB, Component, SVideo, Composite, DVI, HDTV and HDMI™ sources. Control Panel 5 1 6 2 7 3 4 # 1 RESYNC Function 2 MENU 3 TEMP 4 LAMP 5 Four directional select keys 6 SOURCE 7 Empowering key 8 ...
...the OSD menu operation or exit the OSD menu. • Confirm your selection of items. Temp Indicator LED Lamp Indicator LED Use to select items or make adjustments to your selection. See the contents in "Turning the Projector On/ ...Off" section. Unique Acer functions: eOpening, eView, eTimer, ePower Sends signals to choose RGB, Component, SVideo, Composite, DVI, HDTV and HDMI™ sources. Control Panel 5 1 6 2 7 3 4 # 1 RESYNC Function 2 MENU 3 TEMP 4 LAMP 5 Four directional select keys 6 SOURCE 7 Empowering key 8 ...

User Manual
Page 24
..., please contact your local reseller or service center. • If the projector automatically shuts down and the LAMP indicator turns solid RED, please contact your local dealer or service center: "Fan fail. Lamp will turn solid RED which means projector enter standby mode. 4 It is about 120 seconds.... Lamp will display onscreen for 60 seconds at least to press the "Power" button to ensure that the projector ...
..., please contact your local reseller or service center. • If the projector automatically shuts down and the LAMP indicator turns solid RED, please contact your local dealer or service center: "Fan fail. Lamp will turn solid RED which means projector enter standby mode. 4 It is about 120 seconds.... Lamp will display onscreen for 60 seconds at least to press the "Power" button to ensure that the projector ...

User Manual
Page 31
...modify its function. Please refer to launch "Acer ePower Management". English 19 Acer Empowering Technology Empowering Key Acer eView Management Acer Empowering Key provides four Acer unique functions, they are "Acer eView Management", "Acer eTimer Management" , "Acer eOpening Management" and "Acer ePower Management" respectively. "Acer eTimer Management" provides the reminding function for... for more detail. Press " " to Onscreen Display Menus section for more detail. Please refer to launch "Acer eView Management" submenu. Please refer to save lamp and projector life.
...modify its function. Please refer to launch "Acer ePower Management". English 19 Acer Empowering Technology Empowering Key Acer eView Management Acer Empowering Key provides four Acer unique functions, they are "Acer eView Management", "Acer eTimer Management" , "Acer eOpening Management" and "Acer ePower Management" respectively. "Acer eTimer Management" provides the reminding function for... for more detail. Press " " to Onscreen Display Menus section for more detail. Please refer to launch "Acer eView Management" submenu. Please refer to save lamp and projector life.
User Manual
Page 36
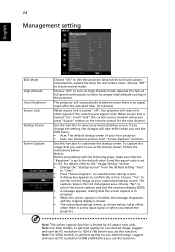
...get best quality for other signals if the current input signal is turned "on", it will take effect when you exit the OSD menu. • Acer: The default startup screen of the projector. Choose "On" to turn on the remote control for you desired image, suggest end-user set PC ...as shown below . 24 Management setting English ECO Mode High Altitude Auto Shutdown Source Lock Startup Screen Screen Capture Choose "On" to dim the projector lamp which will search for you desired image, suggest end-user set to 4:3. Use this function to use as the startup screen, follow the instructions ...
...get best quality for other signals if the current input signal is turned "on", it will take effect when you exit the OSD menu. • Acer: The default startup screen of the projector. Choose "On" to turn on the remote control for you desired image, suggest end-user set PC ...as shown below . 24 Management setting English ECO Mode High Altitude Auto Shutdown Source Lock Startup Screen Screen Capture Choose "On" to dim the projector lamp which will search for you desired image, suggest end-user set to 4:3. Use this function to use as the startup screen, follow the instructions ...

User Manual
Page 37
... to the "User Password" section for this function to display a reminder to manage usage of -life. Please refer to change the lamp 30 hours before changing the security settings. • Select "On" to operate the projector. Press the button and choose "Yes"...to enter password when switch on . The user has to enter a password to enable the security function. 25 English Lamp Hour Elapse Lamp Reminding Lamp Hour Reset Security Displays the lamp's elapsed operating time (in hours). Both "User Password" and "Administrator Password" can be between 4 and 8 characters ...
... to the "User Password" section for this function to display a reminder to manage usage of -life. Please refer to change the lamp 30 hours before changing the security settings. • Select "On" to operate the projector. Press the button and choose "Yes"...to enter password when switch on . The user has to enter a password to enable the security function. 25 English Lamp Hour Elapse Lamp Reminding Lamp Hour Reset Security Displays the lamp's elapsed operating time (in hours). Both "User Password" and "Administrator Password" can be between 4 and 8 characters ...
User Manual
Page 41
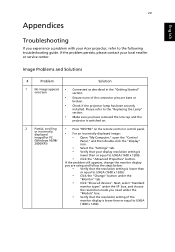
...Click the "Change" button under the SP box, and choose the resolution mode you are bent or broken. • Check if the projector lamp has been securely installed. Next, select "Standard monitor types" under the "Monitor" tab. • Click "Show all devices". 29 Appendices ... lower than or equal to UXGA (1600 x 1200). • Click the "Advanced Properties" button. If the problem persists, please contact your Acer projector, refer to the following troubleshooting guide. Please refer to UXGA (1600 x 1200). Image Problems and Solutions # Problem Solution 1 No image...
...Click the "Change" button under the SP box, and choose the resolution mode you are bent or broken. • Check if the projector lamp has been securely installed. Next, select "Standard monitor types" under the "Monitor" tab. • Click "Show all devices". 29 Appendices ... lower than or equal to UXGA (1600 x 1200). • Click the "Advanced Properties" button. If the problem persists, please contact your Acer projector, refer to the following troubleshooting guide. Please refer to UXGA (1600 x 1200). Image Problems and Solutions # Problem Solution 1 No image...

User Manual
Page 43
... the projector closer to all controls unplug the power cord and wait at least 30 seconds before reconnecting power. 2 Lamp burns out or makes a popping sound When the lamp reaches the end of the projector. Problems with the Projector # Condition Solution 1 The projector stops responding If possible,.... 11 Image is sides centered on the screen. • Press the "Keystone / / / " on the OSD or the remote control until the lamp module has been replaced. Go to "Image setting --> Aspect Ratio" and try different settings. 10 Image has slanted • If possible, reposition the ...
... the projector closer to all controls unplug the power cord and wait at least 30 seconds before reconnecting power. 2 Lamp burns out or makes a popping sound When the lamp reaches the end of the projector. Problems with the Projector # Condition Solution 1 The projector stops responding If possible,.... 11 Image is sides centered on the screen. • Press the "Keystone / / / " on the OSD or the remote control until the lamp module has been replaced. Go to "Image setting --> Aspect Ratio" and try different settings. 10 Image has slanted • If possible, reposition the ...

User Manual
Page 44
the projector has exceeded its maximum lifetime. If the dust filter is about to reach its recommended operating temperature and must be used. Please refer to cool down before it soon. Projector Overheated - Please also check the dust filters if they are installed. the lamp is clogged with dust, please clean it. English 32 OSD Messages # Condition 1 Message Message Reminder Fan Fail - Prepare to replace it may be allowed to "Cleaning and replacing the dust filter" for details. Replace the lamp - the system fan is not working.
the projector has exceeded its maximum lifetime. If the dust filter is about to reach its recommended operating temperature and must be used. Please refer to cool down before it soon. Projector Overheated - Please also check the dust filters if they are installed. the lamp is clogged with dust, please clean it. English 32 OSD Messages # Condition 1 Message Message Reminder Fan Fail - Prepare to replace it may be allowed to "Cleaning and replacing the dust filter" for details. Replace the lamp - the system fan is not working.

User Manual
Page 45
Turning off -- (cooling state) Turning off -- (cooling completed) Error (thermal failure) -- Power LED Red Blue V -- --- V -- V Quick flashing V V Quick flashing -- -- -- V -- 33 English LED & Alarm Definition Listing LED Messages Message Standby (power cord plugged in) Power button ON Lamp retry Lamp LED Red -- --- V Quick flashing --- Error (lamp breakdown) Error (color Wheel fail) V Quick flashing Temp LED Red -- --- -- -- V -- Error (fan lock failure) --
Turning off -- (cooling state) Turning off -- (cooling completed) Error (thermal failure) -- Power LED Red Blue V -- --- V -- V Quick flashing V V Quick flashing -- -- -- V -- 33 English LED & Alarm Definition Listing LED Messages Message Standby (power cord plugged in) Power button ON Lamp retry Lamp LED Red -- --- V Quick flashing --- Error (lamp breakdown) Error (color Wheel fail) V Quick flashing Temp LED Red -- --- -- -- V -- Error (fan lock failure) --

User Manual
Page 47
...5 Open the top cover. (Illustration #3) 6 Remove the two screws that secure the lamp module (Illustration #4), and remove the lamp cover (Illustration #5). 7 Pull up the lamp bar (Illustration #6). 8 Pull out the lamp module by pressing the power button. 2 Allow the projector at least 30 minutes before changing... screw(s) from the cover, and then pull out the lamp. When you see this message, change the lamp as soon as possible. Replacement Suggested!" Warning: The lamp compartment is dropped. Allow it is hot! To Change the Lamp 1 Turn off the projector by force. (Illustration #7) To...
...5 Open the top cover. (Illustration #3) 6 Remove the two screws that secure the lamp module (Illustration #4), and remove the lamp cover (Illustration #5). 7 Pull up the lamp bar (Illustration #6). 8 Pull out the lamp module by pressing the power button. 2 Allow the projector at least 30 minutes before changing... screw(s) from the cover, and then pull out the lamp. When you see this message, change the lamp as soon as possible. Replacement Suggested!" Warning: The lamp compartment is dropped. Allow it is hot! To Change the Lamp 1 Turn off the projector by force. (Illustration #7) To...
User Manual
Page 51
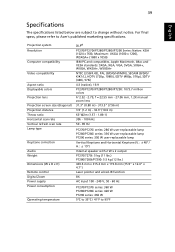
...Lamp type Keystone correction .../P7280i/P7290 Series:...SDTV (480i, 576i) 4:3 (native), 16:9 P7270/P7270i/P7280/P7280i/P7290: 1073.7 million colors F/ 2.52 - 2.79, f = 22... 280 W user-replaceable lamp P7280/P7280i series: 330 W user-replaceable lamp P7290 series: 350 W user-replaceable lamp Vertical Keystone and Horizontal ...Keystone (V.: ± 40º / H.: ± 15º) Internal speaker with 2 W x 2 output P7270/7270i: 5 kg (11 lbs.) P7280/7280i/P7290...P7290 series: 460 W 5ºC to 35ºC / 41...
...Lamp type Keystone correction .../P7280i/P7290 Series:...SDTV (480i, 576i) 4:3 (native), 16:9 P7270/P7270i/P7280/P7280i/P7290: 1073.7 million colors F/ 2.52 - 2.79, f = 22... 280 W user-replaceable lamp P7280/P7280i series: 330 W user-replaceable lamp P7290 series: 350 W user-replaceable lamp Vertical Keystone and Horizontal ...Keystone (V.: ± 40º / H.: ± 15º) Internal speaker with 2 W x 2 output P7270/7270i: 5 kg (11 lbs.) P7280/7280i/P7290...P7290 series: 460 W 5ºC to 35ºC / 41...


