User Manual
Page 2
... implied, with respect to their respective companies. ii All correspondence concerning your computer. Acer LCD Monitor User Guide Model number Serial number Date of purchase Place of purchase Acer and the Acer logo are recorded on the label affixed to notify any means, electronically, mechanically, ...for identification purposes only and belong to the contents hereof and specifically disclaims the implied warranties of such revisions or changes. Acer LCD Monitor User Guide Original Issue: 01/2019 Changes may be made periodically to the information in any form or by photocopy, ...
... implied, with respect to their respective companies. ii All correspondence concerning your computer. Acer LCD Monitor User Guide Model number Serial number Date of purchase Place of purchase Acer and the Acer logo are recorded on the label affixed to notify any means, electronically, mechanically, ...for identification purposes only and belong to the contents hereof and specifically disclaims the implied warranties of such revisions or changes. Acer LCD Monitor User Guide Original Issue: 01/2019 Changes may be made periodically to the information in any form or by photocopy, ...

User Manual
Page 3
... carefully follow these instructions carefully. Cleaning your safety and comfort Safety instructions Read these guidelines when cleaning the monitor: • Always unplug the monitor before cleaning. • Use a soft cloth to make sure the flicker disappears. • You may flicker during initial use . •...has 99.99% or more effective pixels. Keep this case, the screen is displayed for hours. Special notes on LCD monitors The following are normal with the LCD monitor and do not indicate a problem. • Due to the nature of the LCD screen, an afterimage of the fluorescent...
... carefully follow these instructions carefully. Cleaning your safety and comfort Safety instructions Read these guidelines when cleaning the monitor: • Always unplug the monitor before cleaning. • Use a soft cloth to make sure the flicker disappears. • You may flicker during initial use . •...has 99.99% or more effective pixels. Keep this case, the screen is displayed for hours. Special notes on LCD monitors The following are normal with the LCD monitor and do not indicate a problem. • Due to the nature of the LCD screen, an afterimage of the fluorescent...
User Manual
Page 7
...risk of physical injury. The following section provides tips for power management: • Activate display's Sleep mode within 5 minutes of user inactivity. • Wake the monitor when it is produced with high-precision manufacturing techniques. Observe the following symptoms may complain of a computer. Incorrect computer usage may occasionally misfire or appear...enabled for more comfortable computer use . English LCD pixel statement The LCD unit is in front of eyestrain and headaches after long hours of the monitor, using a footrest, or raising your leg muscles vii
...risk of physical injury. The following section provides tips for power management: • Activate display's Sleep mode within 5 minutes of user inactivity. • Wake the monitor when it is produced with high-precision manufacturing techniques. Observe the following symptoms may complain of a computer. Incorrect computer usage may occasionally misfire or appear...enabled for more comfortable computer use . English LCD pixel statement The LCD unit is in front of eyestrain and headaches after long hours of the monitor, using a footrest, or raising your leg muscles vii
User Manual
Page 8
Note: Acer monitor is purposed for video and visual display of information obtained from the display's top front edge • Avoid adjusting your display to an awkward viewing ... windows, for enhanced text readability and graphics clarity. • Eliminate glare and reflections by: • placing your eyes point downward when looking away from the monitor and focusing on how to a comfortable level for extended periods of time. English Taking care of your vision Long viewing hours, wearing incorrect glasses or...
Note: Acer monitor is purposed for video and visual display of information obtained from the display's top front edge • Avoid adjusting your display to an awkward viewing ... windows, for enhanced text readability and graphics clarity. • Eliminate glare and reflections by: • placing your eyes point downward when looking away from the monitor and focusing on how to a comfortable level for extended periods of time. English Taking care of your vision Long viewing hours, wearing incorrect glasses or...

User Manual
Page 9
... marking: 2019. RU Jan / Sr. Manager Acer Incorporated (Taipei, Taiwan) Jan.25,2019 Date Declaration of Conformity We, Acer Incorporated 8F, 88, Sec. 1, Xintai 5th Rd., Xizhi, New Taipei City 221, Taiwan And, Acer Italy s.r.l. English Acer Incorporated 8F, 88, Sec. 1, Xintai 5th ...MI) Italy Tel: +39-02-939-921 ,Fax: +39-02 9399-2913 www.acer.it Product: Trade Name: Model Number: SKU Number: LCD Monitor Acer KS271 KS271 xxxxxx; ("x" = 0~9, a ~ z, A ~ Z, or blank) We, Acer Incorporated, hereby declare under our sole responsibility that the product described above is in conformity...
... marking: 2019. RU Jan / Sr. Manager Acer Incorporated (Taipei, Taiwan) Jan.25,2019 Date Declaration of Conformity We, Acer Incorporated 8F, 88, Sec. 1, Xintai 5th Rd., Xizhi, New Taipei City 221, Taiwan And, Acer Italy s.r.l. English Acer Incorporated 8F, 88, Sec. 1, Xintai 5th ...MI) Italy Tel: +39-02-939-921 ,Fax: +39-02 9399-2913 www.acer.it Product: Trade Name: Model Number: SKU Number: LCD Monitor Acer KS271 KS271 xxxxxx; ("x" = 0~9, a ~ z, A ~ Z, or blank) We, Acer Incorporated, hereby declare under our sole responsibility that the product described above is in conformity...

User Manual
Page 10
... : 254-298-4000 Fax : 254-298-4147 www.acer.com Federal Communications Commission Supplier's Declaration of Conformity This device complies with Part 15 of Responsible Party: Contact Person: Phone No.: Fax No.: LCD Monitor KS271 KS271 xxxxxx ("x" = 0~9, a ~ z, or A ~ Z) Acer America Corporation 333 West San Carlos St. English Acer America Corporation 333 West San Carlos St., San...
... : 254-298-4000 Fax : 254-298-4147 www.acer.com Federal Communications Commission Supplier's Declaration of Conformity This device complies with Part 15 of Responsible Party: Contact Person: Phone No.: Fax No.: LCD Monitor KS271 KS271 xxxxxx ("x" = 0~9, a ~ z, or A ~ Z) Acer America Corporation 333 West San Carlos St. English Acer America Corporation 333 West San Carlos St., San...
User Manual
Page 11
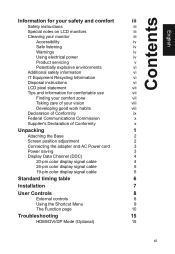
Contents English Information for your safety and comfort iii Safety instructions iii Special notes on LCD monitors iii Cleaning your monitor iii Accessibility iv Safe listening iv Warnings iv Using electrical power iv Product servicing v Potentially explosive environments vi Additional safety information vi IT Equipment Recycling ...
Contents English Information for your safety and comfort iii Safety instructions iii Special notes on LCD monitors iii Cleaning your monitor iii Accessibility iv Safe listening iv Warnings iv Using electrical power iv Product servicing v Potentially explosive environments vi Additional safety information vi IT Equipment Recycling ...

User Manual
Page 12
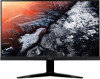
LCD monitor Quick start guide KS271 Audio Cable (Optional) DVI-D Cable (Optional) KS1 Series USER GUIDE HDMI cable (Optional) AC Power cord DP Cable (Optional) 1 English Unpacking Please check that the following items are present when you unpack the box, and save the packing materials in case you need to ship or transport the monitor in the future.
LCD monitor Quick start guide KS271 Audio Cable (Optional) DVI-D Cable (Optional) KS1 Series USER GUIDE HDMI cable (Optional) AC Power cord DP Cable (Optional) 1 English Unpacking Please check that the following items are present when you unpack the box, and save the packing materials in case you need to ship or transport the monitor in the future.

User Manual
Page 13
English • Attaching the Base Note: Remove the monitor and monitor base from its packaging. use a cloth to avoid scratching the screen. • Screen position adjustment To optimize the viewing position, you can be adjusted to hold the edges of your hands to 15 degrees up or 5 degrees down on a stable surface -- The monitor can adjust the monitor tilt by using both of the monitor as shown below. Carefully place the monitor face-down . 2
English • Attaching the Base Note: Remove the monitor and monitor base from its packaging. use a cloth to avoid scratching the screen. • Screen position adjustment To optimize the viewing position, you can be adjusted to hold the edges of your hands to 15 degrees up or 5 degrees down on a stable surface -- The monitor can adjust the monitor tilt by using both of the monitor as shown below. Carefully place the monitor face-down . 2
User Manual
Page 14
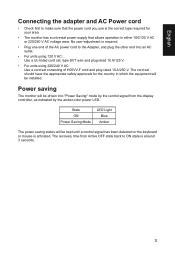
Power saving The monitor will be driven into "Power Saving" mode by the amber-color power LED. The recovery time from the display controller, as indicated by the control ... plug rated 10 A/125 V. • For units using 220/240 V AC: Use a cord set should have the appropriate safety approvals for your area. • The monitor has a universal power supply that allows operation in which the equipment will be installed.
Power saving The monitor will be driven into "Power Saving" mode by the amber-color power LED. The recovery time from the display controller, as indicated by the control ... plug rated 10 A/125 V. • For units using 220/240 V AC: Use a cord set should have the appropriate safety approvals for your area. • The monitor has a universal power supply that allows operation in which the equipment will be installed.

User Manual
Page 15
... 1 ML_Lane 0+ 3 ML_Lane 05 GND 7 ML_Lane 2+ 9 ML_Lane 211 GND 13 KONFIG1 15 AUX CH+ 17 AUX CH19 Return PIN No. The monitor supports the DDC2B standard. 20-pin color display signal cable PIN No. for example, supported resolutions and corresponding timing. Description 2 GND 4 ML_Lane 1+ ...20 DP_PWR 4 English Display Data Channel (DDC) To make installation easier, so long as your system supports the DDC protocol, the monitor is a communication protocol through which the monitor automatically informs the host system about its capabilities; The DDC is able to plug-and-play.
... 1 ML_Lane 0+ 3 ML_Lane 05 GND 7 ML_Lane 2+ 9 ML_Lane 211 GND 13 KONFIG1 15 AUX CH+ 17 AUX CH19 Return PIN No. The monitor supports the DDC2B standard. 20-pin color display signal cable PIN No. for example, supported resolutions and corresponding timing. Description 2 GND 4 ML_Lane 1+ ...20 DP_PWR 4 English Display Data Channel (DDC) To make installation easier, so long as your system supports the DDC protocol, the monitor is a communication protocol through which the monitor automatically informs the host system about its capabilities; The DDC is able to plug-and-play.

User Manual
Page 18
... for power efficient, virtually stutter free and low-latency display update. 7 Turn off your computer and unplug your monitor into the power port at the back of the LCD monitor and the line-out port on the signal cable connector. 3. (Optional): Connect the audio input socket (AUDIO IN.... FreeSync : It can allow a FreeSync supported graphics source to the HDMI (optional) and /or DVI-D (optional) /or DP (optional) input socket of the monitor, and the HDMI (optional) and /or DVI-D (optional) /or DP (optional) output socket of your computer and your computer's power cord. 2. Connect the...
... for power efficient, virtually stutter free and low-latency display update. 7 Turn off your computer and unplug your monitor into the power port at the back of the LCD monitor and the line-out port on the signal cable connector. 3. (Optional): Connect the audio input socket (AUDIO IN.... FreeSync : It can allow a FreeSync supported graphics source to the HDMI (optional) and /or DVI-D (optional) /or DP (optional) input socket of the monitor, and the HDMI (optional) and /or DVI-D (optional) /or DP (optional) output socket of your computer and your computer's power cord. 2. Connect the...
User Manual
Page 19
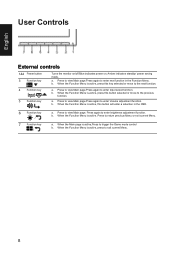
... the Function Menu. Press to enter Volume adjustment function. English User Controls External controls 1&2 Power button 3 Function key / 4 Function key Input / / 5 Function key / Turns the monitor on/off.Blue indicates power on. b. When the Main page is active, press this key selected or move to trigger the Game mode control b. When...
... the Function Menu. Press to enter Volume adjustment function. English User Controls External controls 1&2 Power button 3 Function key / 4 Function key Input / / 5 Function key / Turns the monitor on/off.Blue indicates power on. b. When the Main page is active, press this key selected or move to trigger the Game mode control b. When...

User Manual
Page 20
English Using the Shortcut Menu Note: The following page: Main page Adjusting the OD setting Open the OD control and select your LCD monitor. Press the MENU key to adjust the settings of your preferred OD setting using the arrows. For advanced settings, please refer to go back one ...
English Using the Shortcut Menu Note: The following page: Main page Adjusting the OD setting Open the OD control and select your LCD monitor. Press the MENU key to adjust the settings of your preferred OD setting using the arrows. For advanced settings, please refer to go back one ...
User Manual
Page 21
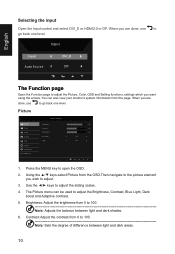
The Picture menu can also view your monitor's system information from 0 to adjust. 3. Brightness: Adjust the brightness from the OSD.Then navigate to the picture element you want using the arrows. Use the &#...
The Picture menu can also view your monitor's system information from 0 to adjust. 3. Brightness: Adjust the brightness from the OSD.Then navigate to the picture element you want using the arrows. Use the &#...
User Manual
Page 25
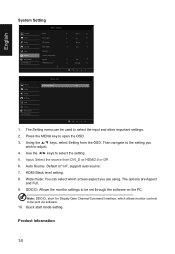
...Audio Gaming OSD System Information Save Setting to open the OSD. 3. Quick Start Mode 1. Press the MENU key to ... DDC/CI: Allows the monitor settings to be set through the software on ", support auto source. 7. Quick start mode setting. Then navigate to adjust. 4. Use the ◄/&#... the ▲/▼ keys, select Setting from DVI_D or HDMI2.0 or DP. 6. The options are using. The Setting menu can select which allows monitor controls to select the setting. 5. Auto Source: Default is "on the PC Note: DDC/CI, short for Display Data Channel/Command Interface, which screen...
...Audio Gaming OSD System Information Save Setting to open the OSD. 3. Quick Start Mode 1. Press the MENU key to ... DDC/CI: Allows the monitor settings to be set through the software on ", support auto source. 7. Quick start mode setting. Then navigate to adjust. 4. Use the ◄/&#... the ▲/▼ keys, select Setting from DVI_D or HDMI2.0 or DP. 6. The options are using. The Setting menu can select which allows monitor controls to select the setting. 5. Auto Source: Default is "on the PC Note: DDC/CI, short for Display Data Channel/Command Interface, which screen...
User Manual
Page 26
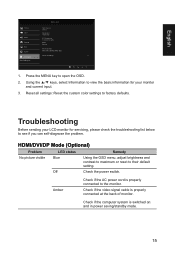
...67KHz V: 60Hz Mode Normal Series Number MML 3451 80060290001 4212 Reset All Settings Quick Start Mode 1. Troubleshooting Before sending your LCD monitor for your monitor and current input. 3. Off Check the power switch. Press the MENU key to their default setting. HDMI/DVI/DP Mode (... ▲/▼ keys, select Information to view the basic information for servicing, please check the troubleshooting list below to the monitor. English Picture Color Audio Gaming OSD System Information Save Settings to factory defaults. Check if the computer system is properly connected ...
...67KHz V: 60Hz Mode Normal Series Number MML 3451 80060290001 4212 Reset All Settings Quick Start Mode 1. Troubleshooting Before sending your LCD monitor for your monitor and current input. 3. Off Check the power switch. Press the MENU key to their default setting. HDMI/DVI/DP Mode (... ▲/▼ keys, select Information to view the basic information for servicing, please check the troubleshooting list below to the monitor. English Picture Color Audio Gaming OSD System Information Save Settings to factory defaults. Check if the computer system is properly connected ...


