
User Manual
Page 3
... fluorescent light, the screen may flicker during initial use . • The LCD screen has 99.99% or more effective pixels. iii It may remain after switching the image, when the same image is recovered slowly by changing the image or turning off the power switch and then turn it on the product. In this document for your monitor Please carefully follow these instructions carefully. Turn off the power switch for hours. Keep...
... fluorescent light, the screen may flicker during initial use . • The LCD screen has 99.99% or more effective pixels. iii It may remain after switching the image, when the same image is recovered slowly by changing the image or turning off the power switch and then turn it on the product. In this document for your monitor Please carefully follow these instructions carefully. Turn off the power switch for hours. Keep...

User Manual
Page 4
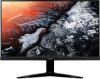
... setting the volume level, do not place the product on a bed, sofa, rug or other similar surface. The openings should never be placed near you. Never spill liquid of any kind onto or into this product through cabinet slots as they may touch dangerous voltage points or short-out parts that the power outlet you plug the power cord...
... setting the volume level, do not place the product on a bed, sofa, rug or other similar surface. The openings should never be placed near you. Never spill liquid of any kind onto or into this product through cabinet slots as they may touch dangerous voltage points or short-out parts that the power outlet you plug the power cord...
User Manual
Page 5
... a three-wire grounded plug. Product servicing Do not attempt to service this product. • Use the product only with the supplied power supply cord set , make sure that the new power cord meets the following the operating instructions v Warning! Note: The grounding pin also provides good protection from the wall outlet and refer servicing to qualified service personnel when: • the power cord or plug is damaged, cut or...
... a three-wire grounded plug. Product servicing Do not attempt to service this product. • Use the product only with the supplied power supply cord set , make sure that the new power cord meets the following the operating instructions v Warning! Note: The grounding pin also provides good protection from the wall outlet and refer servicing to qualified service personnel when: • the power cord or plug is damaged, cut or...

User Manual
Page 6
... Acer is strongly committed to turn off the device near depots, storage and distribution areas; Potentially explosive atmospheres include areas where you would normally be advised to environmental protection and views recycling, in the form of salvaging and disposal of used...identify and provide the best working procedures to reduce the environmental impact of our products. or where blasting operations are in bodily injury or even death. English Note: Adjust only those controls that are covered by the operating instructions, since improper adjustment of other products....
... Acer is strongly committed to turn off the device near depots, storage and distribution areas; Potentially explosive atmospheres include areas where you would normally be advised to environmental protection and views recycling, in the form of salvaging and disposal of used...identify and provide the best working procedures to reduce the environmental impact of our products. or where blasting operations are in bodily injury or even death. English Note: Adjust only those controls that are covered by the operating instructions, since improper adjustment of other products....

User Manual
Page 7
... adjusting the viewing angle of the monitor, using a footrest, or raising your sitting height to computer use . Nevertheless, some pixels may appear in front of physical injury. This has no effect on your company's health and safety department. The following section provides tips for power management: • Activate display's Sleep mode within 5 minutes of eyestrain and headaches after long hours of working...
... adjusting the viewing angle of the monitor, using a footrest, or raising your sitting height to computer use . Nevertheless, some pixels may appear in front of physical injury. This has no effect on your company's health and safety department. The following section provides tips for power management: • Activate display's Sleep mode within 5 minutes of eyestrain and headaches after long hours of working...

User Manual
Page 8
... open windows, for extended periods of time. viii English Taking care of your vision Long viewing hours, wearing incorrect glasses or contact lenses, glare, excessive room lighting, poorly focused screens, very small typefaces and low-contrast displays could stress your eyes point downward when looking at bright light sources, such as possible. • Exercise regularly and maintain a healthy body. The following work...
... open windows, for extended periods of time. viii English Taking care of your vision Long viewing hours, wearing incorrect glasses or contact lenses, glare, excessive room lighting, poorly focused screens, very small typefaces and low-contrast displays could stress your eyes point downward when looking at bright light sources, such as possible. • Exercise regularly and maintain a healthy body. The following work...

User Manual
Page 11
... good work habits viii Declaration of Conformity ix Federal Communications Commission x Supplier's Declaration of Conformity x Unpacking 1 Attaching the Base 2 Screen position adjustment 2 Connecting the adapter and AC Power cord 3 Power saving 3 Display Data Channel (DDC) 4 20-pin color display signal cable 4 24-pin color display signal cable 5 19-pin color display signal cable 5 Standard timing table 6 Installation 7 User Controls 8 External controls 8 Using the Shortcut Menu 9 The Function page 10 Troubleshooting 16 HDMI/DVI/DP Mode (Optional...
... good work habits viii Declaration of Conformity ix Federal Communications Commission x Supplier's Declaration of Conformity x Unpacking 1 Attaching the Base 2 Screen position adjustment 2 Connecting the adapter and AC Power cord 3 Power saving 3 Display Data Channel (DDC) 4 20-pin color display signal cable 4 24-pin color display signal cable 5 19-pin color display signal cable 5 Standard timing table 6 Installation 7 User Controls 8 External controls 8 Using the Shortcut Menu 9 The Function page 10 Troubleshooting 16 HDMI/DVI/DP Mode (Optional...

User Manual
Page 14
... user-adjustment is required. • Plug one end of the AC power cord to ON state is activated. The cord set consisting of H05VV-F cord and plug rated 10 A/250 V. The recovery time from the display controller, as indicated by the amber-color power LED. State ON Power Saving Mode LED Light Blue Amber The power saving states will be driven into "Power Saving" mode by the control signal from Active OFF state back to the Adapter, and plug the...
... user-adjustment is required. • Plug one end of the AC power cord to ON state is activated. The cord set consisting of H05VV-F cord and plug rated 10 A/250 V. The recovery time from the display controller, as indicated by the amber-color power LED. State ON Power Saving Mode LED Light Blue Amber The power saving states will be driven into "Power Saving" mode by the control signal from Active OFF state back to the Adapter, and plug the...

User Manual
Page 15
... PIN No. for example, supported resolutions and corresponding timing. Description 2 GND 4 ML_Lane 1+ 6 ML_Lane 18 GND 10 ML_Lane 3+ 12 ML_Lane 314 CONFIG2 16 GND 18 Hot Plug 20 DP_PWR 4 The monitor supports the DDC2B standard. 20-pin color display signal cable PIN No. English Display Data Channel (DDC) To make installation easier, so long as your system supports the DDC protocol, the monitor is a communication protocol...
... PIN No. for example, supported resolutions and corresponding timing. Description 2 GND 4 ML_Lane 1+ 6 ML_Lane 18 GND 10 ML_Lane 3+ 12 ML_Lane 314 CONFIG2 16 GND 18 Hot Plug 20 DP_PWR 4 The monitor supports the DDC2B standard. 20-pin color display signal cable PIN No. English Display Data Channel (DDC) To make installation easier, so long as your system supports the DDC protocol, the monitor is a communication protocol...

User Manual
Page 17
... 144Hz 120Hz 75Hz 165Hz * * KG271 can be overclocked to a higher refresh rate than advertised by the panel specification.This function can be use the system control panel to support refresh rate overclocking. Important: This device is designed to set the maximum refresh rate. However, overclocking may result in system instability. If you experience instability, try reducing the overclock to a lower refresh rate through the on-screen display settings. 6
... 144Hz 120Hz 75Hz 165Hz * * KG271 can be overclocked to a higher refresh rate than advertised by the panel specification.This function can be use the system control panel to support refresh rate overclocking. Important: This device is designed to set the maximum refresh rate. However, overclocking may result in system instability. If you experience instability, try reducing the overclock to a lower refresh rate through the on-screen display settings. 6
User Manual
Page 18
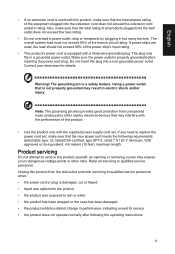
... power cord to the monitor, then to dynamically adjust display refresh rate based on typical content frame rates for power efficient, virtually stutter free and low-latency display update. 7 Please check user manual for audio output model. Insert the monitor power cable into the power port at the back of the graphics card on the computer with the audio cable. 4. Note: Audio output is only for more instruction. Connect the signal cable to the HDMI (optional) and /or DVI-D (optional) /or DP (optional) input...
... power cord to the monitor, then to dynamically adjust display refresh rate based on typical content frame rates for power efficient, virtually stutter free and low-latency display update. 7 Please check user manual for audio output model. Insert the monitor power cable into the power port at the back of the graphics card on the computer with the audio cable. 4. Note: Audio output is only for more instruction. Connect the signal cable to the HDMI (optional) and /or DVI-D (optional) /or DP (optional) input...

User Manual
Page 19
a. b. Press to enter Volume adjustment function. When the Main page is active. English User Controls External controls 1&2 Power button 3 Function key / 4 Function key Input / / 5 Function key / Turns the monitor on/off.Blue indicates power on. a. Press to view Main page.Press again to view Main page. When the Function Menu is active,Press to the previous function. Amber indicates standby/ power saving mode. When the Function Menu is active, press this...
a. b. Press to enter Volume adjustment function. When the Main page is active. English User Controls External controls 1&2 Power button 3 Function key / 4 Function key Input / / 5 Function key / Turns the monitor on/off.Blue indicates power on. a. Press to view Main page.Press again to view Main page. When the Function Menu is active,Press to the previous function. Amber indicates standby/ power saving mode. When the Function Menu is active, press this...
User Manual
Page 20
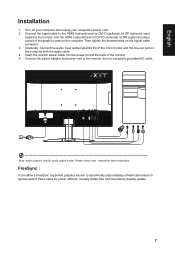
... go back one level. Picture Color Audio Gaming OSD System Information Mode - When you are done, use the OSD to go back one level. 9 9 9 User Over Drive Free-Sync MPRT Aim point Normal On Off Off Adjusting the volume Open the Volume control and set the Volume using the arrows. The OSD (onscreen display) can use to adjust the picture quality, OSD position and general settings. You can be used to open the OSD. English Using the Shortcut Menu Note: The following...
... go back one level. Picture Color Audio Gaming OSD System Information Mode - When you are done, use the OSD to go back one level. 9 9 9 User Over Drive Free-Sync MPRT Aim point Normal On Off Off Adjusting the volume Open the Volume control and set the Volume using the arrows. The OSD (onscreen display) can use to adjust the picture quality, OSD position and general settings. You can be used to open the OSD. English Using the Shortcut Menu Note: The following...

User Manual
Page 21
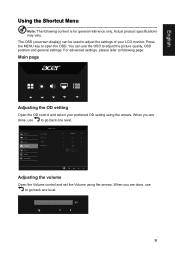
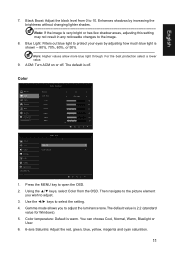
... done, use to adjust the Brightness, Contrast, Blue Light, Dark boost and Adaptive contrast. 5. Brightness: Adjust the brightness from the OSD.Then navigate to 100. Picture Picture Color Audio Gaming OSD System Information Save Setting to adjust the sliding scales. 4. Mode - Note: Adjusts the balance between light and dark areas. 10 Using the ▲/▼ keys,select Picture from 0 to the picture element you want using the arrows. Press the MENU key to adjust. 3. English Selecting the input Open the Input control and select...
... done, use to adjust the Brightness, Contrast, Blue Light, Dark boost and Adaptive contrast. 5. Brightness: Adjust the brightness from the OSD.Then navigate to 100. Picture Picture Color Audio Gaming OSD System Information Save Setting to adjust the sliding scales. 4. Mode - Note: Adjusts the balance between light and dark areas. 10 Using the ▲/▼ keys,select Picture from 0 to the picture element you want using the arrows. Press the MENU key to adjust. 3. English Selecting the input Open the Input control and select...
User Manual
Page 22
... MENU key to ... English 7. User 6-axis Hue 6-axis Saturate Enter Quick Start Mode 1. Using the ▲/▼ keys, select Color from 0 to 10. Then navigate to the picture element you to adjust. 3. You can choose Cool, Normal, Warm, Bluelight or User. 6. 6-axis Saturate: Adjust the red, green, blue, yellow, magenta and cyan saturation. 11 Note: Higher values allow more blue light through. Color Picture Color Audio Gaming OSD System Information Save Setting to open the OSD...
... MENU key to ... English 7. User 6-axis Hue 6-axis Saturate Enter Quick Start Mode 1. Using the ▲/▼ keys, select Color from 0 to 10. Then navigate to the picture element you to adjust. 3. You can choose Cool, Normal, Warm, Bluelight or User. 6. 6-axis Saturate: Adjust the red, green, blue, yellow, magenta and cyan saturation. 11 Note: Higher values allow more blue light through. Color Picture Color Audio Gaming OSD System Information Save Setting to open the OSD...

User Manual
Page 23
Audio Picture Color Audio Gaming OSD System Information Mode - Volume: Adjust the volume Gaming Picture Color Audio Gaming OSD System Information Mode - Then navigate to the setting you wish to adjust any sliding scales. 4. FreeSync: To control support FreeSync or not, default is On 12 English 7. 6-axis Hue: Adjust the red, green, blue, yellow, magenta and cyan hue. Use the ◄/► keys to change . 3. Using the ▲/▼ keys, select Audio from the OSD. Use the ◄/► keys to...
Audio Picture Color Audio Gaming OSD System Information Mode - Volume: Adjust the volume Gaming Picture Color Audio Gaming OSD System Information Mode - Then navigate to the setting you wish to adjust any sliding scales. 4. FreeSync: To control support FreeSync or not, default is On 12 English 7. 6-axis Hue: Adjust the red, green, blue, yellow, magenta and cyan hue. Use the ◄/► keys to change . 3. Using the ▲/▼ keys, select Audio from the OSD. Use the ◄/► keys to...

User Manual
Page 24
MPRT set "On", when to support dynamic picture more clean control, default is "Off". 4. MPRT function does not affect the (Logo, Aim Point, Message and Input Icon) brightness. 5. MPRT setting "On", when detection of Input Timing MPRT: To choose whether to adjustment (Brightness, Blue Light, ACM), will auto set MPRT is Off Note: 1. MPRT set "On", when to turn on FreeSync, will auto set MPRT is not support MPRT. 2. English Note: Only in...
MPRT set "On", when to support dynamic picture more clean control, default is "Off". 4. MPRT function does not affect the (Logo, Aim Point, Message and Input Icon) brightness. 5. MPRT setting "On", when detection of Input Timing MPRT: To choose whether to adjustment (Brightness, Blue Light, ACM), will auto set MPRT is Off Note: 1. MPRT set "On", when to turn on FreeSync, will auto set MPRT is not support MPRT. 2. English Note: Only in...
User Manual
Page 25
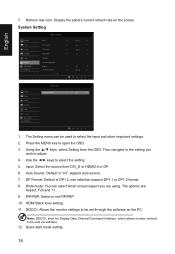
... panel's current refresh rate on ", support auto source. 7. Quick Start Mode 1. The options are using. HDMI Black level setting. 11. User Picture Quick Start Mode Off Color Audio Gaming OSD System Information Save Setting to set through the software on the PC Note: DDC/CI, short for Display Data Channel/Command Interface, which screen aspect you wish to be used to open the OSD. 3. The Setting menu can select which allows monitor controls to be sent via software. 12. Press the MENU key to select the input...
... panel's current refresh rate on ", support auto source. 7. Quick Start Mode 1. The options are using. HDMI Black level setting. 11. User Picture Quick Start Mode Off Color Audio Gaming OSD System Information Save Setting to set through the software on the PC Note: DDC/CI, short for Display Data Channel/Command Interface, which screen aspect you wish to be used to open the OSD. 3. The Setting menu can select which allows monitor controls to be sent via software. 12. Press the MENU key to select the input...

User Manual
Page 26
Using the ▲/▼ keys, select Information to open the OSD. 2. Press the MENU key to view the basic information for your monitor and current input. 3. Reset all settings: Reset the custom color settings to ... English Product information Picture Color Audio Gaming OSD System Information Save Settings to factory defaults. 15 User Main Source DVI_D Resolution 1920x1080 H/V Frequency H: 67KHz V: 60Hz Mode Normal Series Number MML 3451 80060290001 4212 Reset All Settings Quick Start Mode 1. Mode -
Using the ▲/▼ keys, select Information to open the OSD. 2. Press the MENU key to view the basic information for your monitor and current input. 3. Reset all settings: Reset the custom color settings to ... English Product information Picture Color Audio Gaming OSD System Information Save Settings to factory defaults. 15 User Main Source DVI_D Resolution 1920x1080 H/V Frequency H: 67KHz V: 60Hz Mode Normal Series Number MML 3451 80060290001 4212 Reset All Settings Quick Start Mode 1. Mode -

User Manual
Page 27
... the back of monitor. Check if the video signal cable is switched on and in power saving/standby mode. English Troubleshooting Before sending your LCD monitor for servicing, please check the troubleshooting list below to the monitor. Amber Check if the AC power cord is properly connected to see if you can self-diagnose the problem. Regulatory Compliance 16 HDMI/DVI/DP Mode (Optional) Problem LED status Remedy No picture visible Blue Using the OSD menu, adjust brightness and contrast to maximum or reset to their default setting.
... the back of monitor. Check if the video signal cable is switched on and in power saving/standby mode. English Troubleshooting Before sending your LCD monitor for servicing, please check the troubleshooting list below to the monitor. Amber Check if the AC power cord is properly connected to see if you can self-diagnose the problem. Regulatory Compliance 16 HDMI/DVI/DP Mode (Optional) Problem LED status Remedy No picture visible Blue Using the OSD menu, adjust brightness and contrast to maximum or reset to their default setting.


