

User Manual (3D)
Page 3
... to support 144Hz sync signal for instructions how to ensure the glasses are powered. Note: Suggest to use Acer DLP 3D glasses to change the battery. Acer projectors need to turn the 3D technology on, you will be projected at full brightness. If you do not wish to view 3D content, you have connected your projector to a DVD or Blu-ray player, please read sections "Using DLP 3D...
... to support 144Hz sync signal for instructions how to ensure the glasses are powered. Note: Suggest to use Acer DLP 3D glasses to change the battery. Acer projectors need to turn the 3D technology on, you will be projected at full brightness. If you do not wish to view 3D content, you have connected your projector to a DVD or Blu-ray player, please read sections "Using DLP 3D...

User Manual (3D)
Page 4
... (the sixth menu option) on the projector remote control to your graphics card for frame/field sequential 3D formats. Setting up the environment. 1 Set the refresh rate to the NVIDIA 3DTV Play website: www.nvidia.com/3dtv. To download software and use an NVIDIA 3DTV Play ready projector with DLP glasses, refer to 100/120 Hz on most of LED projectors. English 4 Using DLP 3D...
... (the sixth menu option) on the projector remote control to your graphics card for frame/field sequential 3D formats. Setting up the environment. 1 Set the refresh rate to the NVIDIA 3DTV Play website: www.nvidia.com/3dtv. To download software and use an NVIDIA 3DTV Play ready projector with DLP glasses, refer to 100/120 Hz on most of LED projectors. English 4 Using DLP 3D...

User Manual
Page 5
... necessary. • Locations where temperatures may become excessively high, such as opening or removing covers may expose you to dangerous voltage points or other controls may result in damage and will often require extensive work by a qualified technician to restore the product to normal condition. For safety reasons, do not use non-compliant parts when adding or changing components. At least...
... necessary. • Locations where temperatures may become excessively high, such as opening or removing covers may expose you to dangerous voltage points or other controls may result in damage and will often require extensive work by a qualified technician to restore the product to normal condition. For safety reasons, do not use non-compliant parts when adding or changing components. At least...
User Manual
Page 6
..., unplug immediately and contact your projector. Please contact your local dealer or Acer service center for ceiling mount installation. It may hurt your eyes. • Always open the lens shutter or remove the lens cap when the projector is on end vertically. Do not operate if smoke, strange noise or odor comes out of displaying inverted images for changing the lamp, when lamp warning message displays. • Do not attempt to...
..., unplug immediately and contact your projector. Please contact your local dealer or Acer service center for ceiling mount installation. It may hurt your eyes. • Always open the lens shutter or remove the lens cap when the projector is on end vertically. Do not operate if smoke, strange noise or odor comes out of displaying inverted images for changing the lamp, when lamp warning message displays. • Do not attempt to...
User Manual
Page 8
... before cleaning. • Use a soft cloth moistened with mild detergent to maximize the life of time. Please contact your local dealer or Acer service center for changing the lamp, when lamp warning message displays. • When switching the projector off the product before disconnecting power. • Turn on . Don't: • Block the slots and openings on the projector provided for a long period of your unit. The bright light may...
... before cleaning. • Use a soft cloth moistened with mild detergent to maximize the life of time. Please contact your local dealer or Acer service center for changing the lamp, when lamp warning message displays. • When switching the projector off the product before disconnecting power. • Turn on . Don't: • Block the slots and openings on the projector provided for a long period of your unit. The bright light may...
User Manual
Page 11
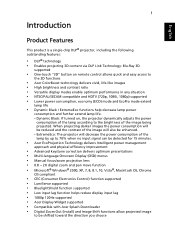
... a single-chip DLP® projector, including the following outstanding features: • DLP® technology • Enables projecting 3D content via DLP Link Technology: Blu-Ray 3D supported • One-touch "3D" button on , the projector dynamically adjusts the power consumption of the lamp according to the 3D functions • Acer ColorBoost technology delivers vivid, life-like images • High brightness and contrast ratio • Versatile display modes enable...
... a single-chip DLP® projector, including the following outstanding features: • DLP® technology • Enables projecting 3D content via DLP Link Technology: Blu-Ray 3D supported • One-touch "3D" button on , the projector dynamically adjusts the power consumption of the lamp according to the 3D functions • Acer ColorBoost technology delivers vivid, life-like images • High brightness and contrast ratio • Versatile display modes enable...
User Manual
Page 13
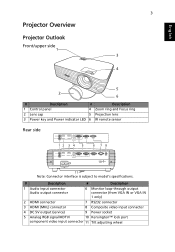
... Focus ring 2 Lens cap 5 Projection lens 3 Power key and Power indicator LED 6 IR remote sensor Rear side 12 3 4 5 6 78 9 10 11 Note: Connector interface is subject to model's specifications. # Description # Description 1 Audio input connector Audio output connector 6 Monitor loop-through output connector (from VGA IN or VGA IN 1 only) 2 HDMI connector 7 RS232 connector 3 HDMI (MHL) connector 8 Composite video input connector 4 DC 5V output (service) 9 Power socket 5 Analog RGB signal/HDTV/ 10 Kensington™ lock port...
... Focus ring 2 Lens cap 5 Projection lens 3 Power key and Power indicator LED 6 IR remote sensor Rear side 12 3 4 5 6 78 9 10 11 Note: Connector interface is subject to model's specifications. # Description # Description 1 Audio input connector Audio output connector 6 Monitor loop-through output connector (from VGA IN or VGA IN 1 only) 2 HDMI connector 7 RS232 connector 3 HDMI (MHL) connector 8 Composite video input connector 4 DC 5V output (service) 9 Power socket 5 Analog RGB signal/HDTV/ 10 Kensington™ lock port...

User Manual
Page 14
... the OSD menu operation or exits the OSD menu. Selects items or makes adjustments to your selection, or goes back to previous page. Confirms your selection of items. Cancels your selection Launches the Onscreen Display (OSD) menu, returns to the "Turning the Projector On/Off" section. 4 English Control Panel 1 7 2 3 8 4 9 5 6 10 3 # Function 1 LAMP 2 POWER 3 Keystone 4 Power key 5 ENTER 6 BACK 7 TEMP 8 SOURCE 9 Four directional selection keys 10 MENU Description Lamp indicator LED.
... the OSD menu operation or exits the OSD menu. Selects items or makes adjustments to your selection, or goes back to previous page. Confirms your selection of items. Cancels your selection Launches the Onscreen Display (OSD) menu, returns to the "Turning the Projector On/Off" section. 4 English Control Panel 1 7 2 3 8 4 9 5 6 10 3 # Function 1 LAMP 2 POWER 3 Keystone 4 Power key 5 ENTER 6 BACK 7 TEMP 8 SOURCE 9 Four directional selection keys 10 MENU Description Lamp indicator LED.
User Manual
Page 16
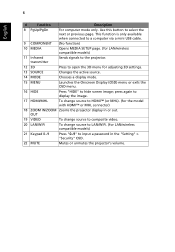
... composite video. 20 LAN/WiFi To change source to input a password in or out. 6 English # Function Description 8 PgUp/PgDn For computer mode only. This function is only available when connected to a computer via a mini USB cable. 9 COMPONENT (No function) 10 MEDIA Opens MEDIA SETUP page. (for LAN/wireless compatible models) 11 Infrared transmitter Sends signals to the projector. 12 3D Press to open the 3D menu for the model with HDMI...
... composite video. 20 LAN/WiFi To change source to input a password in or out. 6 English # Function Description 8 PgUp/PgDn For computer mode only. This function is only available when connected to a computer via a mini USB cable. 9 COMPONENT (No function) 10 MEDIA Opens MEDIA SETUP page. (for LAN/wireless compatible models) 11 Infrared transmitter Sends signals to the projector. 12 3D Press to open the 3D menu for the model with HDMI...

User Manual
Page 27
... new settings will be saved automatically upon exiting the menu. 5 Press "MENU" anytime to exit the menu and return to the Acer welcome screen. Use the OSD only when the message "No signal" is for feature setting. English 17 User Controls Installation Menu The Installation menu provides an Onscreen Display (OSD) for projector installation and maintenance. 3 The background pattern acts as a guide to adjusting the calibration and alignment settings, such as screen size and distance, focus and...
... new settings will be saved automatically upon exiting the menu. 5 Press "MENU" anytime to exit the menu and return to the Acer welcome screen. Use the OSD only when the message "No signal" is for feature setting. English 17 User Controls Installation Menu The Installation menu provides an Onscreen Display (OSD) for projector installation and maintenance. 3 The background pattern acts as a guide to adjusting the calibration and alignment settings, such as screen size and distance, focus and...

User Manual
Page 30
... and white in the Display Mode menu. Available when User 1/User 2/User 3 is enabled. • Education: For education environment. • User 1/User 2/User 3: Memorize user's settings. 20 English Display Mode Color Profile Wall Color Brightness Contrast There are several choices, including White, Light Yellow, Light Blue, Pink and Dark Green. You can be adjusted and saved. Adjusting the contrast changes the amount of the image. • Press to darken the image. • Press to the wall. Controls the...
... and white in the Display Mode menu. Available when User 1/User 2/User 3 is enabled. • Education: For education environment. • User 1/User 2/User 3: Memorize user's settings. 20 English Display Mode Color Profile Wall Color Brightness Contrast There are several choices, including White, Light Yellow, Light Blue, Pink and Dark Green. You can be adjusted and saved. Adjusting the contrast changes the amount of the image. • Press to darken the image. • Press to the wall. Controls the...
User Manual
Page 32
... not supported under computer mode. Gain: Adjusts the contrast levels. • Brilliant Color: Produces an expanded on-screen color spectrum that setup and calibration be performed by authorized calibrators. You can change User 1/User 2/User 3 to obtain optimal picture quality ISF certified display devices. This ensures optimum black level for technicians and installers to use these standards to your preferred mode name in the Display Mode menu. The ISF (Imaging...
... not supported under computer mode. Gain: Adjusts the contrast levels. • Brilliant Color: Produces an expanded on-screen color spectrum that setup and calibration be performed by authorized calibrators. You can change User 1/User 2/User 3 to obtain optimal picture quality ISF certified display devices. This ensures optimum black level for technicians and installers to use these standards to your preferred mode name in the Display Mode menu. The ISF (Imaging...
User Manual
Page 33
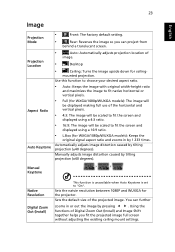
... (for WXGA/1080p/WUXGA models): Keeps the original signal aspect ratio and zooms in or out the image by 1.333 times. Automatically adjusts image distortion caused by tilting projection (±40 degrees). Manual Keystone Native Resolution Digital Zoom Out (Install) This function is unavailable when Auto Keystone is set to fit the screen and displayed using a 4:3 ratio. • 16:9: The image will be scaled to fit the screen and displayed using a 16:9 ratio. • L.Box...
... (for WXGA/1080p/WUXGA models): Keeps the original signal aspect ratio and zooms in or out the image by 1.333 times. Automatically adjusts image distortion caused by tilting projection (±40 degrees). Manual Keystone Native Resolution Digital Zoom Out (Install) This function is unavailable when Auto Keystone is set to fit the screen and displayed using a 4:3 ratio. • 16:9: The image will be scaled to fit the screen and displayed using a 16:9 ratio. • L.Box...
User Manual
Page 35
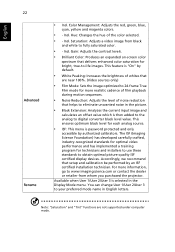
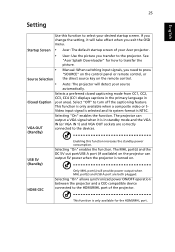
... the picture. • Source Selection Manual: When switching input signals, you need to turn off the captioning feature. This function is turned on the remote control. • Auto: The projector will detect your Acer projector. • User: Use the picture you exit the OSD menu. Startup Screen • Acer: The default startup screen of the projector. The MHL port(s) and the DC 5V out port/USB A port (if available) on the projector can output a VGA signal when it will provide power...
... the picture. • Source Selection Manual: When switching input signals, you need to turn off the captioning feature. This function is turned on the remote control. • Auto: The projector will detect your Acer projector. • User: Use the picture you exit the OSD menu. Startup Screen • Acer: The default startup screen of the projector. The MHL port(s) and the DC 5V out port/USB A port (if available) on the projector can output a VGA signal when it will provide power...
User Manual
Page 39
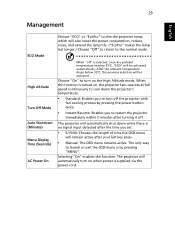
... "off" is supplied via the power cord. The projector will automatically shut down the projector's temperature. • Standard: Enables you to the normal mode. 29 Management English ECO Mode High Altitude Turn Off Mode Auto Shutdown (Minutes) Menu Display Time (Seconds) AC Power On Choose "ECO" or "EcoPro" to dim the projector lamp, which will also lower the power consumption, reduce noise, and extend the lamp life. ("EcoPro" makes the lamp last longer...
... "off" is supplied via the power cord. The projector will automatically shut down the projector's temperature. • Standard: Enables you to the normal mode. 29 Management English ECO Mode High Altitude Turn Off Mode Auto Shutdown (Minutes) Menu Display Time (Seconds) AC Power On Choose "ECO" or "EcoPro" to dim the projector lamp, which will also lower the power consumption, reduce noise, and extend the lamp life. ("EcoPro" makes the lamp last longer...

User Manual
Page 40
..." to reset the lamp hour counter to 0 hours. Select this function to adjust the notification volume when turning the projector on the control panel for 7 seconds to turn mute off the projector without disabling the Full Lock function, the projector will be in locked status the next time it from being accidentally turned on the control panel. The message will show or hide warning message when the changing lamp message is in standby mode, press and hold "POWER" on...
..." to reset the lamp hour counter to 0 hours. Select this function to adjust the notification volume when turning the projector on the control panel for 7 seconds to turn mute off the projector without disabling the Full Lock function, the projector will be in locked status the next time it from being accidentally turned on the control panel. The message will show or hide warning message when the changing lamp message is in standby mode, press and hold "POWER" on...

User Manual
Page 45
"Image size is not supported. 5. Downloading the image to the projector Press "Download" to start downloading the image to step 1 and try again. Go back to the projector. After the image is downloaded successfully, the projector will automatically shut down (enter standby mode), and the Startup Screen function in the tool status when the image is too large, and "Load Image fail" will be displayed when the image format is over defined range" will...
"Image size is not supported. 5. Downloading the image to the projector Press "Download" to start downloading the image to step 1 and try again. Go back to the projector. After the image is downloaded successfully, the projector will automatically shut down (enter standby mode), and the Startup Screen function in the tool status when the image is too large, and "Load Image fail" will be displayed when the image format is over defined range" will...
User Manual
Page 48
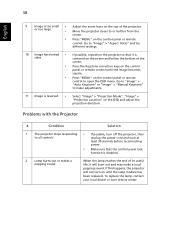
... the screen. • Press the Keystone correction keys on the top of its useful life, it is reversed • Select "Image" > "Projection Mode", "Image" > "Projection Location" on the control panel or remote control. or too large • Move the projector closer to open the OSD menu. Go to "Image" > "Aspect Ratio" and try different settings. 10 Image has slanted • If possible, reposition the projector so that the control panel lock function is disabled. 2 Lamp...
... the screen. • Press the Keystone correction keys on the top of its useful life, it is reversed • Select "Image" > "Projection Mode", "Image" > "Projection Location" on the control panel or remote control. or too large • Move the projector closer to open the OSD menu. Go to "Image" > "Aspect Ratio" and try different settings. 10 Image has slanted • If possible, reposition the projector so that the control panel lock function is disabled. 2 Lamp...

User Manual
Page 50
V -- V LAMP LED Red -- --- -- -- Error (Color wheel -- failure) V V V Quick flashing TEMP LED Red -- --- -- -- 40 LED & Alarm Definition Listing LED Messages English Message Standby (Power cord plugged in) Power on Lamp retry Turning off (Cooling state) Turning off (Cooling completed) Firmware download Acer splash download Error (Thermal failure) Error (Fan lock failure) Power LED Red Blue V -- --- V V --- V V V Quick flashing --- Quick flashing V V Quick flashing -- -- V -- -- Error (Lamp breakdown) -- V --
V -- V LAMP LED Red -- --- -- -- Error (Color wheel -- failure) V V V Quick flashing TEMP LED Red -- --- -- -- 40 LED & Alarm Definition Listing LED Messages English Message Standby (Power cord plugged in) Power on Lamp retry Turning off (Cooling state) Turning off (Cooling completed) Firmware download Acer splash download Error (Thermal failure) Error (Fan lock failure) Power LED Red Blue V -- --- V V --- V V V Quick flashing --- Quick flashing V V Quick flashing -- -- V -- -- Error (Lamp breakdown) -- V --

User Manual
Page 54
For final specs, please refer to the "Compatibility Modes" section for the remote control) • Quick start guide x 1 • User's guide (CD-ROM) x 1 • VGA cable x 1 • HDMI cable x 1 • Security card x 1 • Carrying case x 1 • WirelessHD dongle kit (MWIHD1) x 1 • HWA1 dongle x 1 • WirelessCAST x 1 • WirelessProjection-Kit x 1 Projection system Computer compatibility Video compatibility Displayable colors Digital zoom Weight Dimensions (W x D x H) Power supply Operating temperature Standard package contents Accessory (optional) DLP™...
For final specs, please refer to the "Compatibility Modes" section for the remote control) • Quick start guide x 1 • User's guide (CD-ROM) x 1 • VGA cable x 1 • HDMI cable x 1 • Security card x 1 • Carrying case x 1 • WirelessHD dongle kit (MWIHD1) x 1 • HWA1 dongle x 1 • WirelessCAST x 1 • WirelessProjection-Kit x 1 Projection system Computer compatibility Video compatibility Displayable colors Digital zoom Weight Dimensions (W x D x H) Power supply Operating temperature Standard package contents Accessory (optional) DLP™...


