
Acer H5360 Projector Series User's Guide
Page 4
... prevent battery leakage, do not place the product on the marking label. The overall system load must not exceed 80% of internal components and to replace the power cord set . Using a power outlet that the total ampere rating of the power strip's input rating. • This product's AC adapter is a safety... of power available, consult your electrician for details. Do not locate this product where people will probably cause unexpected short current or damage rotor devices, lamp.
... prevent battery leakage, do not place the product on the marking label. The overall system load must not exceed 80% of internal components and to replace the power cord set . Using a power outlet that the total ampere rating of the power strip's input rating. • This product's AC adapter is a safety... of power available, consult your electrician for details. Do not locate this product where people will probably cause unexpected short current or damage rotor devices, lamp.
Acer H5360 Projector Series User's Guide
Page 6
... become heated and deformed or even cause a fire. It could cause the object to ensure the projector completes its own removable cover. Only use acer ceiling mount kit for the fan to turn off before disconnecting power. • Do not turn off . • Do not touch air outlet... fall over, causing injury or damage. • This product is on end vertically. Allow the projector to cool for replacement. • Do not operate lamps beyond the rated lamp life. There are dangerous high voltages inside may cause the projector to break or drop it. It can lead to removing...
... become heated and deformed or even cause a fire. It could cause the object to ensure the projector completes its own removable cover. Only use acer ceiling mount kit for the fan to turn off before disconnecting power. • Do not turn off . • Do not touch air outlet... fall over, causing injury or damage. • This product is on end vertically. Allow the projector to cool for replacement. • Do not operate lamps beyond the rated lamp life. There are dangerous high voltages inside may cause the projector to break or drop it. It can lead to removing...

Acer H5360 Projector Series User's Guide
Page 10
... product is not being used for ventilation. • Use abrasive cleaners, waxes or solvents to clean the unit. • Use under "Replacing the Lamp". If this user's guide to cool down, and follow the procedures listed under the following conditions: • In extremely hot, cold or... of its cooling cycle before disconnecting power. • Turn on until the lamp module has been replaced. The bright light may hurt your unit. Don't: • Block the slots and openings on . To replace the lamp, follow all warnings, precautions and maintenance as this may make a loud popping...
... product is not being used for ventilation. • Use abrasive cleaners, waxes or solvents to clean the unit. • Use under "Replacing the Lamp". If this user's guide to cool down, and follow the procedures listed under the following conditions: • In extremely hot, cold or... of its cooling cycle before disconnecting power. • Turn on until the lamp module has been replaced. The bright light may hurt your unit. Don't: • Block the slots and openings on . To replace the lamp, follow all warnings, precautions and maintenance as this may make a loud popping...

Acer H5360 Projector Series User's Guide
Page 12
Troubleshooting 25 LED & Alarm Definition Listing 29 Replacing the Lamp 30 Ceiling Mount Installation 31 Specifications 34 Compatibility modes 36 Regulations and safety notices 40
Troubleshooting 25 LED & Alarm Definition Listing 29 Replacing the Lamp 30 Ceiling Mount Installation 31 Specifications 34 Compatibility modes 36 Regulations and safety notices 40
Acer H5360 Projector Series User's Guide
Page 37
... display resolution setting is lower than or equal to UXGA (1600 x 1200). • Click the "Advanced Properties" button. Please refer to the "Replacing the Lamp" section. • Make sure you experience a problem with your local reseller or service center. Next, select "Standard monitor types" under the "Models...that the resolution setting is lower than or equal to the following troubleshooting guide. If the problem persists, please contact your Acer projector, refer to UXGA (1600 x 1200). • Click the "Change" button under the "Monitor" tab. • Click "Show all...
... display resolution setting is lower than or equal to UXGA (1600 x 1200). • Click the "Advanced Properties" button. Please refer to the "Replacing the Lamp" section. • Make sure you experience a problem with your local reseller or service center. Next, select "Standard monitor types" under the "Models...that the resolution setting is lower than or equal to the following troubleshooting guide. If the problem persists, please contact your Acer projector, refer to UXGA (1600 x 1200). • Click the "Change" button under the "Monitor" tab. • Click "Show all...

Acer H5360 Projector Series User's Guide
Page 39
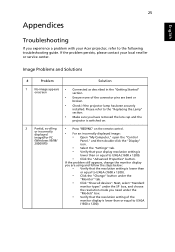
... make a loud popping sound. Problems with the Projector # Condition Solution 1 The projector stops responding If possible, turn on the remote control. To replace the lamp, follow the procedures in the "Replacing the Lamp" section. 27 English 9 Image is too small • Adjust the zoom lever on the remote control. or too large • Move... sides centered on the screen. • Press the "Keystone / " button on the remote control until the sides are vertical. • Press "MENU" on until the lamp module has been replaced.
... make a loud popping sound. Problems with the Projector # Condition Solution 1 The projector stops responding If possible, turn on the remote control. To replace the lamp, follow the procedures in the "Replacing the Lamp" section. 27 English 9 Image is too small • Adjust the zoom lever on the remote control. or too large • Move... sides centered on the screen. • Press the "Keystone / " button on the remote control until the sides are vertical. • Press "MENU" on until the lamp module has been replaced.
Acer H5360 Projector Series User's Guide
Page 40
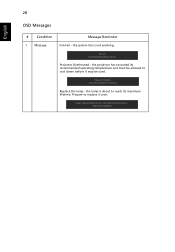
the system fan is about to cool down before it soon. the lamp is not working. English 28 OSD Messages # Condition 1 Message Message Reminder Fan Fail - the projector has exceeded its maximum lifetime. Prepare to replace it may be allowed to reach its recommended operating temperature and must be used. Projector Overheated - Replace the lamp -
the system fan is about to cool down before it soon. the lamp is not working. English 28 OSD Messages # Condition 1 Message Message Reminder Fan Fail - the projector has exceeded its maximum lifetime. Prepare to replace it may be allowed to reach its recommended operating temperature and must be used. Projector Overheated - Replace the lamp -

Acer H5360 Projector Series User's Guide
Page 42
... cooling down . 3 Disconnect the power cord. 4 Use a screwdriver to remove the screw from the cover, and then pull out the lamp. English 30 Replacing the Lamp Use a screwdriver to remove the screw(s) from the cover. (Illustration #1) 5 Push up and remove the cover. 6 Remove the two... screws that secure the lamp module (Illustration #2) and pull up the lamp bar.(Illustration #3) 7 Pull out the lamp module by force. (Illustration #4) To replace the lamp module, reverse the previous step. You will detect the lamp life. When you see this message, change the lamp as soon as possible. ...
... cooling down . 3 Disconnect the power cord. 4 Use a screwdriver to remove the screw from the cover, and then pull out the lamp. English 30 Replacing the Lamp Use a screwdriver to remove the screw(s) from the cover. (Illustration #1) 5 Push up and remove the cover. 6 Remove the two... screws that secure the lamp module (Illustration #2) and pull up the lamp bar.(Illustration #3) 7 Pull out the lamp module by force. (Illustration #4) To replace the lamp module, reverse the previous step. You will detect the lamp life. When you see this message, change the lamp as soon as possible. ...
Acer H5360 Projector Series User's Guide
Page 46
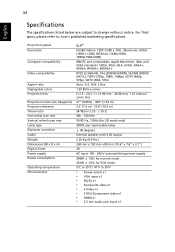
...distance Throw ratio Horizontal scan rate Vertical refresh scan rate Lamp type Keystone correction Audio Weight Dimensions (W x D x H) Digital Zoom Power supply Power consumption Operating temperature I/O connectors DLP® H5360: Native: 720P (1280 x 720) , Maximum: ... m) - 33.8' (10.3 m) 58"@2m (1.55 - 1.70:1) 30k - 100 kHz 50-85 Hz, 120Hz (for 3D mode only) 200W user-replaceable lamp ± 40 degrees Internal speaker with 2 W output 2.26 Kg (4.9 lbs.) 268 mm x 192 mm x 80 mm (10.6" x 7.6" x ...jack input x1 For final specs, please refer to Acer's published marketing specifications.
...distance Throw ratio Horizontal scan rate Vertical refresh scan rate Lamp type Keystone correction Audio Weight Dimensions (W x D x H) Digital Zoom Power supply Power consumption Operating temperature I/O connectors DLP® H5360: Native: 720P (1280 x 720) , Maximum: ... m) - 33.8' (10.3 m) 58"@2m (1.55 - 1.70:1) 30k - 100 kHz 50-85 Hz, 120Hz (for 3D mode only) 200W user-replaceable lamp ± 40 degrees Internal speaker with 2 W output 2.26 Kg (4.9 lbs.) 268 mm x 192 mm x 80 mm (10.6" x 7.6" x ...jack input x1 For final specs, please refer to Acer's published marketing specifications.
Acer X1161, X1261, X110 and H5360 Projector Series Service Guide
Page 25
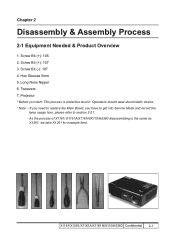
... 7. As the process of X1161/ X1161A/X1161N/X110/H5360 disassembling is protective level II. Projector * Before you have to get into Service Mode and record the lamp usage hour, please refer to section 2-21. - Hex Sleeves 5mm 5. Long Nose Nipper 6. If you need to replace the Main Board, you start: This process is...
... 7. As the process of X1161/ X1161A/X1161N/X110/H5360 disassembling is protective level II. Projector * Before you have to get into Service Mode and record the lamp usage hour, please refer to section 2-21. - Hex Sleeves 5mm 5. Long Nose Nipper 6. If you need to replace the Main Board, you start: This process is...
Acer X1161, X1261, X110 and H5360 Projector Series Service Guide
Page 58
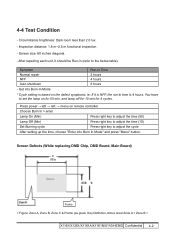
...time is based on remote controller Choose Burn In > enter Lamp On (Min) Press right key to adjust the time (50) Lamp Off (Min) Press right key to adjust the time (... into Burn In Mode'' and press "Menu" button. Symptom Run-in (refer to set the lamp on for 4 cycles. Press power→ left → left → menu on the defect...shutdown 6 hours - You have to the below table). Circumstance brightness: Dark room less than 2.0 lux. - Screen Defects (While replacing DMD Chip, DMD Board, Main Board) Frame < Figure: Zone A, Zone B, Zone C & Frame (as green line) Definition,...
...time is based on remote controller Choose Burn In > enter Lamp On (Min) Press right key to adjust the time (50) Lamp Off (Min) Press right key to adjust the time (... into Burn In Mode'' and press "Menu" button. Symptom Run-in (refer to set the lamp on for 4 cycles. Press power→ left → left → menu on the defect...shutdown 6 hours - You have to the below table). Circumstance brightness: Dark room less than 2.0 lux. - Screen Defects (While replacing DMD Chip, DMD Board, Main Board) Frame < Figure: Zone A, Zone B, Zone C & Frame (as green line) Definition,...


