User Manual
Page 4
... allow anything to block out noisy surroundings. • Turn the volume down if you can hear it clearly and comfortably and without distortion. • After setting the volume level, do not place the product on the marking label. Never spill liquid of any kind onto or into the product. • To...
... allow anything to block out noisy surroundings. • Turn the volume down if you can hear it clearly and comfortably and without distortion. • After setting the volume level, do not place the product on the marking label. Never spill liquid of any kind onto or into the product. • To...

User Manual
Page 5
... circuit rating. The plug only fits in electric shock and/or injury. Make sure the power outlet is equipped with the supplied power supply cord set , make sure that may expose you need for details. Warning! Product servicing Do not attempt to replace the power cord... set . Contact your electrician for service • the product does not operate normally after following requirements: detachable type, UL listed/CSA certified, type SPT-2, rated 7 A 125 V ...
... circuit rating. The plug only fits in electric shock and/or injury. Make sure the power outlet is equipped with the supplied power supply cord set , make sure that may expose you need for details. Warning! Product servicing Do not attempt to replace the power cord... set . Contact your electrician for service • the product does not operate normally after following requirements: detachable type, UL listed/CSA certified, type SPT-2, rated 7 A 125 V ...

User Manual
Page 12
... of the monitor. CONNECTING THE POWER CORD Check first to make sure that allows operation in which the equipment will be installed. The cord set should have the appropriate safety approvals for your area. This monitor has a universal power supply that the power cord you use is required. ... power cord to the adapter, and plug the other end into an AC outlet. For unit using at 120 V AC: Use a UL Listed Cord Set, Type SVT wire and plug rated 10 A/125 V. For unit using at 220/240 V AC (outside of U.S.): Use a Cord...
... of the monitor. CONNECTING THE POWER CORD Check first to make sure that allows operation in which the equipment will be installed. The cord set should have the appropriate safety approvals for your area. This monitor has a universal power supply that the power cord you use is required. ... power cord to the adapter, and plug the other end into an AC outlet. For unit using at 120 V AC: Use a UL Listed Cord Set, Type SVT wire and plug rated 10 A/125 V. For unit using at 220/240 V AC (outside of U.S.): Use a Cord...

User Manual
Page 21
.... OSD functions Press to toggle between the OSD options. Press the key to activate the OD function and set it to your preferred level. If the OSD is active, press it to open the Acer eColor Management OSD and access the scenario modes. Press the key to exit the OSD. USER CONTROLS...
.... OSD functions Press to toggle between the OSD options. Press the key to activate the OD function and set it to your preferred level. If the OSD is active, press it to open the Acer eColor Management OSD and access the scenario modes. Press the key to exit the OSD. USER CONTROLS...

User Manual
Page 22
... colors and emphasize fine detail. EN-13 Acer eColor Management Operation instructions Step 1: Press " " Key to open the Acer eColor Management OSD and access the scenario modes Step 2: Press "" or "" to reduce power consumption. Settings can be fine-tuned to suit any situation... N/A ECO mode Adjusts the settings to select the mode Features and Benefits...
... colors and emphasize fine detail. EN-13 Acer eColor Management Operation instructions Step 1: Press " " Key to open the Acer eColor Management OSD and access the scenario modes Step 2: Press "" or "" to reduce power consumption. Settings can be fine-tuned to suit any situation... N/A ECO mode Adjusts the settings to select the mode Features and Benefits...

User Manual
Page 23
...: The following page: Adjusting Brightness Open the Brightness control and adjust the brightness level using the adjustment arrows. For advanced settings, please refer to following content is for adjusting the settings of your LCD Monitor. When you are done, use Exit to go back one level. EN-14 When you are done..., use Exit to go back one level. Press the MENU key to adjust the picture quality, OSD position and general settings. You can be used for general reference only. The OSD can use the OSD to open the OSD. Adjusting the OD...
...: The following page: Adjusting Brightness Open the Brightness control and adjust the brightness level using the adjustment arrows. For advanced settings, please refer to following content is for adjusting the settings of your LCD Monitor. When you are done, use Exit to go back one level. EN-14 When you are done..., use Exit to go back one level. Press the MENU key to adjust the picture quality, OSD position and general settings. You can be used for general reference only. The OSD can use the OSD to open the OSD. Adjusting the OD...

User Manual
Page 25
EN-16 Then navigate to the feature you wish to bring up the OSD. 2. Press the MENU key to adjust. Adjusting OSD settings 1. Using the directional keys, select OSD from the on screen display.
EN-16 Then navigate to the feature you wish to bring up the OSD. 2. Press the MENU key to adjust. Adjusting OSD settings 1. Using the directional keys, select OSD from the on screen display.

User Manual
Page 26
EN-17 The setting menu can be used to adjust. Setting from the OSD, then navigate the 3. Adjusting miscellaneous settings 1. Using the / keys, select setting you want to adjust the screen Menu Language and other important settings, including Input and OD level. Press the MENU key to bring up the OSD. 2.
EN-17 The setting menu can be used to adjust. Setting from the OSD, then navigate the 3. Adjusting miscellaneous settings 1. Using the / keys, select setting you want to adjust the screen Menu Language and other important settings, including Input and OD level. Press the MENU key to bring up the OSD. 2.
User Manual
Page 28
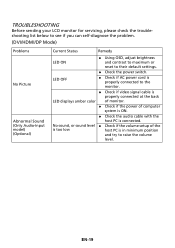
... volume setup of computer system is ON. Check the audio cable with the host PC is in minimum position and try to their default settings. Check the power switch. LED OFF Check if AC power cord is properly connected to the monitor. Check if video signal cable...
... volume setup of computer system is ON. Check the audio cable with the host PC is in minimum position and try to their default settings. Check the power switch. LED OFF Check if AC power cord is properly connected to the monitor. Check if video signal cable...

User Manual
Page 31
... we reduce greenhouse gases and the risks of climate change. More information refers to http://www.energystar.gov or http:// www.energystar.gov/powermangement Acer ENERGY STAR qualified products: • Produce less heat and reduce cooling loads, and warmer climates. • Automatically go into "display sleep"... mark are ENERGY STAR qualified use less energy and prevent greenhouse gas emissions by meeting strict energy efficiency guidelines set by reducing energy costs and helps protect the environment without sacrificing features or performance. marks EN-22 㕐 ENERGY STAR®...
... we reduce greenhouse gases and the risks of climate change. More information refers to http://www.energystar.gov or http:// www.energystar.gov/powermangement Acer ENERGY STAR qualified products: • Produce less heat and reduce cooling loads, and warmer climates. • Automatically go into "display sleep"... mark are ENERGY STAR qualified use less energy and prevent greenhouse gas emissions by meeting strict energy efficiency guidelines set by reducing energy costs and helps protect the environment without sacrificing features or performance. marks EN-22 㕐 ENERGY STAR®...


