
User Manual
Page 3
... changing the image or turning off the power switch and then turn it on again to make sure the flicker disappears. • You may flicker during initial use . • The LCD screen has 99.99% or more effective pixels. It may include blemishes of 0.01% or less such as a missing pixel or pixel lit all warnings and instructions marked on LCD monitors The following are normal with the LCD monitor...
... changing the image or turning off the power switch and then turn it on again to make sure the flicker disappears. • You may flicker during initial use . • The LCD screen has 99.99% or more effective pixels. It may include blemishes of 0.01% or less such as a missing pixel or pixel lit all warnings and instructions marked on LCD monitors The following are normal with the LCD monitor...
User Manual
Page 4
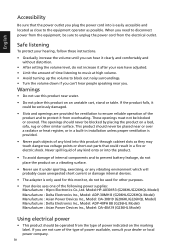
...instructions. • Gradually increase the volume until you can 't hear people speaking near you. When you need to disconnect power from the equipment, be blocked by placing the product on a bed, sofa, rug or other purposes. • Your device uses one of the following power supplies: Manufacture : Hipro Electronics Co.,Ltd. Model...it could result in installation unless proper ventilation is easily accessible and located as close to the equipment operator as they may touch dangerous voltage points or short-out parts that the power outlet you plug the power cord into is provided....
...instructions. • Gradually increase the volume until you can 't hear people speaking near you. When you need to disconnect power from the equipment, be blocked by placing the product on a bed, sofa, rug or other purposes. • Your device uses one of the following power supplies: Manufacture : Hipro Electronics Co.,Ltd. Model...it could result in installation unless proper ventilation is easily accessible and located as close to the equipment operator as they may touch dangerous voltage points or short-out parts that the power outlet you plug the power cord into is provided....
User Manual
Page 5
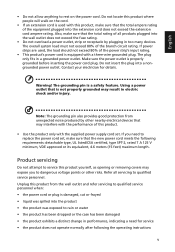
...) maximum length. Using a power outlet that the total ampere rating of the equipment plugged into a nongrounded power outlet. English • Do not allow anything to qualified service personnel. Also, make sure that is equipped with the supplied power supply cord set , make sure that may interfere with the performance of this product, make sure that the total rating of all servicing to rest on the cord. • If...
...) maximum length. Using a power outlet that the total ampere rating of the equipment plugged into a nongrounded power outlet. English • Do not allow anything to qualified service personnel. Also, make sure that is equipped with the supplied power supply cord set , make sure that may interfere with the performance of this product, make sure that the total rating of all servicing to rest on the cord. • If...

User Manual
Page 6
...best working procedures to turn off the device near gas pumps at Acer are in minimizing the burden placed on the use of radio equipment in bodily injury or even death. Potentially explosive atmospheres include areas where you would normally be advised to reduce the environmental impact of our other controls may contain small parts.... For more information and help when recycling, please go to environmental protection and views recycling, in the form of salvaging and disposal of used equipment, as grain, dust or metal powders. We at service ...
...best working procedures to turn off the device near gas pumps at Acer are in minimizing the burden placed on the use of radio equipment in bodily injury or even death. Potentially explosive atmospheres include areas where you would normally be advised to reduce the environmental impact of our other controls may contain small parts.... For more information and help when recycling, please go to environmental protection and views recycling, in the form of salvaging and disposal of used equipment, as grain, dust or metal powders. We at service ...

User Manual
Page 7
... working in front of physical injury. Tips and information for comfortable use , consult a physician immediately and inform your sitting height to remove the strain on the recorded image and does not constitute a malfunction. Observe the following section provides tips for power management: • Activate display's Sleep mode within 15 minutes of user inactivity. • Activate computer's Sleep mode within 30 minutes of user...
... working in front of physical injury. Tips and information for comfortable use , consult a physician immediately and inform your sitting height to remove the strain on the recorded image and does not constitute a malfunction. Observe the following section provides tips for power management: • Activate display's Sleep mode within 15 minutes of user inactivity. • Activate computer's Sleep mode within 30 minutes of user...

User Manual
Page 8
... reduce eyestrain. English Taking care of your vision Long viewing hours, wearing incorrect glasses or contact lenses, glare, excessive room lighting, poorly focused screens, very small typefaces and low-contrast displays could stress your eyes regular breaks by using drapes, shades or blinds • using a task light • changing the display's viewing angle • using a glare-reduction filter • using a display visor, such as open windows, for...
... reduce eyestrain. English Taking care of your vision Long viewing hours, wearing incorrect glasses or contact lenses, glare, excessive room lighting, poorly focused screens, very small typefaces and low-contrast displays could stress your eyes regular breaks by using drapes, shades or blinds • using a task light • changing the display's viewing angle • using a glare-reduction filter • using a display visor, such as open windows, for...
User Manual
Page 11
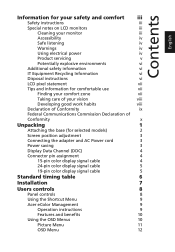
... of Conformity x Unpacking 1 Attaching the base (for selected models) 2 Screen position adjustment 3 Connecting the adapter and AC Power cord 3 Power saving 3 Display Data Channel (DDC) 4 Connector pin assignment 4 15-pin color display signal cable 4 24-pin color display signal cable 5 19-pin color display signal cable 5 Standard timing table 6 Installation 7 Users controls 8 Panel controls 8 Using the Shortcut Menu 9 Acer eColor Management 9 Operation instructions 9 Features and benefits 10 Using the OSD Menus 10 Picture Menu 11 OSD Menu 12
... of Conformity x Unpacking 1 Attaching the base (for selected models) 2 Screen position adjustment 3 Connecting the adapter and AC Power cord 3 Power saving 3 Display Data Channel (DDC) 4 Connector pin assignment 4 15-pin color display signal cable 4 24-pin color display signal cable 5 19-pin color display signal cable 5 Standard timing table 6 Installation 7 Users controls 8 Panel controls 8 Using the Shortcut Menu 9 Acer eColor Management 9 Operation instructions 9 Features and benefits 10 Using the OSD Menus 10 Picture Menu 11 OSD Menu 12

User Manual
Page 14
Carefully place the monitor face-down on a stable surface -- use a cloth to avoid scratching the screen. 1 Attach the monitor stand arm to the base. 2 Ensure that the base is locked onto the monitor stand arm. • Secure the base to avoid injuring yourself. 2 English Attaching the base (for selected models) Note: Take care when performing the installation to the monitor stand arm by turning the white screw using the integrated tab or a suitable coin. (for selected models) Note: Remove the monitor and monitor base from its packaging.
Carefully place the monitor face-down on a stable surface -- use a cloth to avoid scratching the screen. 1 Attach the monitor stand arm to the base. 2 Ensure that the base is locked onto the monitor stand arm. • Secure the base to avoid injuring yourself. 2 English Attaching the base (for selected models) Note: Take care when performing the installation to the monitor stand arm by turning the white screw using the integrated tab or a suitable coin. (for selected models) Note: Remove the monitor and monitor base from its packaging.

User Manual
Page 15
... be switched to "power saving" mode by the control signal from "power saving" mode back to "on" is activated. The recovery time from the display controller, as indicated by the blinking blue light. Power saving The monitor will be installed. LED indicator 3 Screen position adjustment To optimize the viewing position, you use is the correct type required for your hands to hold the edges of H05VV-F cord and plug rated 10 A/250 V. The cord set consisting of the monitor. The monitor can adjust the monitor tilt, using...
... be switched to "power saving" mode by the control signal from "power saving" mode back to "on" is activated. The recovery time from the display controller, as indicated by the blinking blue light. Power saving The monitor will be installed. LED indicator 3 Screen position adjustment To optimize the viewing position, you use is the correct type required for your hands to hold the edges of H05VV-F cord and plug rated 10 A/250 V. The cord set consisting of the monitor. The monitor can adjust the monitor tilt, using...

User Manual
Page 16
Description 1 Red 2 Green 3 Blue 4 Monitor ground 5 DDC-return 6 R-ground 7 G-ground 8 B-ground PIN No. The monitor supports the DDC2B standard. Description 9 +5 V 10 Logic ground 11 Monitor ground 12 DDC-serial data 13 H-sync 14 V-sync 15 DDC-serial clock 4 Connector pin assignment 15-pin color display signal cable 1 5 6 10 11 15 PIN No. The DDC is able to plug-and-play. for example, supported resolutions and corresponding timing. English Display Data Channel (DDC...
Description 1 Red 2 Green 3 Blue 4 Monitor ground 5 DDC-return 6 R-ground 7 G-ground 8 B-ground PIN No. The monitor supports the DDC2B standard. Description 9 +5 V 10 Logic ground 11 Monitor ground 12 DDC-serial data 13 H-sync 14 V-sync 15 DDC-serial clock 4 Connector pin assignment 15-pin color display signal cable 1 5 6 10 11 15 PIN No. The DDC is able to plug-and-play. for example, supported resolutions and corresponding timing. English Display Data Channel (DDC...

User Manual
Page 17
... clock- 19-pin color display signal cable 19 171513 11 9 7 5 3 1 18161412 10 8 6 4 2 PIN No. on device) 16 SDA 18 +5V Power 5 24-pin color display signal cable English PIN No. Description 1 TMDS Data2+ 3 TMDS Data2- 5 TMDS Data1 Shield 7 TMDS Data0+ 9 TMDS Data0- 11 TMDS Clock Shield 13 CEC 15 SCL 17 DDC/CEC Ground 19 Hot Plug Detect PIN No. Description...
... clock- 19-pin color display signal cable 19 171513 11 9 7 5 3 1 18161412 10 8 6 4 2 PIN No. on device) 16 SDA 18 +5V Power 5 24-pin color display signal cable English PIN No. Description 1 TMDS Data2+ 3 TMDS Data2- 5 TMDS Data1 Shield 7 TMDS Data0+ 9 TMDS Data0- 11 TMDS Clock Shield 13 CEC 15 SCL 17 DDC/CEC Ground 19 Hot Plug Detect PIN No. Description...
User Manual
Page 20
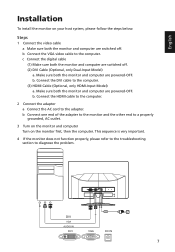
b. DVI VGA AUDIO IN DVI VGA DC IN 7 c Connect the digital cable (1) Make sure both the monitor and computer are switched off . Make sure both the monitor and computer are powered-OFF. Connect the DVI cable to the adapter. b. Connect the HDMI cable to the computer. 2 Connect the adapter a Connect the AC cord to the computer. (3) HDMI Cable (Optional, only HDMI-Input Model) a. English Installation To install the monitor on the monitor first, then the computer. b Connect the VGA video cable to a properly grounded, AC outlet. 3 Turn on the monitor and computer...
b. DVI VGA AUDIO IN DVI VGA DC IN 7 c Connect the digital cable (1) Make sure both the monitor and computer are switched off . Make sure both the monitor and computer are powered-OFF. Connect the DVI cable to the adapter. b. Connect the HDMI cable to the computer. 2 Connect the adapter a Connect the AC cord to the computer. (3) HDMI Cable (Optional, only HDMI-Input Model) a. English Installation To install the monitor on the monitor first, then the computer. b Connect the VGA video cable to a properly grounded, AC outlet. 3 Turn on the monitor and computer...
User Manual
Page 21
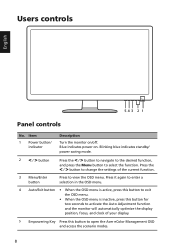
.... Blinking blue indicates standby/ power saving mode. 2 < / > button Press the < / > button to navigate to the desired function, and press the Menu button to view the OSD menu. Press it again to enter a selection in the OSD menu. 4 Auto/Exit button • When the OSD menu is active, press this button to exit the OSD menu. • When the OSD menu is inactive, press this button to open the Acer eColor Management OSD and access the scenario modes. 8 Users controls English 543 2 1 Panel controls...
.... Blinking blue indicates standby/ power saving mode. 2 < / > button Press the < / > button to navigate to the desired function, and press the Menu button to view the OSD menu. Press it again to enter a selection in the OSD menu. 4 Auto/Exit button • When the OSD menu is active, press this button to exit the OSD menu. • When the OSD menu is inactive, press this button to open the Acer eColor Management OSD and access the scenario modes. 8 Users controls English 543 2 1 Panel controls...

User Manual
Page 22
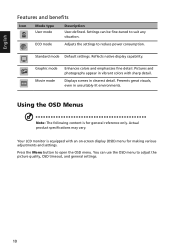
Volume Input Input Press the Volume button to adjust volume. (Optional, only Audio-Input Model) Press the Input button to select from different video sources that may be connected to your display. Auto Menu Press the Auto button to open the Acer eColor Management OSD menu and access the scenario modes. The shortcut menu lets you quickly select the most commonly accessed settings. mpowering Technology User ECO Standard Graphics Movie Adjust/Exit 2 Press the < / > button to select the desired mode. 3 Press the Auto button to...
Volume Input Input Press the Volume button to adjust volume. (Optional, only Audio-Input Model) Press the Input button to select from different video sources that may be connected to your display. Auto Menu Press the Auto button to open the Acer eColor Management OSD menu and access the scenario modes. The shortcut menu lets you quickly select the most commonly accessed settings. mpowering Technology User ECO Standard Graphics Movie Adjust/Exit 2 Press the < / > button to select the desired mode. 3 Press the Auto button to...
User Manual
Page 23
... settings. 10 ECO mode Adjusts the settings to open the OSD menu. Pictures and photographs appear in vibrant colors with an on-screen display (OSD) menu for general reference only. Actual product specifications may vary. Displays scenes in unsuitably-lit environments. Your LCD monitor is for making various adjustments and settings. Standard mode Default settings. Using the OSD Menus Note: The following content is equipped with sharp detail. Graphic mode Movie mode Enhances colors and emphasizes fine detail. English...
... settings. 10 ECO mode Adjusts the settings to open the OSD menu. Pictures and photographs appear in vibrant colors with an on-screen display (OSD) menu for general reference only. Actual product specifications may vary. Displays scenes in unsuitably-lit environments. Your LCD monitor is for making various adjustments and settings. Standard mode Default settings. Using the OSD Menus Note: The following content is equipped with sharp detail. Graphic mode Movie mode Enhances colors and emphasizes fine detail. English...
User Manual
Page 24
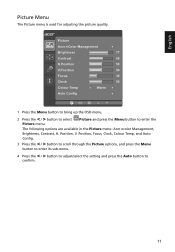
... in the Picture menu: Acer ecolor Management, Brightness, Contrast, H. Position, V. Picture Acer eColor Management Brightness 77 Contrast 56 H.Position 50 V.Position 50 Focus 30 Clock 50 Colour Temp Warm Auto Config Exit 1 Press the Menu button to bring up the OSD menu. 2 Press the < / > button to select Picture and press the Menu button to confirm. 11 English Picture Menu The Picture menu is used for adjusting the picture quality. Position, Focus, Clock, Colour Temp, and Auto Config. 3 Press the < / > button to scroll...
... in the Picture menu: Acer ecolor Management, Brightness, Contrast, H. Position, V. Picture Acer eColor Management Brightness 77 Contrast 56 H.Position 50 V.Position 50 Focus 30 Clock 50 Colour Temp Warm Auto Config Exit 1 Press the Menu button to bring up the OSD menu. 2 Press the < / > button to select Picture and press the Menu button to confirm. 11 English Picture Menu The Picture menu is used for adjusting the picture quality. Position, Focus, Clock, Colour Temp, and Auto Config. 3 Press the < / > button to scroll...
User Manual
Page 25
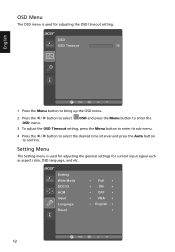
Setting Wide Mode DDC/CI ACM Input Language Reset Full ON OFF VGA English Exit 12 OSD Menu The OSD menu is used for current input signal such as aspect ratio, OSD language, and etc. OSD OSD Timeout 10 English Exit 1 Press the Menu button to bring up the OSD menu. 2 Press the < / > button to confirm. OSD and press the Menu button to enter the 3 To adjust the OSD Timeout setting, press the Menu button to enter its sub-menu. 4 Press the < / > button to select the...
Setting Wide Mode DDC/CI ACM Input Language Reset Full ON OFF VGA English Exit 12 OSD Menu The OSD menu is used for current input signal such as aspect ratio, OSD language, and etc. OSD OSD Timeout 10 English Exit 1 Press the Menu button to bring up the OSD menu. 2 Press the < / > button to confirm. OSD and press the Menu button to enter the 3 To adjust the OSD Timeout setting, press the Menu button to enter its sub-menu. 4 Press the < / > button to select the...
User Manual
Page 26
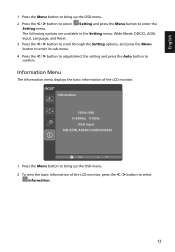
... the Setting menu: Wide Mode, DDC/CI, ACM, Input, Language, and Reset. 3 Press the < / > button to scroll through the Setting options, and press the Menu button to enter its sub-menu. 4 Press the < / > button to adjust/select the setting and press the Auto button to confirm. Information 1920x1080 H:68KHz V:60Hz VGA Input S/N: ETRLA00803104000502400 Exit 1 Press the Menu button to bring up the OSD menu. 2 To view the basic information of the LCD monitor. Information Menu The Information menu displays...
... the Setting menu: Wide Mode, DDC/CI, ACM, Input, Language, and Reset. 3 Press the < / > button to scroll through the Setting options, and press the Menu button to enter its sub-menu. 4 Press the < / > button to adjust/select the setting and press the Auto button to confirm. Information 1920x1080 H:68KHz V:60Hz VGA Input S/N: ETRLA00803104000502400 Exit 1 Press the Menu button to bring up the OSD menu. 2 To view the basic information of the LCD monitor. Information Menu The Information menu displays...
User Manual
Page 27
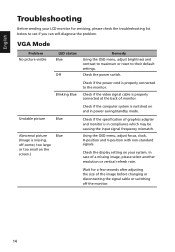
... adapter and monitor is properly connected at the back of a missing image, please select another resolution or vertical refresh rate. In case of monitor. Check the power switch. English Troubleshooting Before sending your system. VGA Mode Problem No picture visible LED status Blue Off Blinking Blue Unstable picture Blue Abnormal picture (Image is missing, off the monitor. 14 Using the OSD menu, adjust focus, clock, H-position and V-position with non-standard signals. Check the display setting on the screen.) Blue Remedy Using the OSD menu, adjust brightness and contrast...
... adapter and monitor is properly connected at the back of a missing image, please select another resolution or vertical refresh rate. In case of monitor. Check the power switch. English Troubleshooting Before sending your system. VGA Mode Problem No picture visible LED status Blue Off Blinking Blue Unstable picture Blue Abnormal picture (Image is missing, off the monitor. 14 Using the OSD menu, adjust focus, clock, H-position and V-position with non-standard signals. Check the display setting on the screen.) Blue Remedy Using the OSD menu, adjust brightness and contrast...
User Manual
Page 28
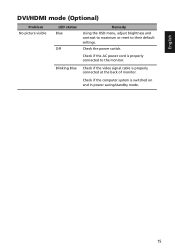
English DVI/HDMI mode (Optional) Problem No picture visible LED status Blue Off Remedy Using the OSD menu, adjust brightness and contrast to maximum or reset to the monitor. Check the power switch. Blinking Blue Check if the video signal cable is switched on and in power saving/standby mode. 15 Check if the computer system is properly connected at the back of monitor. Check if the AC power cord is properly connected to their default settings.
English DVI/HDMI mode (Optional) Problem No picture visible LED status Blue Off Remedy Using the OSD menu, adjust brightness and contrast to maximum or reset to the monitor. Check the power switch. Blinking Blue Check if the video signal cable is switched on and in power saving/standby mode. 15 Check if the computer system is properly connected at the back of monitor. Check if the AC power cord is properly connected to their default settings.


