F20 User's Guide
Page 1
For more information about recycling monitors, please contact Acer agents. Table of Contents Precautions ...2 Package contents ...3 Installation instructions 3 Assembling the Monitor...3 Repackage the Monitor ...4 Adjusting the Viewing Angle...4 Connecting the Devices...5 Switching the Power ...5 Adjusting display settings 6 External Controls ...6 OSD options ...7 OSD Menu ...7 Troubleshooting ...9 General specifications 10 Recycling Information Any question about Acer, please visit http://www.acer.com 1
For more information about recycling monitors, please contact Acer agents. Table of Contents Precautions ...2 Package contents ...3 Installation instructions 3 Assembling the Monitor...3 Repackage the Monitor ...4 Adjusting the Viewing Angle...4 Connecting the Devices...5 Switching the Power ...5 Adjusting display settings 6 External Controls ...6 OSD options ...7 OSD Menu ...7 Troubleshooting ...9 General specifications 10 Recycling Information Any question about Acer, please visit http://www.acer.com 1
F20 User's Guide
Page 2
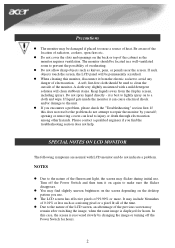
... from the display screen, including sprays. If this case, the screen is recovered slowly by yourself; SPECIAL NOTES ON LCD MONITOR The following symptoms are normal with a mild detergent solution will be used to the nature of the fluorescent light, the screen may flicker during initial ..., when the same image is best to lightly spray on to make sure the flicker disappears. A cloth very slightly moistened with LCD monitor and do not attempt to repair the monitor by changing the image or turning off the Power Switch and then turn it is displayed for hours. 2 it on the back...
... from the display screen, including sprays. If this case, the screen is recovered slowly by yourself; SPECIAL NOTES ON LCD MONITOR The following symptoms are normal with a mild detergent solution will be used to the nature of the fluorescent light, the screen may flicker during initial ..., when the same image is best to lightly spray on to make sure the flicker disappears. A cloth very slightly moistened with LCD monitor and do not attempt to repair the monitor by changing the image or turning off the Power Switch and then turn it is displayed for hours. 2 it on the back...

F20 User's Guide
Page 3
Put the monitor on the desk carefully. 2. Put the base of monitor on flat table or plate. 3 LCD Monitor Package contents Power Cord Audio Cable VGA Cable AC/DC Adapter User Manual (CD) Quick Start Guide Installation instructions Assembling the Monitor 1.
Put the monitor on the desk carefully. 2. Put the base of monitor on flat table or plate. 3 LCD Monitor Package contents Power Cord Audio Cable VGA Cable AC/DC Adapter User Manual (CD) Quick Start Guide Installation instructions Assembling the Monitor 1.
F20 User's Guide
Page 4
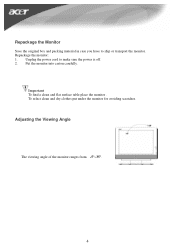
Unplug the power cord to ship or transport the monitor. Repackage the monitor: 1. Adjusting the Viewing Angle The viewing angle of the monitor ranges from -5°~35°. 4 Important To find a clean and flat surface table place the monitor . To select clean and dry clothes put under the monitor for avoiding scratches. Repackage the Monitor Save the original box and packing material in case you have to make sure the power is off. 2. Put the monitor into carton carefully.
Unplug the power cord to ship or transport the monitor. Repackage the monitor: 1. Adjusting the Viewing Angle The viewing angle of the monitor ranges from -5°~35°. 4 Important To find a clean and flat surface table place the monitor . To select clean and dry clothes put under the monitor for avoiding scratches. Repackage the Monitor Save the original box and packing material in case you have to make sure the power is off. 2. Put the monitor into carton carefully.

F20 User's Guide
Page 5
... the thumbscrews on the power button or a video signal, check the connections. 5 Connect the signal cable to the VGA input socket (VGA IN) of the monitor , and connect the signal cable to the computer. When you do not see the LED on the computer. WARNING: The D-Sub 15 pin plug of... the audio cable. Connect the audio input socket (AUDIO IN) of the LCD monitor and the computer by means of the VGA cable is trapezoid in shape. c AC/DC Adapter With power cord d VGA Cable e Audio Cable Connect the...
... the thumbscrews on the power button or a video signal, check the connections. 5 Connect the signal cable to the VGA input socket (VGA IN) of the monitor , and connect the signal cable to the computer. When you do not see the LED on the computer. WARNING: The D-Sub 15 pin plug of... the audio cable. Connect the audio input socket (AUDIO IN) of the LCD monitor and the computer by means of the VGA cable is trapezoid in shape. c AC/DC Adapter With power cord d VGA Cable e Audio Cable Connect the...

F20 User's Guide
Page 6
... Power on/off Blue: power on Orange: in sleep mode Press to exit a selection in OSD. If OSD is ´5 AUTO inactive, press and the monitor will automatically optimize the position, focus and clock of your display. 6
... Power on/off Blue: power on Orange: in sleep mode Press to exit a selection in OSD. If OSD is ´5 AUTO inactive, press and the monitor will automatically optimize the position, focus and clock of your display. 6
F20 User's Guide
Page 9
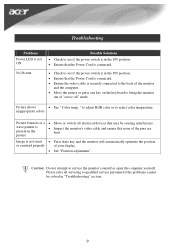
...to select color temperature. Please refer all servicing to qualified service personnel if the problems cannot be solved in the picture • Inspect the monitor's video cable and ensure that may be causing interference. Troubleshooting Problems Power LED is not ON No Picture Possible Solutions • Check to... is connected. • Ensure the video cable is securely connected to the back of the monitor and the computer. • Move the mouse or press any key on the keyboard to bring the monitor out of "active off electrical devices that none of your display. • See "Position ...
...to select color temperature. Please refer all servicing to qualified service personnel if the problems cannot be solved in the picture • Inspect the monitor's video cable and ensure that may be causing interference. Troubleshooting Problems Power LED is not ON No Picture Possible Solutions • Check to... is connected. • Ensure the video cable is securely connected to the back of the monitor and the computer. • Move the mouse or press any key on the keyboard to bring the monitor out of "active off electrical devices that none of your display. • See "Position ...


