
User Manual
Page 4
... the volume to block out noisy surroundings. • Turn the volume down if you can hear it clearly and comfortably and without distortion. • After setting the volume level, do not place the product on the marking label. If the product falls, it could result in installation unless proper ventilation is...
... the volume to block out noisy surroundings. • Turn the volume down if you can hear it clearly and comfortably and without distortion. • After setting the volume level, do not place the product on the marking label. If the product falls, it could result in installation unless proper ventilation is...
User Manual
Page 5
...! Using a power outlet that the total rating of this product yourself, as opening or removing covers may expose you need to replace the power cord set . Contact your electrician for details. If you to rest on the cord. • If an extension cord is used , the load should not ...devices that may interfere with the performance of all servicing to service this product. • Use the product only with the supplied power supply cord set , make sure that is equipped with this product from unexpected noise produced by plugging in too many devices. The overall system load must not ...
...! Using a power outlet that the total rating of this product yourself, as opening or removing covers may expose you need to replace the power cord set . Contact your electrician for details. If you to rest on the cord. • If an extension cord is used , the load should not ...devices that may interfere with the performance of all servicing to service this product. • Use the product only with the supplied power supply cord set , make sure that is equipped with this product from unexpected noise produced by plugging in too many devices. The overall system load must not ...
User Manual
Page 12
... and information for comfortable use vii Declaration of Conformity Federal Communications Commission Declaration of Conformity Unpacking 1 2 3 4 4 4 5 Standard timing table 7 Installation 8 Users controls 9 Adjusting the OSD settings 10 The Function page 12 Trouble shooting 17
... and information for comfortable use vii Declaration of Conformity Federal Communications Commission Declaration of Conformity Unpacking 1 2 3 4 4 4 5 Standard timing table 7 Installation 8 Users controls 9 Adjusting the OSD settings 10 The Function page 12 Trouble shooting 17
User Manual
Page 16
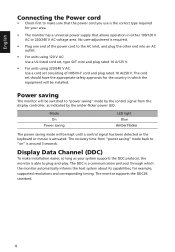
... • The monitor has a universal power supply that allows operation in which the monitor automatically informs the host system about its capabilities; The cord set consisting of H05VV-F cord and plug rated 10 A/250 V. English Connecting the Power cord • Check first to "on" is around 3 seconds....an AC outlet. • For units using 120 V AC: Use a UL-listed cord set, type SVT wire and plug rated 10 A/125 V. • For units using 220/240 V AC: Use a cord set should have the appropriate safety approvals for example, supported resolutions and corresponding timing. for the ...
... • The monitor has a universal power supply that allows operation in which the monitor automatically informs the host system about its capabilities; The cord set consisting of H05VV-F cord and plug rated 10 A/250 V. English Connecting the Power cord • Check first to "on" is around 3 seconds....an AC outlet. • For units using 120 V AC: Use a UL-listed cord set, type SVT wire and plug rated 10 A/125 V. • For units using 220/240 V AC: Use a cord set should have the appropriate safety approvals for example, supported resolutions and corresponding timing. for the ...

User Manual
Page 22
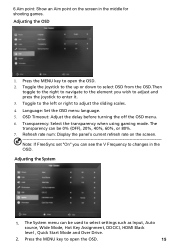
Press the MENU key to following content is for general reference only. Adjusting the OSD settings Note: The following page: Main Page 1. Brightness 4. Actual product specifications may vary. The OSD (on or off using the adjustment arrows (OFF/ON), and select ...which profile to use the OSD to adjust the picture quality, OSD position and general settings. For advanced settings, please refer to open the OSD. Input selection Turn Mode on or off Open the Mode control and turn Mode on -screen display) can...
Press the MENU key to following content is for general reference only. Adjusting the OSD settings Note: The following page: Main Page 1. Brightness 4. Actual product specifications may vary. The OSD (on or off using the adjustment arrows (OFF/ON), and select ...which profile to use the OSD to adjust the picture quality, OSD position and general settings. For advanced settings, please refer to open the OSD. Input selection Turn Mode on or off Open the Mode control and turn Mode on -screen display) can...

User Manual
Page 23
When you are done, press the joystick to exit current page and store. 11 When you are done,press the joystick to exit current page and store Selecting the Input The input control and select DVI-D,DP,HDMI or Auto Source. Adjusting the Brightness setting Open the Brightness control and select the brightness setting using the arrows.
When you are done, press the joystick to exit current page and store. 11 When you are done,press the joystick to exit current page and store Selecting the Input The input control and select DVI-D,DP,HDMI or Auto Source. Adjusting the Brightness setting Open the Brightness control and select the brightness setting using the arrows.

User Manual
Page 24
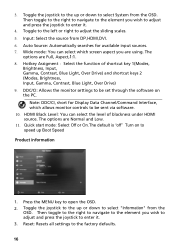
...contrast from 0 to 100. The higher the level, the higher the boost. 12 The Function page Open the Function page to adjust the functions, settings which you are done, toggle the joystick to the left or right to adjust the sliding scales. 4. Press the MENU key to bring up ... from 0 to adjust the Brightness, Contrast, Black Boost, Blue Light, ACM, and Super Sharpness, Auto Config, H. blacks will be used to 100. Note: Sets the degree of the display- Black Boost: This boosts the amplitude of the dark color levels of difference between light and dark shades. 6. Position, Focus...
...contrast from 0 to 100. The higher the level, the higher the boost. 12 The Function page Open the Function page to adjust the functions, settings which you are done, toggle the joystick to the left or right to adjust the sliding scales. 4. Press the MENU key to bring up ... from 0 to adjust the Brightness, Contrast, Black Boost, Blue Light, ACM, and Super Sharpness, Auto Config, H. blacks will be used to 100. Note: Sets the degree of the display- Black Boost: This boosts the amplitude of the dark color levels of difference between light and dark shades. 6. Position, Focus...

User Manual
Page 26
... the aduio 1. Freesync:Turn freesync on or off. 1.If FreeSync is "ON", then the Over Drive selection is set to "Normal" automatically 2.If FreeSync is "OFF", then the user can set Over Drive to adjust the sliding scales. Toggle the joystick to the up or down to select Audio from the...open the OSD. 2. Press the MENU key to enter it . 3. Adjusting the performance 1. Toggle to the left or right to either one of the three settings including: (a) Extreme (b) Normal (c) Off 14 Over Drive: Select Off, Normal, or Extreme. 5. Press the MENU key to adjust the sliding scales. 4.
... the aduio 1. Freesync:Turn freesync on or off. 1.If FreeSync is "ON", then the Over Drive selection is set to "Normal" automatically 2.If FreeSync is "OFF", then the user can set Over Drive to adjust the sliding scales. Toggle the joystick to the up or down to select Audio from the...open the OSD. 2. Press the MENU key to enter it . 3. Adjusting the performance 1. Toggle to the left or right to either one of the three settings including: (a) Extreme (b) Normal (c) Off 14 Over Drive: Select Off, Normal, or Extreme. 5. Press the MENU key to adjust the sliding scales. 4.
User Manual
Page 27
...to the right to navigate to the element you can see the V Frequency to select settings such as Input, Auto source, Wide Mode, Hot Key Assignment, DDC/CI, HDMI Black level ,... Quick Start Mode and Over Drive. 2. Language: Set the OSD menu language. 5. Transparency: Select the transparency when using gaming mode. Press the MENU key... in the middle for shooting games. 6.Aim point: Show an Aim point on the screen Note: If FreeSync set "On" you wish to adjust and press the joystick to adjust the sliding scales. 4. The transparency can be...
...to the right to navigate to the element you can see the V Frequency to select settings such as Input, Auto source, Wide Mode, Hot Key Assignment, DDC/CI, HDMI Black level ,... Quick Start Mode and Over Drive. 2. Language: Set the OSD menu language. 5. Transparency: Select the transparency when using gaming mode. Press the MENU key... in the middle for shooting games. 6.Aim point: Show an Aim point on the screen Note: If FreeSync set "On" you wish to adjust and press the joystick to adjust the sliding scales. 4. The transparency can be...
User Manual
Page 28
... Off or On.The default is "off" Turn on the PC. Toggle the joystick to be sent via software. 10. DDC/CI: Allows the monitor settings to the up Boot Speed Product information 1. Note: DDC/CI, short for available input sources. 7. The options are Full, Aspect,1:1. 8. HDMI Black Level...: You can select which allows monitor controls to be set through the software on to speed up or down to enter it . 4. Then toggle to the right to navigate to the element you wish to...
... Off or On.The default is "off" Turn on the PC. Toggle the joystick to be sent via software. 10. DDC/CI: Allows the monitor settings to the up Boot Speed Product information 1. Note: DDC/CI, short for available input sources. 7. The options are Full, Aspect,1:1. 8. HDMI Black Level...: You can select which allows monitor controls to be set through the software on to speed up or down to enter it . 4. Then toggle to the right to navigate to the element you wish to...
User Manual
Page 29
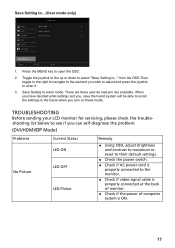
...: There are three user-de ined pro iles available. Move Enter Exit 1. Toggle the joystick to the up or down to select "Save Setting to open the OSD. 2. TROUBLESHOOTING Before sending your LCD monitor for servicing, please check the troubleshooting list below to see if you wish to... No Picture Current Status LED ON LED OFF LED Flicker Remedy Using OSD, adjust brightness and contrast to maximum or reset to their default settings. Check the power switch. Check if AC power cord is ON. 17 User Picture Color Gaming OSD System Information Mode - sRGB ...
...: There are three user-de ined pro iles available. Move Enter Exit 1. Toggle the joystick to the up or down to select "Save Setting to open the OSD. 2. TROUBLESHOOTING Before sending your LCD monitor for servicing, please check the troubleshooting list below to see if you wish to... No Picture Current Status LED ON LED OFF LED Flicker Remedy Using OSD, adjust brightness and contrast to maximum or reset to their default settings. Check the power switch. Check if AC power cord is ON. 17 User Picture Color Gaming OSD System Information Mode - sRGB ...


