

User Manual
Page 3
...supply connection. 19) In the UK, use a BS-approved power cord with molded plug and black (10A) fuse installed. 20) When operating the LCD display with a 120V, 60Hz AC power supply in the United States or Canada, use the power supply provided with this display, please contact your LCD Display monitor:...easily unplugged in case the product requires service. 25) NEVER route the product's power cord inside a wall or similar enclosed area. 26) Never modify this product, never place or store the monitor in the monitor cabinet back, bottom, and sides. Never place the monitor: • On a bed, ...
...supply connection. 19) In the UK, use a BS-approved power cord with molded plug and black (10A) fuse installed. 20) When operating the LCD display with a 120V, 60Hz AC power supply in the United States or Canada, use the power supply provided with this display, please contact your LCD Display monitor:...easily unplugged in case the product requires service. 25) NEVER route the product's power cord inside a wall or similar enclosed area. 26) Never modify this product, never place or store the monitor in the monitor cabinet back, bottom, and sides. Never place the monitor: • On a bed, ...

User Manual
Page 4
... a lightning storm, do not touch the connecting cables or product. 47) Always unplug the monitor to minimize glare and reflections. Save packaging for warm-up. 36) Rest your LCD Display monitor, follow this manual to a Authorized Service Provider. 53) If you have the monitor serviced: • Ask the service technician to use , the monitor may expose you to dangerous voltage or...
... a lightning storm, do not touch the connecting cables or product. 47) Always unplug the monitor to minimize glare and reflections. Save packaging for warm-up. 36) Rest your LCD Display monitor, follow this manual to a Authorized Service Provider. 53) If you have the monitor serviced: • Ask the service technician to use , the monitor may expose you to dangerous voltage or...
User Manual
Page 6
... mounting 20 Using the wall mount or ceiling mount or handles 22 Installation in portrait or landscape orientation 25 Avoiding Image Retention ...26 Connection procedure ...27 Connecting with an analog video source ...28 Connecting with a digital video source ...29 Digital connection: ...29 Connecting LAN...31 Display connection using LAN...31 Connecting the power cord to the display...31 Connecting the power source...31 Chapter 3: How to use the LCD Display Monitor 33 Turning...
... mounting 20 Using the wall mount or ceiling mount or handles 22 Installation in portrait or landscape orientation 25 Avoiding Image Retention ...26 Connection procedure ...27 Connecting with an analog video source ...28 Connecting with a digital video source ...29 Digital connection: ...29 Connecting LAN...31 Display connection using LAN...31 Connecting the power cord to the display...31 Connecting the power source...31 Chapter 3: How to use the LCD Display Monitor 33 Turning...

User Manual
Page 12
... be reset to the system. NOTE Within 2 seconds after the power-off the breaker. If the AC power is used as described above, reconfigure the OSD settings using the following procedure. • Turn off the power of the display using the infrared remote control or another method. • Check and reconfigure the OSD settings. 12 Chapter 1 Introduction Back 1 1 Underside 3 3 3 2 1 Handle screw holes -Used to mount...
... be reset to the system. NOTE Within 2 seconds after the power-off the breaker. If the AC power is used as described above, reconfigure the OSD settings using the following procedure. • Turn off the power of the display using the infrared remote control or another method. • Check and reconfigure the OSD settings. 12 Chapter 1 Introduction Back 1 1 Underside 3 3 3 2 1 Handle screw holes -Used to mount...

User Manual
Page 17
... strong illumination strikes the remote control sensor of the Infrared Remote Control 30° 30° Point the infrared remote control toward the LCD display's remote control sensor during button operation. Reverse this procedure to return the sensor to Use the Infrared Remote Control Setting Up the Infrared Remote Control Sensor Before using the infrared remote control, the LCD display's remote control sensor must be positioned. Use the infrared remote control within a distance of...
... strong illumination strikes the remote control sensor of the Infrared Remote Control 30° 30° Point the infrared remote control toward the LCD display's remote control sensor during button operation. Reverse this procedure to return the sensor to Use the Infrared Remote Control Setting Up the Infrared Remote Control Sensor Before using the infrared remote control, the LCD display's remote control sensor must be positioned. Use the infrared remote control within a distance of...
User Manual
Page 29
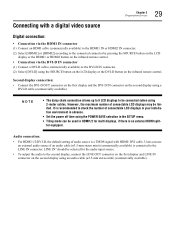
...) is an external HDMI split- It is recommended to check the number of connectable LCD displays in your installation environment in advance. • Set the power off time using the POWER SAVE selection in HDMI1...remote control. • Connection via the DVI-D IN connector (1) Connect a DVI-D cable (commercially available) to the second display, connect the LINE OUT connector on the first display and LINE IN connector on the infrared remote control. Users can be selected for multi displays, if there is connected to be limited. Second display connection: • Connect...
...) is an external HDMI split- It is recommended to check the number of connectable LCD displays in your installation environment in advance. • Set the power off time using the POWER SAVE selection in HDMI1...remote control. • Connection via the DVI-D IN connector (1) Connect a DVI-D cable (commercially available) to the second display, connect the LINE OUT connector on the first display and LINE IN connector on the infrared remote control. Users can be selected for multi displays, if there is connected to be limited. Second display connection: • Connect...

User Manual
Page 35
... infrared remote control. If the AC power is turned off immediately after the power-off operation, all the OSD settings including the language selection may be reset to the factory defaults as described above, reconfigure the OSD settings using the following procedure. • Turn off the breaker. Chapter 3 How to use the LCD Display Monitor 35 4 Turn on the power of the display using the infrared remote control or...
... infrared remote control. If the AC power is turned off immediately after the power-off operation, all the OSD settings including the language selection may be reset to the factory defaults as described above, reconfigure the OSD settings using the following procedure. • Turn off the breaker. Chapter 3 How to use the LCD Display Monitor 35 4 Turn on the power of the display using the infrared remote control or...

User Manual
Page 36
... the current source has no signal. 36 Chapter 3 How to use the LCD Display Monitor Power Management Function To reduce power, the display supports three power off methods, for different purposes. • Sleep Timer • The user can set seven schedules to standby mode as power saving timer; This timer can set the timer to the schedule function. the default is up. NOTE...
... the current source has no signal. 36 Chapter 3 How to use the LCD Display Monitor Power Management Function To reduce power, the display supports three power off methods, for different purposes. • Sleep Timer • The user can set seven schedules to standby mode as power saving timer; This timer can set the timer to the schedule function. the default is up. NOTE...

User Manual
Page 39
... Keypad Operation Anti-Image Retention Initial Settings Details Select the OSD orientation. Adjust backlight setting automatically with Ambient Light Sensor. Chapter 3 How to use the LCD Display Monitor 39 Initial Setting 1 Press the MENU button on the infrared remote control to directly display the OSD menu function. 2 Use the DOWN (▼) button on the infrared remote control or the DOWN (▼) button...
... Keypad Operation Anti-Image Retention Initial Settings Details Select the OSD orientation. Adjust backlight setting automatically with Ambient Light Sensor. Chapter 3 How to use the LCD Display Monitor 39 Initial Setting 1 Press the MENU button on the infrared remote control to directly display the OSD menu function. 2 Use the DOWN (▼) button on the infrared remote control or the DOWN (▼) button...

User Manual
Page 44
Using SCHEDULER in the SETUP menu of the LCD display. Display the OSD menu by pressing the MENU button on the infrared remote control or the MENU button on the infrared remote control. 44 Chapter 3 How to use the LCD Display Monitor Schedule setting You can program poweron/off and input selection using the MENU button on the left side of the OSD screen function, you can program power-on/off and input selection.
Using SCHEDULER in the SETUP menu of the LCD display. Display the OSD menu by pressing the MENU button on the infrared remote control or the MENU button on the infrared remote control. 44 Chapter 3 How to use the LCD Display Monitor Schedule setting You can program poweron/off and input selection using the MENU button on the left side of the OSD screen function, you can program power-on/off and input selection.

User Manual
Page 47
... will display on the screen as the input source. 3 The OSD will display three options, PHOTO, MUSIC, and MOVIE. Use the LEFT (), and RIGHT (), buttons on the infrared remote control to select the media type you wish to view, using the OK button. Chapter 3 How to use the LCD Display Monitor 47 Viewing media from USB storage 1 Insert USB storage...
... will display on the screen as the input source. 3 The OSD will display three options, PHOTO, MUSIC, and MOVIE. Use the LEFT (), and RIGHT (), buttons on the infrared remote control to select the media type you wish to view, using the OK button. Chapter 3 How to use the LCD Display Monitor 47 Viewing media from USB storage 1 Insert USB storage...
User Manual
Page 55
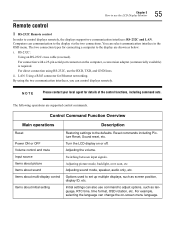
For direct connection using the two communication interfaces, you can control displays remotely. By using RS-232C, use the RXD, TXD, and GND lines. Control Command Function Overview Main operations Description Reset Power ON or OFF Volume control and mute Input source Items about picture Items about sound Items about multi-display control Items about initial setting Restoring settings to set up multiple displays, such as screen position, display ID...
For direct connection using the two communication interfaces, you can control displays remotely. By using RS-232C, use the RXD, TXD, and GND lines. Control Command Function Overview Main operations Description Reset Power ON or OFF Volume control and mute Input source Items about picture Items about sound Items about multi-display control Items about initial setting Restoring settings to set up multiple displays, such as screen position, display ID...

User Manual
Page 56
... 0x0D A remote tool (terminal software), helps users send control commands more conveniently. Value of message excluding end code. The default timeout value is 5,000ms. If the computer does not acknowledge the message within the timeout period, a transmission error is assigned to have occurred. 56 Chapter 3 How to the computer. Control command protocol: The command is as...
... 0x0D A remote tool (terminal software), helps users send control commands more conveniently. Value of message excluding end code. The default timeout value is 5,000ms. If the computer does not acknowledge the message within the timeout period, a transmission error is assigned to have occurred. 56 Chapter 3 How to the computer. Control command protocol: The command is as...
User Manual
Page 58
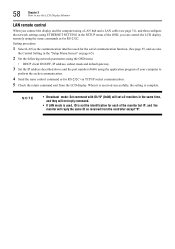
...; If LAN mode is used for the serial communication function. (See page 55, and see also the Control Setting in the SETUP menu of the OSD, you connect the display and the computer using a LAN hub and a LAN cable (see page 31), and then configure the network settings using ETHERNET SETTING in the "Setup Menu Screen" on page 65). 2 Set the following network paramaters using the OSD menu...
...; If LAN mode is used for the serial communication function. (See page 55, and see also the Control Setting in the SETUP menu of the OSD, you connect the display and the computer using a LAN hub and a LAN cable (see page 31), and then configure the network settings using ETHERNET SETTING in the "Setup Menu Screen" on page 65). 2 Set the following network paramaters using the OSD menu...
User Manual
Page 59
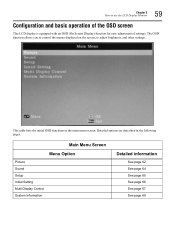
... following pages. Main Menu Screen Menu Option Picture Sound Setup Initial Setting Multi Display Control System Information Detailed information See page 62 See page 64 See page 65 See page 66 See page 67 See page 69 The OSD function allows you to control the menus displayed on the screen, to use the LCD Display Monitor 59 Configuration and basic operation...
... following pages. Main Menu Screen Menu Option Picture Sound Setup Initial Setting Multi Display Control System Information Detailed information See page 62 See page 64 See page 65 See page 66 See page 67 See page 69 The OSD function allows you to control the menus displayed on the screen, to use the LCD Display Monitor 59 Configuration and basic operation...

User Manual
Page 60
...OK button to accept the selected main menu, the sub menu at the top is selected. Step 1 Infrared remote control Monitor button Description SOU ND Press the MENU button to display the OSD screen and then press the UP (▲), and DOWN (▼), buttons to select options in the main menu....menu, the sub menu at the top is selected. 3 SOU ND Press the UP (▲), and DOWN (▼), buttons to use the LCD Display Monitor Basic operation of OSD screen Check that the power indicator illuminates green and the LCD display is powered on. 60 Chapter 3 How to select a sub menu.
...OK button to accept the selected main menu, the sub menu at the top is selected. Step 1 Infrared remote control Monitor button Description SOU ND Press the MENU button to display the OSD screen and then press the UP (▲), and DOWN (▼), buttons to select options in the main menu....menu, the sub menu at the top is selected. 3 SOU ND Press the UP (▲), and DOWN (▼), buttons to use the LCD Display Monitor Basic operation of OSD screen Check that the power indicator illuminates green and the LCD display is powered on. 60 Chapter 3 How to select a sub menu.

User Manual
Page 62
... and inactive when the zoom (in multi-dis- Reset settings to use the LCD Display Monitor Picture Menu Screen Picture mode Backlight Color Temperature Gamma Adaptive Contrast Over Scan Aspect Ratio Color Range VGA setting Reset Picture Setting Picture Menu Screen Select picture style, Dynamic, Cinema, Custom, or... 3 How to factory defaults. Adjust color temperature and gain. Turn adaptive contrast on or off , only aspect ratios 4:3, 16:9. Adjust backlight settings. Adjust over scan settings. • Adjust aspect ratio settings • This option is off . Adjust color range...
... and inactive when the zoom (in multi-dis- Reset settings to use the LCD Display Monitor Picture Menu Screen Picture mode Backlight Color Temperature Gamma Adaptive Contrast Over Scan Aspect Ratio Color Range VGA setting Reset Picture Setting Picture Menu Screen Select picture style, Dynamic, Cinema, Custom, or... 3 How to factory defaults. Adjust color temperature and gain. Turn adaptive contrast on or off , only aspect ratios 4:3, 16:9. Adjust backlight settings. Adjust over scan settings. • Adjust aspect ratio settings • This option is off . Adjust color range...

User Manual
Page 64
Select internal or external speaker. Reset settings to use the LCD Display Monitor Sound Menu Screen Sound mode Surround Sound Speaker Audio Source Reset Sound Setting Sound Menu Screen Select sound style; Select audio source; Adjust Treble, Bass, and Balance settings. Turn surround sound on or off. Line In/HDMI1, or Line In/HDMI2. 64 Chapter 3 How to factory defaults. Standard, Dynamic, or Custom.
Select internal or external speaker. Reset settings to use the LCD Display Monitor Sound Menu Screen Sound mode Surround Sound Speaker Audio Source Reset Sound Setting Sound Menu Screen Select sound style; Select audio source; Adjust Treble, Bass, and Balance settings. Turn surround sound on or off. Line In/HDMI1, or Line In/HDMI2. 64 Chapter 3 How to factory defaults. Standard, Dynamic, or Custom.

User Manual
Page 65
... back to this source. • If signal priority check is disabled, upon power on the display will use the LCD Display Monitor 65 Scheduler Signal Check Priority Control Setting Standby Mode Ethernet Setting Sleep Timer Power Save Setup Menu Screen Change schedule settings. • Set signal priority 1-5 (priority 1 is USB, the system will the last used source. • If signal priority check is enabled and upon...
... back to this source. • If signal priority check is disabled, upon power on the display will use the LCD Display Monitor 65 Scheduler Signal Check Priority Control Setting Standby Mode Ethernet Setting Sleep Timer Power Save Setup Menu Screen Change schedule settings. • Set signal priority 1-5 (priority 1 is USB, the system will the last used source. • If signal priority check is enabled and upon...

User Manual
Page 67
Set the number of displays used for the width of the infrared remote controller and the control function by screen position Set the monitor ID number that is used Turn frame compensation on or off. For installations when Tiling mode is setup for a video wall, to compensate for the horizontal and vertical display. Frame compensation is used for identification, especially when the "SET ID" key of panel bezels so...
Set the number of displays used for the width of the infrared remote controller and the control function by screen position Set the monitor ID number that is used Turn frame compensation on or off. For installations when Tiling mode is setup for a video wall, to compensate for the horizontal and vertical display. Frame compensation is used for identification, especially when the "SET ID" key of panel bezels so...