Acer DW460 Support and Manuals
Get Help and Manuals for this Acer Computers item

Popular Acer DW460 Manual Pages
User Manual - Page 3

... overheating and to repair or open the display by yourself. Important Safety Instructions
Before using the LCD display, please read this manual completely and follow ...instructions in direct sunlight or install near water or install in a high-humidity environment. • DO NOT place this apparatus in this manual.
« Important Safety Instructions » | 3 Consult an authorized service...
User Manual - Page 4
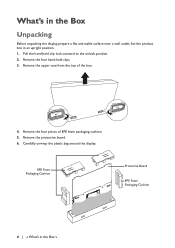
Remove the four pieces of the box.
4. Carefully unwrap the plastic bag around the display. Set the product box in the Box
Unpacking
Before unpacking the display, prepare a flat and stable surface near a wall outlet. Remove the four hand-hold clip ...
User Manual - Page 6
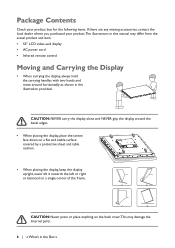
...are any missing accessories, contact the local dealer where you purchased your product.The illustrations in this manual may differ from the actual product and item. • 55" LCD video-wall display •...tilt it towards the left or right or balanced on the back cover.This may damage the internal parts.
6 | « What's in the illustration provided. CAUTION: NEVER carry the display alone and...
User Manual - Page 11
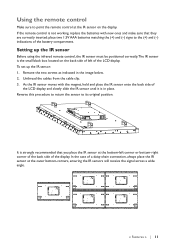
... will receive the signal across a wide angle.
« Features » | 11 Setting up the IR sensor: 1. To set up the IR sensor
Before using the infrared remote control, the IR sensor must be ...positioned correctly.The IR sensor is not working, replace the batteries with the magnet,...
User Manual - Page 13

Getting Started
Setting up the LCD Display
Connecting the power cable
Before making any connections, make sure that matches the AC voltage of the power outlet and has ...
User Manual - Page 14

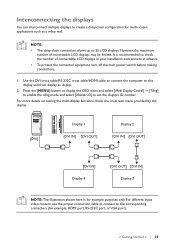
... can be tiled in the following illustrations. Tiling configuration
This feature provides a single large-screen matrix (video-wall) using up to 25 displays (up to 5 set horizontally and 5 set vertically).This function requires a daisy-chain connection.
User Manual - Page 15
...
NOTE: • The daisy-chain connection allows up to display.
2. For more details on setting the multi-display functions, check the on-screen menu provided by the display.
[DVI]
Display 1...Getting Started » | 15 However, the maximum
number of connectable LCD displays in your installation environment in advance. • To protect the connected equipment, turn off the main power ...
User Manual - Page 16
... HDMI (or DVI-D cable) to [LINE IN].
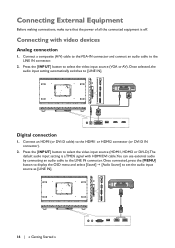
Digital connection
1. Once selected, the audio input setting automatically switches to the HDMI1 or HDMI2 connector (or DVI-D IN connector).
2. Press the [INPUT]...Audio Source] to select the video input source (VGA or AV).
Press the [INPUT] button to set the audio input source as [LINE IN].
16 | « Getting Started » Connecting External...
User Manual - Page 17
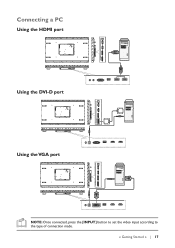
Connecting a PC
Using the HDMI port
Using the DVI-D port
Using the VGA port
NOTE: Once connected, press the [INPUT] button to set the video input according to the type of connection made.
« Getting Started » | 17
User Manual - Page 18
... interfaces, you make a connection
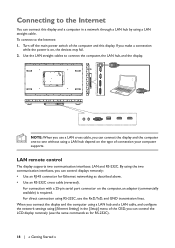
while the power is required. LAN remote control
The display supports two communication interfaces: LAN and RS-232C. For direct connection using a LAN hub depend ...and a computer in a network through a LAN hub by using [Ethernet Setting] in the [Setup] menu of connection your computer supports. For connection with a 25-pin serial port connector on the type ...
User Manual - Page 19

.../IP socket communication. 5. Send the control command via the USB port. To update the firmware: 1. Set the IP address and the port number (4660) using a USB hub is complete. Select [MENU] [Setup] [Software update (USB)] to a USB storage medium. 2. Download the latest firmware for details of the control functions, including network parameters and command...
User Manual - Page 20

... main power switch or disconnect the power cable within two seconds of the display. 4. For more details, see "Setting up . Turn on the LCD display. Make sure the IR sensor has been properly set up the IR sensor".
3. If the AC power is powered on. • If you turn off the display...
User Manual - Page 21

... [Sound] [Speaker] to select whether the built-in speakers or external stereo speakers are to be available. Setting the schedule Press the [MENU] button to display the OSD menu, and select [Setup] [Scheduler] to program the power-on the remote control to directly switch the video input source. Follow the...
User Manual - Page 22
....
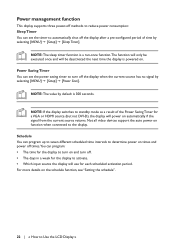
NOTE: If the display switches to standby mode as a result of time by selecting [MENU] [Setup] [Power Save].
Power Saving Timer You can set the timer to the display. Not all video devices support the auto power on function when connected to automatically shut off the display when the current source...
User Manual - Page 25
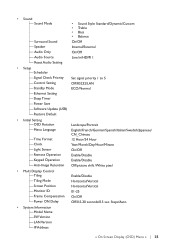
... 1
• Setup Scheduler
Signal Check Priority Set signal priority 1 to 5
Control Setting
Off/RS232/LAN
Standby Mode
ECO/Normal
Ethernet Setting
Sleep Timer
Power Save
Software Update (USB)
Restore Default
• Initial Setting OSD Rotation Menu ...sec. Steps/Auto
• System Information Model Name SW Version LAN Version IP Address
« On Screen Display (OSD) Menu » | 25...
Acer DW460 Reviews
We have not received any reviews for Acer yet.