Acer DV433 Support and Manuals
Get Help and Manuals for this Acer Computers item

Popular Acer DV433 Manual Pages
User Manual - Page 2
...SERVICIBLE PARTS INSIDE. ing type plug has two blades and a third grounding
prong. The wide blade or the third prong are provided
for purchasing this LCD Display monitor. This manual... all instructions. 5) Do not use of your new LCD Display monitor. Servicing is required when the apparatus has been damaged in accordance with the manufacturer's instructions.
8) Do not install near water...
User Manual - Page 3

...space of at all warnings when installing your LCD Display monitor: 18) When operating the LCD display with its AC 220-
240V power supply in case the product requires service.
25) NEVER route the ...anchoring both the furniture and the display to a suitable support. • NEVER allow any part of the display to hang over the edge of supporting furniture. • NEVER place the display on the ...
User Manual - Page 4

...installing the remote control batteries; • Align the batteries according to the (+) and (-) indications inside the case. • Align the (-) indication of service, ask the service technician to perform routine safety checks to use only replacement parts...up.
36) Rest your LCD Display monitor, follow this manual to a Authorized Service Provider.
53) If you to dangerous voltage or other...
User Manual - Page 6
... Safety Instructions 2
Installation, Care, and Service 3
Chapter 1: Introduction 8 Safety Icons...8 Features of your new LCD Display ...9 Package Contents ...10 Parts Name and Functions...11 Connectors and Terminals...13 Infrared Remote Control ...15 IR Daisy Chain Function...16 How to Use the Infrared Remote Control 17
Chapter 2: Preparation for use 20 Preparation for installation ...20...
User Manual - Page 29
.... Audio connection:
• For HDMI 1/2/DVI-D, the default setting of connectable LCD displays may be limited. However, the maximum number...to be connected (when using the POWER SAVE selection in the SETUP menu. • Tiling mode can use
29
Digital connection:... to check the number of connectable LCD displays in your installation environment in HDMI1/2 for multi displays, if there is ...
User Manual - Page 31
...connect this manual for use...supported. the power-on ,
it the devices may fail. • Connect the computer and the LAN hub using a straight type LAN cable (commercially available). • Connect this display and the LAN hub using a straight type LAN cable (commercially available).
Use the clamper to "Important Safety Instructions" and "Installation, Ergonomics, Care, and Service...
User Manual - Page 36

...to use the LCD Display Monitor
Power Management Function
To reduce power, the display supports three power off methods, for different purposes.
• Sleep Timer
• The user can set seven schedules to determine power on times and power off times. The power saving...-off Diagnosis (detecting failure)
Green Red Amber Off Red Blinking *Please contact your nearest authorized service facility.
User Manual - Page 44

44
Chapter 3 How to use the LCD Display Monitor
Schedule setting
You can program poweron/off and input selection using the MENU button on the infrared remote control. Using SCHEDULER in the SETUP menu of the OSD screen function, you can program power-on the left side of the LCD display. Display the...
User Manual - Page 55
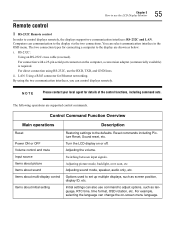
... (reversed).
Switching between input signals. The two connection types for connecting a computer to the display are supported control commands. LAN: Using a RJ45 connector for details of the control functions, including command sets. Adjusting the volume. Initial settings can control displays remotely. Chapter 3 How to use the RXD, TXD, and GND lines. For direct...
User Manual - Page 58
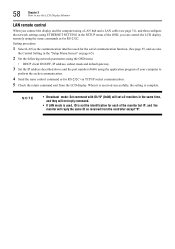
... and the computer using a LAN hub and a LAN cable (see also
the Control Setting in the SETUP menu of the OSD, you can control the LCD display remotely using the application program ...See page 55, and see page 31), and then configure the network settings using ETHERNET SETTING in the "Setup Menu Screen" on page 65).
2 Set the following network paramaters using the OSD menu.
• DHCP client ...
User Manual - Page 59
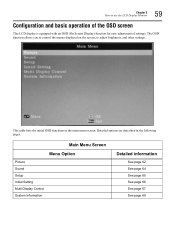
Main Menu Screen
Menu Option
Picture Sound Setup Initial Setting Multi Display Control System Information
Detailed information
See page 62 See page 64 See page 65 See ... screen
This LCD display is equipped with an OSD (On Screen Display) function for easy adjustment of settings. This table lists the initial OSD functions in the following pages. Chapter 3 How to adjust brightness, and other...
User Manual - Page 65

... is disabled, upon power on the display will use the LCD Display Monitor
65
Scheduler Signal Check Priority
Control Setting Standby Mode Ethernet Setting Sleep Timer Power Save
Setup Menu Screen
Change schedule settings.
• Set signal priority 1-5 (priority 1 is USB, the system will automatically play from USB. Choose to control the LCD display through...
User Manual - Page 66
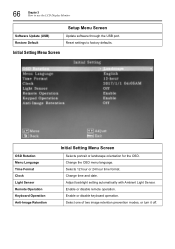
... factory defaults. Selects 12 hour or 24 hour time format.
Enable or disable remote operation. Reset settings to use the LCD Display Monitor
Software Update (USB) Restore Default
Setup Menu Screen
Update software through the USB port. Initial Setting Menu Screen
OSD Rotation Menu Language Time Format Clock Light Sensor Remote Operation Keyboard Operation Anti...
User Manual - Page 67

... number of the infrared remote controller and the control function by screen position
Set the monitor ID number that is setup for the horizontal and vertical display.
For installations when Tiling mode is used for identification, especially when the "SET ID" key of displays used
Turn frame compensation on or off. Up to 25...
User Manual - Page 68

... prevent inrush current problems, and reduce the overall electrical load requirements when a single power supply is used. • Set the power on delay or turn it off. • 0-30 seconds/0.5 second steps. • Set to "AUTO" by pressing the [MENU] button. The OSD will display "IR Set ID 0". 3 Press "2".
Use these instructions to set to identify...
Acer DV433 Reviews
We have not received any reviews for Acer yet.