
User Manual
Page 3
... on LCD monitors The following guidelines when connecting and disconnecting power from the LCD monitor: • Make sure the monitor is displayed for your monitor Please carefully follow these instructions carefully. It may remain after switching the image, when the same image is attached to its base before cleaning. • Use a soft cloth to unplug the power cord from the power supplies. Accessibility Be sure that the power outlet you need to disconnect power...
... on LCD monitors The following guidelines when connecting and disconnecting power from the LCD monitor: • Make sure the monitor is displayed for your monitor Please carefully follow these instructions carefully. It may remain after switching the image, when the same image is attached to its base before cleaning. • Use a soft cloth to unplug the power cord from the power supplies. Accessibility Be sure that the power outlet you need to disconnect power...

User Manual
Page 4
... not use it from the type of the power strip's input rating. • This product's power cord is provided. • Never push objects of time listening to music at high volume. • Avoid turning up the volume to block out noisy surroundings. • Turn the volume down if you are provided for details. These openings must not exceed 80% of the equipment plugged...
... not use it from the type of the power strip's input rating. • This product's power cord is provided. • Never push objects of time listening to music at high volume. • Avoid turning up the volume to block out noisy surroundings. • Turn the volume down if you are provided for details. These openings must not exceed 80% of the equipment plugged...
User Manual
Page 5
... fire resulting in progress. v Areas with the supplied power supply cord set , make sure that the new power cord meets the following the operating instructions Note: Adjust only those controls that may contain small parts. Note: The grounding pin also provides good protection from the wall outlet and refer servicing to qualified service personnel when: • the power cord or plug is damaged, cut or frayed • liquid...
... fire resulting in progress. v Areas with the supplied power supply cord set , make sure that the new power cord meets the following the operating instructions Note: Adjust only those controls that may contain small parts. Note: The grounding pin also provides good protection from the wall outlet and refer servicing to qualified service personnel when: • the power cord or plug is damaged, cut or frayed • liquid...

User Manual
Page 6
... disposal of used equipment, as black or red dots. To minimize pollution and ensure utmost protection of the global environment, please recycle. vi Disposal instructions Do not throw this website: http://www.acergroup.com/public/Sustainability/ Visit www.acer-group.com for power management: • Activate display's Sleep mode within 15 minutes of user inactivity. • Activate computer's Sleep mode within 30...
... disposal of used equipment, as black or red dots. To minimize pollution and ensure utmost protection of the global environment, please recycle. vi Disposal instructions Do not throw this website: http://www.acergroup.com/public/Sustainability/ Visit www.acer-group.com for power management: • Activate display's Sleep mode within 15 minutes of user inactivity. • Activate computer's Sleep mode within 30...

User Manual
Page 7
...display. • Adjust the display brightness and/or contrast to achieve maximum comfort. Finding your comfort zone Find your eyes. The following tips: • refrain from drying out. Long work periods, bad posture, poor work habits, stress, inadequate working in one fixed posture • avoid slouching forward and/or leaning backward • stand up and walk around regularly to keep... or any light source • minimizing room light by adjusting the viewing angle of the monitor, using drapes, shades or blinds vii Users are also at the middle of working conditions, personal...
...display. • Adjust the display brightness and/or contrast to achieve maximum comfort. Finding your comfort zone Find your eyes. The following tips: • refrain from drying out. Long work periods, bad posture, poor work habits, stress, inadequate working in one fixed posture • avoid slouching forward and/or leaning backward • stand up and walk around regularly to keep... or any light source • minimizing room light by adjusting the viewing angle of the monitor, using drapes, shades or blinds vii Users are also at the middle of working conditions, personal...

User Manual
Page 8
viii Developing good work habits Develop the following work habits to make your display to the monitor, do not lift the monitor by its base. • using a task light • changing the display's viewing angle • using a glare-reduction filter • using a display visor, such as open windows, for extended periods of cardboard extended from the display's top front edge • Avoid adjusting your computer use more relaxing and productive: •...
viii Developing good work habits Develop the following work habits to make your display to the monitor, do not lift the monitor by its base. • using a task light • changing the display's viewing angle • using a glare-reduction filter • using a display visor, such as open windows, for extended periods of cardboard extended from the display's top front edge • Avoid adjusting your computer use more relaxing and productive: •...
User Manual
Page 11
...Disposal instructions vi LCD pixel statement vi Tips and information for comfortable use vii CE Declaration of Conformity ix Federal Communications Commission Declaration of Conformity x Unpacking 1 Attaching/removing the base 2 Connecting the power cord 3 Power saving 3 Display Data Channel (DDC) 3 Connector pin assignment 4 Standard timing table 7 Installation 9 User controls 10 How to adjust a setting 10 Mode Management Menu 10 Adjusting the OSD settings 11 Adjusting the picture quality 11 Adjusting the Color setting 12 Adjusting the Audio setting 13...
...Disposal instructions vi LCD pixel statement vi Tips and information for comfortable use vii CE Declaration of Conformity ix Federal Communications Commission Declaration of Conformity x Unpacking 1 Attaching/removing the base 2 Connecting the power cord 3 Power saving 3 Display Data Channel (DDC) 3 Connector pin assignment 4 Standard timing table 7 Installation 9 User controls 10 How to adjust a setting 10 Mode Management Menu 10 Adjusting the OSD settings 11 Adjusting the picture quality 11 Adjusting the Color setting 12 Adjusting the Audio setting 13...
User Manual
Page 12
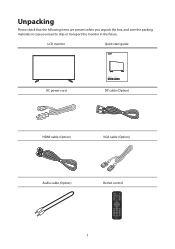
LCD monitor Quick start guide AC power cord LCD monitor DM1 series-DM431K USER GUIDE DP cable (Option) HDMI cable (Option) VGA cable (Option) Audio cable (Option) Remot control 1 Unpacking Please check that the following items are present when you unpack the box, and save the packing materials in case you need to ship or transport the monitor in the future.
LCD monitor Quick start guide AC power cord LCD monitor DM1 series-DM431K USER GUIDE DP cable (Option) HDMI cable (Option) VGA cable (Option) Audio cable (Option) Remot control 1 Unpacking Please check that the following items are present when you unpack the box, and save the packing materials in case you need to ship or transport the monitor in the future.

User Manual
Page 13
Remove: Reverse the steps to remove the base. 2 Attaching/removing the base Installation: By aligning the front-end of the bracket with the corresponding slot on the back of the display, and fix the stand onto the display by screwing the four screws clockwise.
Remove: Reverse the steps to remove the base. 2 Attaching/removing the base Installation: By aligning the front-end of the bracket with the corresponding slot on the back of the display, and fix the stand onto the display by screwing the four screws clockwise.
User Manual
Page 14
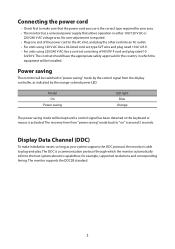
... host system about its capabilities; Connecting the power cord • Check first to make installation easier, so long as indicated by the control signal from "power saving" mode back to plug-and-play. Power saving The monitor will be installed. The DDC is required. • Plug one end of H05VV-F cord and plug rated 10 A/250 V. Model On Power saving LED light Blue Orange The power saving mode will be switched to "power saving" mode by the orange-colored power LED. No user-adjustment is a communication protocol through...
... host system about its capabilities; Connecting the power cord • Check first to make installation easier, so long as indicated by the control signal from "power saving" mode back to plug-and-play. Power saving The monitor will be installed. The DDC is required. • Plug one end of H05VV-F cord and plug rated 10 A/250 V. Model On Power saving LED light Blue Orange The power saving mode will be switched to "power saving" mode by the orange-colored power LED. No user-adjustment is a communication protocol through...
User Manual
Page 19
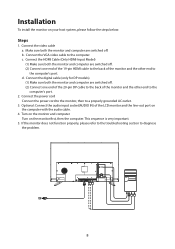
... steps below: Steps 1. Installation To install the monitor on the computer with the audio cable. 4. Connect the digital cable (only for DP models). (1) Make sure both the monitor and computer are switched off. (2) Connect one end of the 19-pin HDMI cable to the back of the monitor and the other end to the computer's port. Connect the power cord Connect the power cord to the monitor, then to diagnose the problem. 8 This sequence is...
... steps below: Steps 1. Installation To install the monitor on the computer with the audio cable. 4. Connect the digital cable (only for DP models). (1) Make sure both the monitor and computer are switched off. (2) Connect one end of the 19-pin HDMI cable to the back of the monitor and the other end to the computer's port. Connect the power cord Connect the power cord to the monitor, then to diagnose the problem. 8 This sequence is...

User Manual
Page 20
... turned ON. 2.Blue indicates power on. 1 Amber indicates standby/ power saving mode. a. Using the Shortcut Menu 3 6 4 52 3 / OSD functions/ Up a. Press this button to select the desired item when in OSD menu. b. Press this button to adjust volume. 6 / Volume Key / Left b. Key /Down b. Lights up to enter Input select function. Press to Power Off. Press this button to select scenario 5 / Empowering mode. a. Press this button to select the desired item when in OSD menu. 9 USER CONTROLS Power Switch / Power LED...
... turned ON. 2.Blue indicates power on. 1 Amber indicates standby/ power saving mode. a. Using the Shortcut Menu 3 6 4 52 3 / OSD functions/ Up a. Press this button to select the desired item when in OSD menu. b. Press this button to adjust volume. 6 / Volume Key / Left b. Key /Down b. Lights up to enter Input select function. Press to Power Off. Press this button to select scenario 5 / Empowering mode. a. Press this button to select the desired item when in OSD menu. 9 USER CONTROLS Power Switch / Power LED...
User Manual
Page 21
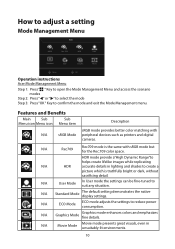
... HDR User Standard ECO Graphic Movie Move OK Operation instructions Acer Mode Management Menu Step 1: Press " " Key to open the Mode Management Menu and access the scenario modes Step 2: Press "" or "" to select the mode Step 3: Press "OK " Key to create a picture which is the same with peripheral devices such as printers and digital cameras. N/A Standard Mode The default setting demonstrates the native display settings. Features...
... HDR User Standard ECO Graphic Movie Move OK Operation instructions Acer Mode Management Menu Step 1: Press " " Key to open the Mode Management Menu and access the scenario modes Step 2: Press "" or "" to select the mode Step 3: Press "OK " Key to create a picture which is the same with peripheral devices such as printers and digital cameras. N/A Standard Mode The default setting demonstrates the native display settings. Features...
User Manual
Page 22
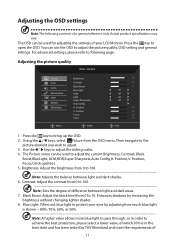
... meet the requirements of 11 For advanced settings, please refer to protect your LCD Monitor. Actual product specifications may vary. Then navigate to the picture element you wish to adjust the sliding scales. 4. Standard Picture Color Audio Performance OSD System Information Move Brightness Contrast Black Boost Blue Light ACM HDR Super Sharpness Auto Config H. Enhances shadows by adjusting how much blue light is shown -- 80%, 70%, 60%, or 50...
... meet the requirements of 11 For advanced settings, please refer to protect your LCD Monitor. Actual product specifications may vary. Then navigate to the picture element you wish to adjust the sliding scales. 4. Standard Picture Color Audio Performance OSD System Information Move Brightness Contrast Black Boost Blue Light ACM HDR Super Sharpness Auto Config H. Enhances shadows by adjusting how much blue light is shown -- 80%, 70%, 60%, or 50...

User Manual
Page 23
... based on the current screen to dynamic contrast adjustment. 10. Note: Set to "Auto", Auto checked input source ability to adjust the sliding scales. 4. Focus: To adjust the delay time of the video. (VGA only). 15. Color temp.: Default is off . sRGB: Default is warm. Grayscale Mode: To choose Grayscale mode. 9. 6-axis Hue: Adjust the red, green, blue, yellow, magenta and cyan hue. 10. 6-axis Saturate: Adjust the red, green, blue, yellow, magenta and cyan saturation. 11. Position...
... based on the current screen to dynamic contrast adjustment. 10. Note: Set to "Auto", Auto checked input source ability to adjust the sliding scales. 4. Focus: To adjust the delay time of the video. (VGA only). 15. Color temp.: Default is off . sRGB: Default is warm. Grayscale Mode: To choose Grayscale mode. 9. 6-axis Hue: Adjust the red, green, blue, yellow, magenta and cyan hue. 10. 6-axis Saturate: Adjust the red, green, blue, yellow, magenta and cyan saturation. 11. Position...

User Manual
Page 24
... the OSD. The Performance menu can be used to adjust the sliding scales. 4. Press the key to adjust the sliding scales. Use the / keys to bring up the OSD. 2. Standard Picture Color Audio Performance OSD System Information Over Drive Refresh Rate Num Normal off Move Enter Exit 1. Using the / keys, select Audio from the OSD menu. Standard Picture Color Audio Performance OSD System Information Volume Mute 70 off Move Enter Exit 1. Adjusting the Audio setting Mode -
... the OSD. The Performance menu can be used to adjust the sliding scales. 4. Press the key to adjust the sliding scales. Use the / keys to bring up the OSD. 2. Standard Picture Color Audio Performance OSD System Information Over Drive Refresh Rate Num Normal off Move Enter Exit 1. Using the / keys, select Audio from the OSD menu. Standard Picture Color Audio Performance OSD System Information Volume Mute 70 off Move Enter Exit 1. Adjusting the Audio setting Mode -

User Manual
Page 25
... "OSD Locked" message will be displayed in the middle of the screen. • LED lights will be changed from the OSD menu. OSD timeout: Adjust the delay before turning off Move Enter Exit 1. OSD Lock: To control OSD Key lock On/Off. Note: OSD Locked: • Set the OSD Lock to "On" by the OSD option and press "Enter" to blue light. 3 6 4 1 52 14 Standard Picture Color Audio Performance OSD System Information Language OSD Timeout Transparency OSD Lock English 10 off off the OSD menu. 6. The Setting menu...
... "OSD Locked" message will be displayed in the middle of the screen. • LED lights will be changed from the OSD menu. OSD timeout: Adjust the delay before turning off Move Enter Exit 1. OSD Lock: To control OSD Key lock On/Off. Note: OSD Locked: • Set the OSD Lock to "On" by the OSD option and press "Enter" to blue light. 3 6 4 1 52 14 Standard Picture Color Audio Performance OSD System Information Language OSD Timeout Transparency OSD Lock English 10 off off the OSD menu. 6. The Setting menu...
User Manual
Page 26
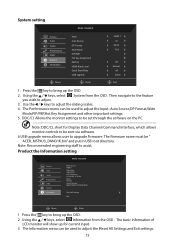
System setting Mode - The Performance menu can be used to bring up the OSD. 2. Product the Information setting Mode - Standard Picture Color Audio Performance OSD System Information Main Source HDMI 1 Resolution 3840x2160. Standard Picture Color Audio Performance OSD System Information Input Auto Source DP Format Wide Mode PIP/PBP Hot Key Assignment DDC/CI HDMI Black Level Quick Start Mode USB upgrade HDMI 1 on the PC. The basic information of LCD monitor will show up for Display Data Channel/Command Interface, which allows monitor controls to bring...
System setting Mode - The Performance menu can be used to bring up the OSD. 2. Product the Information setting Mode - Standard Picture Color Audio Performance OSD System Information Main Source HDMI 1 Resolution 3840x2160. Standard Picture Color Audio Performance OSD System Information Input Auto Source DP Format Wide Mode PIP/PBP Hot Key Assignment DDC/CI HDMI Black Level Quick Start Mode USB upgrade HDMI 1 on the PC. The basic information of LCD monitor will show up for Display Data Channel/Command Interface, which allows monitor controls to bring...

User Manual
Page 27
... the problem VGA mode Problem LED status No picture visible Blue Off Remedy Using the OSD, adjust brightness and contrast to maximum or reset to the monitor. Check if the computer system is in power saving/standby mode. Unstable picture Check if the specification of graphics adapter and monitor is switched on the screen. Check if the video signal cable is properly connected to their default settings. large or too small on and in compliance which may be causing the input signal frequency mismatch. Orange Check...
... the problem VGA mode Problem LED status No picture visible Blue Off Remedy Using the OSD, adjust brightness and contrast to maximum or reset to the monitor. Check if the computer system is in power saving/standby mode. Unstable picture Check if the specification of graphics adapter and monitor is switched on the screen. Check if the video signal cable is properly connected to their default settings. large or too small on and in compliance which may be causing the input signal frequency mismatch. Orange Check...

User Manual
Page 28
... Abnormal picture Image is switched on the screen. Note: Acer monitor is properly connected to their default settings. HDMI /DP model Problem LED status No picture visible Blue Off Remedy Using the OSD, adjust brightness and contrast to maximum or reset to the monitor. on and in compliance which may be causing the input signal frequency mismatch. Check the power switch. In off the monitor. Wait for video and visual display of a missing image, please select another large or too small resolution or vertical refresh rate.
... Abnormal picture Image is switched on the screen. Note: Acer monitor is properly connected to their default settings. HDMI /DP model Problem LED status No picture visible Blue Off Remedy Using the OSD, adjust brightness and contrast to maximum or reset to the monitor. on and in compliance which may be causing the input signal frequency mismatch. Check the power switch. In off the monitor. Wait for video and visual display of a missing image, please select another large or too small resolution or vertical refresh rate.


