User Manual
Page 1
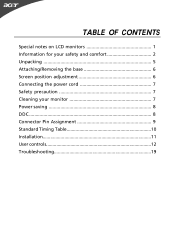
TABLE OF CONTENTS Special notes on LCD monitors 1 Information for your safety and comfort 2 Unpacking 5 Attaching/Removing the base 6 Screen position adjustment 6 Connecting the power cord 7 Safety precaution 7 Cleaning your monitor 7 Power saving 8 DDC 8 Connector Pin Assignment 9 Standard Timing Table 10 Installation 11 User controls 12 Troubleshooting 19
TABLE OF CONTENTS Special notes on LCD monitors 1 Information for your safety and comfort 2 Unpacking 5 Attaching/Removing the base 6 Screen position adjustment 6 Connecting the power cord 7 Safety precaution 7 Cleaning your monitor 7 Power saving 8 DDC 8 Connector Pin Assignment 9 Standard Timing Table 10 Installation 11 User controls 12 Troubleshooting 19

User Manual
Page 3
... the volume until you can 't hear people speaking near you plug the power cord into this product through cabinet slots as they may touch dangerous voltage points or short-out parts that the power outlet you . These openings must not be blocked or covered. Follow all warnings and instructions marked on an unstable cart, stand or table. CAUTION for future reference. Keep...
... the volume until you can 't hear people speaking near you plug the power cord into this product through cabinet slots as they may touch dangerous voltage points or short-out parts that the power outlet you . These openings must not be blocked or covered. Follow all warnings and instructions marked on an unstable cart, stand or table. CAUTION for future reference. Keep...
User Manual
Page 4
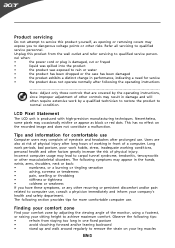
... power cord or plug is produced with high-precision manufacturing techniques. Finding your comfort zone Find your comfort zone by a qualified technician to restore the product to qualified service personnel. Users are covered by the operating instructions, since improper adjustment of other musculoskeletal disorders. Unplug this product yourself, as black or red dots. Tips and information for more comfortable computer use...
... power cord or plug is produced with high-precision manufacturing techniques. Finding your comfort zone Find your comfort zone by a qualified technician to restore the product to qualified service personnel. Users are covered by the operating instructions, since improper adjustment of other musculoskeletal disorders. Unplug this product yourself, as black or red dots. Tips and information for more comfortable computer use...

User Manual
Page 5
... front edge • Avoid adjusting your display to an awkward viewing angle. • Avoid looking at the center of your desk to keep your eyes from the monitor and focusing on a couch or bed. Warning! Display • Keep your display clean. • Keep your head at a higher level than your documents, place the display at bright light sources, such as open windows, for extended periods of...
... front edge • Avoid adjusting your display to an awkward viewing angle. • Avoid looking at the center of your desk to keep your eyes from the monitor and focusing on a couch or bed. Warning! Display • Keep your display clean. • Keep your head at a higher level than your documents, place the display at bright light sources, such as open windows, for extended periods of...

User Manual
Page 8
.../240 V AC voltage area. The cord set should have the appropriate safety approvals for your area. • This monitor has a universal power supply that the power cord you use is adequate ventilation. • Avoid placing the monitor against a bright background or where sun- No user-adjustment is fragile. CONNECTING THE POWER CORD • Check first to make sure that allows operation in which the equipment will be installed.
.../240 V AC voltage area. The cord set should have the appropriate safety approvals for your area. • This monitor has a universal power supply that the power cord you use is adequate ventilation. • Avoid placing the monitor against a bright background or where sun- No user-adjustment is fragile. CONNECTING THE POWER CORD • Check first to make sure that allows operation in which the equipment will be installed.

User Manual
Page 9
... into Power Saving mode by the control signal from Power Saving state back to ON state is able to Plug and Play with your system if your installation easier, the monitor is around 3 seconds. The DDC (Display Data Channel) is activated. The monitor supports DDC2B standard. Long press Power Button for example, supported resolutions and corresponding timing. DDC To make your system also supports DDC protocol. Power saving The monitor will be...
... into Power Saving mode by the control signal from Power Saving state back to ON state is able to Plug and Play with your system if your installation easier, the monitor is around 3 seconds. The DDC (Display Data Channel) is activated. The monitor supports DDC2B standard. Long press Power Button for example, supported resolutions and corresponding timing. DDC To make your system also supports DDC protocol. Power saving The monitor will be...

User Manual
Page 10
... Monitor Ground DDC-Serial Data H-Sync V-Sync DDC-Serial Clock 19-Pin color display signal cable* PIN D ESC R IPT ION PIN D ESC R IPT ION 1. TMDS Data 1 Shield 14. SCL 7. TMDS Data 2+ 10. SDA 8. Green 10. 3. R-Ground 14. 7. TMDS Clock+ 2. TMDS Data 0- 18. +5V Power 19. Hot Plug Detect * only for certain models EN-9 TMDS Data 1+ 13. on device) 6. Red 9. 2. DDC/CEC Ground 9. Blue 11. 4. CEC 5. CONNECTOR...
... Monitor Ground DDC-Serial Data H-Sync V-Sync DDC-Serial Clock 19-Pin color display signal cable* PIN D ESC R IPT ION PIN D ESC R IPT ION 1. TMDS Data 1 Shield 14. SCL 7. TMDS Data 2+ 10. SDA 8. Green 10. 3. R-Ground 14. 7. TMDS Clock+ 2. TMDS Data 0- 18. +5V Power 19. Hot Plug Detect * only for certain models EN-9 TMDS Data 1+ 13. on device) 6. Red 9. 2. DDC/CEC Ground 9. Blue 11. 4. CEC 5. CONNECTOR...
User Manual
Page 12
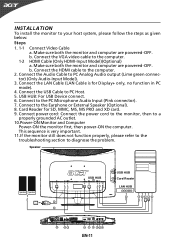
... problem. b. Make sure both the monitor and computer are powered-OFF. Connect the Audio Cable to the Earphone or External Speaker (Optional). 8. USB HUB: For USB Device connect. 6. Connect to PC Analog Audio output (Lime green connector) (Only Audio-Input Model). 3. INSTALLATION To install the monitor to PC Host. 5. Make sure both the monitor and computer are powered-OFF. b. Connect the USB Cable to your host system, please follow the steps as given below: Steps 1. 1-1 Connect Video Cable a. Connect power cord: Connect the power cord to the monitor...
... problem. b. Make sure both the monitor and computer are powered-OFF. Connect the Audio Cable to the Earphone or External Speaker (Optional). 8. USB HUB: For USB Device connect. 6. Connect to PC Analog Audio output (Lime green connector) (Only Audio-Input Model). 3. INSTALLATION To install the monitor to PC Host. 5. Make sure both the monitor and computer are powered-OFF. b. Connect the USB Cable to your host system, please follow the steps as given below: Steps 1. 1-1 Connect Video Cable a. Connect power cord: Connect the power cord to the monitor...

User Manual
Page 13
EN-12 Using the Shortcut Menu 1 2 34 5 6 Power Press the function button to indicate the power is turned ON. The shortcut menu lets you quickly select the most commonly accessed settings. Lights up to open the shortcut menu. USER CONTROLS Power Switch / Power LED: To turn the monitor ON or OFF.
EN-12 Using the Shortcut Menu 1 2 34 5 6 Power Press the function button to indicate the power is turned ON. The shortcut menu lets you quickly select the most commonly accessed settings. Lights up to open the shortcut menu. USER CONTROLS Power Switch / Power LED: To turn the monitor ON or OFF.
User Manual
Page 14
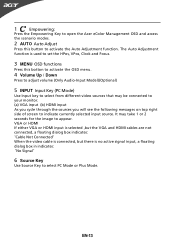
... be connected to your monitor. (a) VGA input (b) HDMI input As you cycle through the sources you will see the following messages on top right side of screen to activate the Auto Adjustment function. 1 Empowering: Press the Empowering Key to open the Acer eColor Management OSD and access the scenario modes. 2 AUTO Auto Adjust Press this botton to activate the OSD menu. 4 Volume Up / Down Press to adjust volume (Only Audio-Input Model)(Optional) 5 INPUT Input Key (PC Mode) Use Input...
... be connected to your monitor. (a) VGA input (b) HDMI input As you cycle through the sources you will see the following messages on top right side of screen to activate the Auto Adjustment function. 1 Empowering: Press the Empowering Key to open the Acer eColor Management OSD and access the scenario modes. 2 AUTO Auto Adjust Press this botton to activate the OSD menu. 4 Volume Up / Down Press to adjust volume (Only Audio-Input Model)(Optional) 5 INPUT Input Key (PC Mode) Use Input...

User Manual
Page 15
... Menu icon Sub Menu ic o n Sub Menu item D e s cr ip tio n N/A User mode User defined. The most comfortable way to suit any situation Optimal balance of brightness and contrast N/A Text mode prevent eyestrain. R eflects n ative d isp la y mode capability N/A Grahpic mode Enhances colors and emphasize fine detail. Pictures and photographs appear in unsuitably-lit environments. Presents great visuals, even in vibrant colors with sharp detail. Settings...
... Menu icon Sub Menu ic o n Sub Menu item D e s cr ip tio n N/A User mode User defined. The most comfortable way to suit any situation Optimal balance of brightness and contrast N/A Text mode prevent eyestrain. R eflects n ative d isp la y mode capability N/A Grahpic mode Enhances colors and emphasize fine detail. Pictures and photographs appear in unsuitably-lit environments. Presents great visuals, even in vibrant colors with sharp detail. Settings...
User Manual
Page 16
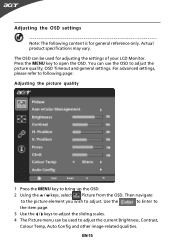
... for adjusting the settings of your LCD Monitor. Use the to Enter to the item page. 3 Use the / keys to adjust the sliding scales. 4 The Picture menu can use the OSD to adjust the current Brightness, Contrast, Colour Temp, Auto Config and other image-related qualities. Actual product specifications may vary. Then navigate to the picture element you wish to open the OSD. You can be used to adjust the picture quality, OSD Timeout...
... for adjusting the settings of your LCD Monitor. Use the to Enter to the item page. 3 Use the / keys to adjust the sliding scales. 4 The Picture menu can use the OSD to adjust the current Brightness, Contrast, Colour Temp, Auto Config and other image-related qualities. Actual product specifications may vary. Then navigate to the picture element you wish to open the OSD. You can be used to adjust the picture quality, OSD Timeout...
User Manual
Page 20
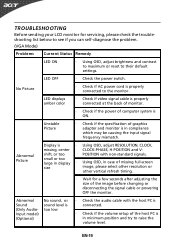
... compliance which may be causing the input signal frequency mismatch. Unstable Picture · Check if the specification of computer system is ON. EN-19 No Picture · Check if AC power cord is in minimum position and try to raise the volume level. LED displays amber color · Check if video signal cable is properly connected at the back of monitor. · Check if the power of graphics adapter and monitor is properly connected to their default settings.
... compliance which may be causing the input signal frequency mismatch. Unstable Picture · Check if the specification of computer system is ON. EN-19 No Picture · Check if AC power cord is in minimum position and try to raise the volume level. LED displays amber color · Check if video signal cable is properly connected at the back of monitor. · Check if the power of graphics adapter and monitor is properly connected to their default settings.

User Manual
Page 26
... display speaker.* 4 Connect external speakers.* 5 Connect the USB cable to the PC to enable the USB device and memory cards to act as extended hub for PC use.* 7 Connect the power cord to the monitor, then to a properly grounded AC outlet. 8 Turn on the monitor first, then the computer. To install Acer Display+ on your host system, please follow the steps below : 1 Connecting the video cable a Make sure both the monitor and computer are switched...
... display speaker.* 4 Connect external speakers.* 5 Connect the USB cable to the PC to enable the USB device and memory cards to act as extended hub for PC use.* 7 Connect the power cord to the monitor, then to a properly grounded AC outlet. 8 Turn on the monitor first, then the computer. To install Acer Display+ on your host system, please follow the steps below : 1 Connecting the video cable a Make sure both the monitor and computer are switched...

User Manual
Page 27
... go to sleep mode. * Press and hold for each widget application. Shortcut buttons / Input button Shortcut buttons: Pre-defined shortcut functions for more than four seconds to USB mass storage devices, keyboard and mouse. USB port Display+ mode: Connects to turn the monitor off. Generic monitor mode: Acts as normal downstream port. English 4 Overview 4 5 2 1 3 1 6 78 14 13 9 10 11 12 Number 1 2 3 4 Item Description Microphone Internal microphone. Input button: Switches between Display+ mode and generic monitor mode.
... go to sleep mode. * Press and hold for each widget application. Shortcut buttons / Input button Shortcut buttons: Pre-defined shortcut functions for more than four seconds to USB mass storage devices, keyboard and mouse. USB port Display+ mode: Connects to turn the monitor off. Generic monitor mode: Acts as normal downstream port. English 4 Overview 4 5 2 1 3 1 6 78 14 13 9 10 11 12 Number 1 2 3 4 Item Description Microphone Internal microphone. Input button: Switches between Display+ mode and generic monitor mode.

User Manual
Page 28
... downstream port. HDMI Supports high-definition digital video connections. USB port Display+ mode: Connects to a PC. Type B USB port Connects to USB mass storage devices, keyboard and mouse. Mic-out Connects to a PC. VGA-in Connects to the PC mic-in for microphone function in Connects to external speakers. Audio-out Connects to an AC adapter. AC-in generic monitor mode. Ethernet (RJ-45) port Connects to an Ethernet 10/100-based network. Audio-in Accepts audio line-in -1 card reader...
... downstream port. HDMI Supports high-definition digital video connections. USB port Display+ mode: Connects to a PC. Type B USB port Connects to USB mass storage devices, keyboard and mouse. Mic-out Connects to a PC. VGA-in Connects to the PC mic-in for microphone function in Connects to external speakers. Audio-out Connects to an AC adapter. AC-in generic monitor mode. Ethernet (RJ-45) port Connects to an Ethernet 10/100-based network. Audio-in Accepts audio line-in -1 card reader...

User Manual
Page 43
Important: Do not turn the display off while the update is ongoing. English 20 System In the System page, you can adjust the volume, set the Startup Wizard, change your selected settings. Press Back to go back to the default, and play the Startup Tutorial. Software update To update your software: 1 Download the latest software code from http://csd.acer.com.tw and copy to apply or cancel your settings back to the main view. Click the Apply / Cancel button to a USB drive or an SD card. 2 Insert the SD card and follow the instructions on the pop up window.
Important: Do not turn the display off while the update is ongoing. English 20 System In the System page, you can adjust the volume, set the Startup Wizard, change your selected settings. Press Back to go back to the default, and play the Startup Tutorial. Software update To update your software: 1 Download the latest software code from http://csd.acer.com.tw and copy to apply or cancel your settings back to the main view. Click the Apply / Cancel button to a USB drive or an SD card. 2 Insert the SD card and follow the instructions on the pop up window.
Quick Start Guide
Page 2
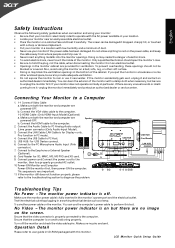
.... • To avoid electric shock, never touch the inside of the monitor with this test. b. Speaker b. You can use the computer's power cable to PC Analog Audio output (Lime green connector)(Only Audio-Input Model). 3. The screen can clean the exterior of the monitor. Connect the Audio Cable to perform this monitor. Power-ON Monitor and Computer Power-ON the monitor first, then power-ON the computer. Make sure no image on a solid surface and treat it...
.... • To avoid electric shock, never touch the inside of the monitor with this test. b. Speaker b. You can use the computer's power cable to PC Analog Audio output (Lime green connector)(Only Audio-Input Model). 3. The screen can clean the exterior of the monitor. Connect the Audio Cable to perform this monitor. Power-ON Monitor and Computer Power-ON the monitor first, then power-ON the computer. Make sure no image on a solid surface and treat it...

Quick Start Guide
Page 3
... B digital apparatus complies with regard to establishing a framework for the setting of the FCC Rules. LCD Monitor Quick Setup Guide This device generates, uses, and can be attached to this product. However, there is no guarantee that excessive sound pressure from that to which can radiate radio frequency energy and, if not installed and used in interfer- Notice: Peripheral devices Only peripherals (input...
... B digital apparatus complies with regard to establishing a framework for the setting of the FCC Rules. LCD Monitor Quick Setup Guide This device generates, uses, and can be attached to this product. However, there is no guarantee that excessive sound pressure from that to which can radiate radio frequency energy and, if not installed and used in interfer- Notice: Peripheral devices Only peripherals (input...

Quick Start Guide
Page 4
... Temp.: -20º to 60ºC, Operating Humidity: 10% to 1280 x 720. Regulatory Compliance ADM(Acer_eDisplay_Management) Regarding the features and operation instructions, please refer to the "Help" section in the ADM software on the CD Manual.(For Windows 98SE/ME/NT 4.0/2000/XP/Vista) LCD Monintor Quick Setup Guide English SPECIFICATION LCD Panel VGA Driving system Size Pixel pitch Brightness Contrast Viewable angle Response time Video H-Frequency V-Frequency Display Colors Dot Clock Max.
... Temp.: -20º to 60ºC, Operating Humidity: 10% to 1280 x 720. Regulatory Compliance ADM(Acer_eDisplay_Management) Regarding the features and operation instructions, please refer to the "Help" section in the ADM software on the CD Manual.(For Windows 98SE/ME/NT 4.0/2000/XP/Vista) LCD Monintor Quick Setup Guide English SPECIFICATION LCD Panel VGA Driving system Size Pixel pitch Brightness Contrast Viewable angle Response time Video H-Frequency V-Frequency Display Colors Dot Clock Max.


