Quick Start Guide
Page 1
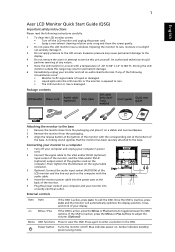
... attached to view the OSD. If the OSD is damaged. Press again to toggle between the OSD options. Amber indicates standby/ power saving mode. English 1 Acer LCD Monitor Quick Start Guide (QSG) Important safety instructions Please read the following circumstances occur: • Monitor-to-PC signal cable is frayed or damaged...
... attached to view the OSD. If the OSD is damaged. Press again to toggle between the OSD options. Amber indicates standby/ power saving mode. English 1 Acer LCD Monitor Quick Start Guide (QSG) Important safety instructions Please read the following circumstances occur: • Monitor-to-PC signal cable is frayed or damaged...
Quick Start Guide
Page 2
These limits are designed to provide reasonable protection against harmful interference in interference to radio and TV reception. CE declaration of conformity Hereby, Acer Inc., declares that this product must not be disposed of the FCC Rules. Operation conditions This device complies with Canadian ICES-003. Notice: Canadian users ...
These limits are designed to provide reasonable protection against harmful interference in interference to radio and TV reception. CE declaration of conformity Hereby, Acer Inc., declares that this product must not be disposed of the FCC Rules. Operation conditions This device complies with Canadian ICES-003. Notice: Canadian users ...
Quick Start Guide
Page 3
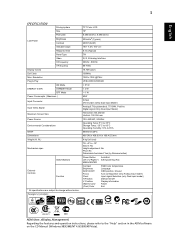
Regulgatory Cyomplpianc TFT Color LCD 19" 0.294mm(H) x 0.294mm(V) 300cd/m2 (Typical) 2000:1(ACM) 160° X (H) 160° (V) 5 ms (Typical) TN R, G, B Analog Interface 30KHz - 80KHz 50-75Hz 16.7M Colors 136MHz 1280 x 1024 @75Hz VESA DDCCI/DDC2B < 37 W < 2 W < 1 W 40W D-Sub DVI-D 24pin (Only Dual-Input Model) Analog:0.7Vp-p(standard), 75 OHM, Positive Digital signal (Only Dual-Input Model) Horizontal: 344.232mm Vertical: 193.536 mm 100~240VAC, 50/60Hz Operating Temp: 5°C to 35°C Storage Temp: -20°C to 60°C Operating Humidity: 10% to 85% 50000 hrs...
Regulgatory Cyomplpianc TFT Color LCD 19" 0.294mm(H) x 0.294mm(V) 300cd/m2 (Typical) 2000:1(ACM) 160° X (H) 160° (V) 5 ms (Typical) TN R, G, B Analog Interface 30KHz - 80KHz 50-75Hz 16.7M Colors 136MHz 1280 x 1024 @75Hz VESA DDCCI/DDC2B < 37 W < 2 W < 1 W 40W D-Sub DVI-D 24pin (Only Dual-Input Model) Analog:0.7Vp-p(standard), 75 OHM, Positive Digital signal (Only Dual-Input Model) Horizontal: 344.232mm Vertical: 193.536 mm 100~240VAC, 50/60Hz Operating Temp: 5°C to 35°C Storage Temp: -20°C to 60°C Operating Humidity: 10% to 85% 50000 hrs...
User Manual
Page 2
... made periodically to the information in any form or by photocopy, recording or otherwise, without the prior written permission of Acer Incorporated. Record the model number, serial number, purchase date and place of purchase information in new editions of merchantability or... documents and publications. This company makes no representations or warranties, either expressed or implied, with respect to their respective companies. Acer Incorporated. Acer LCD Monitor User's Guide Original Issue: 1/2008 Changes may be reproduced, stored in a retrieval system, or transmitted, in ...
... made periodically to the information in any form or by photocopy, recording or otherwise, without the prior written permission of Acer Incorporated. Record the model number, serial number, purchase date and place of purchase information in new editions of merchantability or... documents and publications. This company makes no representations or warranties, either expressed or implied, with respect to their respective companies. Acer Incorporated. Acer LCD Monitor User's Guide Original Issue: 1/2008 Changes may be reproduced, stored in a retrieval system, or transmitted, in ...
User Manual
Page 3
In this document for hours. Information for a few hours. Keep this case, the screen is recovered slowly by unplugging all power cords from the power supplies. Follow all the time. • Due to the nature of the LCD screen, an afterimage of the previous screen may find slightly uneven brightness on the screen depending on the desktop pattern you use . Cleaning your safety and comfort Safety instructions Read these guidelines when cleaning the monitor: • Always unplug the monitor before connecting any cable or unplugging the power cord. • If the system has multiple ...
In this document for hours. Information for a few hours. Keep this case, the screen is recovered slowly by unplugging all power cords from the power supplies. Follow all the time. • Due to the nature of the LCD screen, an afterimage of the previous screen may find slightly uneven brightness on the screen depending on the desktop pattern you use . Cleaning your safety and comfort Safety instructions Read these guidelines when cleaning the monitor: • Always unplug the monitor before connecting any cable or unplugging the power cord. • If the system has multiple ...

User Manual
Page 4
This product should never be operated from overheating. Never spill liquid of any kind onto or into the product. • To avoid damage of internal components and to prevent battery leakage, do not increase it after your ears have adjusted. • Limit the amount of time listening to music at high volume. • Avoid turning up the volume to protect it from the type of any vibrating environment which will walk on the cord. • If an extension cord is used with this product on an unstable cart, stand or table. Using electrical power • This product should never be ...
This product should never be operated from overheating. Never spill liquid of any kind onto or into the product. • To avoid damage of internal components and to prevent battery leakage, do not increase it after your ears have adjusted. • Limit the amount of time listening to music at high volume. • Avoid turning up the volume to protect it from the type of any vibrating environment which will walk on the cord. • If an extension cord is used with this product on an unstable cart, stand or table. Using electrical power • This product should never be ...
User Manual
Page 5
Contact your electrician for service • the product does not operate normally after following requirements: detachable type, UL listed/CSA certified, type SPT-2, rated 7 A 125 V minimum, VDE approved or its equivalent, 4.6 meters (15 feet) maximum length. Refer all products plugged into the product • the product was exposed to qualified service personnel when: • the power cord or plug is damaged, cut or frayed • liquid was spilled into the wall outlet does not exceed the fuse rating. • Do not overload a power outlet, strip or receptacle by other risks...
Contact your electrician for service • the product does not operate normally after following requirements: detachable type, UL listed/CSA certified, type SPT-2, rated 7 A 125 V minimum, VDE approved or its equivalent, 4.6 meters (15 feet) maximum length. Refer all products plugged into the product • the product was exposed to qualified service personnel when: • the power cord or plug is damaged, cut or frayed • liquid was spilled into the wall outlet does not exceed the fuse rating. • Do not overload a power outlet, strip or receptacle by other risks...

User Manual
Page 6
... small children. Areas with a potentially explosive atmosphere and obey all signs and instructions. IT Equipment Recycling Information Acer is strongly committed to reduce the environmental impact of our products. Potentially explosive environments Switch off the device near gas pumps at...in progress. Potentially explosive atmospheres include areas where you would normally be advised to this website: http://global.acer.com/about/sustainability32.htm Visit www.global.acer.com for further information on the features and benefits of our other controls may contain small parts. vi ...
... small children. Areas with a potentially explosive atmosphere and obey all signs and instructions. IT Equipment Recycling Information Acer is strongly committed to reduce the environmental impact of our products. Potentially explosive environments Switch off the device near gas pumps at...in progress. Potentially explosive atmospheres include areas where you would normally be advised to this website: http://global.acer.com/about/sustainability32.htm Visit www.global.acer.com for further information on the features and benefits of our other controls may contain small parts. vi ...
User Manual
Page 7
... pollution and ensure utmost protection of Energy (DOE). This has no effect on the Waste from Electrical and Electronics Equipment (WEEE) regulations, visit http://global.acer.com/about/sustainability.htm Mercury advisory For projectors or electronic products containing an LCD/CRT monitor or display: lamp(s) inside this electronic device into the...
... pollution and ensure utmost protection of Energy (DOE). This has no effect on the Waste from Electrical and Electronics Equipment (WEEE) regulations, visit http://global.acer.com/about/sustainability.htm Mercury advisory For projectors or electronic products containing an LCD/CRT monitor or display: lamp(s) inside this electronic device into the...

User Manual
Page 8
... or throbbing • stiffness or tightness • coldness or weakness If you have these symptoms, or any other musculoskeletal disorders. As an ENERGY STAR partner, Acer Inc. Tips and information for power management: • Activate display's Sleep mode within 15 minutes of user inactivity. • Activate computer's Sleep mode within 30... shipped enabled for comfortable use , consult a physician immediately and inform your leg muscles Observe the following section provides tips for energy efficiency. viii refers to Acer LCD monitor with an ENERGY STAR logo.
... or throbbing • stiffness or tightness • coldness or weakness If you have these symptoms, or any other musculoskeletal disorders. As an ENERGY STAR partner, Acer Inc. Tips and information for power management: • Activate display's Sleep mode within 15 minutes of user inactivity. • Activate computer's Sleep mode within 30... shipped enabled for comfortable use , consult a physician immediately and inform your leg muscles Observe the following section provides tips for energy efficiency. viii refers to Acer LCD monitor with an ENERGY STAR logo.
User Manual
Page 9
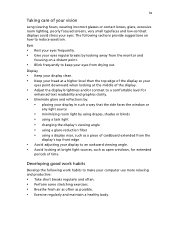
Eyes • Rest your eyes frequently. • Give your eyes regular breaks by using drapes, shades or blinds • using a task light • changing the display's viewing angle • using a glare-reduction filter • using a display visor, such as possible. • Exercise regularly and maintain a healthy body. Display • Keep your display clean. • Keep your head at a higher level than the top edge of the display so your eyes point downward when looking at the middle of time. Developing good work habits Develop the following sections provide suggestions ...
Eyes • Rest your eyes frequently. • Give your eyes regular breaks by using drapes, shades or blinds • using a task light • changing the display's viewing angle • using a glare-reduction filter • using a display visor, such as possible. • Exercise regularly and maintain a healthy body. Display • Keep your display clean. • Keep your head at a higher level than the top edge of the display so your eyes point downward when looking at the middle of time. Developing good work habits Develop the following sections provide suggestions ...
User Manual
Page 10
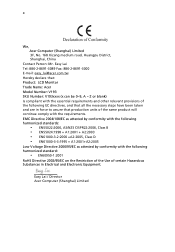
...EN61000-3-3:1995 + A1:2001+A2:2005 Low Voltage Directive 2006/95/EC as attested by conformity with the requirements. Easy Lai / Director Acer Computer (Shanghai) Limited x We, Acer Computer (Shanghai) Limited 3F, No. 168 Xizang medium road, Huangpu District, Shanghai, China Contact Person: Mr. Easy Lai Tel: ...886-2-8691-3089 Fax: 886-2-8691-3000 E-mail: easy_lai@acer.com.tw Hereby declare that: Product: LCD Monitor Trade Name: Acer Model Number: V193 SKU Number: V193xxxx (x can be 0~9, A ~ Z or blank) Is compliant with the essential ...
...EN61000-3-3:1995 + A1:2001+A2:2005 Low Voltage Directive 2006/95/EC as attested by conformity with the requirements. Easy Lai / Director Acer Computer (Shanghai) Limited x We, Acer Computer (Shanghai) Limited 3F, No. 168 Xizang medium road, Huangpu District, Shanghai, China Contact Person: Mr. Easy Lai Tel: ...886-2-8691-3089 Fax: 886-2-8691-3000 E-mail: easy_lai@acer.com.tw Hereby declare that: Product: LCD Monitor Trade Name: Acer Model Number: V193 SKU Number: V193xxxx (x can be 0~9, A ~ Z or blank) Is compliant with the essential ...

User Manual
Page 11
... Tel: 1-254-298-4000 Fax: 1-254-298-4147 Z or blank) Name of responsible party: Acer America Corporation Address of the FCC Rules. The following local manufacturer/importer is subject to the following two conditions: (1) This device may not cause harmful ...
... Tel: 1-254-298-4000 Fax: 1-254-298-4147 Z or blank) Name of responsible party: Acer America Corporation Address of the FCC Rules. The following local manufacturer/importer is subject to the following two conditions: (1) This device may not cause harmful ...
User Manual
Page 13
... position adjustment Connecting the power cord Power saving Display Data Channel (DDC) Connector pin assignment Standard timing table Installation User controls How to adjust a setting Acer eColor Management User Troubleshooting VGA mode DVI mode 1 iii iii iii iii iii iv iv iv iv v vi vi vii vii viii xi 1 2 2 3 3 3 4 6 7 8 9 10 11...
... position adjustment Connecting the power cord Power saving Display Data Channel (DDC) Connector pin assignment Standard timing table Installation User controls How to adjust a setting Acer eColor Management User Troubleshooting VGA mode DVI mode 1 iii iii iii iii iii iv iv iv iv v vi vi vii vii viii xi 1 2 2 3 3 3 4 6 7 8 9 10 11...

User Manual
Page 15
English 1 Unpacking Please check that the following items are present when you unpack the box, and save the packing materials in case you need to ship or transport the monitor in the future. LCD monitor User's guide Quick start guide D-sub cable DVI cable (only dualinput models) AC power cord Audio cable (Option)
English 1 Unpacking Please check that the following items are present when you unpack the box, and save the packing materials in case you need to ship or transport the monitor in the future. LCD monitor User's guide Quick start guide D-sub cable DVI cable (only dualinput models) AC power cord Audio cable (Option)
User Manual
Page 16
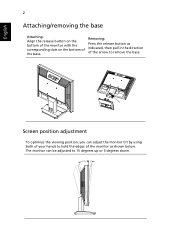
Removing: Press the release button as shown below. The monitor can adjust the monitor tilt by using both of your hands to hold the edges of the monitor as indicated, then pull in the direction of the base. Screen position adjustment To optimize the viewing position, you can be adjusted to 15 degrees up or 5 degrees down. English 2 Attaching/removing the base Attaching: Align the release button on the bottom of the monitor with the corresponding slots on the bottom of the arrow to remove the base.
Removing: Press the release button as shown below. The monitor can adjust the monitor tilt by using both of your hands to hold the edges of the monitor as indicated, then pull in the direction of the base. Screen position adjustment To optimize the viewing position, you can be adjusted to 15 degrees up or 5 degrees down. English 2 Attaching/removing the base Attaching: Align the release button on the bottom of the monitor with the corresponding slots on the bottom of the arrow to remove the base.
User Manual
Page 17
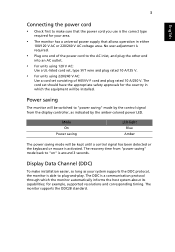
Display Data Channel (DDC) To make installation easier, so long as indicated by the control signal from "power saving" mode back to make sure that allows operation in which the monitor automatically informs the host system about its capabilities; for the country in either 100/120 V AC or 220/240 V AC voltage area. The monitor supports the DDC2B standard. Power saving The monitor will be switched to plug-and-play. The recovery time from the display controller, as your area. • The monitor has a universal power supply that the power cord you use is the correct type ...
Display Data Channel (DDC) To make installation easier, so long as indicated by the control signal from "power saving" mode back to make sure that allows operation in which the monitor automatically informs the host system about its capabilities; for the country in either 100/120 V AC or 220/240 V AC voltage area. The monitor supports the DDC2B standard. Power saving The monitor will be switched to plug-and-play. The recovery time from the display controller, as your area. • The monitor has a universal power supply that the power cord you use is the correct type ...

User Manual
Page 19
Description 13 NC 14 +5 V power 15 GND (return for +5 V hsync.vsync) 16 Hot-plug detection 17 TMDS data 0- 18 TMDS data 0+ 19 TMDS data 0/5 shield 20 NC 21 NC 22 TMDS clock shield 23 TMDS clock+ 24 DDC TMDS clock- 5 English 24-pin color display signal cable PIN No. Description 1 TMDS data 2- 2 TMDS data 2+ 3 TMDS data 2/4 shield 4 NC 5 NC 6 DDC clock 7 DDC data 8 NC 9 TMDS data 1- 10 TMDS data 1+ 11 TMDS data 1/3 shield 12 NC PIN No.
Description 13 NC 14 +5 V power 15 GND (return for +5 V hsync.vsync) 16 Hot-plug detection 17 TMDS data 0- 18 TMDS data 0+ 19 TMDS data 0/5 shield 20 NC 21 NC 22 TMDS clock shield 23 TMDS clock+ 24 DDC TMDS clock- 5 English 24-pin color display signal cable PIN No. Description 1 TMDS data 2- 2 TMDS data 2+ 3 TMDS data 2/4 shield 4 NC 5 NC 6 DDC clock 7 DDC data 8 NC 9 TMDS data 1- 10 TMDS data 1+ 11 TMDS data 1/3 shield 12 NC PIN No.
User Manual
Page 20
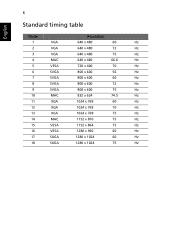
6 English Standard timing table Mode Resolution 1 VGA 640 x 480 60 Hz 2 VGA 640 x 480 72 Hz 3 VGA 640 x 480 75 Hz 4 MAC 640 x 480 66.6 Hz 5 VESA 720 x 400 70 Hz 6 SVGA 800 x 600 56 Hz 7 SVGA 800 x 600 60 Hz 8 SVGA 800 x 600 72 Hz 9 SVGA 800 x 600 75 Hz 10 MAC 832 x 624 74.5 Hz 11 XGA 1024 x 768 60 Hz 12 XGA 1024 x 768 70 Hz 13 XGA 1024 x 768 75 Hz 14 MAC 1152 x 870 75 Hz 15 VESA 1152 x 864 75 Hz 16 VESA 1280 x 960 60 Hz 17 SXGA 1280 x 1024 60 Hz 18 SXGA 1280 x 1024 75 Hz
6 English Standard timing table Mode Resolution 1 VGA 640 x 480 60 Hz 2 VGA 640 x 480 72 Hz 3 VGA 640 x 480 75 Hz 4 MAC 640 x 480 66.6 Hz 5 VESA 720 x 400 70 Hz 6 SVGA 800 x 600 56 Hz 7 SVGA 800 x 600 60 Hz 8 SVGA 800 x 600 72 Hz 9 SVGA 800 x 600 75 Hz 10 MAC 832 x 624 74.5 Hz 11 XGA 1024 x 768 60 Hz 12 XGA 1024 x 768 70 Hz 13 XGA 1024 x 768 75 Hz 14 MAC 1152 x 870 75 Hz 15 VESA 1152 x 864 75 Hz 16 VESA 1280 x 960 60 Hz 17 SXGA 1280 x 1024 60 Hz 18 SXGA 1280 x 1024 75 Hz
User Manual
Page 21
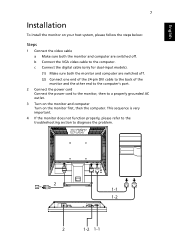
b Connect the VGA video cable to diagnose the problem. DVI D-Sub 2 1-1 1-2 2 1-2 1-1 This sequence is very important. 4 If the monitor does not function properly, please refer to the troubleshooting section to the computer. English 7 Installation To install the monitor on the monitor first, then the computer. c Connect the digital cable (only for dual-input models). (1) Make sure both the monitor and computer are switched off. (2) Connect one end of the 24-pin DVI cable to the back of the monitor and the other end to the computer's port. 2 Connect the power cord Connect the ...
b Connect the VGA video cable to diagnose the problem. DVI D-Sub 2 1-1 1-2 2 1-2 1-1 This sequence is very important. 4 If the monitor does not function properly, please refer to the troubleshooting section to the computer. English 7 Installation To install the monitor on the monitor first, then the computer. c Connect the digital cable (only for dual-input models). (1) Make sure both the monitor and computer are switched off. (2) Connect one end of the 24-pin DVI cable to the back of the monitor and the other end to the computer's port. 2 Connect the power cord Connect the ...