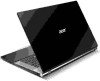
Acer Aspire V3-771G Notebook Service Guide
Page 6
...BIOS Passwords 2-20 Cleaning BIOS Passwords 2-21 Using DMI Tools 2-22 LAN MAC EEPROM Utility 2-29 CHAPTER 3 Machine Maintenance Machine Disassembly and Replacement 3-5 Recommended Equipment 3-5 Replacement Requirements 3-5 Pre-disassembly Instructions 3-6 Disassembly Process 3-7 External Module Disassembly Process 3-8 External Modules Disassembly Flowchart 3-8 Removing the Memory Card 3-9 Removing... the Top Case 3-33 Removing the Speaker Module 3-37 Remove the Power Switch Board 3-40 Removing the Keyboard Bracket 3-42 Removing the Keyboard 3-45 Removing the IO Board 3-46 vi
Acer Aspire V3-771G Notebook Service Guide
Page 7
... Reassembly Procedure 3-76 Replacing the Camera 3-76 Replacing the LCD Panel 3-77 Replacing the LCD Bezel 3-84 Replacing the Bottom Case 3-87 Replacing the CPU 3-90 Replacing the Thermal Module 3-92 Replacing the Motherboard 3-95 Replacing the IO Board 3-98 Replacing the Keyboard 3-100 Replacing the Power Switch Board 3-103 Replacing the Speaker Module 3-105 Replacing the Top Case 3-108 Replacing the Top Case...
Acer Aspire V3-771G Notebook Service Guide
Page 90
... Switch Board 3-30 Removing the Top Case 3-33 Removing the Speaker Module 3-37 Remove the Power Switch Board 3-40 Removing the Keyboard Bracket 3-42 Removing the Keyboard 3-45 Removing the IO Board 3-46 Removing the Motherboard 3-48 Removing the Thermal Module 3-52 Removing the CPU 3-54 Removing the...the LCD Panel 3-66 Removing the Hinges 3-69 Removing the Camera 3-71 Removing the LVDS Combo Cable 3-72 LCD Reassembly Procedure 3-76 Replacing the Camera 3-76 Replacing the LCD Panel 3-77 Replacing the LCD Bezel 3-84 Replacing the Bottom Case 3-87 Replacing the CPU 3-90 3-2
Acer Aspire V3-771G Notebook Service Guide
Page 91
Replacing the Thermal Module 3-92 Replacing the Motherboard 3-95 Replacing the IO Board 3-98 Replacing the Keyboard 3-100 Replacing the Power Switch Board 3-103 Replacing the Speaker Module 3-105 Replacing the Top Case 3-108 Replacing the Top Case Palmrest 3-111 Replacing the ODD Module 3-116 Replacing the WLAN Card 3-119 Replacing the HDD Module 3-121 Replacing the DIMM Module 3-125 Replacing the Main Door 3-127 Replacing the Battery 3-128 3-3
Acer Aspire V3-771G Notebook Service Guide
Page 188
Figure 3-156. Keyboard 2. Cover the keyboard bracket on the back side of bracket first. Figure 3-157. Turn over the keyboard and positon it to lock all latches and aim the screw holes on bracket 3-100 Lay the bracket down and shift it on the keyboard by passing keyboard cable through the cable slot of top case. Replacing the Keyboard 0 1. Keyboard Bracket 3.
Acer Aspire V3-771G Notebook Service Guide
Page 196
Figure 3-169. Place the top case module on the bottom case. Keyboard Cable 2. Lay the top case module down to the motherboard. Top Case Module 3-108 Figure 3-170. Replacing the Top Case 0 1. Turn over the top case module. Connect the keyboard cable to position it on the bottom case with an about 45-degree angle.
Acer Aspire V3-771G Notebook Service Guide
Page 224
NG Connect it Well Keyboard Ok? Keyboard Failure 4-8 Troubleshooting Do not replace a non-defective FRU: START Keyboard FFC Well Connected? NG Replace Keyboard Replace M/B Figure 4-4. Keyboard Failure 0 If the Keyboard fails, perform the following, one at a time.
Acer Aspire V3-771G Notebook Service Guide
Page 257
... 22 Left Hinge 5 GPU 23 Right Hinge 6 WLAN Card 24 Screw 7 Microphone 25 LVDS cable 8 Fan & Heatsink module 26 Speaker 9 HDD 27 Bottom case 10 Keyboard 28 Screw 11 LCD panel 29 Antenna 12 Main board 30 Antenna 13 Touch pad 31 Top case 14 Screw 32 ODD bezel 15 Screw...