Acer Aspire V3-771G Notebook Service Guide
Page 5
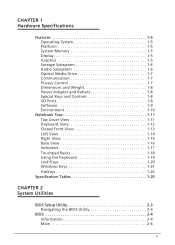
... Memory 1-5 Display 1-5 Graphics 1-5 Storage Subsystem 1-6 Audio Subsystem 1-6 Optical Media Drive 1-7 Communication 1-7 Privacy Control 1-7 Dimensions and Weight 1-8 Power Adapter and Battery 1-8 Special Keys and Controls 1-8 I/O Ports 1-8 Software 1-9 Environment 1-10 Notebook Tour 1-11 Top Cover View 1-11 Keyboard View 1-12 Closed Front View 1-13 Left View 1-14 Right View 1-15 Base View 1-16 Indicators 1-17 Touchpad Basics 1-18 Using the Keyboard 1-19 Lock Keys 1-20 Windows Keys 1-21 Hotkeys 1-22 Specification Tables 1-25 CHAPTER 2 System Utilities BIOS Setup...
... Memory 1-5 Display 1-5 Graphics 1-5 Storage Subsystem 1-6 Audio Subsystem 1-6 Optical Media Drive 1-7 Communication 1-7 Privacy Control 1-7 Dimensions and Weight 1-8 Power Adapter and Battery 1-8 Special Keys and Controls 1-8 I/O Ports 1-8 Software 1-9 Environment 1-10 Notebook Tour 1-11 Top Cover View 1-11 Keyboard View 1-12 Closed Front View 1-13 Left View 1-14 Right View 1-15 Base View 1-16 Indicators 1-17 Touchpad Basics 1-18 Using the Keyboard 1-19 Lock Keys 1-20 Windows Keys 1-21 Hotkeys 1-22 Specification Tables 1-25 CHAPTER 2 System Utilities BIOS Setup...
Acer Aspire V3-771G Notebook Service Guide
Page 6
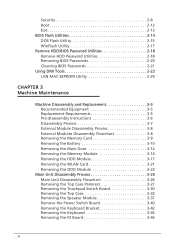
... BIOS Flash Utilities 2-14 DOS Flash Utility 2-15 WinFlash Utility 2-17 Remove HDD/BIOS Password Utilities 2-18 Remove HDD Password Utilities 2-18 Removing BIOS Passwords 2-20 Cleaning BIOS Passwords 2-21 Using DMI Tools 2-22 LAN MAC EEPROM Utility 2-29 CHAPTER 3 Machine Maintenance Machine Disassembly and Replacement 3-5 Recommended Equipment 3-5 Replacement Requirements 3-5 Pre-disassembly Instructions 3-6 Disassembly Process 3-7 External Module Disassembly Process 3-8 External Modules Disassembly Flowchart 3-8 Removing the Memory Card 3-9 Removing the Battery 3-10 Removing...
... BIOS Flash Utilities 2-14 DOS Flash Utility 2-15 WinFlash Utility 2-17 Remove HDD/BIOS Password Utilities 2-18 Remove HDD Password Utilities 2-18 Removing BIOS Passwords 2-20 Cleaning BIOS Passwords 2-21 Using DMI Tools 2-22 LAN MAC EEPROM Utility 2-29 CHAPTER 3 Machine Maintenance Machine Disassembly and Replacement 3-5 Recommended Equipment 3-5 Replacement Requirements 3-5 Pre-disassembly Instructions 3-6 Disassembly Process 3-7 External Module Disassembly Process 3-8 External Modules Disassembly Flowchart 3-8 Removing the Memory Card 3-9 Removing the Battery 3-10 Removing...
Acer Aspire V3-771G Notebook Service Guide
Page 7
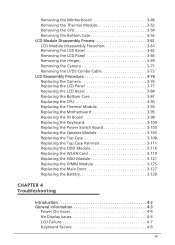
... Combo Cable 3-72 LCD Reassembly Procedure 3-76 Replacing the Camera 3-76 Replacing the LCD Panel 3-77 Replacing the LCD Bezel 3-84 Replacing the Bottom Case 3-87 Replacing the CPU 3-90 Replacing the Thermal Module 3-92 Replacing the Motherboard 3-95 Replacing the IO Board 3-98 Replacing the Keyboard 3-100 Replacing the Power Switch Board 3-103 Replacing the Speaker Module 3-105 Replacing the Top Case 3-108 Replacing the Top Case Palmrest 3-111 Replacing the ODD Module 3-116 Replacing the WLAN Card 3-119 Replacing the HDD Module 3-121 Replacing...
... Combo Cable 3-72 LCD Reassembly Procedure 3-76 Replacing the Camera 3-76 Replacing the LCD Panel 3-77 Replacing the LCD Bezel 3-84 Replacing the Bottom Case 3-87 Replacing the CPU 3-90 Replacing the Thermal Module 3-92 Replacing the Motherboard 3-95 Replacing the IO Board 3-98 Replacing the Keyboard 3-100 Replacing the Power Switch Board 3-103 Replacing the Speaker Module 3-105 Replacing the Top Case 3-108 Replacing the Top Case Palmrest 3-111 Replacing the ODD Module 3-116 Replacing the WLAN Card 3-119 Replacing the HDD Module 3-121 Replacing...
Acer Aspire V3-771G Notebook Service Guide
Page 12
... 1-5 Operating System 1-5 Platform 1-5 System Memory 1-5 Display 1-5 Graphics 1-5 Storage Subsystem 1-6 Audio Subsystem 1-6 Optical Media Drive 1-7 Communication 1-7 Privacy Control 1-7 Dimensions and Weight 1-8 Power Adapter and Battery 1-8 Special Keys and Controls 1-8 I/O Ports 1-8 Software 1-9 Environment 1-10 Notebook Tour 1-11 Top Cover View 1-11 Keyboard View 1-12 Closed Front View 1-13 Left View 1-14 Right View 1-15 Base View 1-16 Indicators 1-17 Touchpad Basics 1-18 Using the Keyboard 1-19 Lock Keys 1-20 Windows Keys 1-21 Hotkeys 1-22 System Block Diagram...
... 1-5 Operating System 1-5 Platform 1-5 System Memory 1-5 Display 1-5 Graphics 1-5 Storage Subsystem 1-6 Audio Subsystem 1-6 Optical Media Drive 1-7 Communication 1-7 Privacy Control 1-7 Dimensions and Weight 1-8 Power Adapter and Battery 1-8 Special Keys and Controls 1-8 I/O Ports 1-8 Software 1-9 Environment 1-10 Notebook Tour 1-11 Top Cover View 1-11 Keyboard View 1-12 Closed Front View 1-13 Left View 1-14 Right View 1-15 Base View 1-16 Indicators 1-17 Touchpad Basics 1-18 Using the Keyboard 1-19 Lock Keys 1-20 Windows Keys 1-21 Hotkeys 1-22 System Block Diagram...
Acer Aspire V3-771G Notebook Service Guide
Page 23
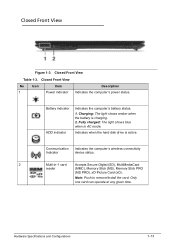
...is active Communication Indicator Indicates the computer's wireless connectivity device status. 2 Multi-in AC mode. Battery indicator HDD indicator Indicates the computer's battery status. 1. Fully charged: The light shows blue when in -1 card Accepts Secure Digital (SD), MultiMediaCard reader (MMC), Memory Stick (MS), Memory Stick PRO (MS PRO), xD-Picture Card (xD). Indicates when the hard disk drive is charging. 2. Closed Front View No Icon Item 1 Power indicator Description Indicates the computer's power status. Hardware Specifications and Configurations 1-13...
...is active Communication Indicator Indicates the computer's wireless connectivity device status. 2 Multi-in AC mode. Battery indicator HDD indicator Indicates the computer's battery status. 1. Fully charged: The light shows blue when in -1 card Accepts Secure Digital (SD), MultiMediaCard reader (MMC), Memory Stick (MS), Memory Stick PRO (MS PRO), xD-Picture Card (xD). Indicates when the hard disk drive is charging. 2. Closed Front View No Icon Item 1 Power indicator Description Indicates the computer's power status. Hardware Specifications and Configurations 1-13...
Acer Aspire V3-771G Notebook Service Guide
Page 24
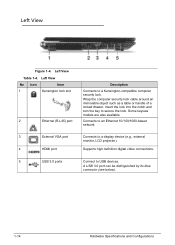
... A USB 3.0 port can be distinguished by its blue connector (see below). 1-14 Hardware Specifications and Configurations Connects to USB devices. Left View No Icon Item 1 Kensington lock slot 2 Ethernet (RJ-45) port 3 External VGA port 4 HDMI port 5 USB 3.0 ports Description Connects to a display device (e.g., external monitor, LCD projector). Left View Table 1-4. Connects to a Kensington-compatible computer security lock. Insert the lock into the notch and turn the key to secure the lock. Supports high definition digital video connections. Some keyless models are...
... A USB 3.0 port can be distinguished by its blue connector (see below). 1-14 Hardware Specifications and Configurations Connects to USB devices. Left View No Icon Item 1 Kensington lock slot 2 Ethernet (RJ-45) port 3 External VGA port 4 HDMI port 5 USB 3.0 ports Description Connects to a display device (e.g., external monitor, LCD projector). Left View Table 1-4. Connects to a Kensington-compatible computer security lock. Insert the lock into the notch and turn the key to secure the lock. Supports high definition digital video connections. Some keyless models are...
Acer Aspire V3-771G Notebook Service Guide
Page 27
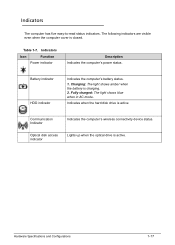
...computer cover is active Communication Indicator Indicates the computer's wireless connectivity device status. Indicators Icon Function Power indicator Description Indicates the computer's power status. Battery indicator HDD indicator Indicates the computer's battery status. 1. Indicates when the hard disk drive is closed. Optical disk access indicator Lights up when the optical drive is charging. 2. Table 1-7. Charging: The light shows amber when the battery is active. Fully charged: The light shows blue when in AC mode. Hardware Specifications and Configurations 1-17...
...computer cover is active Communication Indicator Indicates the computer's wireless connectivity device status. Indicators Icon Function Power indicator Description Indicates the computer's power status. Battery indicator HDD indicator Indicates the computer's battery status. 1. Indicates when the hard disk drive is closed. Optical disk access indicator Lights up when the optical drive is charging. 2. Table 1-7. Charging: The light shows amber when the battery is active. Fully charged: The light shows blue when in AC mode. Hardware Specifications and Configurations 1-17...
Acer Aspire V3-771G Notebook Service Guide
Page 31
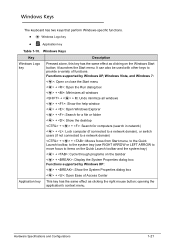
... network) < > + : Lock computer (if connected to a network domain), or switch users (if not connected to a network domain) + < > + : Moves focus from Start menu, to the Quick Launch toolbar, to the system tray (use RIGHT ARROW or LEFT ARROW to move focus to provide a variety of Access Center Application key This key has the same effect as clicking on the Windows Start button; Hardware Specifications and Configurations 1-21 Windows Keys 0 The keyboard has two keys that perform Windows-specific functions...
... network) < > + : Lock computer (if connected to a network domain), or switch users (if not connected to a network domain) + < > + : Moves focus from Start menu, to the Quick Launch toolbar, to the system tray (use RIGHT ARROW or LEFT ARROW to move focus to provide a variety of Access Center Application key This key has the same effect as clicking on the Windows Start button; Hardware Specifications and Configurations 1-21 Windows Keys 0 The keyboard has two keys that perform Windows-specific functions...
Acer Aspire V3-771G Notebook Service Guide
Page 32
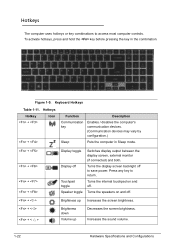
...Brightness up Brightness down Volume up Increases the screen brightness. Hotkeys 0 The computer uses hotkeys or key combinations to save power. Hotkeys Hotkey + + Icon Function Communication key Sleep Description Enables / disables the computer's communication devices. (Communication devices may vary by configuration.) Puts the computer in the combination. Increases the sound volume. 1-22 Hardware Specifications and Configurations Turns the display screen backlight off Touchpad toggle Speaker toggle Switches display output between the display screen, external monitor...
...Brightness up Brightness down Volume up Increases the screen brightness. Hotkeys 0 The computer uses hotkeys or key combinations to save power. Hotkeys Hotkey + + Icon Function Communication key Sleep Description Enables / disables the computer's communication devices. (Communication devices may vary by configuration.) Puts the computer in the combination. Increases the sound volume. 1-22 Hardware Specifications and Configurations Turns the display screen backlight off Touchpad toggle Speaker toggle Switches display output between the display screen, external monitor...
Acer Aspire V3-771G Notebook Service Guide
Page 47
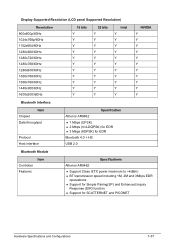
...) 2 Mbps (π/4-DQPSK) for EDR 3 Mbps (8DPSK) for EDR Bluetooth 4.0 + HS USB 2.0 Bluetooth Module Controller Features Item Specifications Atheros AR9462 Support Class II(TX power maximum to +4dBm) BT transmission speed including 1M, 2M and 3Mbps EDR opereations Support for Simple Pairing(SP) and Enhanced Inquiry Response (EIR) function Support for SCATTERNET and PICONET Hardware Specifications and Configurations 1-37
...) 2 Mbps (π/4-DQPSK) for EDR 3 Mbps (8DPSK) for EDR Bluetooth 4.0 + HS USB 2.0 Bluetooth Module Controller Features Item Specifications Atheros AR9462 Support Class II(TX power maximum to +4dBm) BT transmission speed including 1M, 2M and 3Mbps EDR opereations Support for Simple Pairing(SP) and Enhanced Inquiry Response (EIR) function Support for SCATTERNET and PICONET Hardware Specifications and Configurations 1-37

Acer Aspire V3-771G Notebook Service Guide
Page 59
... disabled. To change boot device without entering the BIOS SETUP, Press during POST when prompted at the bottom of screen. use the up and down arrow keys Change parameter value - If configuration problems occur, users may need to run Setup. To change boot device without entering BIOS Setup Utility, set to specific models. Refer to save changes and exit BIOS Setup Utility NOTE: NOTE: Parameter values can be changed if enclosed in the Item Specific Help area of F12 Boot Menu is set...
... disabled. To change boot device without entering the BIOS SETUP, Press during POST when prompted at the bottom of screen. use the up and down arrow keys Change parameter value - If configuration problems occur, users may need to run Setup. To change boot device without entering BIOS Setup Utility, set to specific models. Refer to save changes and exit BIOS Setup Utility NOTE: NOTE: Parameter values can be changed if enclosed in the Item Specific Help area of F12 Boot Menu is set...

Acer Aspire V3-771G Notebook Service Guide
Page 65
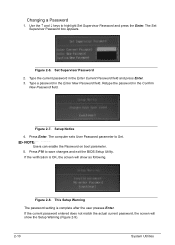
... then sets the Supervisor Password parameter to highlight Set Supervisor Password and press Enter. The Set Supervisor Password box appears. The Set Supervisor Password box appears: Figure 2-5. Type the current password in the Enter New Password and Confirm New Password fields. Figure 2-4. NOTE: NOTE: Users can opt to enable the Password on the screen. 3. Setting a Password 0 Perform the following : 1. Press Enter. Press F10 to save changes and exit the BIOS Setup Utility. Use the and keys...
... then sets the Supervisor Password parameter to highlight Set Supervisor Password and press Enter. The Set Supervisor Password box appears. The Set Supervisor Password box appears: Figure 2-5. Type the current password in the Enter New Password and Confirm New Password fields. Figure 2-4. NOTE: NOTE: Users can opt to enable the Password on the screen. 3. Setting a Password 0 Perform the following : 1. Press Enter. Press F10 to save changes and exit the BIOS Setup Utility. Use the and keys...
Acer Aspire V3-771G Notebook Service Guide
Page 66
... highlight Set Supervisor Password and press the Enter. If the verification is complete after the user presses Enter. Retype the password in the Confirm New Password field. Set Supervisor Password 2. Setup Notice 4. If the current password entered does not match the actual current password, the screen will show the Setup Warning (Figure 2-9). 2-10 System Utilities Use the and keys to save changes and exit the BIOS Setup Utility. The computer sets User Password...
... highlight Set Supervisor Password and press the Enter. If the verification is complete after the user presses Enter. Retype the password in the Confirm New Password field. Set Supervisor Password 2. Setup Notice 4. If the current password entered does not match the actual current password, the screen will show the Setup Warning (Figure 2-9). 2-10 System Utilities Use the and keys to save changes and exit the BIOS Setup Utility. The computer sets User Password...
Acer Aspire V3-771G Notebook Service Guide
Page 90
...3-5 Pre-disassembly Instructions 3-6 Disassembly Process 3-7 External Module Disassembly Process 3-8 External Modules Disassembly Flowchart 3-8 Removing the Memory Card 3-9 Removing the Battery 3-10 Removing the Main Door 3-12 Removing the Memory Module 3-14 Removing the HDD Module 3-17 Removing the WLAN Card 3-21 Removing the ODD Module 3-23 Main Unit Disassembly Process 3-26 Main Unit Disassembly Flowchart 3-26 Removing the Top Case Palmrest 3-27 Removing the Touchpad Switch Board 3-30 Removing the Top Case 3-33 Removing the Speaker Module 3-37 Remove the Power Switch Board...
...3-5 Pre-disassembly Instructions 3-6 Disassembly Process 3-7 External Module Disassembly Process 3-8 External Modules Disassembly Flowchart 3-8 Removing the Memory Card 3-9 Removing the Battery 3-10 Removing the Main Door 3-12 Removing the Memory Module 3-14 Removing the HDD Module 3-17 Removing the WLAN Card 3-21 Removing the ODD Module 3-23 Main Unit Disassembly Process 3-26 Main Unit Disassembly Flowchart 3-26 Removing the Top Case Palmrest 3-27 Removing the Touchpad Switch Board 3-30 Removing the Top Case 3-33 Removing the Speaker Module 3-37 Remove the Power Switch Board...
Acer Aspire V3-771G Notebook Service Guide
Page 219
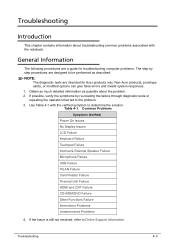
... a guide for Acer products only. Table 4-1. Common Problems Symptoms (Verified) Power On Issues No Display Issues LCD Failure Keyboard Failure Touchpad Failure Internal & External Speaker Failure Microphone Failure USB Failure WLAN Failure Card Reader Failure Thermal Unit Failure HDMI and CRT Failure CD-ROM/DVD Failure Other Functions Failure Intermittent Problems Undetermined Problems 4. Troubleshooting Introduction 0 This chapter contains information about the problem. 2. Troubleshooting 4-3 Non-Acer products, prototype cards, or modified options can give false errors and...
... a guide for Acer products only. Table 4-1. Common Problems Symptoms (Verified) Power On Issues No Display Issues LCD Failure Keyboard Failure Touchpad Failure Internal & External Speaker Failure Microphone Failure USB Failure WLAN Failure Card Reader Failure Thermal Unit Failure HDMI and CRT Failure CD-ROM/DVD Failure Other Functions Failure Intermittent Problems Undetermined Problems 4. Troubleshooting Introduction 0 This chapter contains information about the problem. 2. Troubleshooting 4-3 Non-Acer products, prototype cards, or modified options can give false errors and...
Acer Aspire V3-771G Notebook Service Guide
Page 221
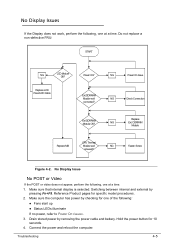
... at a time. 1. Troubleshooting 4-5 Make sure that internal display is selected. Drain stored power by pressing Fn+F5. Figure 4-2. DDRRAM Module CPU Thermal Replace MB Module well NG Fasten Screw screwed? Replace LCD Panel/LCD Cable Power On? Switching between internal and external by removing the power cable and battery. Ext.DDRRAM Module well connected? NG Power On Issue NG Check Connection Ext DDRRAM Module OK? Connect the power and reboot the computer. No Display Issues 0 If the Display does not work, perform the...
... at a time. 1. Troubleshooting 4-5 Make sure that internal display is selected. Drain stored power by pressing Fn+F5. Figure 4-2. DDRRAM Module CPU Thermal Replace MB Module well NG Fasten Screw screwed? Replace LCD Panel/LCD Cable Power On? Switching between internal and external by removing the power cable and battery. Ext.DDRRAM Module well connected? NG Power On Issue NG Check Connection Ext DDRRAM Module OK? Connect the power and reboot the computer. No Display Issues 0 If the Display does not work, perform the...
Acer Aspire V3-771G Notebook Service Guide
Page 222
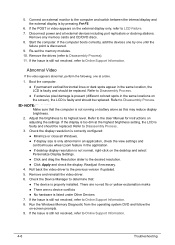
If the POST or video appears on adjusting the settings. Re-set the memory modules. 10. Refer to the User Manual for instructions on the external display only, refer to LCD Failure. 7. Readjust if necessary. 4. Roll back the video driver to Disassembly Process. If the Issue is properly installed. Disconnect power and all Windows. If display size is faulty and should be replaced. Remove any memory cards and CD/DVD discs. 8. Boot the computer. ...
If the POST or video appears on adjusting the settings. Re-set the memory modules. 10. Refer to the User Manual for instructions on the external display only, refer to LCD Failure. 7. Readjust if necessary. 4. Roll back the video driver to Disassembly Process. If the Issue is properly installed. Disconnect power and all Windows. If display size is faulty and should be replaced. Remove any memory cards and CD/DVD discs. 8. Boot the computer. ...
Acer Aspire V3-771G Notebook Service Guide
Page 235
... the following procedures to Power On Issues). 1. Remove power from the computer. 2. If the problem does not recur, connect the removed devices one is detected, replace the FRU. Perform the following devices: Non-Acer devices Printer, mouse, and other external devices Battery pack Hard disk drive DIMM CD-ROM/Diskette drive Module PC Cards 4. Other Functions Failure 0 1. Run the...
... the following procedures to Power On Issues). 1. Remove power from the computer. 2. If the problem does not recur, connect the removed devices one is detected, replace the FRU. Perform the following devices: Non-Acer devices Printer, mouse, and other external devices Battery pack Hard disk drive DIMM CD-ROM/Diskette drive Module PC Cards 4. Other Functions Failure 0 1. Run the...
Acer Aspire V3-771G Notebook Service Guide
Page 239
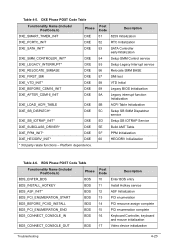
BDS Phase POST Code Table Functionality Name (Include\ PostCode.h) Phase Post Code Description BDS_ENTER_BDS BDS 10 Enter BDS entry BDS_INSTALL_HOTKEY BDS 11 Install Hotkey service BDS_ASF_INIT* BDS 12 ASF Initialization BDS_PCI_ENUMERATION_START BDS 13 PCI enumeration BDS_BEFORE_PCIIO_INSTALL BDS 14 PCI resource assign complete BDS_PCI_ENUMERATION_END BDS 15 PCI enumeration complete BDS_CONNECT_CONSOLE_IN BDS 16 Keyboard Controller, keyboard and mouse initialization BDS_CONNECT_CONSOLE_OUT BDS 17 Video device initialization Troubleshooting 4-23...
BDS Phase POST Code Table Functionality Name (Include\ PostCode.h) Phase Post Code Description BDS_ENTER_BDS BDS 10 Enter BDS entry BDS_INSTALL_HOTKEY BDS 11 Install Hotkey service BDS_ASF_INIT* BDS 12 ASF Initialization BDS_PCI_ENUMERATION_START BDS 13 PCI enumeration BDS_BEFORE_PCIIO_INSTALL BDS 14 PCI resource assign complete BDS_PCI_ENUMERATION_END BDS 15 PCI enumeration complete BDS_CONNECT_CONSOLE_IN BDS 16 Keyboard Controller, keyboard and mouse initialization BDS_CONNECT_CONSOLE_OUT BDS 17 Video device initialization Troubleshooting 4-23...
Acer Aspire V3-771G Notebook Service Guide
Page 250
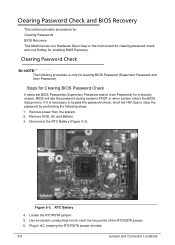
... and BIOS Recovery 0 This section provides procedures for enabling BIOS Recovery. RTC Battery 4. If it is only for a security reason, BIOS will ask the password during systems POST or when system enters the BIOS Setup menu. Steps for Clearing BIOS Password Check 0 If users set BIOS Passwords (Supervisor Password and/or User Password) for clearing BIOS Password (Supervisor Password and User Password). Remove HDD, AC and Battery. 3. Remove power from the system. 2. Plug in AC, keeping the RTCRST# jumper shorted. 5-6 Jumper and Connector Locations Locate...
... and BIOS Recovery 0 This section provides procedures for enabling BIOS Recovery. RTC Battery 4. If it is only for a security reason, BIOS will ask the password during systems POST or when system enters the BIOS Setup menu. Steps for Clearing BIOS Password Check 0 If users set BIOS Passwords (Supervisor Password and/or User Password) for clearing BIOS Password (Supervisor Password and User Password). Remove HDD, AC and Battery. 3. Remove power from the system. 2. Plug in AC, keeping the RTCRST# jumper shorted. 5-6 Jumper and Connector Locations Locate...


