
Service Guide
Page 7
Table of Contents System Specifications 1 Features 1 System Block Diagram 3 Your Acer Notebook tour 4 Front View 4 Closed Front View 5 Left View 5 Right View 6 Rear View 6 Bottom View 7 Indicators 7 TouchPad Basics 8 Using the Keyboard 9 Lock Keys...11 Hardware Specifications and Configurations 12 System Utilities 19 BIOS Setup Utility 19 Navigating the BIOS Utility 19 Information 20 Main 21 Security 22 Boot 25 Exit 26 BIOS Flash Utility 27 Remove HDD/BIOS Utility 29 Machine Disassembly and Replacement 33 Disassembly Requirements 33 Related Information 33 General...
Table of Contents System Specifications 1 Features 1 System Block Diagram 3 Your Acer Notebook tour 4 Front View 4 Closed Front View 5 Left View 5 Right View 6 Rear View 6 Bottom View 7 Indicators 7 TouchPad Basics 8 Using the Keyboard 9 Lock Keys...11 Hardware Specifications and Configurations 12 System Utilities 19 BIOS Setup Utility 19 Navigating the BIOS Utility 19 Information 20 Main 21 Security 22 Boot 25 Exit 26 BIOS Flash Utility 27 Remove HDD/BIOS Utility 29 Machine Disassembly and Replacement 33 Disassembly Requirements 33 Related Information 33 General...
Service Guide
Page 24
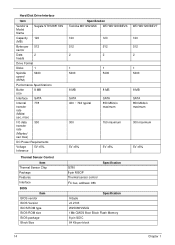
... BIOS ROM size BIOS package Block Size G780 8-pin MSOP Thermal sensor control I2C bus, address: 98h Specification Specification InSyde v0.2103 W25X80VSSIG 1Mb CMOS Boot Block Flash Memory 8 pin SOIC 64 Kb per block WD WD1200BEVT 120 512 2 1 5400 8 MB SATA 850 Mbits/s maximum 300 maximum 5V ±5% 14 Chapter...
... BIOS ROM size BIOS package Block Size G780 8-pin MSOP Thermal sensor control I2C bus, address: 98h Specification Specification InSyde v0.2103 W25X80VSSIG 1Mb CMOS Boot Block Flash Memory 8 pin SOIC 64 Kb per block WD WD1200BEVT 120 512 2 1 5400 8 MB SATA 850 Mbits/s maximum 300 maximum 5V ±5% 14 Chapter...
Service Guide
Page 29
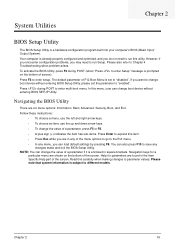
...NOTE: You can also press F10 to save any menu, you want to change the value of the screen. Chapter 2 19 You can change boot device without entering BIOS Setup Utility, please set to "disabled". Press during POST (when "Press to enter Setup" message is enclosed in square ...your computer's BIOS (Basic Input/ Output System). However, if you encounter configuration problems, you are six menu options: Information, Main, Advanced, Security, Boot, and Exit. The default parameter of the menu options to go to the Exit menu. • In any changes made and exit the BIOS ...
...NOTE: You can also press F10 to save any menu, you want to change the value of the screen. Chapter 2 19 You can change boot device without entering BIOS Setup Utility, please set to "disabled". Press during POST (when "Press to enter Setup" message is enclosed in square ...your computer's BIOS (Basic Input/ Output System). However, if you encounter configuration problems, you are six menu options: Information, Main, Advanced, Security, Boot, and Exit. The default parameter of the menu options to go to the Exit menu. • In any changes made and exit the BIOS ...
Service Guide
Page 30
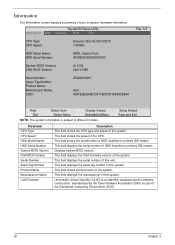
InsydeH20 Setup Utility Information Main Security Boot Exit CPU Type: CPU Speed: Genuine Intel (R) CPU N270 1.60GHz HDD Model Name: HDD Serial Number: INTEL Castle Point 00008030320000000000 System BIOS Version: VGA BIOS Version: v0.2103 Intel V1585 Serial Number: Asset Tag Number: Product Name: Manufacturer Name: UUID: ZG008160067 Acer 405FE2E9A4E1D4118251001E684CE894 Rev. 3.5 F1 Help...
InsydeH20 Setup Utility Information Main Security Boot Exit CPU Type: CPU Speed: Genuine Intel (R) CPU N270 1.60GHz HDD Model Name: HDD Serial Number: INTEL Castle Point 00008030320000000000 System BIOS Version: VGA BIOS Version: v0.2103 Intel V1585 Serial Number: Asset Tag Number: Product Name: Manufacturer Name: UUID: ZG008160067 Acer 405FE2E9A4E1D4118251001E684CE894 Rev. 3.5 F1 Help...
Service Guide
Page 31
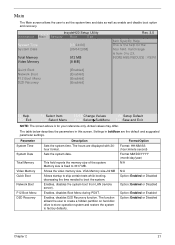
... Valid range is for the hour field. Settings in this screen. Enables, disables the system boot from 0 to 23. Parameter System Time System Date Total Memory Video Memory Quick Boot Network Boot F12 Boot Menu D2D Recovery Description Sets the system time. This field reports the memory size of the ... Memory size is the help for your reference only. Main The Main screen allows the user to 3017 MB. InsydeH20 Setup Utility Information Main Security Boot Exit System Time System Date [13:04:04] [06/04/2008] Total Memory Video Memory 512 MB [8 MB] Rev. 3.5 Item Specific ...
... Valid range is for the hour field. Settings in this screen. Enables, disables the system boot from 0 to 23. Parameter System Time System Date Total Memory Video Memory Quick Boot Network Boot F12 Boot Menu D2D Recovery Description Sets the system time. This field reports the memory size of the ... Memory size is the help for your reference only. Main The Main screen allows the user to 3017 MB. InsydeH20 Setup Utility Information Main Security Boot Exit System Time System Date [13:04:04] [06/04/2008] Total Memory Video Memory 512 MB [8 MB] Rev. 3.5 Item Specific ...
Service Guide
Page 32
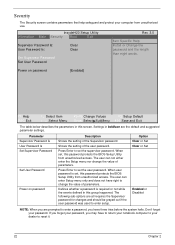
... out if the user password was used to set , this password protects the BIOS Setup Utility from unauthorized use. InsydeH20 Setup Utility Information Main Security Boot Exit Supervisor Password Is: User Password Is: Clear Clear Set Supervisor Password Set User Password Rev. 3.5 Item Specific Help Install or Change the password and...
... out if the user password was used to set , this password protects the BIOS Setup Utility from unauthorized use. InsydeH20 Setup Utility Information Main Security Boot Exit Supervisor Password Is: User Password Is: Clear Clear Set Supervisor Password Set User Password Rev. 3.5 Item Specific Help Install or Change the password and...
Service Guide
Page 33
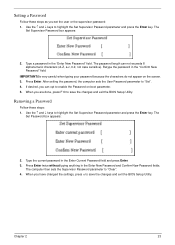
IMPORTANT:Be very careful when typing your password because the characters do not appear on boot parameter. 5. Press Enter. After setting the password, the computer sets the User Password parameter to highlight the Set Supervisor Password parameter and press the Enter ...
IMPORTANT:Be very careful when typing your password because the characters do not appear on boot parameter. 5. Press Enter. After setting the password, the computer sets the User Password parameter to highlight the Set Supervisor Password parameter and press the Enter ...

Service Guide
Page 34
If the current password entered does not match the actual current password, the screen will show you can enable the Password on boot parameter. 6. If the new password and confirm new password strings do not match, the screen will display as following message. 24 Chapter 2 The password setting ...
If the current password entered does not match the actual current password, the screen will show you can enable the Password on boot parameter. 6. If the new password and confirm new password strings do not match, the screen will display as following message. 24 Chapter 2 The password setting ...
Service Guide
Page 35
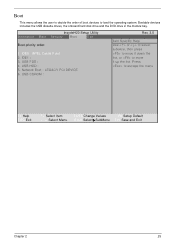
... Values F9 Setup Default Enter SelectXSubMenu F10 Save and Exit Chapter 2 25 InsydeH20 Setup Utility Information Main Security Boot Exit Boot priority order: 1. USB FDD : 4. Press to move it up the list. IDE1 : 3. Network Boot : LEGACY PCI DEVICE 6. IDE0 : INTEL Castle Point 2. Bootable devices includes the USB diskette drives, the onboard hard disk...
... Values F9 Setup Default Enter SelectXSubMenu F10 Save and Exit Chapter 2 25 InsydeH20 Setup Utility Information Main Security Boot Exit Boot priority order: 1. USB FDD : 4. Press to move it up the list. IDE1 : 3. Network Boot : LEGACY PCI DEVICE 6. IDE0 : INTEL Castle Point 2. Bootable devices includes the USB diskette drives, the onboard hard disk...

Service Guide
Page 36
InsydeH20 Setup Utility Information Main Security Boot Exit Exit Saving Changes Exit Discarding Changes Load Setup Defaults Discard Changes Save Changes Rev. 3.5 Item Specific Help Exit System Setup and save your changes ...
InsydeH20 Setup Utility Information Main Security Boot Exit Exit Saving Changes Exit Discarding Changes Load Setup Defaults Discard Changes Save Changes Rev. 3.5 Item Specific Help Exit System Setup and save your changes ...
Service Guide
Page 37
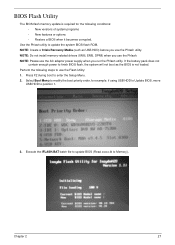
... loaded. NOTE: Do not install memory-related drivers (XMS, EMS, DPMI) when you run the Phlash utility. Select Boot Menu to modify the boot priority order, for the following steps to Memory). Press F2 during boot to position 1. 3. NOTE: Create a Crisis Recovery Media (such as the BIOS is required for example, if using... pack does not contain enough power to update the system BIOS flash ROM. Use the Phlash utility to finish BIOS flash, the system will not boot as USB HDD) before you use the Flash Utility: 1.
... loaded. NOTE: Do not install memory-related drivers (XMS, EMS, DPMI) when you run the Phlash utility. Select Boot Menu to modify the boot priority order, for the following steps to Memory). Press F2 during boot to position 1. 3. NOTE: Create a Crisis Recovery Media (such as the BIOS is required for example, if using... pack does not contain enough power to update the system BIOS flash ROM. Use the Phlash utility to finish BIOS flash, the system will not boot as USB HDD) before you use the Flash Utility: 1.

Service Guide
Page 90
... and the outlet. 3. Do not replace a non-defective FRUs: Computer Shutsdown Intermittently If the system powers off at intervals, perform the following actions one at a time to correct the problem. Power On Issue If the system doesn't power on page 161. 80 Chapter 4 Remove all external and ...non-essential hardware connected to the computer that are not necessary to boot the computer to the failure point. 5. Check the power cable is still not resolved, see "Online Support Information" on , perform the following ...
... and the outlet. 3. Do not replace a non-defective FRUs: Computer Shutsdown Intermittently If the system powers off at intervals, perform the following actions one at a time to correct the problem. Power On Issue If the system doesn't power on page 161. 80 Chapter 4 Remove all external and ...non-essential hardware connected to the computer that are not necessary to boot the computer to the failure point. 5. Check the power cable is still not resolved, see "Online Support Information" on , perform the following ...
Service Guide
Page 92
... (on this notebook model, switching between the internal display and the external display is selected. Make sure the computer has power by one at a time to the computer and switch between the internal display and the external display is done by pressing Fn+F5. If the ...computer boots correctly, add the devices one by checking at least one of the following actions one until the failure point is discovered. 6. Reseat the memory modules. 7. If the Issue is still not resolved...
... (on this notebook model, switching between the internal display and the external display is selected. Make sure the computer has power by one at a time to the computer and switch between the internal display and the external display is done by pressing Fn+F5. If the ...computer boots correctly, add the devices one by checking at least one of the following actions one until the failure point is discovered. 6. Reseat the memory modules. 7. If the Issue is still not resolved...
Service Guide
Page 98
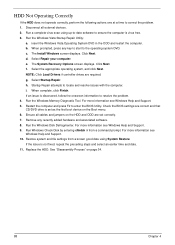
...enter the BIOS Utility. i. Ensure all external devices. 2. For more information see Windows Help and Support. 10. See "Disassembly Process" on the Boot menu. 6. Select Repair your computer. Click Next. d. Run Windows Check Disk by entering chkdsk /r from a known good date using up-to...h. Run a complete virus scan using System Restore. c. HDD Not Operating Correctly If the HDD does not operate correctly, perform the following actions one at a time to ensure the computer is virus free. 3. Disconnect all cables and jumpers on the HDD and ODD are required. e. Run...
...enter the BIOS Utility. i. Ensure all external devices. 2. For more information see Windows Help and Support. 10. See "Disassembly Process" on the Boot menu. 6. Select Repair your computer. Click Next. d. Run Windows Check Disk by entering chkdsk /r from a known good date using up-to...h. Run a complete virus scan using System Restore. c. HDD Not Operating Correctly If the HDD does not operate correctly, perform the following actions one at a time to ensure the computer is virus free. 3. Disconnect all cables and jumpers on the HDD and ODD are required. e. Run...
Service Guide
Page 103
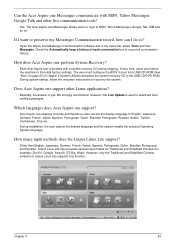
... all conversation history. Chapter 4 93 Does Acer Aspire one Messenger allows users to login to MSN, Yahoo Messenger, Google Talk, AIM and so on page 25 of each conversation box to boot from USB CD-ROM (See "Boot" on . During installation, the user selects... the desired language and the system installs the selected Operating System language. The Acer Aspire one support other live communication tools? Acer Aspire one perform System Recovery? Yes. How does Acer Aspire one employs Unicode ...
... all conversation history. Chapter 4 93 Does Acer Aspire one Messenger allows users to login to MSN, Yahoo Messenger, Google Talk, AIM and so on page 25 of each conversation box to boot from USB CD-ROM (See "Boot" on . During installation, the user selects... the desired language and the system installs the selected Operating System language. The Acer Aspire one support other live communication tools? Acer Aspire one perform System Recovery? Yes. How does Acer Aspire one employs Unicode ...
Service Guide
Page 113
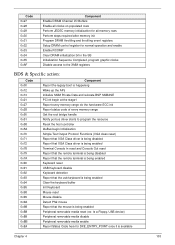
... 0x5A 0x70 0x71 0x72 0x78 0x79 0x7A 0x90 0x91 0x92 0x93 0x94 0x95 0x98 0x99 0x9A 0x9B 0xB8 0xB9 0xBB 0xE4 Component Report the legacy boot is happening Wake up the APs Initialize SMM Private Data and relocate BSP SMBASE PC init begin at the stage1 Report every memory range do...
... 0x5A 0x70 0x71 0x72 0x78 0x79 0x7A 0x90 0x91 0x92 0x93 0x94 0x95 0x98 0x99 0x9A 0x9B 0xB8 0xB9 0xBB 0xE4 Component Report the legacy boot is happening Wake up the APs Initialize SMM Private Data and relocate BSP SMBASE PC init begin at the stage1 Report every memory range do...
Service Guide
Page 124
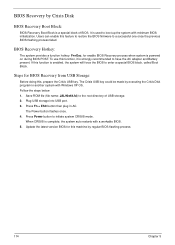
...114 Chapter 5 Users can enable this function is strongly recommended to have the AC adapter and Battery present. Press Power button to a successful one once the previous BIOS flashing process failed. It is a special block of USB storage. 2. Steps for enable BIOS Recovery process when system ... it is enabled, the system will force the BIOS to enter a special BIOS block, called Boot Block. BIOS Recovery by Crisis Disk BIOS Recovery Boot Block: BIOS Recovery Boot Block is used to boot up the system with minimum BIOS initialization. The Power button flashes once. 4. Press Fn + ...
...114 Chapter 5 Users can enable this function is strongly recommended to have the AC adapter and Battery present. Press Power button to a successful one once the previous BIOS flashing process failed. It is a special block of USB storage. 2. Steps for enable BIOS Recovery process when system ... it is enabled, the system will force the BIOS to enter a special BIOS block, called Boot Block. BIOS Recovery by Crisis Disk BIOS Recovery Boot Block: BIOS Recovery Boot Block is used to boot up the system with minimum BIOS initialization. The Power button flashes once. 4. Press Fn + ...
User Guide
Page 18
... passwords 22 Setting passwords 22 Expanding through options 23 Connectivity options 23 Built-in network feature 23 Universal Serial Bus (USB) 24 BIOS utility 24 Boot sequence 24 Enable disk-to-disk recovery 24 Password 25 Power management 25 Troubleshooting 26 Troubleshooting tips 26 Error messages 26 Regulations and safety notices...
... passwords 22 Setting passwords 22 Expanding through options 23 Connectivity options 23 Built-in network feature 23 Universal Serial Bus (USB) 24 BIOS utility 24 Boot sequence 24 Enable disk-to-disk recovery 24 Password 25 Power management 25 Troubleshooting 26 Troubleshooting tips 26 Error messages 26 Regulations and safety notices...
User Guide
Page 28
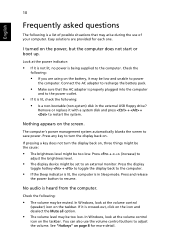
... volume may be set to resume. In Windows, look at the volume control (speaker) icon on the power, but the computer does not start or boot up. English 10 Frequently asked questions The following is a list of your computer. Easy solutions are using on the screen. Press and release the power... is not lit, no power is crossed-out, click on the taskbar. If pressing a key does not turn the display back on page 8 for each one. If it may arise during the use the volume control buttons to save power. In Windows, look at the volume control icon on the icon...
... volume may be set to resume. In Windows, look at the volume control (speaker) icon on the power, but the computer does not start or boot up. English 10 Frequently asked questions The following is a list of your computer. Easy solutions are using on the screen. Press and release the power... is not lit, no power is crossed-out, click on the taskbar. If pressing a key does not turn the display back on page 8 for each one. If it may arise during the use the volume control buttons to save power. In Windows, look at the volume control icon on the icon...

User Guide
Page 39
... investment that you need to take care of a locked drawer. Using a computer security lock The notebook comes with password checkpoints on boot-up and resume from unauthorized access. Setting these passwords creates several different levels of . Combine the use of this password with your...must enter this password with a Kensington-compatible security slot for maximum security. • Password on Boot secures your dealer or an authorized service center. See "BIOS utility" on boot-up and resume from Hibernation for a security lock. Important! Learn how to protect and take care...
... investment that you need to take care of a locked drawer. Using a computer security lock The notebook comes with password checkpoints on boot-up and resume from unauthorized access. Setting these passwords creates several different levels of . Combine the use of this password with your...must enter this password with a Kensington-compatible security slot for maximum security. • Password on Boot secures your dealer or an authorized service center. See "BIOS utility" on boot-up and resume from Hibernation for a security lock. Important! Learn how to protect and take care...


