

AL2051 User's Guide EN
Page 1
TABLE OF CONTENTS FOR YOUR SAFETY 1 SAFETY PRECAUTIONS 2 SPECIAL NOTES ON LCD MONITORS 3 BEFORE YOU OPERATE THE MONITOR 3 FEATURES 3 PACKING LIST 3 INSTALLATION INSTRUCTIONS 4 CONTROLS AND CONNECTORS 5 ADJUSTING THE VIEWING ANGLE 6 OPERATING INSTRUCTIONS 7 GENERAL INSTRUCTIONS 7 HOW TO ADJUST A SETTING 9 ADJUSTING THE PICTURE 10-11 PLUG AND PLAY 12 TECHNICAL SUPPORT(FAQ 13-14 ERROR MESSAGE & POSSIBLE SOLUTION ------- 15 APPENDIX 16 SPECIFICATIONS 16-17 FACTORY PRESET TIMING TABLE 18 CONNECTOR PIN ASSIGNMENT 19
TABLE OF CONTENTS FOR YOUR SAFETY 1 SAFETY PRECAUTIONS 2 SPECIAL NOTES ON LCD MONITORS 3 BEFORE YOU OPERATE THE MONITOR 3 FEATURES 3 PACKING LIST 3 INSTALLATION INSTRUCTIONS 4 CONTROLS AND CONNECTORS 5 ADJUSTING THE VIEWING ANGLE 6 OPERATING INSTRUCTIONS 7 GENERAL INSTRUCTIONS 7 HOW TO ADJUST A SETTING 9 ADJUSTING THE PICTURE 10-11 PLUG AND PLAY 12 TECHNICAL SUPPORT(FAQ 13-14 ERROR MESSAGE & POSSIBLE SOLUTION ------- 15 APPENDIX 16 SPECIFICATIONS 16-17 FACTORY PRESET TIMING TABLE 18 CONNECTOR PIN ASSIGNMENT 19
AL2051 User's Guide EN
Page 2
These limits are present inside the monitor. If this equipment does cause harmful interference to radio or television reception, which the ... order to which can radiate radio frequency energy, and if not installed and used in a residential installation. Before operating the monitor, please read this equipment. Connect the equipment into an outlet on , the user is not responsible for any , must... with the emission limits. 3. WARNING: To prevent fire or shock hazard, do not expose the monitor to Part 15 of the user to correct such interference. It is connected. 4.
These limits are present inside the monitor. If this equipment does cause harmful interference to radio or television reception, which the ... order to which can radiate radio frequency energy, and if not installed and used in a residential installation. Before operating the monitor, please read this equipment. Connect the equipment into an outlet on , the user is not responsible for any , must... with the emission limits. 3. WARNING: To prevent fire or shock hazard, do not expose the monitor to Part 15 of the user to correct such interference. It is connected. 4.
AL2051 User's Guide EN
Page 3
...a plug with UL listed computers which have an electrician install the correct outlet, or ground the appliance safely. Overloading can expose you mount the monitor on an unstable cart, stand, or table. If you to your home, consult your outlet does not accommodate the three-wire plug, have ...UL, CSA listed license 2 z To ensure satisfactory operation, use the monitor only with a third (grounding) pin. z For use only with the monitor. If the monitor falls, it will not be sure these openings are not sure of the type of power source indicated ...
...a plug with UL listed computers which have an electrician install the correct outlet, or ground the appliance safely. Overloading can expose you mount the monitor on an unstable cart, stand, or table. If you to your home, consult your outlet does not accommodate the three-wire plug, have ...UL, CSA listed license 2 z To ensure satisfactory operation, use the monitor only with a third (grounding) pin. z For use only with the monitor. If the monitor falls, it will not be sure these openings are not sure of the type of power source indicated ...

AL2051 User's Guide EN
Page 4
... screen depending on again to the nature of the LCD screen, an afterimage of 99.99% or more. BEFORE YOU OPERATE THE MONITOR FEATURES • 51cm(20") TFT Color LCD Monitor • Crisp, Clear Display for hours. External Adapter 5. 15-pin D-Sub Cable 6. Audio Cable 8. DVI Cable (only Dual-Input Model) 7. In... Approved) • Space Saving, Compact Case Design CHECKING THE CONTENTS OF THE PACKAGE The product package should include the following symptoms are normal with LCD monitor and do not indicate a problem. SPECIAL NOTES ON LCD...
... screen depending on again to the nature of the LCD screen, an afterimage of 99.99% or more. BEFORE YOU OPERATE THE MONITOR FEATURES • 51cm(20") TFT Color LCD Monitor • Crisp, Clear Display for hours. External Adapter 5. 15-pin D-Sub Cable 6. Audio Cable 8. DVI Cable (only Dual-Input Model) 7. In... Approved) • Space Saving, Compact Case Design CHECKING THE CONTENTS OF THE PACKAGE The product package should include the following symptoms are normal with LCD monitor and do not indicate a problem. SPECIAL NOTES ON LCD...
AL2051 User's Guide EN
Page 5
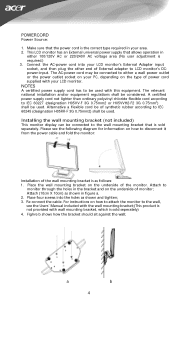
...240V AC voltage area (No user adjustment is sold seperately) 4. NOTES A certified power supply cord has to be connected to LCD monitor's DCpower-input. The relevant national installation and/or equipment regulations shall be used . A certified power supply cord not lighter than ...ordinary polyvinyl chloride flexible cord according to the wall mounting bracket that allows operation in your LCD monitor's External Adapter input socket, and then plug the other end of the wall mounting bracket is sold separately. Alternative a flexible ...
...240V AC voltage area (No user adjustment is sold seperately) 4. NOTES A certified power supply cord has to be connected to LCD monitor's DCpower-input. The relevant national installation and/or equipment regulations shall be used . A certified power supply cord not lighter than ...ordinary polyvinyl chloride flexible cord according to the wall mounting bracket that allows operation in your LCD monitor's External Adapter input socket, and then plug the other end of the wall mounting bracket is sold separately. Alternative a flexible ...
AL2051 User's Guide EN
Page 6
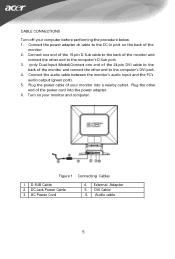
... the power adapter. 6. Connect the power adapter dc cable to the back of the power cord into a nearby outlet. Plug the other end of the monitor and connect the other end to the computer's D-Sub port. 3. (only Dual-Input Model)Connect one end of the 24-pin DVI cable to the... DC-In port on your monitor and computer. DC-Jack Power Cable 3. DVI Cable 6. Audio cable 5 Plug the power cable of the monitor. 2. AC Power Cord 4. Turn on the back of your computer before performing the procedure below. 1. D-SUB Cable...
... the power adapter. 6. Connect the power adapter dc cable to the back of the power cord into a nearby outlet. Plug the other end of the monitor and connect the other end to the computer's D-Sub port. 3. (only Dual-Input Model)Connect one end of the 24-pin DVI cable to the... DC-In port on your monitor and computer. DC-Jack Power Cable 3. DVI Cable 6. Audio cable 5 Plug the power cable of the monitor. 2. AC Power Cord 4. Turn on the back of your computer before performing the procedure below. 1. D-SUB Cable...
AL2051 User's Guide EN
Page 7
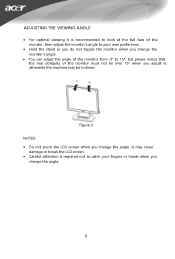
...inclined. ADJUSTING THE VIEWING ANGLE • For optimal viewing it is required not to 15°, but please notice that the rear obliquity of the monitor must not be over 15° when you adjust it, otherwise the machine may cause damage or break the LCD screen. • Careful attention is... recommended to look at the full face of the monitor, then adjust the monitor's angle to your own preference. • Hold the stand so you do not topple the monitor when you change the monitor's angle. • You can adjust the angle of the monitor from -5° to catch your fingers or hands ...
...inclined. ADJUSTING THE VIEWING ANGLE • For optimal viewing it is required not to 15°, but please notice that the rear obliquity of the monitor must not be over 15° when you adjust it, otherwise the machine may cause damage or break the LCD screen. • Careful attention is... recommended to look at the full face of the monitor, then adjust the monitor's angle to your own preference. • Hold the stand so you do not topple the monitor when you change the monitor's angle. • You can adjust the angle of the monitor from -5° to catch your fingers or hands ...
AL2051 User's Guide EN
Page 8
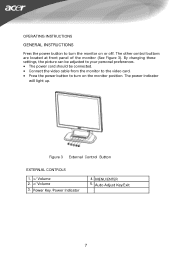
The power indicator will light up. Figure 3 External Control Button EXTERNAL CONTROLS 1. >/ Volume 2. The other control buttons are located at front panel of the monitor (See Figure 3). By changing these settings, the picture can be adjusted to your personal preferences. • The power cord should be connected. • Connect the video cable from the monitor to the video card. • Press the power button to turn on or off. OPERATING INSTRUCTIONS GENERAL INSTRUCTIONS Press the power button to turn the monitor on the monitor position.
The power indicator will light up. Figure 3 External Control Button EXTERNAL CONTROLS 1. >/ Volume 2. The other control buttons are located at front panel of the monitor (See Figure 3). By changing these settings, the picture can be adjusted to your personal preferences. • The power cord should be connected. • Connect the video cable from the monitor to the video card. • Press the power button to turn on or off. OPERATING INSTRUCTIONS GENERAL INSTRUCTIONS Press the power button to turn the monitor on the monitor position.

AL2051 User's Guide EN
Page 9
... 2. FRONT PANEL CONTROL • Power Button: Press this button will act as it was originally packed at the factory. • To keep the monitor looking new, periodically clean it . 8 Never use strong solvents such as they will damage the cabinet. Power off status, press this button for ...2 seconds to turn the monitor ON or OFF, And display the monitor's state. • Power Indicator: Blue - When OSD menu is in Volume Adjust OSD status. • /Volume: Activates the ...
... 2. FRONT PANEL CONTROL • Power Button: Press this button will act as it was originally packed at the factory. • To keep the monitor looking new, periodically clean it . 8 Never use strong solvents such as they will damage the cabinet. Power off status, press this button for ...2 seconds to turn the monitor ON or OFF, And display the monitor's state. • Power Indicator: Blue - When OSD menu is in Volume Adjust OSD status. • /Volume: Activates the ...
AL2051 User's Guide EN
Page 13
...to an OFF mode. After the video input signal is restored, full power is restored and the display is no video input signal this monitor, following a time-out period, will automatically switch to conserve electrical energy by the Video Electronics Standards Association (VESA) and The Swedish ...labeled. The other end terminates with NEMA 5-15 style and is a bidirectional data channel based on the I2C protocol. IN ORDER FOR THIS MONITOR TO OPERATE PROPERLY, THERE MUST BE A VIDEO INPUT SIGNAL. Supplied with a grounding type attachment plug, rated 10A, 250V, CEE-22 male...
...to an OFF mode. After the video input signal is restored, full power is restored and the display is no video input signal this monitor, following a time-out period, will automatically switch to conserve electrical energy by the Video Electronics Standards Association (VESA) and The Swedish ...labeled. The other end terminates with NEMA 5-15 style and is a bidirectional data channel based on the I2C protocol. IN ORDER FOR THIS MONITOR TO OPERATE PROPERLY, THERE MUST BE A VIDEO INPUT SIGNAL. Supplied with a grounding type attachment plug, rated 10A, 250V, CEE-22 male...
AL2051 User's Guide EN
Page 14
Missing one of the primary *Inspect the monitor's video cable and colors (RED, GREEN, or make sure none of the pins are BLUE) bent. 13 TECHNICAL SUPPORT (FAQ) Problem & Question Possible Solution Power .... *Make sure computer is fuzzy *Adjust the Contrast and Brightness Controls. The power LED is present in its slot *Make sure monitor's video cable is properly connected to the computer. *Inspect monitor's video cable and make sure that may cause pattern is ON (orange) *Computer Power Switch should either turn ON or...
Missing one of the primary *Inspect the monitor's video cable and colors (RED, GREEN, or make sure none of the pins are BLUE) bent. 13 TECHNICAL SUPPORT (FAQ) Problem & Question Possible Solution Power .... *Make sure computer is fuzzy *Adjust the Contrast and Brightness Controls. The power LED is present in its slot *Make sure monitor's video cable is properly connected to the computer. *Inspect monitor's video cable and make sure that may cause pattern is ON (orange) *Computer Power Switch should either turn ON or...
AL2051 User's Guide EN
Page 20
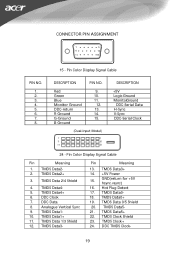
Red Green Blue Monitor Ground DDC-return R-Ground G-Ground B-Ground 9. 10. 11. 12. 13. 14. 15. (Dual-Input Model) DESCRIPTION +5V Logic Ground MonitorGround DDC-Serial Data H-Sync V-Sync ...
Red Green Blue Monitor Ground DDC-return R-Ground G-Ground B-Ground 9. 10. 11. 12. 13. 14. 15. (Dual-Input Model) DESCRIPTION +5V Logic Ground MonitorGround DDC-Serial Data H-Sync V-Sync ...


