
AL1913 LCD Monitor Service Guide
Page 7
...1 Monitor Features 8 1.1 Test Conditions 8 1.2 Features 8 1.3 LCD Panel Specification 9 Chapter 2 OPERATING INSTRUCTIONS 12 2.1 Function Name 12 2.2 OSD Menu Description 14 2.3 OSD Control 15 2.4 OSD Menu Screen 15 2.5 OSD Function Definition 17 2.6 Plug and Play 18 2.7 Power Saver 18 Chapter 3 Machine Disassembly and Assembly 19 3.1 Machine Disassembly 19 3.2 Machine Assembly 22 Chapter 4 Troubleshooting 25 4.1 Abnormal display Troubleshooting 25 4.2 Abnormal (On/Off, LCD Display, K/B) Troubleshooting...27 4.3 Abnormal (BIOS, OSD, Other Display) Troubleshooting...28 4.4 Audio...
...1 Monitor Features 8 1.1 Test Conditions 8 1.2 Features 8 1.3 LCD Panel Specification 9 Chapter 2 OPERATING INSTRUCTIONS 12 2.1 Function Name 12 2.2 OSD Menu Description 14 2.3 OSD Control 15 2.4 OSD Menu Screen 15 2.5 OSD Function Definition 17 2.6 Plug and Play 18 2.7 Power Saver 18 Chapter 3 Machine Disassembly and Assembly 19 3.1 Machine Disassembly 19 3.2 Machine Assembly 22 Chapter 4 Troubleshooting 25 4.1 Abnormal display Troubleshooting 25 4.2 Abnormal (On/Off, LCD Display, K/B) Troubleshooting...27 4.3 Abnormal (BIOS, OSD, Other Display) Troubleshooting...28 4.4 Audio...
AL1913 LCD Monitor Service Guide
Page 8
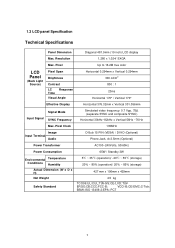
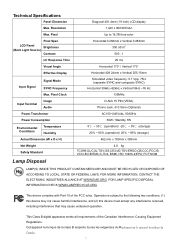
..., 50Hz Maximum with OSD setting Middle with OSD setting 1280 x 1024 @60HZ With OSD setting Topcon luminance colorimeter BM-5A or equivalent Before measuring, "Auto Adjust" & "Auto Balance" must be done in advance 1.2 Features l 19" SXGA TFT LCD Panel l MVA Mode Liquid Crystal l D-SUB/ DVI-D Input l Audio Function l Support to 75Hz Refresh Rate l Support VESA-DCC 2B plug & play function l Support VESA-DPMS & DVI DMPM Power Management Function l Super Wide Viewing Angle l High Brightness & Contrast Ratio l High Brightness & Contrast Angular Dependent l Fast...
..., 50Hz Maximum with OSD setting Middle with OSD setting 1280 x 1024 @60HZ With OSD setting Topcon luminance colorimeter BM-5A or equivalent Before measuring, "Auto Adjust" & "Auto Balance" must be done in advance 1.2 Features l 19" SXGA TFT LCD Panel l MVA Mode Liquid Crystal l D-SUB/ DVI-D Input l Audio Function l Support to 75Hz Refresh Rate l Support VESA-DCC 2B plug & play function l Support VESA-DPMS & DVI DMPM Power Management Function l Super Wide Viewing Angle l High Brightness & Contrast Ratio l High Brightness & Contrast Angular Dependent l Fast...
AL1913 LCD Monitor Service Guide
Page 9
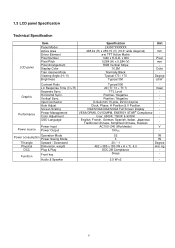
... 13406-2;EPA; BSMI; Resolution 1,280 x 1,024/ S XGA Max. VCCI -B;CE/EMC;C- Pixel Up to 16.2M true color LCD Panel (Back Light Source) Pixel Span Brightness Contrast LC Response Time Visual Angle Effective Display Horizontal 0.294mm x Vertical 0.294mm 300 cd/m2 800 : 1 23ms Horizontal 170° / Vertical 170° Horizontal 376.32mm x Vertical 301.056mm Signal Mode Input Signal SYNC Frequency Simulated video frequency: 0.7 Vpp, 75Ω (separate SYNC and composite SYNC) Horizontal 30kHz~82kHz x Vertical 56Hz ~76 Hz...
... 13406-2;EPA; BSMI; Resolution 1,280 x 1,024/ S XGA Max. VCCI -B;CE/EMC;C- Pixel Up to 16.2M true color LCD Panel (Back Light Source) Pixel Span Brightness Contrast LC Response Time Visual Angle Effective Display Horizontal 0.294mm x Vertical 0.294mm 300 cd/m2 800 : 1 23ms Horizontal 170° / Vertical 170° Horizontal 376.32mm x Vertical 301.056mm Signal Mode Input Signal SYNC Frequency Simulated video frequency: 0.7 Vpp, 75Ω (separate SYNC and composite SYNC) Horizontal 30kHz~82kHz x Vertical 56Hz ~76 Hz...
AL1913 LCD Monitor Service Guide
Page 14
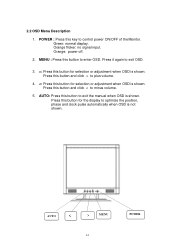
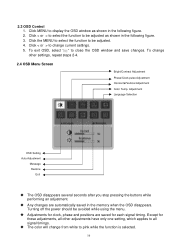
Orange: power off. 2. MENU : Press this key to control power ON/OFF of the Monitor. MENU 14 POWER POWER : Press this button to plus volume. 4. 2.2 OSD Menu Description 1. Orange flicker: no signal input. Press it again to exit OSD. 3. >: Press this button and click > to enter OSD. Press this button for selection or adjustment when OSD is shown. Green: normal display.
Orange: power off. 2. MENU : Press this key to control power ON/OFF of the Monitor. MENU 14 POWER POWER : Press this button to plus volume. 4. 2.2 OSD Menu Description 1. Orange flicker: no signal input. Press it again to exit OSD. 3. >: Press this button and click > to enter OSD. Press this button for selection or adjustment when OSD is shown. Green: normal display.

AL1913 LCD Monitor Service Guide
Page 15
... to be adjusted as shown in the following figure. 2. To exit OSD, select " " to change other settings, repeat steps 2-4. 2.4 OSD Menu Screen Bright/Contract Adjustment Phase/Clock pulse Adjustment Horizontal/Vertical Adjustment Color Temp. Adjustment Language Selection OSD Setting Auto Adjustment Message Restore Exit 15 Click MENU to be adjusted. 4. To change current settings. 5. Click < or > to select the function to display the OSD window as shown in the following figure. 3. Click < or > to close the OSD window and save changes. 2.3 OSD Control 1.
... to be adjusted as shown in the following figure. 2. To exit OSD, select " " to change other settings, repeat steps 2-4. 2.4 OSD Menu Screen Bright/Contract Adjustment Phase/Clock pulse Adjustment Horizontal/Vertical Adjustment Color Temp. Adjustment Language Selection OSD Setting Auto Adjustment Message Restore Exit 15 Click MENU to be adjusted. 4. To change current settings. 5. Click < or > to select the function to display the OSD window as shown in the following figure. 3. Click < or > to close the OSD window and save changes. 2.3 OSD Control 1.
AL1913 LCD Monitor Service Guide
Page 17
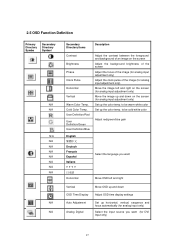
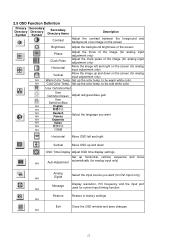
... the input source you want (for analog input adjustment only) Set up the color temp. to be cold white color Adjust red/green/blue gain English Deutsch Français Español Italiano ???? Select the language you want Horizontal Move OSD left and right Vertical OSD Time Display Auto Adjustment Analog Digital Move OSD up and down on the screen (for DVI Input only) 17 2.5 OSD Function Definition Primary Directory Symbo Secondary Directory Symbol N/A N/A N/A N/A N/A N/A N/A N/A N/A N/A N/A N/A Secondary Directory Items Description Contrast Brightness...
... the input source you want (for analog input adjustment only) Set up the color temp. to be cold white color Adjust red/green/blue gain English Deutsch Français Español Italiano ???? Select the language you want Horizontal Move OSD left and right Vertical OSD Time Display Auto Adjustment Analog Digital Move OSD up and down on the screen (for DVI Input only) 17 2.5 OSD Function Definition Primary Directory Symbo Secondary Directory Symbol N/A N/A N/A N/A N/A N/A N/A N/A N/A N/A N/A N/A Secondary Directory Items Description Contrast Brightness...
AL1913 LCD Monitor Service Guide
Page 18
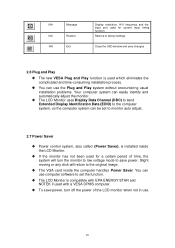
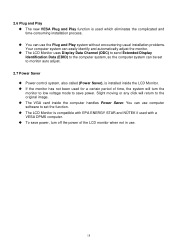
... original image. u The VGA card inside the LCD Monitor. u To save power, turn the monitor to low voltage mode to save power. u The LCD Monitor is used which eliminates the complicated and time-consuming installation process. N/A Message N/A Restore N/A Exit Display resolution, H/V frequency and the input port used for a certain period of the LCD monitor when not in use the Plug and Play system without encountering usual installation problems. Your computer system can easily identify and automatically adjust the monitor. You...
... original image. u The VGA card inside the LCD Monitor. u To save power, turn the monitor to low voltage mode to save power. u The LCD Monitor is used which eliminates the complicated and time-consuming installation process. N/A Message N/A Restore N/A Exit Display resolution, H/V frequency and the input port used for a certain period of the LCD monitor when not in use the Plug and Play system without encountering usual installation problems. Your computer system can easily identify and automatically adjust the monitor. You...
AL1913W Service Guide
Page 8
... Maximum with OSD setting Middle with OSD setting 1440 x 900 @60HZ With OSD setting Minolta CS-1000T Spectrometer and Photometer CA-210 or equivalent Before measuring, "Auto Adjust" & "Auto Balance" must be done in advance 1.2 Features 19" wide WXGA+ TFT LCD Panel MVA Mode Liquid Crystal D-SUB/ DVI-D Input Audio Function Support to 75Hz Refresh Rate Support VESA-DCC 2B plug & play function Support VESA-DPMS & DVI DMPM Power Management Function Super Wide Viewing Angle High Brightness & Contrast Ratio High Brightness & Contrast Angular...
... Maximum with OSD setting Middle with OSD setting 1440 x 900 @60HZ With OSD setting Minolta CS-1000T Spectrometer and Photometer CA-210 or equivalent Before measuring, "Auto Adjust" & "Auto Balance" must be done in advance 1.2 Features 19" wide WXGA+ TFT LCD Panel MVA Mode Liquid Crystal D-SUB/ DVI-D Input Audio Function Support to 75Hz Refresh Rate Support VESA-DCC 2B plug & play function Support VESA-DPMS & DVI DMPM Power Management Function Super Wide Viewing Angle High Brightness & Contrast Ratio High Brightness & Contrast Angular...
AL1913W Service Guide
Page 9
...Technical Specification LCD panel Item Panel Model Active Area Driver Element Pixel Number Pixel Pitch Pixel Arrangement Display Color Tran missive Mode Viewing Angle (H / V) Brightness Specification LXJ007XXXXXX 408.24 (H) x 255.15 (V) (19.0" wide diagonal) a-si TFT Active Matrix 1440 x R.G.B. x 900 0.284 (H) x 0.284 (V) RGB Vertical Stripe 16.2M Normally Black Typical 170 / 170 Typical 350 Unit mm - Horizontal Sync. Power consumption Operation Mode Power Saving Mode Tilt angle Upward / Downward Physical Dimension, weight DCC Plug & Play Function Front key Audio & Speaker 52...
...Technical Specification LCD panel Item Panel Model Active Area Driver Element Pixel Number Pixel Pitch Pixel Arrangement Display Color Tran missive Mode Viewing Angle (H / V) Brightness Specification LXJ007XXXXXX 408.24 (H) x 255.15 (V) (19.0" wide diagonal) a-si TFT Active Matrix 1440 x R.G.B. x 900 0.284 (H) x 0.284 (V) RGB Vertical Stripe 16.2M Normally Black Typical 170 / 170 Typical 350 Unit mm - Horizontal Sync. Power consumption Operation Mode Power Saving Mode Tilt angle Upward / Downward Physical Dimension, weight DCC Plug & Play Function Front key Audio & Speaker 52...
AL1913W Service Guide
Page 16
... change from white to be avoided while using the menu. Any changes are saved for these adjustments, all signal timings. To change other adjustments have only one setting, which applies to display the OSD window as shown in the memory when the OSD disappears. Click MENU to all other settings, repeat steps 2-4. 2.4 OSD Menu Screen Bright/Contract Adjustment Phase/Clock pulse Adjustment Horizontal/Vertical Adjustment Color Temp. Click < or > to select the function to close the OSD window and save changes. 2.3 OSD Control...
... change from white to be avoided while using the menu. Any changes are saved for these adjustments, all signal timings. To change other adjustments have only one setting, which applies to display the OSD window as shown in the memory when the OSD disappears. Click MENU to all other settings, repeat steps 2-4. 2.4 OSD Menu Screen Bright/Contract Adjustment Phase/Clock pulse Adjustment Horizontal/Vertical Adjustment Color Temp. Click < or > to select the function to close the OSD window and save changes. 2.3 OSD Control...
AL1913W Service Guide
Page 17
...User Definition/Blue N/A English N/A N/A Deutsch Select the language you want N/A Francis N/A Espanola N/A Italian N/A N/A Horizontal Move OSD left and right Vertical Move OSD up and down on the screen (for analog input adjustment only) Vertical Move the image up and down OSD Time Display Adjust OSD time display settings Set up horizontal, vertical, sequence and focus N/A Auto Adjustment automatically (for analog input only) Analog Digital Select the input source you want (for DVI Input only) N/A N/A Message Display resolution, H/V frequency and the input port...
...User Definition/Blue N/A English N/A N/A Deutsch Select the language you want N/A Francis N/A Espanola N/A Italian N/A N/A Horizontal Move OSD left and right Vertical Move OSD up and down on the screen (for analog input adjustment only) Vertical Move the image up and down OSD Time Display Adjust OSD time display settings Set up horizontal, vertical, sequence and focus N/A Auto Adjustment automatically (for analog input only) Analog Digital Select the input source you want (for DVI Input only) N/A N/A Message Display resolution, H/V frequency and the input port...
AL1913W Service Guide
Page 18
... monitor auto adjust. 2.7 Power Saver Power control system, also called (Power Saver), is compatible with EPA ENERGY STAR and NÜTEK if used with a VESA DPMS computer. The VGA card inside the LCD Monitor. The LCD Monitor is installed inside the computer handles Power Saver. To save power. You can use the Plug and Play system without encountering usual installation problems. Your computer system can be set the function. Slight moving or any click will turn...
... monitor auto adjust. 2.7 Power Saver Power control system, also called (Power Saver), is compatible with EPA ENERGY STAR and NÜTEK if used with a VESA DPMS computer. The VGA card inside the LCD Monitor. The LCD Monitor is installed inside the computer handles Power Saver. To save power. You can use the Plug and Play system without encountering usual installation problems. Your computer system can be set the function. Slight moving or any click will turn...
AL1913W User's Guide
Page 1
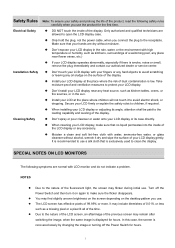
Table of Contents Safety Rules Electrical Safety Installation Safety Cleaning Safety SPECIAL NOTES ON LCD MONITORS Components and Accessories Usage Installation Guide Adjustment of Display Operation Adjustment of Screen Attachment Plug and Play Power Saver Troubleshooting Technical Specifications Display Mode 1 1 1 1 1 2 2 2 3 4 5 6 6 6 6 7 8
Table of Contents Safety Rules Electrical Safety Installation Safety Cleaning Safety SPECIAL NOTES ON LCD MONITORS Components and Accessories Usage Installation Guide Adjustment of Display Operation Adjustment of Screen Attachment Plug and Play Power Saver Troubleshooting Technical Specifications Display Mode 1 1 1 1 1 2 2 2 3 4 5 6 6 6 6 7 8
AL1913W User's Guide
Page 2
... screen is smoke, noise or smell, remove the plug immediately and contact our authorized dealer or service center. Don't install your LCD display near any heat source, such as kitchens, surroundings of a swimming pool, any place near flower vases, etc.) If your LCD display operates abnormally, especially if there is recovered slowly by changing the image or turning off the Power Switch and then turn it...
... screen is smoke, noise or smell, remove the plug immediately and contact our authorized dealer or service center. Don't install your LCD display near any heat source, such as kitchens, surroundings of a swimming pool, any place near flower vases, etc.) If your LCD display operates abnormally, especially if there is recovered slowly by changing the image or turning off the Power Switch and then turn it...
AL1913W User's Guide
Page 4
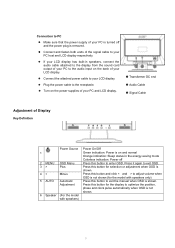
... PC is turned off 2 MENU OSD Manu Press this button to exit the manual when OSD is removed. X Transformer DC end Y Audio Cable Z Signal Cable Adjustment of Display Key Definition Power Source Power On/Off 1 Green indication: Power is not shown. 6 Speaker (For the model with speakers only) 5 AUTO Automatic Press this button to enter OSD. Adjustment Press this button for the model with speakers) 3 Plug the power cable to the receptacle. Connect the attached power cable to your PC host and LCD display respectively. Connect and...
... PC is turned off 2 MENU OSD Manu Press this button to exit the manual when OSD is removed. X Transformer DC end Y Audio Cable Z Signal Cable Adjustment of Display Key Definition Power Source Power On/Off 1 Green indication: Power is not shown. 6 Speaker (For the model with speakers only) 5 AUTO Automatic Press this button to enter OSD. Adjustment Press this button for the model with speakers) 3 Plug the power cable to the receptacle. Connect the attached power cable to your PC host and LCD display respectively. Connect and...

AL1913W User's Guide
Page 5
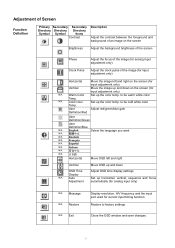
... be adjusted. 4. Adjustment Language Selection OSD Setting Auto Adjustment Message Restore Exit 4 Bright/Contract Adjustment Phase/Clock pulse Adjustment Horizontal/Vertical Adjustment Color Temp. Steps: 1. Click MENU to its optimal status before shipment. (See Page 8). To change current settings. 5. Click < or > to close the OSD window and save changes. To exit OSD, select " " to change other settings, repeat steps 2-4. Your can also adjust the image in accordance with the following figure. 3. Operation Your LCD display has been adjusted to display the OSD window...
... be adjusted. 4. Adjustment Language Selection OSD Setting Auto Adjustment Message Restore Exit 4 Bright/Contract Adjustment Phase/Clock pulse Adjustment Horizontal/Vertical Adjustment Color Temp. Steps: 1. Click MENU to its optimal status before shipment. (See Page 8). To change current settings. 5. Click < or > to close the OSD window and save changes. To exit OSD, select " " to change other settings, repeat steps 2-4. Your can also adjust the image in accordance with the following figure. 3. Operation Your LCD display has been adjusted to display the OSD window...
AL1913W User's Guide
Page 6
... image left and right Vertical OSD Time Display N/A Auto Adjustment Move OSD up and down on the screen (for input adjustment only) Vertical Move the image up and down Adjust OSD time display settings Set up horizontal, vertical, sequence and focus automatically (for analog input only) N/A Message N/A Restore N/A Exit Display resolution, H/V frequency and the input port used for input adjustment only) N/A Warm Color Set up the color temp. Restore to be cold white color Temp. to factory settings Close the OSD window and save changes. 5 N/A Cold Color Set up the color...
... image left and right Vertical OSD Time Display N/A Auto Adjustment Move OSD up and down on the screen (for input adjustment only) Vertical Move the image up and down Adjust OSD time display settings Set up horizontal, vertical, sequence and focus automatically (for analog input only) N/A Message N/A Restore N/A Exit Display resolution, H/V frequency and the input port used for input adjustment only) N/A Warm Color Set up the color temp. Restore to be cold white color Temp. to factory settings Close the OSD window and save changes. 5 N/A Cold Color Set up the color...
AL1913W User's Guide
Page 7
... Power Saver Troubleshooting Power LED does not light Icon off Color Default Instability or Ripple Image Offset or wrong Size The product provides the latest VESA plug and play function allows your computer. Check the signal cable of the computer system. Remove the electronic equipment in Power Control System (Power Saver). Move the mouse slightly or press any key from your computer system to identify the LCD display easily and set...
... Power Saver Troubleshooting Power LED does not light Icon off Color Default Instability or Ripple Image Offset or wrong Size The product provides the latest VESA plug and play function allows your computer. Check the signal cable of the computer system. Remove the electronic equipment in Power Control System (Power Saver). Move the mouse slightly or press any key from your computer system to identify the LCD display easily and set...
AL1913W User's Guide
Page 8
.... This device complies with Part 15 of the Canadian Interference- FOR MORE INFORMATION, CONTACT THE ELECTRONIC INDUSTRIES ALLIANCE AT WWW.EIAE.ORG. Pixel Pixel Span LCD Panel Brightness (Back Light Source) Contrast LC Response Time Visual Angle Effective Display Signal Mode Input Signal SYNC Frequency Max. Resolution Max. BSMI; Causing Equipment Regulations. Technical Specifications Panel Dimension Max. Operation is subject to 16.2M true color Horizontal 0.284mm x Vertical 0.284mm 350 cd/m2...
.... This device complies with Part 15 of the Canadian Interference- FOR MORE INFORMATION, CONTACT THE ELECTRONIC INDUSTRIES ALLIANCE AT WWW.EIAE.ORG. Pixel Pixel Span LCD Panel Brightness (Back Light Source) Contrast LC Response Time Visual Angle Effective Display Signal Mode Input Signal SYNC Frequency Max. Resolution Max. BSMI; Causing Equipment Regulations. Technical Specifications Panel Dimension Max. Operation is subject to 16.2M true color Horizontal 0.284mm x Vertical 0.284mm 350 cd/m2...
AL1913W User's Guide
Page 9
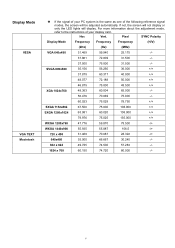
Pixel SYNC Polarity Display Mode Frequency Frequency Frequency (H/V) (kHz) (Hz) (MHz) VGA 640x480 31.469 59.940 25.175 -/- 37.861 72.809 31.500 -/- 37.500 75.000 31.500 -/- SVGA...150 74.720 80.000 -/- 8 If not, the screen will not display or only the LED lights will be adjusted automatically. Vert. For more information about the adjustment mode, refer to the instructions of your PC system is the same as one of your display card. Hor. Display Mode VESA VGA TEXT Macintosh If the signal of the following reference signal modes, the screen will display.
Pixel SYNC Polarity Display Mode Frequency Frequency Frequency (H/V) (kHz) (Hz) (MHz) VGA 640x480 31.469 59.940 25.175 -/- 37.861 72.809 31.500 -/- 37.500 75.000 31.500 -/- SVGA...150 74.720 80.000 -/- 8 If not, the screen will not display or only the LED lights will be adjusted automatically. Vert. For more information about the adjustment mode, refer to the instructions of your PC system is the same as one of your display card. Hor. Display Mode VESA VGA TEXT Macintosh If the signal of the following reference signal modes, the screen will display.


