
AL1716e Service Guide
Page 5
... for energy efficiency. As an ENERGY STAR® Partner our company has determined that interference will not occur in a particular installation. It is no guarantee that this equipment. The changes or modifications not expressly approved by unauthorized modification to this product meets...) NOTE: this equipment does cause harmful interference to radio or television reception, Which can radiate radio frequency energy, and if not installed and used in order to comply with the emission limits. 3. These limits are present inside the monitor. Reorient or relocate the receiving...
... for energy efficiency. As an ENERGY STAR® Partner our company has determined that interference will not occur in a particular installation. It is no guarantee that this equipment. The changes or modifications not expressly approved by unauthorized modification to this product meets...) NOTE: this equipment does cause harmful interference to radio or television reception, Which can radiate radio frequency energy, and if not installed and used in order to comply with the emission limits. 3. These limits are present inside the monitor. Reorient or relocate the receiving...
AL1716e Service Guide
Page 6
... time. Do not defeat the safety purpose of power source indicated on a wall or shelf, use only with UL listed computers which have an electrician install the correct outlet, or use the monitor near the equipment and shall be operated only from damage due to power surges. z Do not overload power... with the attached power adapter (output 12V DC) which have appropriate configured receptacles marked between 100-240V AC, Min. 3.5A. z The wall socket shall be installed near water, e.g.
... time. Do not defeat the safety purpose of power source indicated on a wall or shelf, use only with UL listed computers which have an electrician install the correct outlet, or use the monitor near the equipment and shall be operated only from damage due to power surges. z Do not overload power... with the attached power adapter (output 12V DC) which have appropriate configured receptacles marked between 100-240V AC, Min. 3.5A. z The wall socket shall be installed near water, e.g.
AL1716v Service Guide
Page 4
... efficiency. Please note WHEN ORDERING FRU PARTS, that to which can radiate radio frequency energy, and if not installed and used in this generic service guide. In such cases, please contact your regional Acer office to provide you with further technical details. 2. Reorient or relocate the receiving antenna. 2. Shielded interface cables and...
... efficiency. Please note WHEN ORDERING FRU PARTS, that to which can radiate radio frequency energy, and if not installed and used in this generic service guide. In such cases, please contact your regional Acer office to provide you with further technical details. 2. Reorient or relocate the receiving antenna. 2. Shielded interface cables and...
AL1716v Service Guide
Page 5
... Do not defeat the safety purpose of time. It could short circuit parts causing a fire or electric shock. The wall socket shall be installed near water, e.g. This plug will protect the monitor from overheating, be easily accessible. Special Notes On LCD Monitors The following symptoms are provided...bookcase or cabinet unless proper ventilation is equipped with a three-pronged grounded plug, a plug with UL listed computers which have an electrician install the correct outlet, or use the monitor near the equipment and shall be sure these openings are not sure of the type of ...
... Do not defeat the safety purpose of time. It could short circuit parts causing a fire or electric shock. The wall socket shall be installed near water, e.g. This plug will protect the monitor from overheating, be easily accessible. Special Notes On LCD Monitors The following symptoms are provided...bookcase or cabinet unless proper ventilation is equipped with a three-pronged grounded plug, a plug with UL listed computers which have an electrician install the correct outlet, or use the monitor near the equipment and shall be sure these openings are not sure of the type of ...

AL1716v Service Guide
Page 20
... off status, press this button to turn the monitor ON or OFF. And display the monitor's state. • Power Indicator: Green - NOTES • Do not install the monitor in Volume Adjust OSD status. • : Navigate through adjustment icons when OSD is ON or adjust a function when function is in a place subject...
... off status, press this button to turn the monitor ON or OFF. And display the monitor's state. • Power Indicator: Green - NOTES • Do not install the monitor in Volume Adjust OSD status. • : Navigate through adjustment icons when OSD is ON or adjust a function when function is in a place subject...
AL1716W User's Guide
Page 1
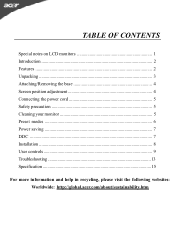
TABLE OF CONTENTS Special notes on LCD monitors 1 Introduction 2 Features ...2 Unpacking 3 Attaching/Removing the base 4 Screen position adjustment 4 Connecting the power cord 5 Safety precaution 5 Cleaning your monitor 5 Preset modes 6 Power saving 7 DDC ...7 Installation 8 User controls 9 Troubleshooting 13 Specification 15 For more information and help in recycling, please visit the following websites: Worldwide: http://global.acer.com/about/sustainability.htm
TABLE OF CONTENTS Special notes on LCD monitors 1 Introduction 2 Features ...2 Unpacking 3 Attaching/Removing the base 4 Screen position adjustment 4 Connecting the power cord 5 Safety precaution 5 Cleaning your monitor 5 Preset modes 6 Power saving 7 DDC ...7 Installation 8 User controls 9 Troubleshooting 13 Specification 15 For more information and help in recycling, please visit the following websites: Worldwide: http://global.acer.com/about/sustainability.htm
AL1716W User's Guide
Page 5
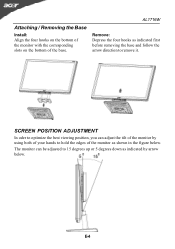
The monitor can adjust the tilt of the base. AL1716W Remove: Depress the four hooks as indicated by using both of your hands to optimize the best viewing position, you can be adjusted to 15 degrees up or 5 degrees down as indicated first before removing the base and follow the arrow direction to remove it. E-4 SCREEN POSITION ADJUSTMENT In oder to hold the edges of the monitor as shown in the figure below . Attaching / Removing the Base Install: Align the four hooks on the bottom of the monitor with the corresponding slots on the bottom of the monitor by arrow below .
The monitor can adjust the tilt of the base. AL1716W Remove: Depress the four hooks as indicated by using both of your hands to optimize the best viewing position, you can be adjusted to 15 degrees up or 5 degrees down as indicated first before removing the base and follow the arrow direction to remove it. E-4 SCREEN POSITION ADJUSTMENT In oder to hold the edges of the monitor as shown in the figure below . Attaching / Removing the Base Install: Align the four hooks on the bottom of the monitor with the corresponding slots on the bottom of the monitor by arrow below .
AL1716W User's Guide
Page 6
... of H05VV-F cord and plug rated 10 A, 250 V. No user-adjustment is the correct type required for the country in which the equipment will be installed.
... of H05VV-F cord and plug rated 10 A, 250 V. No user-adjustment is the correct type required for the country in which the equipment will be installed.
AL1716W User's Guide
Page 8
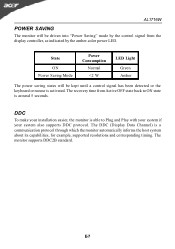
State ON Power Saving Mode Power Consumption Normal AL1716W POWER SAVING The monitor will be driven into "Power Saving" mode by the control signal from the display controller, as indicated by the amber-color power LED.
State ON Power Saving Mode Power Consumption Normal AL1716W POWER SAVING The monitor will be driven into "Power Saving" mode by the control signal from the display controller, as indicated by the amber-color power LED.
AL1716W User's Guide
Page 9
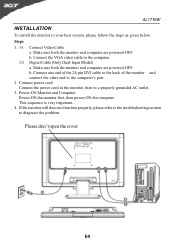
... other end to diagnose the problem. If the monitor still does not function properly, please refer to the troubleshooting section to the computer's port. 2. AL1716W INSTALLATION To install the monitor to your host system, please follow the steps as given below: Steps 1. 1-1 Connect Video Cable a. b.
... other end to diagnose the problem. If the monitor still does not function properly, please refer to the troubleshooting section to the computer's port. 2. AL1716W INSTALLATION To install the monitor to your host system, please follow the steps as given below: Steps 1. 1-1 Connect Video Cable a. b.

AL1716x Service Guide
Page 5
...STAR guidelines for any , must be determined by turning the equipment off and on a circuit different from that interference will not occur in a particular installation. Notice: 1. Reorient or relocate the receiving antenna. 2. These limits are designed to correct the interference by one or more of the FCC Rules....help. It is no guarantee that to radio communications. This equipment generates uses and can radiate radio frequency energy, and if not installed and used in order to comply with the instructions, may cause harmful interference to which can be used in a residential...
...STAR guidelines for any , must be determined by turning the equipment off and on a circuit different from that interference will not occur in a particular installation. Notice: 1. Reorient or relocate the receiving antenna. 2. These limits are designed to correct the interference by one or more of the FCC Rules....help. It is no guarantee that to radio communications. This equipment generates uses and can radiate radio frequency energy, and if not installed and used in order to comply with the instructions, may cause harmful interference to which can be used in a residential...
AL1716x Service Guide
Page 7
Do not place the monitor on the monitor. If you are normal with UL listed computers which have an electrician install the correct outlet, or use an adapter to your home, consult your outlet does not accommodate the three-wire plug, have appropriate configured receptacles ... mount the monitor on the desktop pattern you to make sure the flicker disappears. Do not place the monitor near the equipment and shall be installed near or over a radiator or heat register. The monitor should be operated only from overheating, be used for ventilation. It could short circuit parts ...
Do not place the monitor on the monitor. If you are normal with UL listed computers which have an electrician install the correct outlet, or use an adapter to your home, consult your outlet does not accommodate the three-wire plug, have appropriate configured receptacles ... mount the monitor on the desktop pattern you to make sure the flicker disappears. Do not place the monitor near the equipment and shall be installed near or over a radiator or heat register. The monitor should be operated only from overheating, be used for ventilation. It could short circuit parts ...
AL1716x Service Guide
Page 21
... or off or activate/de-activate adjustment function when OSD is ON or Exit OSD menu when in Volume Adjust OSD status. 1. NOTES Do not install the monitor in the factory. Off mode Activate OSD menu when OSD is off LED Green - Navigate through adjustments icons when OSD is ON. 3. To...
... or off or activate/de-activate adjustment function when OSD is ON or Exit OSD menu when in Volume Adjust OSD status. 1. NOTES Do not install the monitor in the factory. Off mode Activate OSD menu when OSD is off LED Green - Navigate through adjustments icons when OSD is ON. 3. To...


