Aspire 5335 / 5735 / 5735Z User's Guide EN
Page 3
... you use Adobe Reader, access the Help and Support menu. It covers basic topics such as the AcerSystem User Guide mentioned below will run the Adobe Reader setup program first. Follow these steps to access it contains warranty information and the general regulations and safety notices for meeting your mobile computing needs. For instructions on how to use your Acer notebook, we have designed a set of your new...
... you use Adobe Reader, access the Help and Support menu. It covers basic topics such as the AcerSystem User Guide mentioned below will run the Adobe Reader setup program first. Follow these steps to access it contains warranty information and the general regulations and safety notices for meeting your mobile computing needs. For instructions on how to use your Acer notebook, we have designed a set of your new...

Service Guide
Page 7
... Using the System Utilities 24 Acer GridVista (dual-display compatible 24 Hardware Specifications and Configurations 26 System Utilities 33 BIOS Setup Utility 33 Navigating the BIOS Utility 34 Information 35 Main 36 Security 38 Boot 42 Exit 43 BIOS Flash Utility 44 Remove HDD/BIOS Utility 45 Machine Disassembly and Replacement 47 Disassembly Requirements 47 General Information 48 Pre-disassembly Instructions 48 Disassembly Process 48 External Module Disassembly Process 49 External Modules Disassembly Flowchart 49 Removing the Battery Pack 50 Removing the SD dummy card...
... Using the System Utilities 24 Acer GridVista (dual-display compatible 24 Hardware Specifications and Configurations 26 System Utilities 33 BIOS Setup Utility 33 Navigating the BIOS Utility 34 Information 35 Main 36 Security 38 Boot 42 Exit 43 BIOS Flash Utility 44 Remove HDD/BIOS Utility 45 Machine Disassembly and Replacement 47 Disassembly Requirements 47 General Information 48 Pre-disassembly Instructions 48 Disassembly Process 48 External Module Disassembly Process 49 External Modules Disassembly Flowchart 49 Removing the Battery Pack 50 Removing the SD dummy card...

Service Guide
Page 8
... Symptom-to-FRU Error Message 111 Intermittent Problems 115 Undetermined Problems 116 Jumper and Connector Locations 117 Top and Bottom View 117 Clearing Password Check and BIOS Recovery 119 Clearing Password Check 119 BIOS Recovery by Crisis Disk 120 FRU (Field Replaceable Unit) List 121 Aspire 5735/5735Z/5335 Series Exploded Diagram 122 Model Definition and Configuration 130 Aspire 5735/5735Z/5335 Series 130 Test Compatible Components 155 Microsoft® Windows® Vista Environment Test 156...
... Symptom-to-FRU Error Message 111 Intermittent Problems 115 Undetermined Problems 116 Jumper and Connector Locations 117 Top and Bottom View 117 Clearing Password Check and BIOS Recovery 119 Clearing Password Check 119 BIOS Recovery by Crisis Disk 120 FRU (Field Replaceable Unit) List 121 Aspire 5735/5735Z/5335 Series Exploded Diagram 122 Model Definition and Configuration 130 Aspire 5735/5735Z/5335 Series 130 Test Compatible Components 155 Microsoft® Windows® Vista Environment Test 156...

Service Guide
Page 16
...-out jack with S/PDIF support 5-in jack Connect to audio line-out devices (e.g., speakers, headphones). accepts CDs or DVDs. Optical drive eject button Ejects the optical disk from external microphones. USB 2.0 ports Microphone-in -1 card reader Connects to USB 2.0 devices (e.g., USB mouse, USB camera) (only for certain models). Optical disk access indicator Lights up when the optical drive is active. Accepts input from the drive. ExpressCard/54 slot Accepts one ExpressCard/54 module. 1 2 3 6 Icon Item Description Optical drive Internal optical drive; Left...
...-out jack with S/PDIF support 5-in jack Connect to audio line-out devices (e.g., speakers, headphones). accepts CDs or DVDs. Optical drive eject button Ejects the optical disk from external microphones. USB 2.0 ports Microphone-in -1 card reader Connects to USB 2.0 devices (e.g., USB mouse, USB camera) (only for certain models). Optical disk access indicator Lights up when the optical drive is active. Accepts input from the drive. ExpressCard/54 slot Accepts one ExpressCard/54 module. 1 2 3 6 Icon Item Description Optical drive Internal optical drive; Left...

Service Guide
Page 19
... Technology. Decreases the sound volume. Icon VOL+ VOL- Icon Function Description HDD Indicates when the hard disk drive is closed. Num Lock Caps Lock Power Battery Lights up when Num Lock is activated. Lights up Volume down Bluetooth communication button/indicator (manufacturing option) Acer Empowering Technology Description Enables/disables the wireless function. Charging: The light shows amber when the battery is charging. 2. They are pre-set the Web browser, mail and programmable buttons, run the Acer Launch Manager.You can be reset by clicking on...
... Technology. Decreases the sound volume. Icon VOL+ VOL- Icon Function Description HDD Indicates when the hard disk drive is closed. Num Lock Caps Lock Power Battery Lights up when Num Lock is activated. Lights up Volume down Bluetooth communication button/indicator (manufacturing option) Acer Empowering Technology Description Enables/disables the wireless function. Charging: The light shows amber when the battery is charging. 2. They are pre-set the Web browser, mail and programmable buttons, run the Acer Launch Manager.You can be reset by clicking on...

Service Guide
Page 23
... Acer ePower Management in Acer Empowering Technology. Press any key to access most of the computer's controls like screen brightness, volume output and the BIOS utility. Turns the speakers on and off to save power. Increases the screen brightness. Decreases the sound volume (only for certain models). Turns the display screen backlight off . Chapter 1 13 Switches display output between the display screen, external monitor (if connected) and both. Hot Keys The computer employs hotkeys or key combinations to return. Launches Acer eSettings in Acer...
... Acer ePower Management in Acer Empowering Technology. Press any key to access most of the computer's controls like screen brightness, volume output and the BIOS utility. Turns the speakers on and off to save power. Increases the screen brightness. Decreases the sound volume (only for certain models). Turns the display screen backlight off . Chapter 1 13 Switches display output between the display screen, external monitor (if connected) and both. Hot Keys The computer employs hotkeys or key combinations to return. Launches Acer eSettings in Acer...

Service Guide
Page 28
... first. 1. You can revert to use. 5. The quick menu appears. Select the power plan you can create, switch between power plans by launching the Acer ePower Management application. To edit a power plan: Editing a power plan allows you want your new power plan. 3. If you to adjust system settings like LCD brightness, CPU speed and Graphics power mode (only for your computer to the default settings of power options. 1. The active power plan will mark with three...
... first. 1. You can revert to use. 5. The quick menu appears. Select the power plan you can create, switch between power plans by launching the Acer ePower Management application. To edit a power plan: Editing a power plan allows you want your new power plan. 3. If you to adjust system settings like LCD brightness, CPU speed and Graphics power mode (only for your computer to the default settings of power options. 1. The active power plan will mark with three...
Service Guide
Page 29
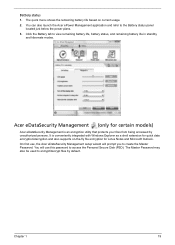
... certain models) Acer eDataSecurity Management is conveniently integrated with Windows Explorer as a shell extension for quick data encryption/decryption and also supports on current usage. 2. Acer eDataSecurity Management (only for Lotus Notes and Microsoft Outlook. On first use, the Acer eDataSecurity Management setup wizard will use this password to the Battery status panel located just below the power plans. 3. The Master Password may also be used to create the Master Password. You...
... certain models) Acer eDataSecurity Management is conveniently integrated with Windows Explorer as a shell extension for quick data encryption/decryption and also supports on current usage. 2. Acer eDataSecurity Management (only for Lotus Notes and Microsoft Outlook. On first use, the Acer eDataSecurity Management setup wizard will use this password to the Battery status panel located just below the power plans. 3. The Master Password may also be used to create the Master Password. You...
Service Guide
Page 36
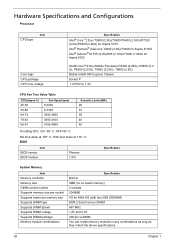
H/W shot down at 110° .C BIOS Item BIOS vendor BIOS Version Phoenix 1.04c Specification System Memory Item Memory controller Memory size DIMM socket number Supports memory size per socket Supports maximum memory size Supports DIMM type Supports DIMM Speed Supports DIMM voltage Supports DIMM package Memory module combinations Specification Built-in 0MB (no on-board memory) 2 sockets 2048MB 4G for Aspire 5335 Intel® Core™2 Duo Mobile Processor P8400 (2.26G), P8600 (2.4 G), P9500 (2.53G), T9400 (2.53G...
H/W shot down at 110° .C BIOS Item BIOS vendor BIOS Version Phoenix 1.04c Specification System Memory Item Memory controller Memory size DIMM socket number Supports memory size per socket Supports maximum memory size Supports DIMM type Supports DIMM Speed Supports DIMM voltage Supports DIMM package Memory module combinations Specification Built-in 0MB (no on-board memory) 2 sockets 2048MB 4G for Aspire 5335 Intel® Core™2 Duo Mobile Processor P8400 (2.26G), P8600 (2.4 G), P9500 (2.53G), T9400 (2.53G...

Service Guide
Page 45
... XXXXXXXXXXXXXXXXXXXXXXX None Aspire 5730 Acer XXXxXxXX-xXxX-XXxx-xXXx-xXXxXXxXxxXX F1 Help Esc Exit Select Item -/+ Change Values F9 Setup Defaults Select Menu Enter Select Sub-Menu F10 Save and Exit NOTE: The system information is an identifier standard used in the system. This field displays the serial number of this system. This field shows the keyboard This field displays the serial number of HDD installed on primary...
... XXXXXXXXXXXXXXXXXXXXXXX None Aspire 5730 Acer XXXxXxXX-xXxX-XXxx-xXXx-xXXxXXxXxxXX F1 Help Esc Exit Select Item -/+ Change Values F9 Setup Defaults Select Menu Enter Select Sub-Menu F10 Save and Exit NOTE: The system information is an identifier standard used in the system. This field displays the serial number of this system. This field shows the keyboard This field displays the serial number of HDD installed on primary...
Service Guide
Page 49
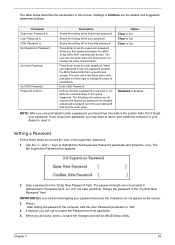
... screen. When set , this password protects the BIOS Setup Utility from unauthorized access. The following sub-options are the default and suggested parameter settings. Use the "w" and "y" keys to enable the Password on Boot Description Shows the setting of the Supervisor password Shows the setting of the hard disk password. Shows the setting of the user password. The user can opt to highlight the Set Supervisor Password parameter and press the e key. The Set Supervisor Password box appears: 2. Type a password in the "Enter New Password...
... screen. When set , this password protects the BIOS Setup Utility from unauthorized access. The following sub-options are the default and suggested parameter settings. Use the "w" and "y" keys to enable the Password on Boot Description Shows the setting of the Supervisor password Shows the setting of the hard disk password. Shows the setting of the user password. The user can opt to highlight the Set Supervisor Password parameter and press the e key. The Set Supervisor Password box appears: 2. Type a password in the "Enter New Password...

Service Guide
Page 50
... "Clear". 4. If the verification is complete after the user presses u. 40 Chapter 2 The password setting is OK, the screen will display as following. After setting the password, the computer sets the User Password parameter to save the changes and exit the BIOS Setup Utility. Type the current password in the Enter New Password field. Press e twice without typing anything in the Enter Current Password field and press e. 3. Type the current password in the Enter New Password and Confirm New Password...
... "Clear". 4. If the verification is complete after the user presses u. 40 Chapter 2 The password setting is OK, the screen will display as following. After setting the password, the computer sets the User Password parameter to save the changes and exit the BIOS Setup Utility. Type the current password in the Enter New Password field. Press e twice without typing anything in the Enter Current Password field and press e. 3. Type the current password in the Enter New Password and Confirm New Password...
Service Guide
Page 53
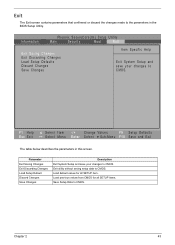
... Changes Description Exit System Setup and save your changes to CMOS. Chapter 2 43 Load previous values from CMOS for all SETUP items. Save Setup Data to CMOS. Exit utility without saving setup data to CMOS. F1 Help Esc Exit Select Item -/+ Change Values F9 Setup Defaults Select Menu Enter Select Sub-Menu F10 Save and Exit The table below describes the parameters in the BIOS Setup Utility. Exit The Exit screen...
... Changes Description Exit System Setup and save your changes to CMOS. Chapter 2 43 Load previous values from CMOS for all SETUP items. Save Setup Data to CMOS. Exit utility without saving setup data to CMOS. F1 Help Esc Exit Select Item -/+ Change Values F9 Setup Defaults Select Menu Enter Select Sub-Menu F10 Save and Exit The table below describes the parameters in the BIOS Setup Utility. Exit The Exit screen...
Service Guide
Page 113
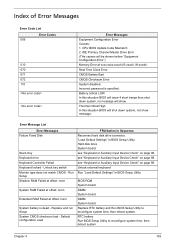
Unlock key switch Monitor type does not match CMOS - Hard disk drive System board see "Keyboard or Auxiliary Input Device Check" on page 98. Chapter 4 103 Error Message List Error Messages Failure Fixed Disk Stuck Key Keyboard error Keyboard Controller Failed Keyboard locked - Replace and run Setup System CMOS checksum bad - see "Keyboard or Auxiliary Input Device Check" on page 98. Incorrect password is dead - Thermal critical High In this situation BIOS will issue 4 short beeps then shut down system, not show...
Unlock key switch Monitor type does not match CMOS - Hard disk drive System board see "Keyboard or Auxiliary Input Device Check" on page 98. Chapter 4 103 Error Message List Error Messages Failure Fixed Disk Stuck Key Keyboard error Keyboard Controller Failed Keyboard locked - Replace and run Setup System CMOS checksum bad - see "Keyboard or Auxiliary Input Device Check" on page 98. Incorrect password is dead - Thermal critical High In this situation BIOS will issue 4 short beeps then shut down system, not show...

Service Guide
Page 117
... Load alternate registers with CMOS values Initialize interrupt vectors POST device initialization Check ROM copyright notice Check video configuration against CMOS Initialize PCI bus and devices Initialize all video adapters in system QuietBoot start (optional) Shadow video BIOS ROM Display BIOS copyright notice Display CPU type and speed Initialize EISA board Test keyboard Set key click if enabled Test for unexpected interrupts Initialize POST display service Display prompt "Press F2 to enter SETUP" Disable CPU cache Test RAM between 512 and 640...
... Load alternate registers with CMOS values Initialize interrupt vectors POST device initialization Check ROM copyright notice Check video configuration against CMOS Initialize PCI bus and devices Initialize all video adapters in system QuietBoot start (optional) Shadow video BIOS ROM Display BIOS copyright notice Display CPU type and speed Initialize EISA board Test keyboard Set key click if enabled Test for unexpected interrupts Initialize POST display service Display prompt "Press F2 to enter SETUP" Disable CPU cache Test RAM between 512 and 640...

Service Guide
Page 118
... I/O ports Configure Motherboard Configurable Devices (optional) Initialize BIOS Area Enable Non-Maskable Interrupts (NMIs) Initialize Extended BIOS Data Area Test and initialize PS/2 mouse Initialize floppy controller Determine number of day Check key lock Initialize Typematic rate Erase F2 prompt Scan for F2 key stroke Enter SETUP Clear Boot flag Check for option ROMs. One long, two short beeps on checksum failure. Check for SMART drive (optional) Shadow option ROMs Set up Power Management Initialize security engine (optional) Enable hardware interrupts...
... I/O ports Configure Motherboard Configurable Devices (optional) Initialize BIOS Area Enable Non-Maskable Interrupts (NMIs) Initialize Extended BIOS Data Area Test and initialize PS/2 mouse Initialize floppy controller Determine number of day Check key lock Initialize Typematic rate Erase F2 prompt Scan for F2 key stroke Enter SETUP Clear Boot flag Check for option ROMs. One long, two short beeps on checksum failure. Check for SMART drive (optional) Shadow option ROMs Set up Power Management Initialize security engine (optional) Enable hardware interrupts...

Service Guide
Page 121
... operation The system doesn't power-on. Battery pack Power adapter Hard drive & battery connection board System board Power source (battery pack and power adapter). Keyboard (if contrast and brightness function key doesn't work LCD is too dark LCD brightness cannot be adjusted LCD contrast cannot be adjusted Unreadable LCD screen Missing pels in Sequence Enter BIOS Utility to -FRU Error Message LCD-Related Symptoms Symptom / Error LCD backlight doesn't work ). LCD inverter ID LCD cable LCD inverter LCD System board Reconnect the LCD connector LCD inverter ID LCD cable LCD inverter LCD...
... operation The system doesn't power-on. Battery pack Power adapter Hard drive & battery connection board System board Power source (battery pack and power adapter). Keyboard (if contrast and brightness function key doesn't work LCD is too dark LCD brightness cannot be adjusted LCD contrast cannot be adjusted Unreadable LCD screen Missing pels in Sequence Enter BIOS Utility to -FRU Error Message LCD-Related Symptoms Symptom / Error LCD backlight doesn't work ). LCD inverter ID LCD cable LCD inverter LCD System board Reconnect the LCD connector LCD inverter ID LCD cable LCD inverter LCD...
Service Guide
Page 122
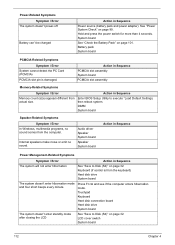
...) PCMCIA slot pin is from actual size. Audio driver Speaker System board Speaker System board Action in Sequence Power Management-Related Symptoms Symptom / Error Action in Sequence Power source (battery pack and power adapter). LCD cover switch System board 112 Chapter 4 Power-Related Symptoms Symptom / Error The system doesn't power-off. See "Power System Check" on page 101. Keyboard (if control is damaged. System board See "Check the Battery Pack" on page 99. Enter BIOS Setup Utility to Disk...
...) PCMCIA slot pin is from actual size. Audio driver Speaker System board Speaker System board Action in Sequence Power Management-Related Symptoms Symptom / Error Action in Sequence Power source (battery pack and power adapter). LCD cover switch System board 112 Chapter 4 Power-Related Symptoms Symptom / Error The system doesn't power-off. See "Power System Check" on page 101. Keyboard (if control is damaged. System board See "Check the Battery Pack" on page 99. Enter BIOS Setup Utility to Disk...

Service Guide
Page 123
.... Keyboard System board Chapter 4 113 Hard disk connection board Hard disk drive System board See "Save to execute "Load Default Settings", then reboot system. Reconnect hard disk/CD-ROM/diskette drives. Onboard Devices Configuration Run printer self-test. USB does not work correctly Print problems. Serial or parallel port device problems. Action in the "Onboard Devices Configuration" of BIOS Setup Utility is set to Disk (S4)" on page 32. Press Fn+F5, LCD/CRT/Both display switching System board System board Ensure the "Parallel Port" in Sequence Enter BIOS Setup Utility to Disk...
.... Keyboard System board Chapter 4 113 Hard disk connection board Hard disk drive System board See "Save to execute "Load Default Settings", then reboot system. Reconnect hard disk/CD-ROM/diskette drives. Onboard Devices Configuration Run printer self-test. USB does not work correctly Print problems. Serial or parallel port device problems. Action in the "Onboard Devices Configuration" of BIOS Setup Utility is set to Disk (S4)" on page 32. Press Fn+F5, LCD/CRT/Both display switching System board System board Ensure the "Parallel Port" in Sequence Enter BIOS Setup Utility to Disk...
Service Guide
Page 148
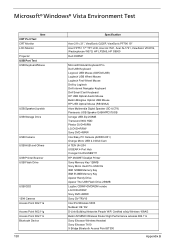
Microsoft® Windows® Vista Environment Test CRT Port Test CRT Monitor LCD Monitor Item Projector USB Port Test USB Keyboard/Mouse USB Speaker/Joystick USB Storage Drive USB Camera USB HUB and Others USB Printer/Scanner USB Flash Drive USB ODD 1394 Camera Access Point 802.11a Access Point 802.11g Access Point 802.11n Bluetooth Device 138 Specification Acer 211c 21", ViewSonic G220F, ViewSonic PF790 19" Acer FP751 17" TFT LCD, Acer AL1521, Acer AL1721, ViewSonic VD201b, Westinghouse W37G, HP LP2065, HP S9500...
Microsoft® Windows® Vista Environment Test CRT Port Test CRT Monitor LCD Monitor Item Projector USB Port Test USB Keyboard/Mouse USB Speaker/Joystick USB Storage Drive USB Camera USB HUB and Others USB Printer/Scanner USB Flash Drive USB ODD 1394 Camera Access Point 802.11a Access Point 802.11g Access Point 802.11n Bluetooth Device 138 Specification Acer 211c 21", ViewSonic G220F, ViewSonic PF790 19" Acer FP751 17" TFT LCD, Acer AL1521, Acer AL1721, ViewSonic VD201b, Westinghouse W37G, HP LP2065, HP S9500...


