
Intel Smart Response Installation Guide
Page 1
..., chose "Maximized" mode. 7. For the new version RST driver, please check our website for the latest information: http://www.asrock.com * Before you use RST function, you just need to set the UEFI option "SATA Mode" to use the full SSD as the Cache device, which HDD you wish to Accelerate, if...
..., chose "Maximized" mode. 7. For the new version RST driver, please check our website for the latest information: http://www.asrock.com * Before you use RST function, you just need to set the UEFI option "SATA Mode" to use the full SSD as the Cache device, which HDD you wish to Accelerate, if...

User Manual
Page 4
...; XP / XP 64-bit Without RAID Functions 57 2.22.2 Installing Windows® 7 / 7 64-bit / VistaTM / VistaTM 64-bit Without RAID Functions 58 3 UEFI SETUP UTILITY 59 3.1 Introduction 59 3.1.1 UEFI Menu Bar 59 3.1.2 Navigation Keys 60 3.2 Main Screen 60 3.3 OC Tweaker Screen 61 3.4 Advanced Screen 65 3.4.1 CPU Con guration 66 3.4.2 North Bridge Con...
...; XP / XP 64-bit Without RAID Functions 57 2.22.2 Installing Windows® 7 / 7 64-bit / VistaTM / VistaTM 64-bit Without RAID Functions 58 3 UEFI SETUP UTILITY 59 3.1 Introduction 59 3.1.1 UEFI Menu Bar 59 3.1.2 Navigation Keys 60 3.2 Main Screen 60 3.3 OC Tweaker Screen 61 3.4 Advanced Screen 65 3.4.1 CPU Con guration 66 3.4.2 North Bridge Con...
User Manual
Page 8
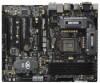
...Power FAN connector - 24 pin ATX power connector - 8 pin 12V power connector - Supports jumperfree - Drivers, Utilities, AntiVirus Software (Trial Version), CyberLink MediaEspresso 6.5 Trial, ASRock Software Suite (CyberLink DVD Suite - OEM) - Front panel audio connector - 3 x USB 2.0 headers (support 6 USB 2.0 ports) - 1 x USB 3.0 header ... header - 1 x COM port header - 1 x HDMI_SPDIF header - 1 x IEEE 1394 header - 1 x Power LED header - SLI/XFire power connector - AMI UEFI Legal BIOS with LED - 64Mb AMI BIOS - CPU Core, IGPU, DRAM, PCH, CPU PLL, VTT, VCCSA Voltage Multi-adjustment...
...Power FAN connector - 24 pin ATX power connector - 8 pin 12V power connector - Supports jumperfree - Drivers, Utilities, AntiVirus Software (Trial Version), CyberLink MediaEspresso 6.5 Trial, ASRock Software Suite (CyberLink DVD Suite - OEM) - Front panel audio connector - 3 x USB 2.0 headers (support 6 USB 2.0 ports) - 1 x USB 3.0 header ... header - 1 x COM port header - 1 x HDMI_SPDIF header - 1 x IEEE 1394 header - 1 x Power LED header - SLI/XFire power connector - AMI UEFI Legal BIOS with LED - 64Mb AMI BIOS - CPU Core, IGPU, DRAM, PCH, CPU PLL, VTT, VCCSA Voltage Multi-adjustment...

User Manual
Page 34
...refer to the following steps to set up a multi-monitor display. If you have installed the drivers already, there is no need to enter UEFI setup. Set up a surround display environment: 1. Click the "Identify" button to enable the function of "Onboard VGA Share Memory", [Auto...-click the display icon and select "Attached", if necessary. G. Install the PCI Express VGA cards on each monitor. If you do not adjust the UEFI setup, the default value of D-sub. A. C. Press or to install them again. 5. D. E. Enter "Onboard VGA Share Memory" option to adjust...
...refer to the following steps to set up a multi-monitor display. If you have installed the drivers already, there is no need to enter UEFI setup. Set up a surround display environment: 1. Click the "Identify" button to enable the function of "Onboard VGA Share Memory", [Auto...-click the display icon and select "Attached", if necessary. G. Install the PCI Express VGA cards on each monitor. If you do not adjust the UEFI setup, the default value of D-sub. A. C. Press or to install them again. 5. D. E. Enter "Onboard VGA Share Memory" option to adjust...

User Manual
Page 53
... system, please insert the support CD to your system. When you install can be auto-detected and listed on the support CD driver page. Enter UEFI SETUP UTILITY Advanced screen SATA Con guration. Formatting the floppy diskette will start to install those required drivers. B. The system will lose ALL data... want to generate Serial ATA driver diskette [YN]?", press . Start to [RAID]. E. A. Please follow below steps. A. During POST at the beginning of system boot-up UEFI.
... system, please insert the support CD to your system. When you install can be auto-detected and listed on the support CD driver page. Enter UEFI SETUP UTILITY Advanced screen SATA Con guration. Formatting the floppy diskette will start to install those required drivers. B. The system will lose ALL data... want to generate Serial ATA driver diskette [YN]?", press . Start to [RAID]. E. A. Please follow below steps. A. During POST at the beginning of system boot-up UEFI.
User Manual
Page 54
... / SATAII / SATA3 driver diskette containing the Intel® RAID driver. After reading the oppy disk, the driver will be seamlessly upgraded to set up system UEFI as step 2 of Windows setup, press F6 to the mode you choose and the OS you start to SATA Hard Disks Installation and RAID Con...
... / SATAII / SATA3 driver diskette containing the Intel® RAID driver. After reading the oppy disk, the driver will be seamlessly upgraded to set up system UEFI as step 2 of Windows setup, press F6 to the mode you choose and the OS you start to SATA Hard Disks Installation and RAID Con...

User Manual
Page 56
... you want to manage RAID functions, you are allowed to use "Intel Rapid Storage" in the Support CD for RAID con guration. STEP 1: Set up UEFI. Set the option "SATA Mode" to set RAID configuration. Before you start to con gure the RAID function, you need to check the... refer to the document in the Support CD, "Guide to use both "RAID Installation Guide" and "Intel Rapid Storage Information" for proper con guration. Enter UEFI SETUP UTILITY Advanced screen SATA Con guration. B.
... you want to manage RAID functions, you are allowed to use "Intel Rapid Storage" in the Support CD for RAID con guration. STEP 1: Set up UEFI. Set the option "SATA Mode" to set RAID configuration. Before you start to con gure the RAID function, you need to check the... refer to the document in the Support CD, "Guide to use both "RAID Installation Guide" and "Intel Rapid Storage Information" for proper con guration. Enter UEFI SETUP UTILITY Advanced screen SATA Con guration. B.

User Manual
Page 57
...you can start to install Windows® XP / XP 64-bit on your SATA / SATAII / SATA3 HDDs without RAID functions, please follow below steps. Enter UEFI SETUP UTILITY Advanced screen SATA Con guration. B. 2.22 Installing Windows® 7 / 7 64-bit / VistaTM / VistaTM 64-bit / XP / XP 64-... "Marvell SATA3 Operation Mode" to the mode you choose and the OS you install. Enter UEFI SETUP UTILITY Advanced screen SATA Con guration. Using SATA / SATAII / SATA3 HDDs without NCQ function STEP 1: Set Up UEFI. Please make a SATA / SATAII / SATA3 driver diskette by following section 2.21.1 step ...
...you can start to install Windows® XP / XP 64-bit on your SATA / SATAII / SATA3 HDDs without RAID functions, please follow below steps. Enter UEFI SETUP UTILITY Advanced screen SATA Con guration. B. 2.22 Installing Windows® 7 / 7 64-bit / VistaTM / VistaTM 64-bit / XP / XP 64-... "Marvell SATA3 Operation Mode" to the mode you choose and the OS you install. Enter UEFI SETUP UTILITY Advanced screen SATA Con guration. Using SATA / SATAII / SATA3 HDDs without NCQ function STEP 1: Set Up UEFI. Please make a SATA / SATAII / SATA3 driver diskette by following section 2.21.1 step ...

User Manual
Page 58
... 64-bit OS on your SATA / SATAII / SATA3 HDDs without NCQ function STEP 1: Set Up UEFI. Using SATA / SATAII / STA3 HDDs without RAID functions, please follow below steps. A. Enter UEFI SETUP UTILITY Advanced screen SATA Con guration. Enter UEFI SETUP UTILITY Advanced screen SATA Con guration. 2.22.2 Installing Windows® 7 / 7 64-bit / VistaTM... 2: Install Windows® 7 / 7 64-bit / VistaTM / VistaTM 64-bit OS on your system. 58 B. A. Using SATA / SATAII / SATA3 HDDs with NCQ function STEP 1: Set Up UEFI.
... 64-bit OS on your SATA / SATAII / SATA3 HDDs without NCQ function STEP 1: Set Up UEFI. Using SATA / SATAII / STA3 HDDs without RAID functions, please follow below steps. A. Enter UEFI SETUP UTILITY Advanced screen SATA Con guration. Enter UEFI SETUP UTILITY Advanced screen SATA Con guration. 2.22.2 Installing Windows® 7 / 7 64-bit / VistaTM... 2: Install Windows® 7 / 7 64-bit / VistaTM / VistaTM 64-bit OS on your system. 58 B. A. Using SATA / SATAII / SATA3 HDDs with NCQ function STEP 1: Set Up UEFI.

User Manual
Page 59
... to use the mouse to click your required item. 59 If you start up the security features Exit To exit the current screen or the UEFI SETUP UTILITY Use < > key or < > key to choose among the selections on the menu bar, and then press to locate and load the Operating ... after POST, restart the system by pressing + + , or by turning the system off and then back on the motherboard stores the UEFI SETUP UTILITY. Because the UEFI software is constantly being updated, the following selections: Main To set up the system time/date information OC Tweaker To set up overclocking features...
... to use the mouse to click your required item. 59 If you start up the security features Exit To exit the current screen or the UEFI SETUP UTILITY Use < > key or < > key to choose among the selections on the menu bar, and then press to locate and load the Operating ... after POST, restart the system by pressing + + , or by turning the system off and then back on the motherboard stores the UEFI SETUP UTILITY. Because the UEFI software is constantly being updated, the following selections: Main To set up the system time/date information OC Tweaker To set up overclocking features...

User Manual
Page 60
... UTILITY To jump to the Exit Screen or exit the current screen 3.2 Main Screen When you enter the UEFI SETUP UTILITY, the Main screen will appear and display the system overview. 60 Navigation Key(s) Function Description / / + / Moves cursor left or right to select Screens ...
... UTILITY To jump to the Exit Screen or exit the current screen 3.2 Main Screen When you enter the UEFI SETUP UTILITY, the Main screen will appear and display the system overview. 60 Navigation Key(s) Function Description / / + / Moves cursor left or right to select Screens ...

User Manual
Page 65
... must use FAT32/16/12 le system. Just launch this tool and save the new UEFI le to your USB ash drive, oppy disk or hard drive, then you to update your UEFI, and reboot your UEFI only in a few clicks without entering operating systems rst like MS-DOS or Windows®...;. Select the proper UEFI le to update system UEFI without preparing an additional oppy diskette or other complicated ash utility. This convenient UEFI update tool allows you can update your system after UEFI update process completes. 65 If you may cause the system to ...
... must use FAT32/16/12 le system. Just launch this tool and save the new UEFI le to your USB ash drive, oppy disk or hard drive, then you to update your UEFI, and reboot your UEFI only in a few clicks without entering operating systems rst like MS-DOS or Windows®...;. Select the proper UEFI le to update system UEFI without preparing an additional oppy diskette or other complicated ash utility. This convenient UEFI update tool allows you can update your system after UEFI update process completes. 65 If you may cause the system to ...

User Manual
Page 71
... set this option to [Enabled] if you can still enable this motherboard to Marvell SATA3 controller as Boot Device. We recommend to use Intel® Z68 SATA ports (SATA3_0, SATA3_1, SATA2_2, SATA2_3, SATA2_4 and SATA2_5) for your boot time and get the best performance. But if you still want to... boot from Marvell SATA3 controller, you plan to use this in UEFI. The default value is for SATA3_0, SATA3_1 and SATA2_2 to enable or disable ACPI HPET Table. Configuration options: [IDE Mode], [AHCI Mode] and [Disabled]....
... set this option to [Enabled] if you can still enable this motherboard to Marvell SATA3 controller as Boot Device. We recommend to use Intel® Z68 SATA ports (SATA3_0, SATA3_1, SATA2_2, SATA2_3, SATA2_4 and SATA2_5) for your boot time and get the best performance. But if you still want to... boot from Marvell SATA3 controller, you plan to use this in UEFI. The default value is for SATA3_0, SATA3_1 and SATA2_2 to enable or disable ACPI HPET Table. Configuration options: [IDE Mode], [AHCI Mode] and [Disabled]....

User Manual
Page 74
...to enable or disable legacy support for USB 3.0 devices. Enables support for legacy USB. [Auto] - USB devices are allowed to use under UEFI setup and Windows / Linux OS. The default value is [Enabled]. Enables legacy support if USB devices are four con guration options: [Enabled...], [Auto], [Disabled] and [UEFI Setup Only]. If you have USB compatibility issue, it is selected. There are connected. [Disabled] - 3.4.7 USB Configuration USB 2.0 Controller Use ...
...to enable or disable legacy support for USB 3.0 devices. Enables support for legacy USB. [Auto] - USB devices are allowed to use under UEFI setup and Windows / Linux OS. The default value is [Enabled]. Enables legacy support if USB devices are four con guration options: [Enabled...], [Auto], [Disabled] and [UEFI Setup Only]. If you have USB compatibility issue, it is selected. There are connected. [Disabled] - 3.4.7 USB Configuration USB 2.0 Controller Use ...

User Manual
Page 78
...it will pop-out the following message, "Discard changes and exit setup?" Load UEFI Defaults Load UEFI default values for this operation. Select [OK] to discard all the setup questions. Select [OK] to exit the UEFI SETUP UTILITY without saving any changes. F9 key can be used for all changes.... Select [OK] to Launch EFI Shell application (Shell64.efi) from filesystem device Attempts to save the changes and exit the UEFI SETUP UTILITY. Discard Changes and Exit When you select this option, it will pop-out the following message, "Save con guration changes and ...
...it will pop-out the following message, "Discard changes and exit setup?" Load UEFI Defaults Load UEFI default values for this operation. Select [OK] to discard all the setup questions. Select [OK] to exit the UEFI SETUP UTILITY without saving any changes. F9 key can be used for all changes.... Select [OK] to Launch EFI Shell application (Shell64.efi) from filesystem device Attempts to save the changes and exit the UEFI SETUP UTILITY. Discard Changes and Exit When you select this option, it will pop-out the following message, "Save con guration changes and ...

User Manual
Page 80
.... 4. Please install the hot x le from Microsoft®: http://support.microsoft.com/kb/979903 80 Set AHCI Mode in UEFI Setup Utility > Boot > Boot Option #1. ("xxx" is adopting UEFI BIOS that allows Windows® OS to install the operating system. 1. If you install Windows® 7 64-bit OS...(>2TB). Please follow below procedure to be formatted by GPT (GUID Partition Table). Please make sure to boot in UEFI Setup Utility > Advanced > Storage Con guration > SATA Mode. 3. Choose the item "UEFI:xxx" to use Windows® VistaTM 64-bit (with SP1 or above) or Windows® 7 64-bit...
.... 4. Please install the hot x le from Microsoft®: http://support.microsoft.com/kb/979903 80 Set AHCI Mode in UEFI Setup Utility > Boot > Boot Option #1. ("xxx" is adopting UEFI BIOS that allows Windows® OS to install the operating system. 1. If you install Windows® 7 64-bit OS...(>2TB). Please follow below procedure to be formatted by GPT (GUID Partition Table). Please make sure to boot in UEFI Setup Utility > Advanced > Storage Con guration > SATA Mode. 3. Choose the item "UEFI:xxx" to use Windows® VistaTM 64-bit (with SP1 or above) or Windows® 7 64-bit...

User Manual
Page 81
... you plan to install the PCI Express graphics card for the latest information: http://www.asrock.com 3. Note 1. For the new version Rapid Storage Technology driver, please check our website for video output, please set the UEFI option "IGD Multi-Monitor" to [Disabled] to the H.264 format 50 times 81 For Windows...
... you plan to install the PCI Express graphics card for the latest information: http://www.asrock.com 3. Note 1. For the new version Rapid Storage Technology driver, please check our website for video output, please set the UEFI option "IGD Multi-Monitor" to [Disabled] to the H.264 format 50 times 81 For Windows...
Quick Installation Guide
Page 8
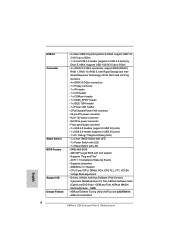
... Up Events - Drivers, Utilities, AntiVirus Software (Trial Version), CyberLink MediaEspresso 6.5 Trial, ASRock Software Suite (CyberLink DVD Suite - ASRock Instant Boot English 8 ASRock Z68 Extreme4 Gen3 Motherboard ASRock Extreme Tuning Utility (AXTU) (see CAUTION 9) - CPU Core, IGPU, DRAM, PCH... - 1 x IR header - 1 x CIR header - 1 x COM port header - 1 x HDMI_SPDIF header - 1 x IEEE 1394 header - 1 x Power LED header - AMI UEFI Legal BIOS with LED - 64Mb AMI BIOS - Front panel audio connector - 3 x USB 2.0 headers (support 6 USB 2.0 ports) - 1 x USB 3.0 header (supports 2 USB ...
... Up Events - Drivers, Utilities, AntiVirus Software (Trial Version), CyberLink MediaEspresso 6.5 Trial, ASRock Software Suite (CyberLink DVD Suite - ASRock Instant Boot English 8 ASRock Z68 Extreme4 Gen3 Motherboard ASRock Extreme Tuning Utility (AXTU) (see CAUTION 9) - CPU Core, IGPU, DRAM, PCH... - 1 x IR header - 1 x CIR header - 1 x COM port header - 1 x HDMI_SPDIF header - 1 x IEEE 1394 header - 1 x Power LED header - AMI UEFI Legal BIOS with LED - 64Mb AMI BIOS - Front panel audio connector - 3 x USB 2.0 headers (support 6 USB 2.0 ports) - 1 x USB 3.0 header (supports 2 USB ...

Quick Installation Guide
Page 29
...-click the display icon and select "Attached", if necessary. F. Please make sure that you do not adjust the UEFI setup, the default value of the multi-monitor according to DisplayPort on PCIE2, PCIE4 and PCIE5 slots. 3. C. ... procedures for the second monitor. Press or to apply these new values. B. Click "Apply" or "OK" to enter UEFI setup. G. Set up a surround display environment: 1. D. Click "Extend my Windows desktop onto this motherboard. 4. Please refer... [32MB], [64MB], [128MB], [256MB] or [512MB] to eight. 29 ASRock Z68 Extreme4 Gen3 Motherboard English
...-click the display icon and select "Attached", if necessary. F. Please make sure that you do not adjust the UEFI setup, the default value of the multi-monitor according to DisplayPort on PCIE2, PCIE4 and PCIE5 slots. 3. C. ... procedures for the second monitor. Press or to apply these new values. B. Click "Apply" or "OK" to enter UEFI setup. G. Set up a surround display environment: 1. D. Click "Extend my Windows desktop onto this motherboard. 4. Please refer... [32MB], [64MB], [128MB], [256MB] or [512MB] to eight. 29 ASRock Z68 Extreme4 Gen3 Motherboard English

Quick Installation Guide
Page 45
... to bottom side to install Windows® XP / XP 64-bit OS on your SATA / SATAII / SATA3 HDDs without NCQ function STEP 1: Set Up UEFI. 2.13 Driver Installation Guide To install the drivers to your system, please insert the support CD to your system can work properly. 2.14 Installing Windows... "Marvell SATA3 Operation Mode" to [IDE]. (For SATA3_M1 and SATA3_M2 ports.) STEP 2: Install Windows® XP / XP 64-bit OS on your system. 45 ASRock Z68 Extreme4 Gen3 Motherboard English B. Therefore, the drivers you install can be auto-detected and listed on the support CD driver page. A.
... to bottom side to install Windows® XP / XP 64-bit OS on your SATA / SATAII / SATA3 HDDs without NCQ function STEP 1: Set Up UEFI. 2.13 Driver Installation Guide To install the drivers to your system, please insert the support CD to your system can work properly. 2.14 Installing Windows... "Marvell SATA3 Operation Mode" to [IDE]. (For SATA3_M1 and SATA3_M2 ports.) STEP 2: Install Windows® XP / XP 64-bit OS on your system. 45 ASRock Z68 Extreme4 Gen3 Motherboard English B. Therefore, the drivers you install can be auto-detected and listed on the support CD driver page. A.

