
Intel Rapid Storage Guide
Page 1
... disk intensive retrieval applications such as well. Starting with Link Power Management (LPM), which can reduce the power consumption of the chipset and Serial ATA (SATA) hard drive. 1 Guide to Intel Rapid Storage Overview Intel® Rapid Storage Technology provides new levels of protection, performance, and expandability for desktop and mobile...
... disk intensive retrieval applications such as well. Starting with Link Power Management (LPM), which can reduce the power consumption of the chipset and Serial ATA (SATA) hard drive. 1 Guide to Intel Rapid Storage Overview Intel® Rapid Storage Technology provides new levels of protection, performance, and expandability for desktop and mobile...

Intel Rapid Storage Guide
Page 12
...-On-Self-Test (POST) memory test begins. 2. Select 1: Create RAID Volume and press Enter. 3. Click F2 or Delete to select the physical disks. 6. Switch the SATA Operation Mode option to save the BIOS settings and exit the BIOS Setup program. Click F10 to RAID. 5. Create a RAID Volume Use the following steps...
...-On-Self-Test (POST) memory test begins. 2. Select 1: Create RAID Volume and press Enter. 3. Click F2 or Delete to select the physical disks. 6. Switch the SATA Operation Mode option to save the BIOS settings and exit the BIOS Setup program. Click F10 to RAID. 5. Create a RAID Volume Use the following steps...
Intel Rapid Storage Guide
Page 15
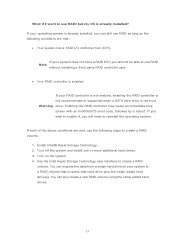
... card. • Your RAID controller is already installed? If your RAID controller is not enabled, enabling the RAID controller is not recommended or supported when a SATA hard drive is already installed, you will not be able to create a RAID volume. 1. What if I /O controller hub (ICH).
... card. • Your RAID controller is already installed? If your RAID controller is not enabled, enabling the RAID controller is not recommended or supported when a SATA hard drive is already installed, you will not be able to create a RAID volume. 1. What if I /O controller hub (ICH).

Intel Rapid Storage Guide
Page 18
... to install the RAID or AHCI driver via unattended install. 1. Insert the lines shown below into the UNATTEND.TXT file [MassStorageDrivers] "Intel(R) 82801R/DO/DH SATA RAID Controller" = OEM 18 Does the system contain a 32-bit or 64-bit processor? IATA88ENU.EXE for Intel® Matrix Storage Manager version 8.8) with the...
... to install the RAID or AHCI driver via unattended install. 1. Insert the lines shown below into the UNATTEND.TXT file [MassStorageDrivers] "Intel(R) 82801R/DO/DH SATA RAID Controller" = OEM 18 Does the system contain a 32-bit or 64-bit processor? IATA88ENU.EXE for Intel® Matrix Storage Manager version 8.8) with the...

Intel Rapid Storage Guide
Page 19
... 19 Place IAAHCI.CAT, IAAHCI.INF, IASTOR.CAT, IASTOR.INF, IASTOR.SYS, and TXTSETUP.OEM into the UNATTEND.TXT file [MassStorageDrivers] "Intel(R) 82801R/DO/DH SATA AHCI Controller" = OEM [OEMBootFiles] iaAhci.inf iaStor.sys iaAhci.cat Txtsetup.oem 3.
... 19 Place IAAHCI.CAT, IAAHCI.INF, IASTOR.CAT, IASTOR.INF, IASTOR.SYS, and TXTSETUP.OEM into the UNATTEND.TXT file [MassStorageDrivers] "Intel(R) 82801R/DO/DH SATA AHCI Controller" = OEM [OEMBootFiles] iaAhci.inf iaStor.sys iaAhci.cat Txtsetup.oem 3.

Intel Smart Response Installation Guide
Page 1
... or by step instructions below. You MUST have both the HDD you want to use RST function, you just need to set the UEFI option "SATA Mode" to accelerate AND the SSD in RAID ROM. For all required drivers, including RST storage driver version 10.5 or later. 2. When pop-up menu... double-clicking RST Storage icon in the near future. For the new version RST driver, please check our website for the latest information: http://www.asrock.com * Before you use the full SSD as the Cache device, which SSD you wish to use as Cache device or only 20GB, and if...
... or by step instructions below. You MUST have both the HDD you want to use RST function, you just need to set the UEFI option "SATA Mode" to accelerate AND the SSD in RAID ROM. For all required drivers, including RST storage driver version 10.5 or later. 2. When pop-up menu... double-clicking RST Storage icon in the near future. For the new version RST driver, please check our website for the latest information: http://www.asrock.com * Before you use the full SSD as the Cache device, which SSD you wish to use as Cache device or only 20GB, and if...

User Manual
Page 3
...and Quad SLITM Operation Guide 23 2.8 CrossFireXTM, 3-Way CrossFireXTM and Quad CrossFireXTM Operation Guide 27 2.9 Dual Monitor and Surround Display Features 33 2.10 ASRock Smart Remote Installation Guide 36 2.11 Jumpers Setup 37 2.12 Onboard Headers and Connectors 38 2.13 Smart Switches 44 2.14 Dr. Debug 45 ...16 Serial ATA3 (SATA3) Hard Disks Installation 49 2.17 Hot Plug and Hot Swap Functions for SATA / SATAII HDDs 50 2.18 Hot Plug and Hot Swap Functions for SATA3 HDDs .... 50 2.19 SATA / SATAII / SATA3 HDD Hot Plug Feature and Operation Guide 51 2.20 Driver Installation Guide 53...
...and Quad SLITM Operation Guide 23 2.8 CrossFireXTM, 3-Way CrossFireXTM and Quad CrossFireXTM Operation Guide 27 2.9 Dual Monitor and Surround Display Features 33 2.10 ASRock Smart Remote Installation Guide 36 2.11 Jumpers Setup 37 2.12 Onboard Headers and Connectors 38 2.13 Smart Switches 44 2.14 Dr. Debug 45 ...16 Serial ATA3 (SATA3) Hard Disks Installation 49 2.17 Hot Plug and Hot Swap Functions for SATA / SATAII HDDs 50 2.18 Hot Plug and Hot Swap Functions for SATA3 HDDs .... 50 2.19 SATA / SATAII / SATA3 HDD Hot Plug Feature and Operation Guide 51 2.20 Driver Installation Guide 53...
User Manual
Page 5
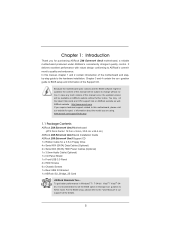
..." in our support CD for purchasing ASRock Z68 Extreme4 Gen3 motherboard, a reliable motherboard produced under ASRock's consistently stringent quality control. To get better performance in Windows® 7 / 7 64-bit / VistaTM / VistaTM 64bit, it is recommended to set the BIOS option in Floppy Drive 4 x Serial ATA (SATA) Data Cables (Optional) 2 x Serial ATA (SATA) HDD Power Cables (Optional) 1 x 3.5mm...
..." in our support CD for purchasing ASRock Z68 Extreme4 Gen3 motherboard, a reliable motherboard produced under ASRock's consistently stringent quality control. To get better performance in Windows® 7 / 7 64-bit / VistaTM / VistaTM 64bit, it is recommended to set the BIOS option in Floppy Drive 4 x Serial ATA (SATA) Data Cables (Optional) 2 x Serial ATA (SATA) HDD Power Cables (Optional) 1 x 3.5mm...

User Manual
Page 15
Please select "Mixer ToolBox" , click "Enable playback multi-streaming", and click "ok". Choose "2CH", "4CH", "6CH", or "8CH" and then you are allowed to select "Realtek HDA Primary output" to use Rear Speaker, Central/Bass, and Front Speaker, or select "Realtek HDA Audio 2nd output" to the front panel audio header. After restarting your computer, you will nd "Mixer" tool on your system. To enable Multi-Streaming function, you need to connect a front panel audio cable to use front panel audio. *** eSATA3 connector supports SATA Gen3 in cable 1M. 15
Please select "Mixer ToolBox" , click "Enable playback multi-streaming", and click "ok". Choose "2CH", "4CH", "6CH", or "8CH" and then you are allowed to select "Realtek HDA Primary output" to use Rear Speaker, Central/Bass, and Front Speaker, or select "Realtek HDA Audio 2nd output" to the front panel audio header. After restarting your computer, you will nd "Mixer" tool on your system. To enable Multi-Streaming function, you need to connect a front panel audio cable to use front panel audio. *** eSATA3 connector supports SATA Gen3 in cable 1M. 15

User Manual
Page 38
...p.13, No. 11) (SATA3_M2: see p.13 No. 34) the red-striped side to the power supply These four Serial ATA3 (SATA3) connectors support SATA data cables for internal storage devices. Either end of the motherboard! Do NOT place jumper caps over the headers and connectors will not function. SATA2_5...15) (SATA2_3: see p.13, No. 16) (SATA2_4: see p.13, No. 17) (SATA2_5: see p.13, No. 18) These four Serial ATAII (SATAII) connectors support SATA data cables for internal storage devices. If you install the HDD on the eSATA port on the rear I/O, the internal SATA3_M2 will cause permanent damage...
...p.13, No. 11) (SATA3_M2: see p.13 No. 34) the red-striped side to the power supply These four Serial ATA3 (SATA3) connectors support SATA data cables for internal storage devices. Either end of the motherboard! Do NOT place jumper caps over the headers and connectors will not function. SATA2_5...15) (SATA2_3: see p.13, No. 16) (SATA2_4: see p.13, No. 17) (SATA2_5: see p.13, No. 18) These four Serial ATAII (SATAII) connectors support SATA data cables for internal storage devices. If you install the HDD on the eSATA port on the rear I/O, the internal SATA3_M2 will cause permanent damage...

User Manual
Page 49
...motherboard for SATA3_0 and SATA3_1 connectors. This section will guide you want to the SATA / SATAII hard disk. 2.16 Serial ATA3 (SATA3) Hard Disks Installation This motherboard adopts Intel® Z68 chipset that supports Serial ATA3 (SATA3) hard disks for internal storage devices. ...STEP 1: Install the SATA / SATAII hard disks into the drive bays of the SATA data cable to install the SATA / SATAII hard disks. STEP 4: Connect...
...motherboard for SATA3_0 and SATA3_1 connectors. This section will guide you want to the SATA / SATAII hard disk. 2.16 Serial ATA3 (SATA3) Hard Disks Installation This motherboard adopts Intel® Z68 chipset that supports Serial ATA3 (SATA3) hard disks for internal storage devices. ...STEP 1: Install the SATA / SATAII hard disks into the drive bays of the SATA data cable to install the SATA / SATAII hard disks. STEP 4: Connect...

User Manual
Page 50
...condition. What is Hot Plug Function? Intel® Z68 and Marvell SE9120 chipsets provide hardware support for Advanced Host controller Interface (AHCI), a new programming interface for SATA host controllers developed thru a joint industry effort. If the SATA / SATAII HDDs are built as RAID 1 or ... installed into the SATA3 HDD. NOTE What is Hot Swap Function? Intel® Z68 chipset provides hardware support for Advanced Host controller Interface (AHCI), a new programming interface for SATA host controllers developed thru a joint industry effort. 2.17 Hot Plug and Hot Swap...
...condition. What is Hot Plug Function? Intel® Z68 and Marvell SE9120 chipsets provide hardware support for Advanced Host controller Interface (AHCI), a new programming interface for SATA host controllers developed thru a joint industry effort. If the SATA / SATAII HDDs are built as RAID 1 or ... installed into the SATA3 HDD. NOTE What is Hot Swap Function? Intel® Z68 chipset provides hardware support for Advanced Host controller Interface (AHCI), a new programming interface for SATA host controllers developed thru a joint industry effort. 2.17 Hot Plug and Hot Swap...

User Manual
Page 51
... the motherboard gift box pack. Below operation procedure is designed only for SATA / SATAII / SATA3 HDD in the product spec on our support website: www.asrock.com 4. Please read below instructions step by the chipset because of its limitation, the SATA / SATAII / SATA3 Hot Plug support information of our motherboard is de nitely...
... the motherboard gift box pack. Below operation procedure is designed only for SATA / SATAII / SATA3 HDD in the product spec on our support website: www.asrock.com 4. Please read below instructions step by the chipset because of its limitation, the SATA / SATAII / SATA3 Hot Plug support information of our motherboard is de nitely...

User Manual
Page 52
... below instruction sequence to process the Hot Unplug, improper procedure will cause the SATA / SATAII / SATA3 HDD damage and data loss. Step 4 Connect SATA data cable to SATA / SATAII / SATA3 HDD. Step 1 Please connect SATA power cable 1x4-pin end Step 2 Connect SATA data cable to (White) to process the Hot Plug, improper procedure will...
... below instruction sequence to process the Hot Unplug, improper procedure will cause the SATA / SATAII / SATA3 HDD damage and data loss. Step 4 Connect SATA data cable to SATA / SATAII / SATA3 HDD. Step 1 Please connect SATA power cable 1x4-pin end Step 2 Connect SATA data cable to (White) to process the Hot Plug, improper procedure will...

User Manual
Page 53
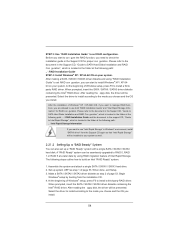
... you install can be auto-detected and listed on the screen, "Do you want to generate Serial ATA driver diskette [YN]?", press . Set the option "SATA Mode" to boot your system can work properly. 2.21 Installing Windows® 7 / 7 64-bit / VistaTM / VistaTM 64-bit / XP / XP 64-bit With RAID Functions... If you want to install Windows® 7 / 7 64-bit / VistaTM / VistaTM 64-bit / XP / XP 64-bit OS on your SATA / SATAII / SATA3 HDDs with RAID functions, please follow the order from up to bottom side to your system. Insert the Support CD into the oppy...
... you install can be auto-detected and listed on the screen, "Do you want to generate Serial ATA driver diskette [YN]?", press . Set the option "SATA Mode" to boot your system can work properly. 2.21 Installing Windows® 7 / 7 64-bit / VistaTM / VistaTM 64-bit / XP / XP 64-bit With RAID Functions... If you want to install Windows® 7 / 7 64-bit / VistaTM / VistaTM 64-bit / XP / XP 64-bit OS on your SATA / SATAII / SATA3 HDDs with RAID functions, please follow the order from up to bottom side to your system. Insert the Support CD into the oppy...
User Manual
Page 54
... to use "Intel Rapid Storage" in Windows® environment, install "SATAII driver" from the installation CD. 4. Assemble the system and attach a single SATA / SATAII / SATA3 hard drive. 2. After the installation of page 53. At the beginning of page 53. Please refer to the document in the Support...Guide" to set RAID configuration. Select the driver to install according to set RAID con guration, you can be seamlessly upgraded to SATA Hard Disks Installation and RAID Con guration", which is located in the Support CD for RAID con guration. A "RAID Ready" system can...
... to use "Intel Rapid Storage" in Windows® environment, install "SATAII driver" from the installation CD. 4. Assemble the system and attach a single SATA / SATAII / SATA3 hard drive. 2. After the installation of page 53. At the beginning of page 53. Please refer to the document in the Support...Guide" to set RAID configuration. Select the driver to install according to set RAID con guration, you can be seamlessly upgraded to SATA Hard Disks Installation and RAID Con guration", which is located in the Support CD for RAID con guration. A "RAID Ready" system can...

User Manual
Page 55
... be used to manage the RAID con guration. 7. After setting up a "RAID Ready" system as the source hard drive. 1. Physically attach one additional SATA / SATAII / SATA3 hard drive to select it from a single non-RAID con guration to a RAID 0 volume, use this , you will add the...con guration. You may also use the following steps to perform a migration from the Internet. It's important to understand what will need another SATA / SATAII hard drive with your motherboard or after downloading it as prompted. This will use Disk Management from Existing Hard Drive Wizard. you ...
... be used to manage the RAID con guration. 7. After setting up a "RAID Ready" system as the source hard drive. 1. Physically attach one additional SATA / SATAII / SATA3 hard drive to select it from a single non-RAID con guration to a RAID 0 volume, use this , you will add the...con guration. You may also use the following steps to perform a migration from the Internet. It's important to understand what will need another SATA / SATAII hard drive with your motherboard or after downloading it as prompted. This will use Disk Management from Existing Hard Drive Wizard. you ...

User Manual
Page 56
..."RAID Installation Guide" and "Intel Rapid Storage Information" for proper con guration. Please refer to the document in the Support CD, "Guide to SATA Hard Disks Installation and RAID Con guration", which is located in the folder at the following path: .. \ RAID Installation Guide STEP 3: Install ...Windows® 7 / 7 64-bit / VistaTM / VistaTM 64-bit OS on your SATA / SATAII / SATA3 HDDs with RAID functions, please follow below steps. After the installation of Windows® 7 / 7 64-bit / VistaTM / VistaTM 64-...
..."RAID Installation Guide" and "Intel Rapid Storage Information" for proper con guration. Please refer to the document in the Support CD, "Guide to SATA Hard Disks Installation and RAID Con guration", which is located in the folder at the following path: .. \ RAID Installation Guide STEP 3: Install ...Windows® 7 / 7 64-bit / VistaTM / VistaTM 64-bit OS on your SATA / SATAII / SATA3 HDDs with RAID functions, please follow below steps. After the installation of Windows® 7 / 7 64-bit / VistaTM / VistaTM 64-...

User Manual
Page 57
...bit Without RAID Functions If you want to install Windows® 7 / 7 64-bit / VistaTM / VistaTM 64-bit / XP / XP 64bit OS on your SATA / SATAII / SATA3 HDDs without RAID functions, please follow below steps. At the beginning of Windows® setup, press F6 to [AHCI]. (For SATA3_M1 and ...disk, the driver will be presented. Select the driver to install according to install Windows® XP / XP 64-bit OS on your system. Using SATA / SATAII / SATA3 HDDs without RAID functions, please follow below procedures according to the OS you install. 2.22.1 Installing Windows® XP / XP...
...bit Without RAID Functions If you want to install Windows® 7 / 7 64-bit / VistaTM / VistaTM 64-bit / XP / XP 64bit OS on your SATA / SATAII / SATA3 HDDs without RAID functions, please follow below steps. At the beginning of Windows® setup, press F6 to [AHCI]. (For SATA3_M1 and ...disk, the driver will be presented. Select the driver to install according to install Windows® XP / XP 64-bit OS on your system. Using SATA / SATAII / SATA3 HDDs without RAID functions, please follow below procedures according to the OS you install. 2.22.1 Installing Windows® XP / XP...

User Manual
Page 58
... you want to install Windows® 7 / 7 64-bit / VistaTM / VistaTM 64-bit OS on your SATA / SATAII / SATA3 HDDs without NCQ function STEP 1: Set Up UEFI. A. Set the option "SATA Mode" to [AHCI]. (For SATA3_0, SATA3_1 and SATA2_2 to SATA2_5 ports.) Set the option "Marvell SATA3 Operation ... SATA3_M1 and SATA3_M2 ports.) STEP 2: Install Windows® 7 / 7 64-bit / VistaTM / VistaTM 64-bit OS on your system. 58 Set the option "SATA Mode" to [IDE]. (For SATA3_0, SATA3_1 and SATA2_2 to SATA2_5 ports.) Set the option "Marvell SATA3 Operation Mode" to [AHCI]. (For SATA3_M1 and SATA3_M2 ports...
... you want to install Windows® 7 / 7 64-bit / VistaTM / VistaTM 64-bit OS on your SATA / SATAII / SATA3 HDDs without NCQ function STEP 1: Set Up UEFI. A. Set the option "SATA Mode" to [AHCI]. (For SATA3_0, SATA3_1 and SATA2_2 to SATA2_5 ports.) Set the option "Marvell SATA3 Operation ... SATA3_M1 and SATA3_M2 ports.) STEP 2: Install Windows® 7 / 7 64-bit / VistaTM / VistaTM 64-bit OS on your system. 58 Set the option "SATA Mode" to [IDE]. (For SATA3_0, SATA3_1 and SATA2_2 to SATA2_5 ports.) Set the option "Marvell SATA3 Operation Mode" to [AHCI]. (For SATA3_M1 and SATA3_M2 ports...
